Introduction
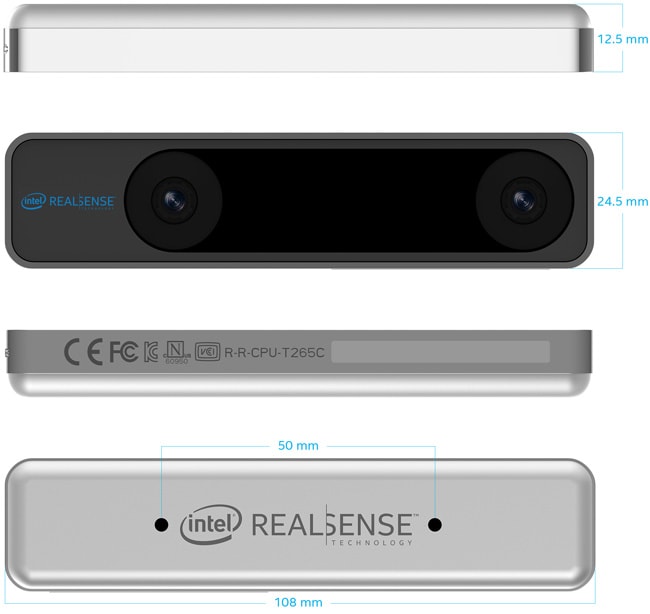
The Intel RealSense Tracking Camera T265 is a type of smart camera that uses proprietary V-SLAM (Visual-Inertial Simultaneous Localization and Mapping) technology to combine data from cameras and Inertial Measurement Units (IMU) to track the camera’s position around unknown spaces where GPS might not be available. The software uses all of these data to construct and continually update maps of the environment and the location of a device with high accuracy.
Besides the small form factor, the T265’s selling point is that all of the complicated V-SLAM algorithms and software run directly on the device itself, thus the computational resources required for the companion computer to run VIO/V-SLAM algorithms, much like these projects on ROVIO (part 1 and part 2) by @ppoirier, would be greatly reduced.
As part of my ongoing series to incorporate the T265 with ArduPilot, in this blog we will start with installing all necessary packages to use the T265 with Raspberry Pi 3B, specifically:
System requirements
The T265 is supported via librealsense on Windows and Linux. Depends on what you need from the T265, the companion computer should have USB2 or USB3:
- For pose (x y z position and orientation) data: Any board with USB2 should be sufficient.
- For fisheye image streams: USB3 is required.
For localization and navigation use case, we need to capture pose data and send the data to the flight controller for localization. A system consists of:
- A Raspberry Pi 3 Model B with 16GB micro SD card
- Running Ubuntu MATE 16.04 LTS
should be good to go since no images are needed by our application (the RPi 3 does not have USB3 anyway).
Install librealsense
Before we begin, it is worth pointing out that the installation process for librealsense varies widely depends on the architecture of your companion computer. The content of this blog works for RPi running Ubuntu. For instruction on different systems, refer to the document page:
Since no Debian packages are available for RPi, librealsense must be built from source.
- Install OS (if you have not done so): Ubuntu MATE 16.04 LTS
-
Increase swap size: RPi does not have enough RAM to compile the SDK, hence swap size needs to be increased. Swap size of
2048(2GB) seems to do the trick, but you can try other values. Here is the commands that I used, taken from this page.
# Toggle swap off

sudo dphys-swapfile swapoff

# Edit the config file and increase the swap size to 2048

# by editing variable CONF_SWAPSIZE=2048

sudo nano /etc/dphys-swapfile

# Toggle swap back on

sudo dphys-swapfile swapon

# Reboot your raspberry

sudo reboot

# After reboot, check that swap size changed

free

# Should show something like Swap: 2097148
- Clone librealsense repo and compile SDK:
# Update system

sudo apt update

sudo apt upgrade -y

# Install dependencies

sudo apt install git libssl-dev libusb-1.0-0-dev pkg-config -y

sudo apt install cmake python3-dev raspberrypi-kernel-headers -y

# Clone the repository under home

cd ~

git clone https://github.com/IntelRealSense/librealsense.git

cd librealsense

# Install udev rules

sudo cp config/99-realsense-libusb.rules /etc/udev/rules.d/

sudo udevadm control --reload-rules && udevadm trigger

# Create the destination directory

mkdir build

cd build

# Remove extra files if this is not your first run

xarg sudo rm < install_manifest.txt

rm CMakeCache.txt

export CC=/usr/bin/gcc-6

export CXX=/usr/bin/g++-6

cmake -D CMAKE_BUILD_TYPE="Release"\

-D FORCE_LIBUVC=ON \

-D BUILD_PYTHON_BINDINGS=ON \

-D BUILD_EXAMPLES=ON ..

make -j4

sudo make install

sudo ldconfig

# Finally, reboot the pi:

sudo reboot
- Test that librealsense is installed correctly:
The easiest way is to plug in the T265 and play with the SDK examples/tools.
- If you have a monitor plugged in, you can open Intel Realsense Viewer by typing in:
realsense-viewer. If the T265 is connected, the device will be available on the left panel. Click on the slider to start the device and switch to 3D view. Move the T265 around and you should see its trajectory.
Note 1: The RPi cannot handle the image streams with USB2. Trying to view the fisheye images in the 2D view or rviz or rqt_image_view might crash the application.
Note 2: Not all USB cables are created equal. If you use a different USB cable than the one came with the T265, check that the RPi / computer can recognize the device with that cable. Open the terminal and type in lsusb or rs-enumerate-devices to see if the device is recognized.
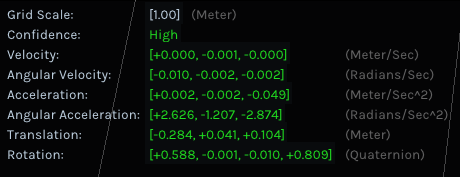
Note 3: In realsense-viewer, the T265’s tracking confidence will be shown in different color, i.e. “low” (red trace in 3D view), “medium” (yellow) or “high” (green). Press on the “i” button on the 2D/3D view to display T265’s info (including translation data).
You can also try the following tools and demos (just type the name in the terminal):
-
rs-pose- A basic pose retrieval example -
rs-pose-predict- Demonstrates pose prediction using current system time and the callback API -
rs-capture- 2D Visualization. -
rs-enumerate-devices- list the IMU and tracking profiles (FPS rates and formats). -
rs-data-collect- Store and serialize IMU and Tracking (pose) data in Excel-friendlycsvformat. The tool uses low-level sensor API to minimize software-imposed latencies. Useful for performance profiling.
- Test pyrealsense2 python wrapper:
The SDK provides a python wrapper named pyrealsense2, which is an essential part for one of our future work. The compiled library is located in the build folder: ~/librealsense/build/wrappers/python.
- Update the
PYTHONPATHenvironment variable to add the path to the pyrealsense library:export PYTHONPATH=$PYTHONPATH:/usr/local/lib - Alternatively, copy the build output (
librealsense2.soandpyrealsense2.soin~/librealsense/build/) next to your script. - The basic examples provided by Intel can be found in the folder
~/librealsense/wrappers/python/example. Run withpython3.
export PYTHONPATH=$PYTHONPATH:/usr/local/lib

cd ~/librealsense/wrappers/python/example

python3 t265_example.py
You should see a stream of data coming from the T265.
Install realsense-ros
If you intend to use the T265 with ROS, you should install realsense-ros after librealsense. Note that the version of realsense-ros need to match the version of librealsense releases, so every time you update ros/lib, the other should be updated as well.
- Installation
The installation steps are straightforward and you can follow the instruction on the official repo here.
- Usage on the RPi
Since RPi cannot handle image streams, you should not open any image viewer on rviz or rqt_image_view. The system may crash on launch.
-
On RPi: start the camera node with
roslaunch realsense2_camera rs_t265.launch. This will stream all camera sensors and publish on the appropriate ROS topics.
/camera/odom/sample
/camera/accel/sample
/camera/gyro/sample
/camera/fisheye1/image_raw (not viewable on RPi)
/camera/fisheye2/image_raw (not viewable on RPi)
- If RPi is not connected to a display, view the data on PC with Linux Ubuntu:
export ROS_MATER_URI=http://<rpi-ip>:11311 && rviz - You can now view the
/camera/odom/sampleand/tfdata inrviz. Move the camera around and verify that the camera is indeed tracking its trajectory. - In another terminal on RPi:
topto view current CPU usage.
Done. Can we start flying now?
Not quite. There are a few more steps that needed to be done:
- Install MAVROS
- Connect RPi to ArduPilot with MAVROS
- Convert the coordinates system of the T265 to MAVROS’ convention.
- Convert the data topic from T265 (we will use
/tf, but you can also use/camera/odom/sample) to/mavros/vision_position/pose. - Limit the publishing rate of pose data, from 200Hz to something slower, i.e. 30Hz.
Step 1 and 2 are straighforward and you can follow the wiki link to complete. Step 3, 4 and 5 will need more than a little explaination, and will be dicussed in the next blog.
Why do we need these extra steps?
Step 3, 4 is necessary since we are working with ROS, hence data topic and frame coordinates need to match between nodes (in this case, realsense-ros node and mavros node).
Why do we need to limit the T265 data rate in step 5? As it turns out, the 200Hz data stream from the T265 is too fast for the FCU, especially the older hardware versions, to handle. In my experiment with fmuv2 hardware, the moment you start sending pose data at 200 times per second, the FCU will be flooded and “freezed”, as no more data coming to telem channel. Slowing down the pose data is necessary. Furthermore, we don’t really need 200Hz of data. 10-15Hz localization data is the bare minimum threshold that is required for testing, and 30Hz should be more than enough for most cases (relative to how fast the vehicle is moving).
To elaborate on that last step, if you have worked with VIO/VI-SLAM algorithms before, you would know that there is always a trade-off between accuracy and efficiency that you have to tune for your specific use case. That is to say, unless you put an Intel NUC i7 CPU onboard the UAV, anything less and you will have to tweak the parameters related to computational cost to get borderline usable data (10-15Hz), at the expense of less accurate localization. With the T265, we got the opposite problem: accurate data can be obtained using the one of the most DIY-friendly and cheapest platform out there, the Raspberry Pi 3B, and even then it is still too fast. As @ppoirier put it, what we have here is “a beautiful problem”.
Conclusion and next steps
In this blog we have setup the RPi 3B to gather pose data from the Intel Realsense T265 tracking camera, with example and test for each step along the way.
Next time, we will take a deeper look at the above-mentioned extra steps, why we need to convert the frames between realsense-ros and MAVROS and what would happen if we don’t, and of course, start flying (after some successful ground test, that is).