Simple ESP Telemetry Serial Bridges

Background
Due to the low cost and high flexibility of Espressif development boards, it’s very attractive to use them for a telemetry link, among many other things. There is some existing software for ESP-based MAVLink telemetry, but I found it somewhat frustrating.

I have had very little success with DroneBridge, even after following the documentation closely. I also tried Tridge’s fork of mavesp8266 with little success.

I think Tridge’s mavesp8266 fork is quite promising, and I do not intend to replace or supplant it in any way, I’m just offering my own (likely somewhat “caveman”) solution to the problem at hand.

DroneBridge, on the other hand, seems a bit bloated for the intended purpose and offers no way to operate in station mode, but only as an access point, which does not fit my use case. My apologies if my criticism is taken negatively by its developers. In fairness, I forked the project, made an attempt at bending it to my will…and failed, mostly due to my unfamiliarity with the build environment.

Concept
Because of my success relaying MAVLink messages using ser2net on a Raspberry Pi, which simply repeats serial traffic over a network connection without regard for message content, I thought it should be possible to use an ESP board to do similar. Both DroneBridge and mavesp8266 parse MAVLink messages prior to forwarding them, which seems an unnecessary processing and memory burden.

Testing shows that an ESP32 clocked at 240MHz can process a simple serial repeater loop in less than 3μs, which means that even at 921600 baud, the loop will complete in less time than it takes for an 8-N-1 byte to be transmitted, meaning that the ESP32 can process a serial message byte-by-byte without loss, if necessary.

ESP WiFi Serial Bridge
In any case, I was motivated to attempt my own solution set, and I first achieved success with an ESP32 and this serial bridge code, forked from another example. Testing the bridge with an ESP8266 proved unreliable, perhaps because of the way its UARTs are configured in hardware, so I recommend using an ESP32. It simply creates an access point or connects to an existing network and relays serial traffic on a TCP port.

You’ll need to modify config.h to suit your application and then compile, build, and upload using the Arduino IDE. While I’m sure the Espressif IDE is more capable, I find the Arduino IDE more friendly for small projects like this, and I’ve been frustrated more than once when using the Espressif one.

Moving Forward with ESP-Now
I was dissatisfied with the range using the built-in antenna, and before I started cutting traces or ordering hardware for an external antenna modification, I stumbled on Espressif’s ESP-Now feature for ESP32 and ESP8266 platforms. If you are unfamiliar, ESP-Now is a peer-to-peer 2.4GHz protocol allowing Espressif WiFi boards to communicate directly with one another at a fairly low power state and at longer ranges than the usual WiFi connection (without as much overhead).

ESP-Now is somewhat weakly documented, and the online examples are sometimes a bit dated, as the libraries have changed since some of the example code was written. I found this bi-directional example which seemed most up to date and worked from there. The author of that example, Rui Santos, posted this video describing ESP-Now.

I arrived at this sketch, which shows zero packet loss at short range, and has offered ~25m range with brick walls obstructing the signal. Outdoor testing showed a reliable range of ~115m with direct line of sight, though ANY minor obstruction causes signal loss when using the built-in antennas beyond ~50m. A range test with these external antennas got ~50m through brick/obstacles and 430m outdoors in direct line-of-sight (and farther is probably achievable, since I couldn’t really get much farther away than that and maintain direct line-of-sight where I was testing). All testing was done at 57600 baud, though it should be possible to use much faster serial transmission rates.

OF NOTE: There is a 250 byte limit for ESP-Now packet transmission, where MAVLink defines a maximum packet size of 263 bytes. In practice, most MAVLink messages are much shorter than that, and I have not discovered a case where information is lost under the latest Rover 4.2.0-dev firmware. I have not yet done the homework to determine which MAVLink messages exceed 250 bytes (I suspect few to none). I think it’s important to realize, though, that this ESP-Now bridge may result in data loss when large packets are transmitted, and it should likely not be considered for critical applications.

I did not include the libraries/definitions for ESP8266 compatibility in the ESP-Now code, though it would likely be trivial to do so if one were so motivated.

TLDR;
I modified an ESP-based WiFi serial bridge you can use for MAVLink..
and then
I wrote an ESP-Now serial bridge for increased range at the expense of using another ESP board.

Post Script
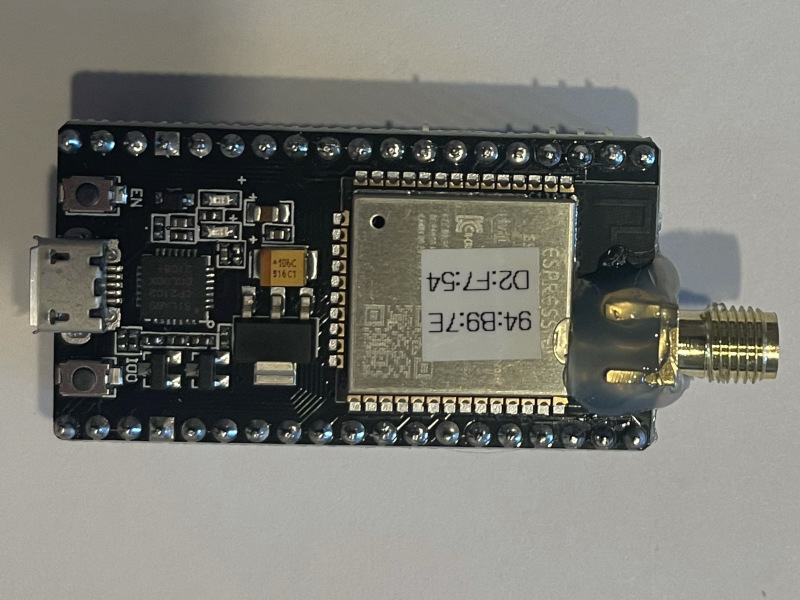
If you’re interested in adding an external antenna to your ESP development board, the following should get you pointed in the right direction. There are MANY variations of these boards, so use caution when cutting traces and soldering components based on these pictures alone - your board may differ significantly. There are some boards with antenna connectors already present if you don’t want to go to this trouble and/or potentially ruin your board.

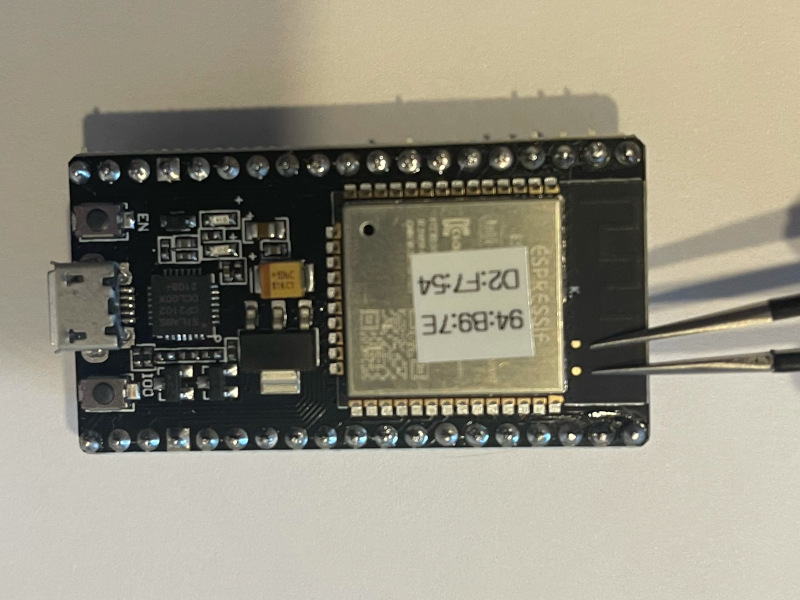
The onboard antenna is located here, and the portion of it we are going to modify is under the tweezers - the two traces leading away from the exposed dots just left of the tweezer tips.

Cut the traces as shown, scoring somewhat deeply with a razor blade to ensure the circuit is permanently broken. You want to cut the two short sections that are vertically oriented in this picture.

Carefully use a razor blade to scrape the solder mask away, exposing the bare copper traces here. It doesn’t take much pressure, and you could easily damage the traces, so go easy.

Tin the traces and component leads, and carefully solder the connector like this. Note, in this orientation, the bottom trace is ground, and the top trace is signal (center pin). You could also solder a length of small coaxial cable or a different style connector in a similar fashion. These SMA connectors have appropriate pin spacing for the job.

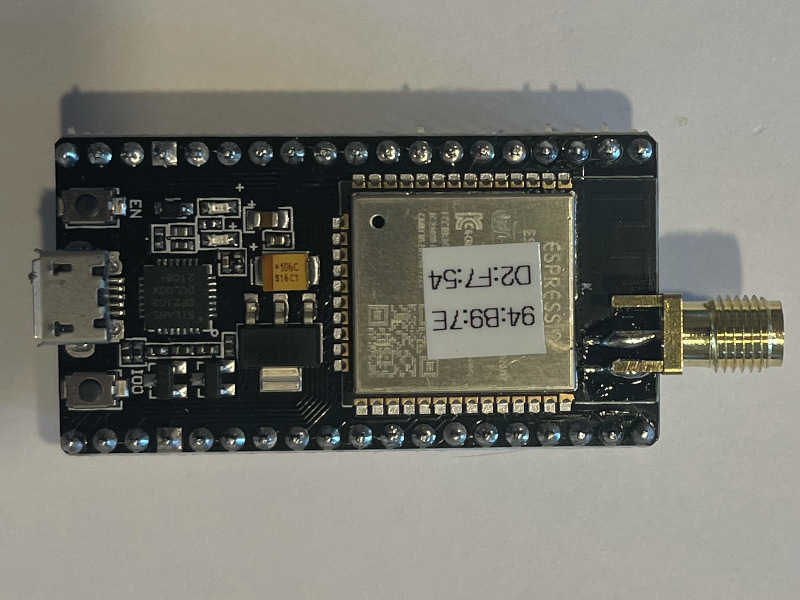
You don’t want to rely on the thin copper traces and solder joint as the only mechanical support for the connector, so add some hot glue or dielectric epoxy to provide some additional strength/strain relief. Use care when screwing an antenna onto the board - hold the entire connector rather than relying on the solder joint and glue.

10 Likes

Hi @Yuri_Rage,

Thanks for the great idea to transmit MAVLink packages via ESP-Now. My very first tests on the bench show way better results than I ever was able to achieve with mavesp8266 or BT-dongles.
Very promising!!!
Maybe others busy with swarming experiments will love this too.

Thanks for sharing.

1 Like

Handling Databurst-Type Messages > 250 bytes

Through my testing of RTCM3 injection on Rover-4.1.0-rc1, I found a need for a slightly different version of the ESP-Now bridge discussed above.

MAVLink messages generally fit within ESP-Now’s 250 byte limit, so any ESP-Now message could be assumed a fully formed packet ready for further transmission and processing. RTCM3 messages, on the other hand, can be as large as 1023 bytes, generally hovering in the 400-600 byte range.

The original sketch’s serial polling simply waited for a delay just long enough (in μs) to ensure that any given serial message had been fully collected in a buffer before sending it forward. The receiver simply dumped that message to the serial port immediately upon receipt.

That same serial polling routine works for the sender even when dealing with larger databurst-type transmissions like RTCM3, but the receiver must also do some work to collect things up before passing a message forward. In the case of 1Hz RTCM3 messaging, I found that a 50ms delay between ESP-Now messages is more than adequate to have reasonable certainty that a fully formed packet has been received before writing the entire thing to the serial port (just like @ktrussell uses in his Serial_to_LoRa logic) .

I arrived at the sketch linked below, which was tested up to 460800 baud using external 2.4GHz antennas and resulted in complete coverage of a 2 acre property (where I run my Rover mower) at ranges of up to ~75m, with some elevation changes and obstacles like buildings and trees with virtually no data loss.

I’m so encouraged by the results that I plan to use this method for RTCM3 injection on Zed-F9P modules as a permanent solution for my mower.

A minor footnote: I still recommend the original ESP-Now-Serial-Bridge linked above for MAVLink - it’s faster and likely more reliable for smaller message sizes.

Would something like this be an easier way to use an external antenna?

What do these boards weigh?

That is actually my preferred form factor, but I had a hard time sourcing those boards when I was writing the code for this project. I should have mentioned their existence. Of note, sometimes boards with u.FL connectors have an onboard antenna as well, and there’s a tiny 0 ohm resistor whose positioned must be changed to use the external antenna properly.

The boards weigh about 10g with the headers soldered.

You can sometimes find an even more compact version like this one if you don’t mind using a USB-serial converter for programming.

ESP32 Development Board

2 Likes

Hi guys.

Please, how about the speed to download dataflash logs that you are reaching?

I am using DroneBridge and I was not able to reach more than 35kB/s.

cheers,

I typically download logs by removing the SD card and copying the files manually. I’ve never achieved a “speedy” download over MAVFTP, nor would I expect to.

Ok, thanks! I am testing some alternatives to USB cables.

I received my ESP32 boards and uploaded your sketch to test. Upon boot, I was receiving an error on the serial console: “ESPNOW: Peer interface is invalid”. Googling revealed very little, except for one suggestion to move esp_now_peer_info_t peerInfo; out of loop() to make it a global variable. I’m not sure if something changed between when you wrote this and now, but there seems to be a scope issue as is. Moving it outside of loop() and setup() indeed solved the error, and now everything is working perfectly on the bench!

FYI, I ended up ordering these ESP32 boards that have a u.fl connector: ESP32 Development Board with USB2Serial and External Antenna Port | eBay for $10.95. They include a small PCB antenna, and weigh 6g (7g with antenna). I’m sure I could find smaller/cheaper, but these shipped from the US and arrived quickly. (More info: ESP32 Development and Breakout Board)

Finally, in my Googling to solve the peer interface error, I came across this: PJON - ESPNOW
It looks interesting, but well outside of my comfort zone to implement. Do you think it would be useful?

1 Like

Thanks for letting me know about the issues (and the workaround!). I’ll push a commit later today or tomorrow that contains the workaround.

I’m not particularly interested in incorporating the PJON library here. It seems like an unnecessary layer of complexity to a very simple (and admittedly perhaps inelegant) project. If you were interested in creating a network of linked vehicles (swarm maybe?), then perhaps the PJON project would be suitable for connecting the nodes. Of course, that would still require some effort, since PJON supports only 10 devices on a single network.

1 Like

I have pushed code fixes with the arduino-esp32 v2.0.1 workaround to the master branch of both ESP-Now projects. Thanks again for letting me know about the issue.

2 Likes

This is an interesting post. I don’t have a solution of what Yuri was looking to do and am only sharing my experience here.

I played with Tridge’s fork of mavesp8266 code previously. My initial hope was to use ESP32 in place of the 3DR radio telemetry for faster transmission rate and perhaps using it as a companion processor to the flight control. The possibility expands from there. For example, the onboard ESP32 telemetry can possibly retrieve NTRIP message directly through internet and pass to the GPS.

With limited code changes I was able to compile Tridge’s fork of mavesp8266 for EPS32 using PlatformIO as the github project was already setup for PlatformIO.

ESP32 alone eventually did not achieve what I have hoped for two reasons: 1. The wifi range was short (as my wifi router stays indoors) and 2. I wasn’t able to pass the RTCM message to the flight control directly for the GPS to get to RTK fixed state, even though I thought I have used the same logic in constructing the MAV message as in the Mission Planner (C# source code) and MAVProxy (GitHub - ArduPilot/MAVProxy: MAVLink proxy and command line ground station).

I have only played with ESP32-Now code sample and agree it can potentially extend the wifi range; but I understand ESP-Now isn’t compatible with the regular wifi network, which would eliminate a lot other wifi-enabled possibilities. I am also not sure the benefit of faster rate of transmission as the 915mhz 3dr telemetry seems to provide sufficient bandwidth for the Mission Planner, except for downloading dataflash logs.

As to Yuri’s comment regarding both DroneBridge and mavesp8266 having to parse MAVLink messages prior to forwarding them, I believe the reason was to reduce the error rate as the Ardupilot source code probably expects complete MAV message packets once it starts parsing the MAV data. (I remember seeing a comment regarding this from the mavesp8266 source code; but can’t find it off hand.) Tridge’s fork of mavesp8266 has a raw mode enabled option so as to pass through MAV message without parsing it first.

If there is any help, GitHub - zs6buj/MavlinkToPassthru: Mavlink to FrSky Passthrough protocol telemetry has quite a bit of code sample too.

I also have to add that trying to debug ESP32 with wifi connection was a pain even with the JTAG debugger, as when the debugger stops the code, the wifi stops. A lot of Serial.println() is needed. It is extremely time consuming and there is no telling when things are not working. This project alone is probably a Winter’s worth of coding. The codes that I played with before unfortunately is in a scrambled state; so I am only sharing my experience without much of actual help here.

To attempt a direct comparison of long range, somewhat expensive 3DR radios and Espressif dev boards is a bit of an apples/oranges debate.

The advantage to using Espressif hardware here is primarily cost and possibly availability. 3DR/SiK radios have always been quite a bit more expensive than Espressif dev boards, and lately, they are nearly impossible to find in stock.

The disadvantage to Espressif hardware (as implemented here) is a lack of range. ESP-Now + external antennas works for my use case of a couple hundred yards at most. Beyond that, it would certainly begin to fail, and you’d be better off with 3DR-type hardware.


As for ESP-Now vs WiFi, I proved quite conclusively that ESP-Now is capable of far greater range than WiFi when using very similar strategies for wireless serial data transmission on identical hardware. If your goal is to maximize range and minimize cost, ESP-Now might be your huckleberry. If your goal is a MAVLink telemetry connection over a wired or wireless network, there are probably better options than Espressif hardware (like 3DR radios connected to networked computers/devices).


The code introduced here uses an assumption based timing algorithm to ensure complete packet transmission, and in practice, the error rate is very low (surprisingly so…which is what prompted me to share it!). As such, you could view that as analogous to the MAVLink parsing strategies used by DroneBridge or mavesp8266.

Thanks for sharing your point of view. My initial naive thinking was that after the rover (UAV) is fully tuned, there is no need to have a standalone Mission Planner running on the background other than for the RTCM injection purpose. Using ESP32+wifi would potentially free the rover/UAV from Mission Planner as fortunately in the state that I live in, the CORS system (NTRIP message) is open to public. However given the early stage of my development, I am using all the off the shelf hardware and software currently so as to eliminate any of rookie errors I might introduce to the system before I can get it walking and turning gracefully. I do however understand your point of view. Happy to revisit this further down the road.

if this could take a rc signal in on the ground station and inject mavlink rc override it could be used as a complete rc system, probably not ideal for flying but ideal for rovers.

And imagine the

is a smart phone where you can just push a button to start or stop the rover and the smart device also acts as a remote control …
But yes, it is very doable to overwrite the rc command: RC_CHANNELS_OVERRIDE here: Messages (common) · MAVLink Developer Guide and I have had success experimenting this with mavesp8266 code.
A piratical downside of using a smart phone as a rc is that there is no feedback, unlike the stick on an actual remote. You will have to keep looking down at the touch screen and take eyes away from the rover. This is a particular problem for me as my rover doesn’t turn well in the Acro mode (overshooting) but undershoots in Auto mode.

If implementing an RC interface with a microcontroller board, your goal should be to actually use an RC protocol that is supported by the flight controller rather than just kludge it together with override commands.

yes, I wasnt talking about using a phone, I mean accept a ppm or sbus signal directly from a handset and inject it into the mavlink stream on the ground esp32 bypassing the phone or ground station all together so it can work standalone.

I don’t know how to make esp32 to receive sbus or ppm signal. But assuming the signal is received on to esp32, there are codes that seem to be able process the signal GitHub - bolderflight/sbus: SBUS encoder and decoder. and GitHub - bolderflight/pwm: PWM actuator library.. I haven’t tried those myself.

1 Like

I created a branch to the “ESP-Now-Burst-Serial-Bridge” project that allows a one-to-many broadcast architecture. For my use case, I wanted an RTK Fixed Base to use ESP-Now to broadcast RTCM3 to more than one client without the need to modify the code each time I added a new one.

It’s pretty easy to set up - you’ll just need to edit the sketch with the MAC address of the sending ESP32. You can use the same sketch on all boards (sender and receivers alike).

yuri-rage/ESP-Now-Burst-Serial-Bridge at broadcast-mode (github.com)

Of further interest, this ESP32 “SuperB” breakout board is perfect for mating to an ArduSimple SimpleRTK2B in place of the intended XBee radio, allowing ESP-Now communication in place of XBee. It appears that Crowd Supply fulfillment is done by Mouser, and I had no problems ordering.

SuperB Docs :honeybee: - Macchina Docs

2 Likes