Scripted MagFit flightpath generation

I set out to better understand how to leverage the MagFit tool and ended up with this script.

I’d always assumed that long, straight legs of varying headings were best for MagFit, thinking that method would stabilize a GPS heading track for use with the tool. The dev team corrected my assumption, and it turns out, it’s better to fly long, sweeping curves. They recommended a large figure-8 pattern while varying throttle to some extent. Many thanks to @peterbarker and @iampete for the discussion!

Before I describe the resulting script and its use, I should caution that this may not actually be the best method for using the MagFit tool, as the compass must be reasonably calibrated in the first place in order to fly nav missions at all. Still, I’ve achieved what I think are very good, consistent results by doing a basic compass calibration and then running MagFit against a flight where this script was employed.

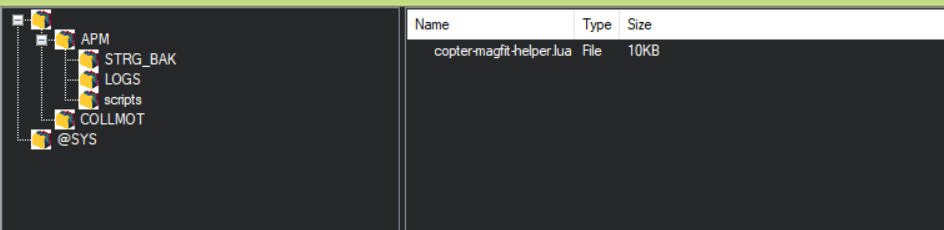
First, upload the attached script, enable scripting, and reboot to initialize the script’s custom parameter set.

Connect to the Copter and look for the parameters prefixed “MAGH_” (for “MagFit-Helper”). Here’s a brief description of each:

image

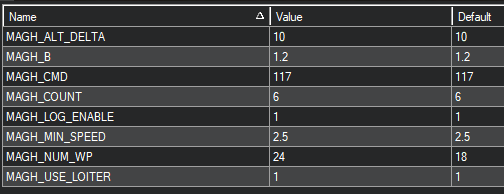
  • MAGH_ALT_DELTA: Altitude change to be commanded during the figure-8 pattern to capture mag field changes during throttle changes. Defaults to 10m. Starting altitude is based upon the entry waypoint’s altitude, and the Copter will climb this amount ABOVE that starting altitude on occasion.
  • MAGH_B: geometric factor to adjust the width of the figure-8. Values of 1.2-1.5 should be more than adequate.
  • MAGH_CMD: The SCRIPT_TIME command value used to initiate the scripted pattern. Defaults to 117.
  • MAGH_COUNT: Number of times to repeat the figure-8. If battery failsafes are properly configured, you can make this number somewhat high so that the figure-8 will be repeated until failsafe.
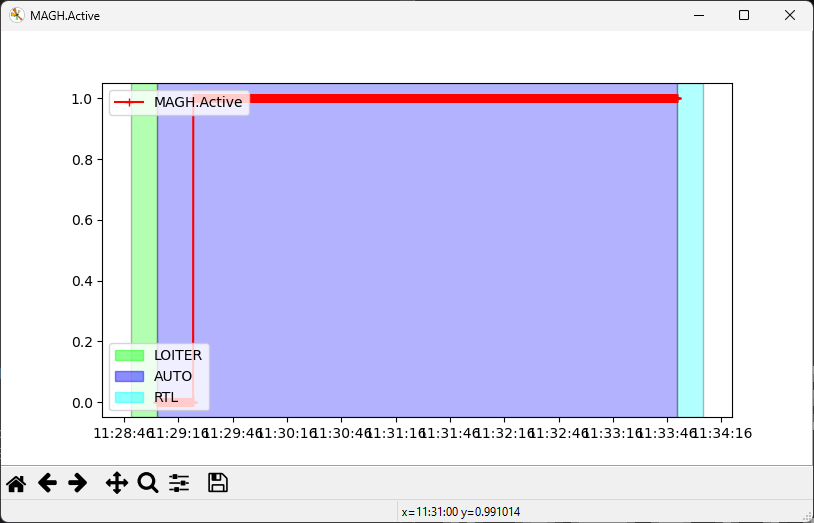
  • MAGH_LOG_ENABLE: Enable a MAGH.Active value to be logged in dataflash for later consumption. Set 0 for no logging.
  • MAGH_MIN_SPEED: Starting speed (m/s) for the figure-8. Defaults to 1/2 of WPNAV_SPEED. Speed will slowly increment to WPNAV_SPEED as the pattern is repeated.
  • MAGH_NUM_WP: The number of waypoints to be used in defining the figure-8. Defaults to 18. 16-24 should be adequate for most cases. Use more points for a smoother path at the cost of potentially slower speed during navigation.
  • MAGH_USE_LOITER: Insert a LOITER_UNLIMITED waypoint prior to the figure-8 so that the new waypoints can be downloaded and verified prior to continuing. Set 0 to disable (not recommended). See the end of the writeup for a helper script to advance waypoints via an RC switch.

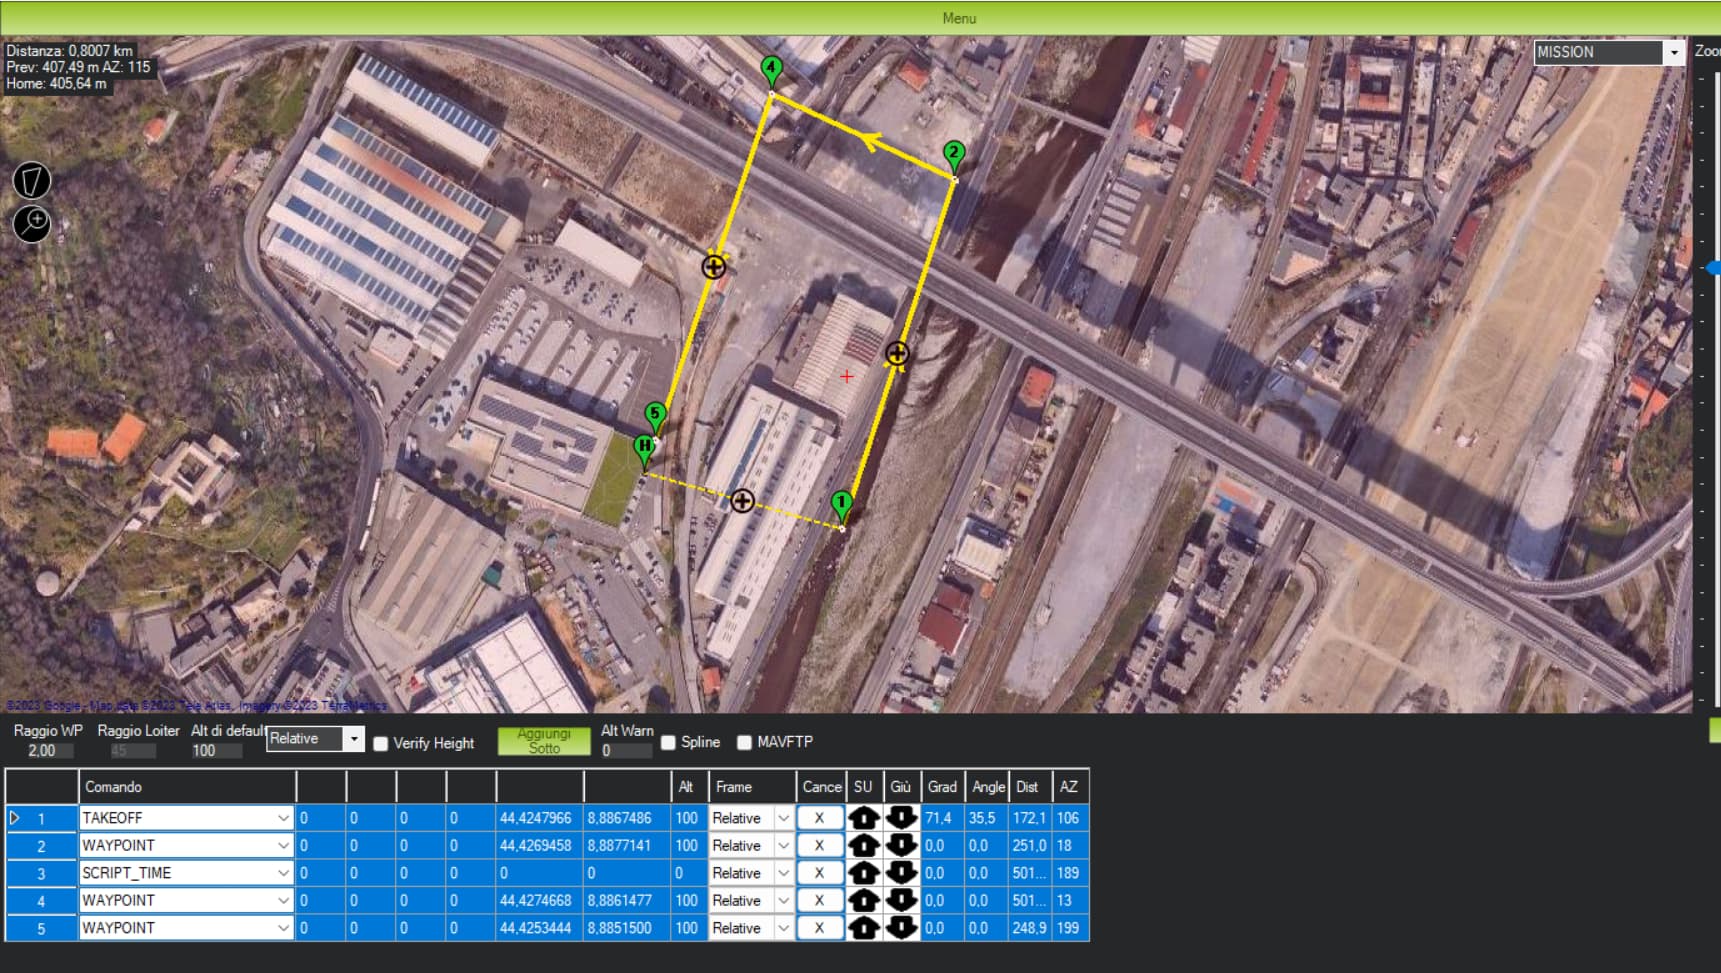
Once the script is loaded and active, create a flight plan that uses it, like this one. The figure-8 will be inserted between the points on either side of the SCRIPT_TIME command.

image

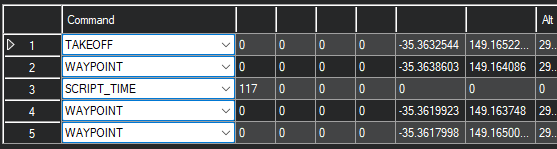
The SCRIPT_TIME command can be given two arguments for min speed and altitude delta, respectively, if you want to override MAGH_MIN_SPEED and MAGH_ALT_DELTA. Zero values (as shown) will let the parameter values remain in use.

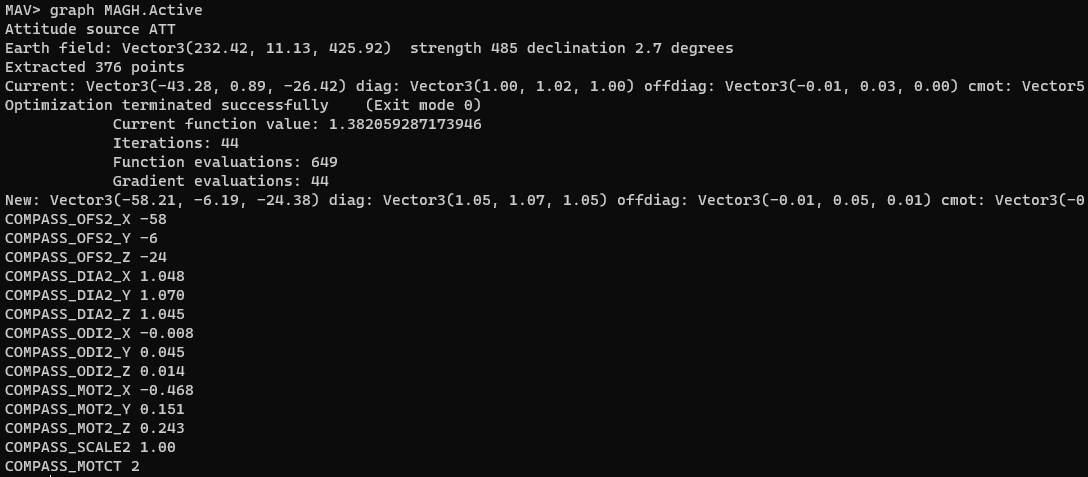
Upon execution of the mission, several messages will be displayed via telemetry:
image

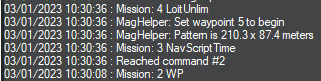
At this point, the figure-8 has been created, and the script is awaiting the user to set the waypoint beyond the loiter to commence the pattern. Download the mission to confirm obstacle clearance before proceeding, and then use the GCS to set the indicated waypoint to continue (or use the additional helper script below to use an RC switch for advancing the waypoint).

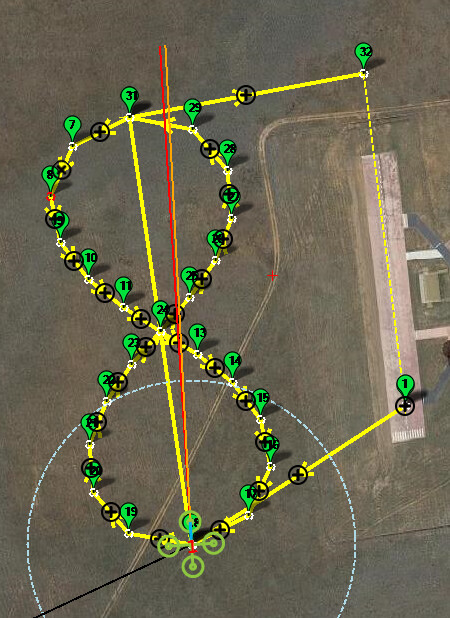
The figure-8 will then repeat MAGH_COUNT times, occasionally climbing and descending by MAGH_ALT_DELTA meters and incrementing speed toward WPNAV_SPEED.

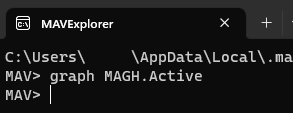
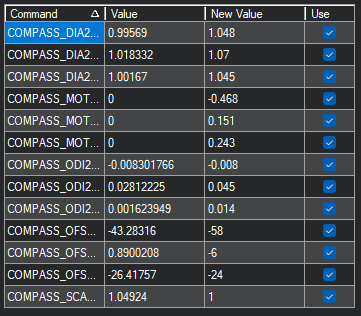
Once complete, download the .bin log for analysis via MavExplorer (see the next post).

The ~200m long pattern consisting of 24 points depicted here should be more than adequate. I’ve achieved good success with patterns as small as ~50m and only 16 waypoints.

While it appears limited to use with Copter firmware at the moment, I don’t see any roadblocks to using the script on quadplanes (or similar) with no adaptation, and compass-based electric Rovers should be able to take advantage as well. Plane users may find that the number of waypoints is excessive (a simple “X” shaped pattern might be enough for a Plane), and I think there is room for optimization there. I did include the MAGH_MIN_SPEED parameter with Plane users in mind.

Scripts:
copter-magfit-helper.lua (10.9 KB)

If you’d like to advance past the LOITER_UNLIM via RC switch, you can use this one. Set RCx_OPTION=300 to a channel with a switch (preferably momentary). When that switch is activated during a nav mission, the vehicle will skip to the next waypoint.

advance-wp.lua (1.2 KB)

Bonus supernerd content:
The generated figure-8 is based upon the Lemniscate of Bernoulli and uses a scale factor (MAGH_B) in the y-direction. I arrived at the scaling technique by asking ChatGPT to craft MatLab scripts graphing various lemniscate figures.

11 Likes

To use the data collected during the MagFit flight, download and install MavExplorer. Open the .bin log from the flight, and use the command line to graph MAGH.Active.

image

You’ll get a graph like this:

Click the magnifying glass in the bottom toolbar, and click/drag to select only the area where MAGH.Active is greater than zero.

Back in the MavExplorer window, click Tools, MagFit, and set up the analysis like so (MAG[1] is my external compass, reduce 10 keeps the processing time reasonable, and calculate offsets, elliptical info, and motor info).

After some number crunching, you’ll get a comparison graph, and the command line window will display some new parameter values.

image

Give the results a sanity check and then upload the new parameter values to the vehicle.

Top tip - copy the command line window results into a text editor, do a global find/replace to replace the spaces with commas, and save that file as a .param file. Then use the “Compare Parameters” feature in Mission Planner to compare and upload the new values from that file.

More info in the wiki, of course:
Refining Calibration Parameters using a Flight Log — Copter documentation (ardupilot.org)

5 Likes

What an awesome idea Yuri! This will have everyone with a Lua capable FC running scripts!

1 Like

I get the impression that a lot of folks see scripting as an experimental kludge. It really is not. The engine has been carefully scheduled and sandboxed such that there are protections against silly mistakes/poor practices while retaining an incredibly high degree of functionality, including some very low level routine access.

In all of my heavy scripting use, I’ve only ever had one catastrophe. It was easily traced to bad math on my part, which caused an OS panic rather than exiting gracefully (it was a math.asin() call that I accidentally fed a number greater than 1, resulting in the equivalent of a “divide by zero” error). Given that I’ve attempted dozens of experiments with autonomous control and scripting, I think that says a lot for the built-in protections!

I’m not sure this particular script is the shining star example of professional and well integrated scripting (Pete’s 6DOF script is almost certainly that!), but I do hope it’s accessible and useful!


Back to the topic at hand, be sure to calibrate your voltage and current sensors prior to using this script and the MagFit tool.
3 Likes

Very useful! I’ll give it a go soon on my Yuri Drone. Yeah, I built one just like it.

1 Like

My earlier log file example was run on an already tuned airframe, so I couldn’t realistically show the resulting graphs. For the sake of completeness, here’s a series of images from a different Copter that just got a new GPS/compass module and a fresh copy of 4.3.4 (latest stable as of this post).

This graph shows the correction from initial calibration to expected with the MagFit parameters. In this case, the initial calibration was actually quite good. I simply installed the new module, took the Copter outside, got a good GPS lock, and rotated it through all the axes until compass calibration was complete. There was no additional tuning of compass parameters prior to running the figure-8 patterns and MagFit. In any case, you can see that there is a bit of blue/green aliasing of the uncorrected vs expected values in the “Original” graph, and that is all gone in the “Corrected” graph.

If you pay a little closer attention, you can clearly see the figure-8 pattern represented by the sinusoidal appearance of the yaw graph. The Copter completed 6 patterns, resulting in the 12 peaks and troughs shown on the graph.

Here is the output on the command line:

And here is the .param file that I created from it:

image

Finally, here is the “Compare Params” screen from Mission Planner prior to writing the new values:

image

As you can see, there isn’t much to sanity check here. MagFit was hardly necessary in this case but should improve compass performance, nonetheless. The entire process took less than 10 minutes of flight time and about the same amount of time to perform the post-flight analysis.

The test Copter was a Hexsoon EDU-450 frame and stock motors with a Cube Orange, XRotor Micro 40A ESC, and newly installed Here3+ GPS/compass module.

3 Likes

Amazing work @Yuri_Rage! Thanks for sharing!

1 Like

@Yuri_Rage
Hello ! I am trying the magfit script , but without using your lua script . However, the method I use has the limitation of not having the yaw vary during the show . I would like to ask you how much this may affect the calculation result of the magfit script .

Also I would like to ask you if it is possible to select a portion of the log based on a start time and end time . When there are very long logs , it would be useful to be able to select only an interested portion of time . Thank you very much

If you’re not making yaw changes, don’t run MAGFIT. You’ll get poor results.

Watch the video on the wiki page. It shows how to select only a portion of the flight.

1 Like

Thank you @Yuri_Rage, for your valuable reply !
I am trying to use your script but there are some parts I don’t understand well .
I was able to load the lua script on my drone ,
then I went to the “plan” section and created a rectangle , with an initial takeoff and several takeoffs , and with a “SCRIPT TIME” action between the waypoints , I then wrote the waypoints on the drone , but nothing happened .
It is not clear to me , when and by what action the 8 shape is created . Also I would like to ask you if it is possible to operate the script by putting the drone in GUIDED mode . Thank you very much .

Just change the first script time parameter to 117 (look at the example mission in my first post).

I tried to use the copter-magfit-helper.lua script on ArduCopter V4.5.0-dev (1036244c), however I can not arm the copter because of following error:

< Lua: /APM/scripts/copter-magfit-helper.lua:283: attempt to index a nil value (global ‘gcs’) >

For now I am able to arm the Copter when I coment out all the instances where ‘gcs’ is called in the script, although that is agreeably bad practice and not recomendable.

Mission file here (600 Bytes)

[EDIT]: the same issue (and workaround) applies to the advance-wp.lua script

EDIT: I was incorrect.

But you shouldn’t be using 4.5-dev unless you have a very specific use case requiring a feature that the master branch provides over the stable, beta, or RC branches.

I’m working with Amilcar and Amilcar told me to do so.

Not reproducible in latest 4.5-dev 83a31ac3.

@amilcarlucas , recommend you take this one. I don’t have further suggestions.

Have you tested it with the included mission file? Could it be an issue caused by the relative position of the starting points to the figure 8 segment?

It sounds like a broken Lua binding to gcs. I’ve never seen that before, and I cannot reproduce.

OK, thanks that you looked into it.

@Yuri_Rage

hi i used the magfit script and did the flight also later used the webtool. could you have a look at my logfile and advise if it was done properly.

Hi, I have simiular issue with advance-wp.lua “/APM/scripts/advance-wp.lua:23”. I am no able to arm during this error. Any idea how to fix it please?