Based on my experience with people wanting to fly Ardupilot for fun, they usually want a few essential things,
1, Flight time, there is no use trying to do waypoints with a quad that only flies for 5 minutes.
2, Under 250g. The laws in most countries only allow up to 250g to be flown unregistered or near buildings and houses.
3, Telemetry, you want to be able to upload waypoints and send commands reliably without using USB.
4, RC channels, with all the functions and modes ardupilot has, the last thing you want is to be running out of channels.
5, Live video, for the FPV experience.
6, People want it cheap, its a hobby after all and at some point it just becomes unaffordable.
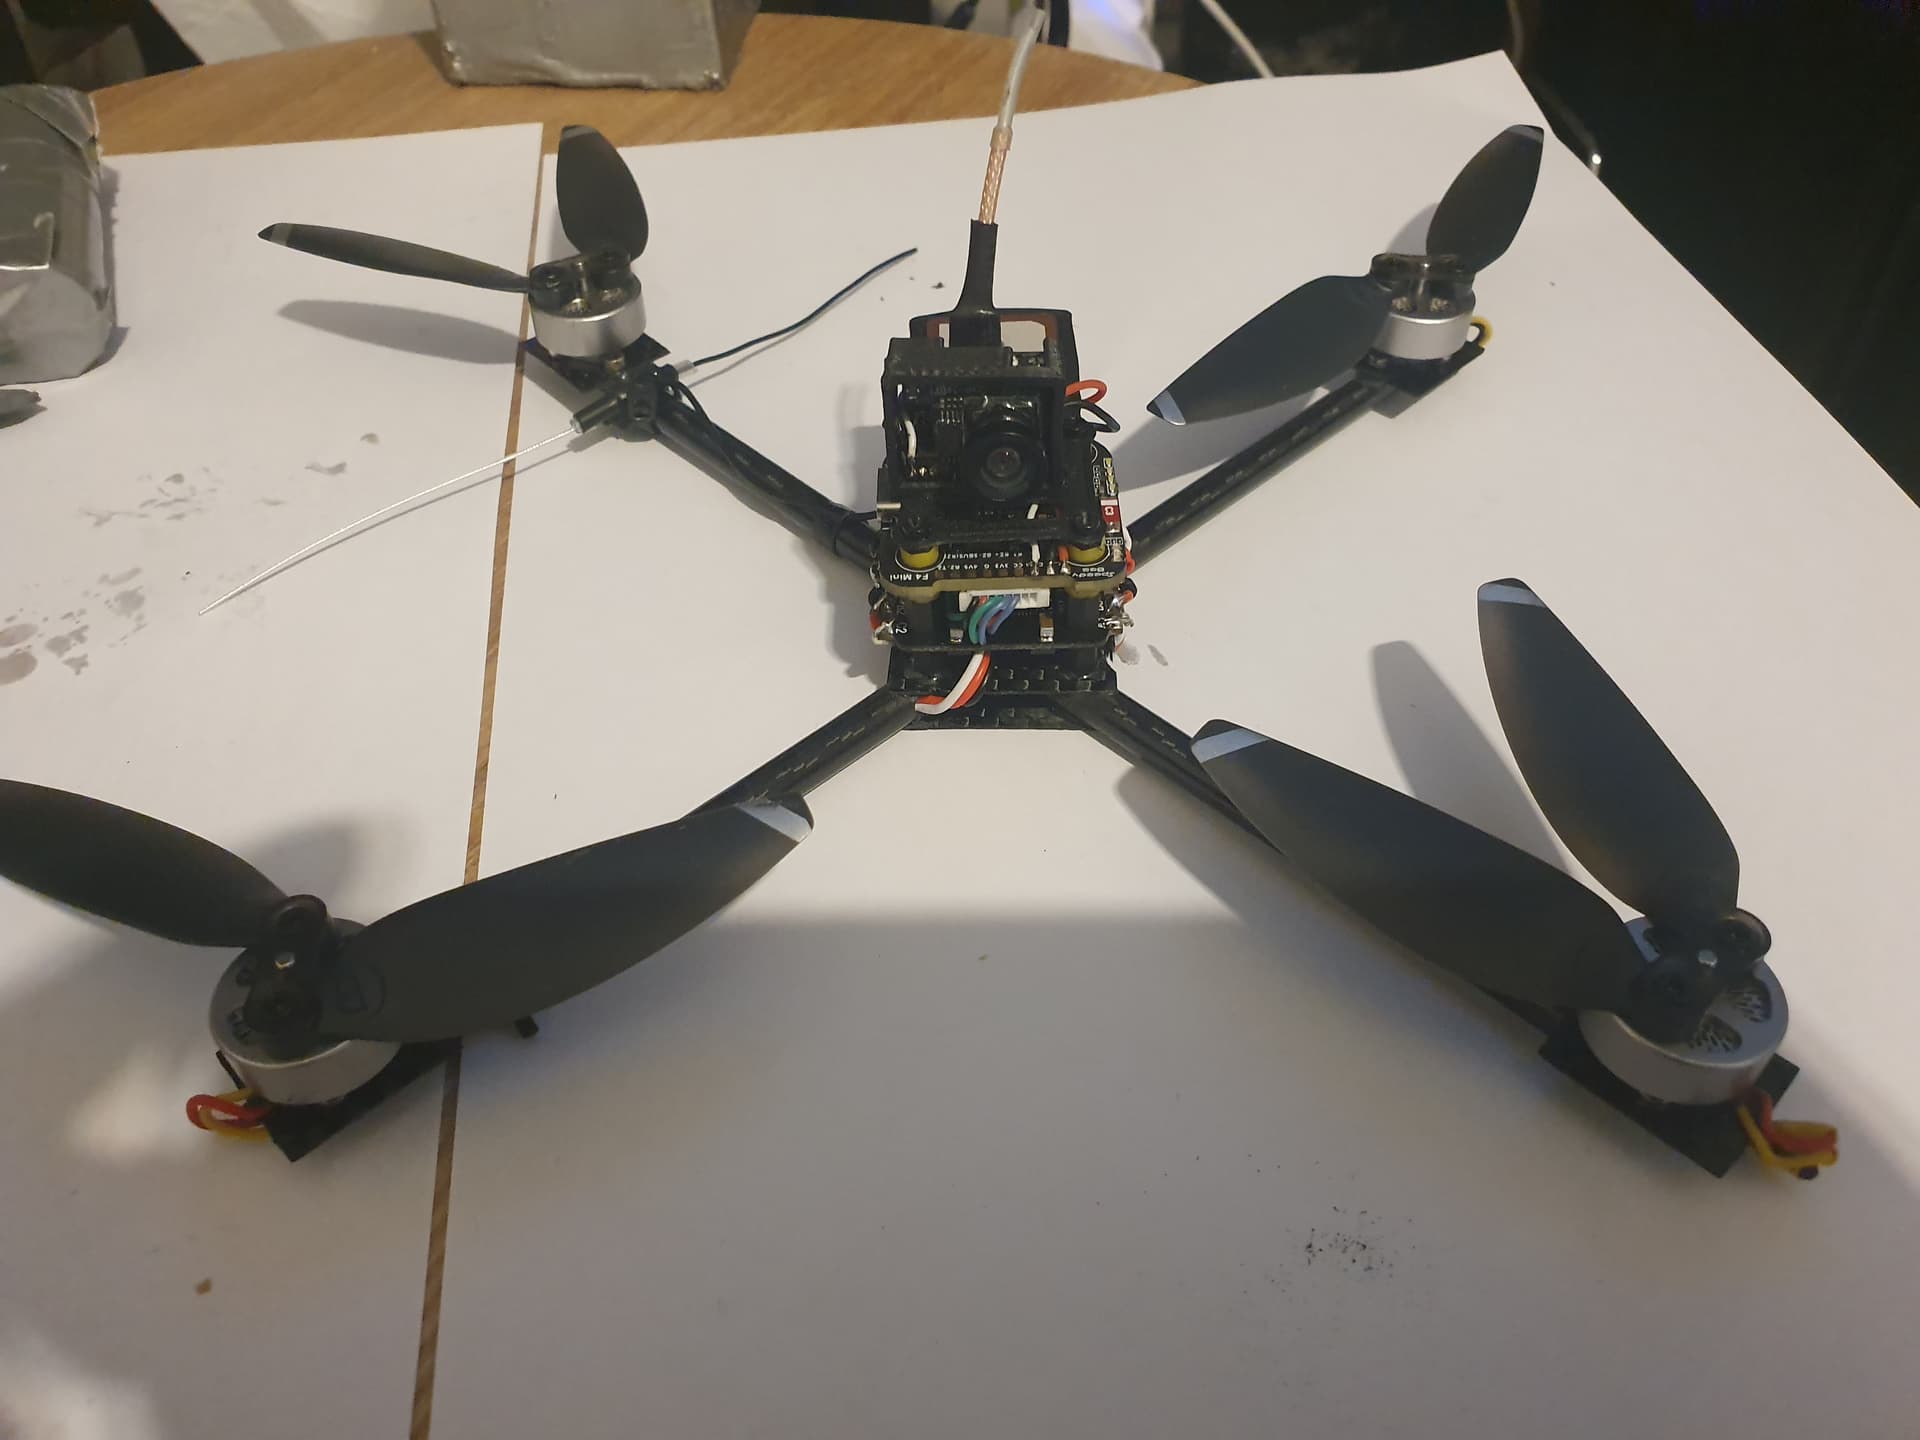
With this design It hits all these targets, without using anything not easily available online. .
The key to its long flight time is lightness, basically when you add weight to a quadcopter your not just using more energy to overcome that weight but the propellers become less efficient the more load that is placed on them. The bigger issue is that it’s not linear, Adding 10% more weight can take 15% off your flight time just due to the added inefficiency of the propellers. This is why adding bigger and bigger batteries doesn’t really get you any more flight time because usually they end up so heavy and inefficient that doubling the battery usually only ends up giving a small fraction more flight time.
On the upside, This can work to your benefit if you can take weight off the aircraft, since now your not just removing weight but also increasing the propellers efficiency. So by being very careful about component selection we can optimize for flight time.
Parts Required:
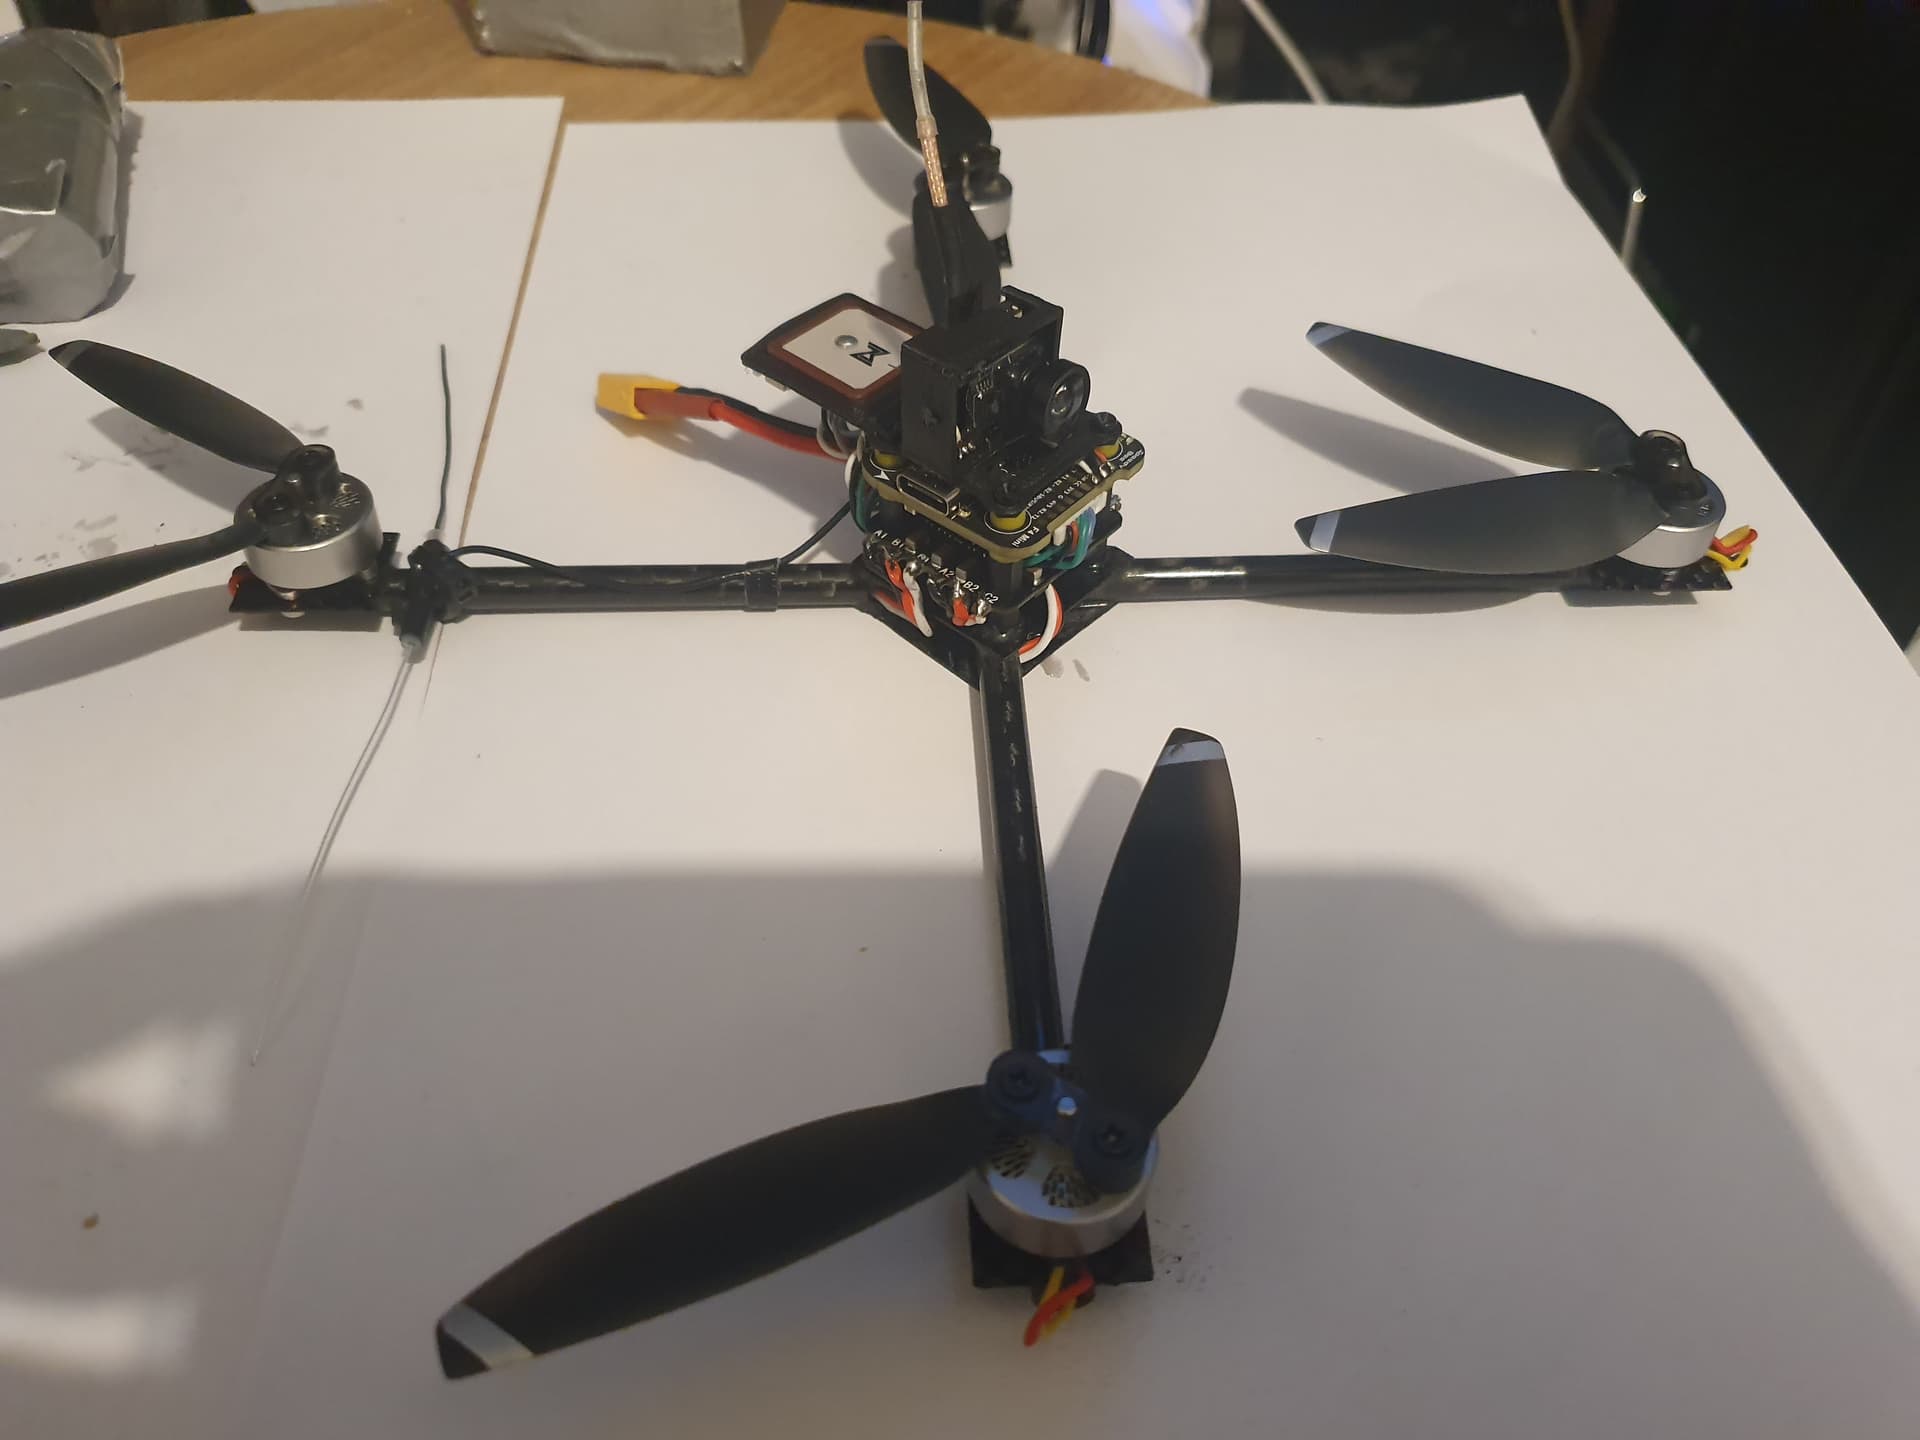
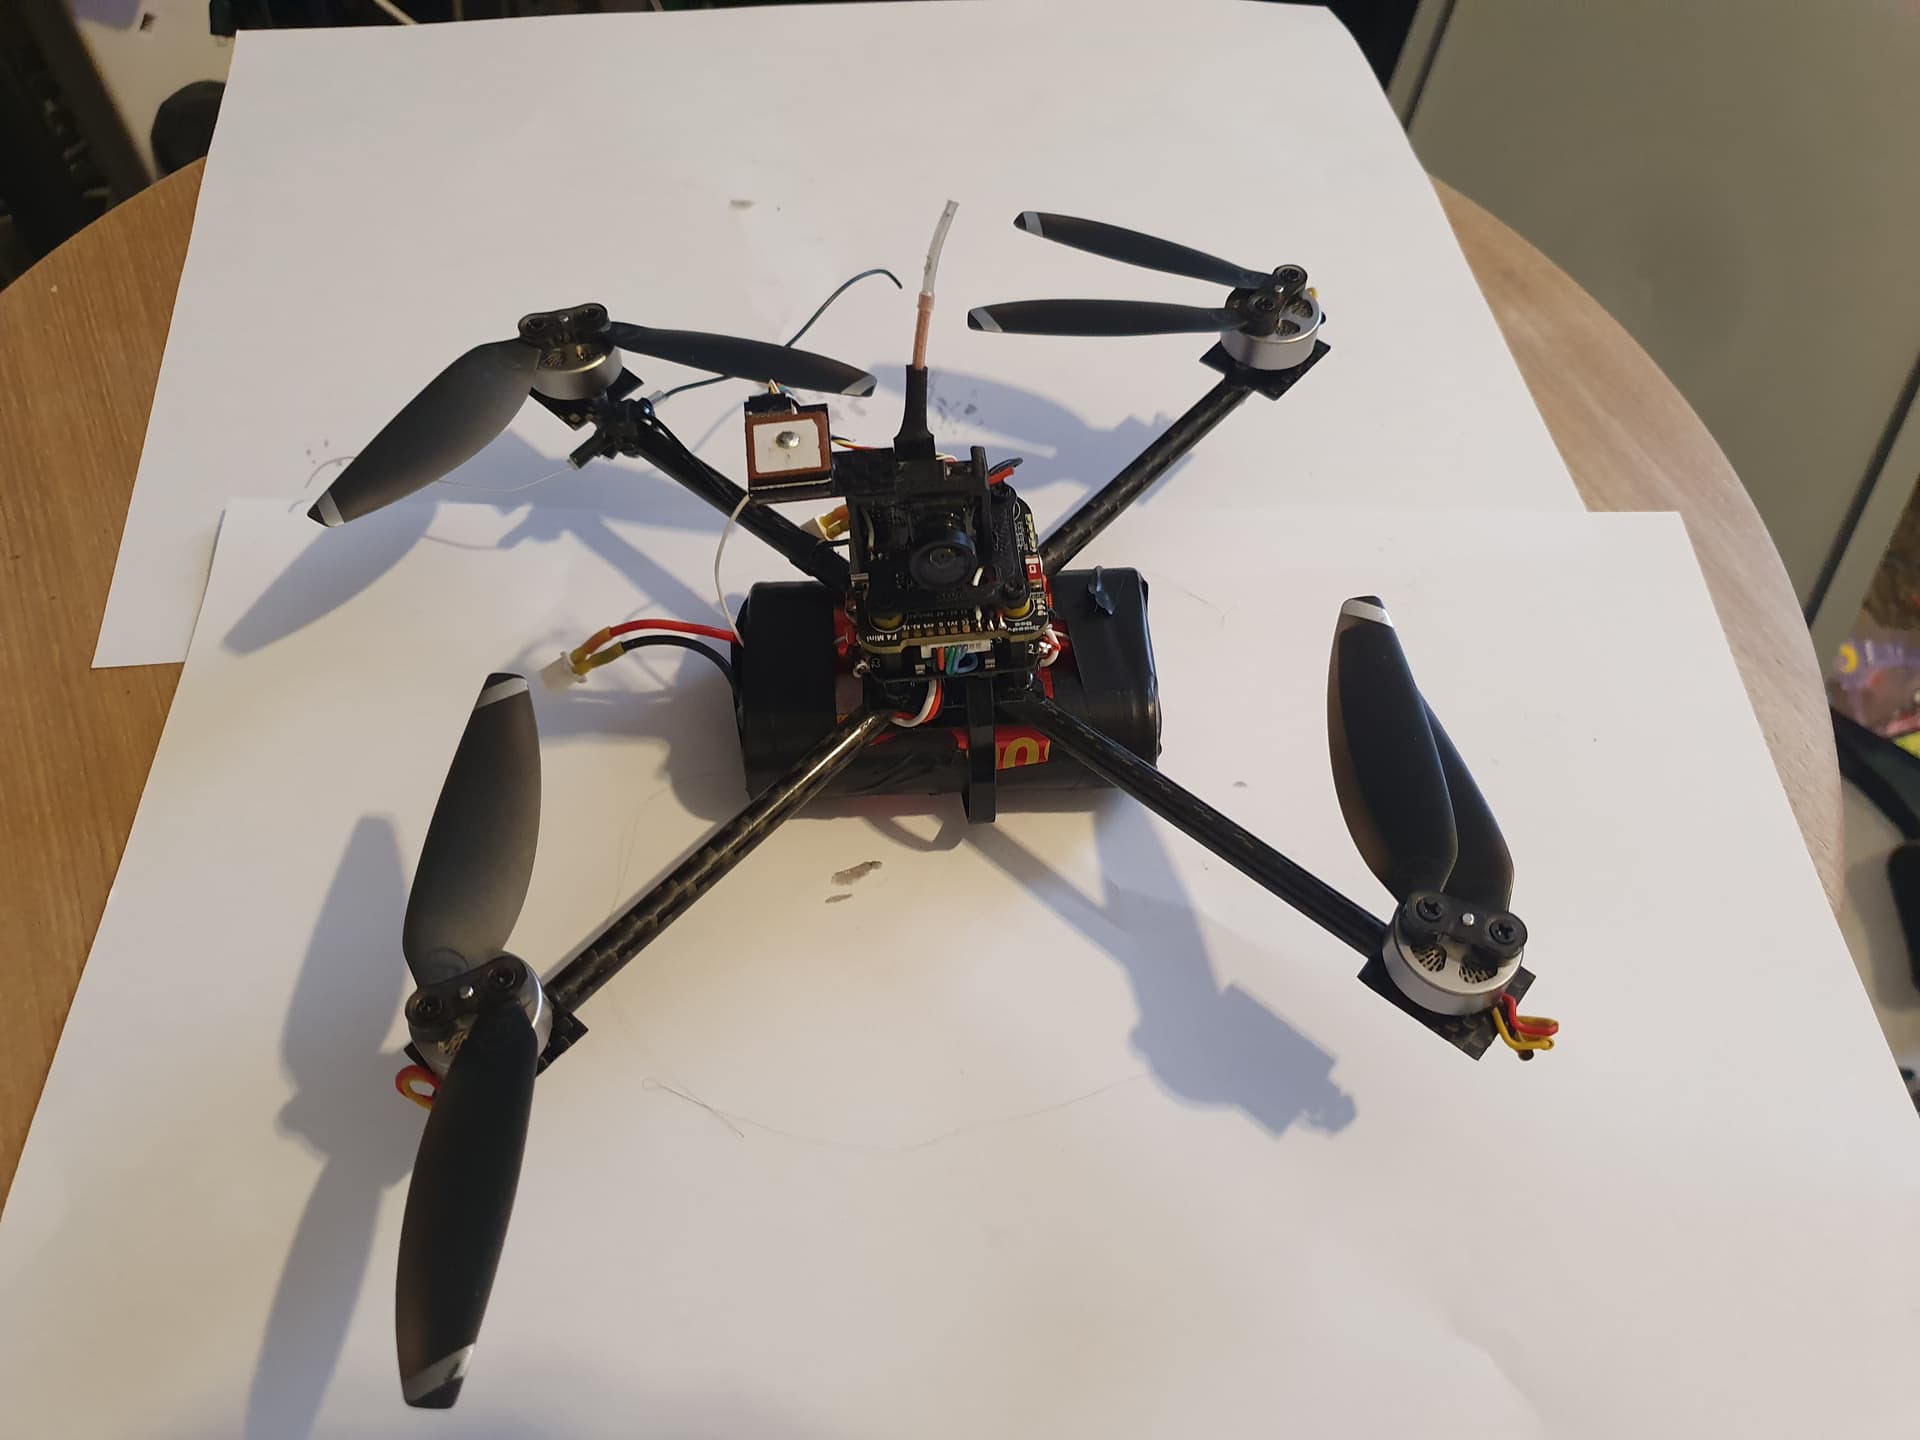
Frame:
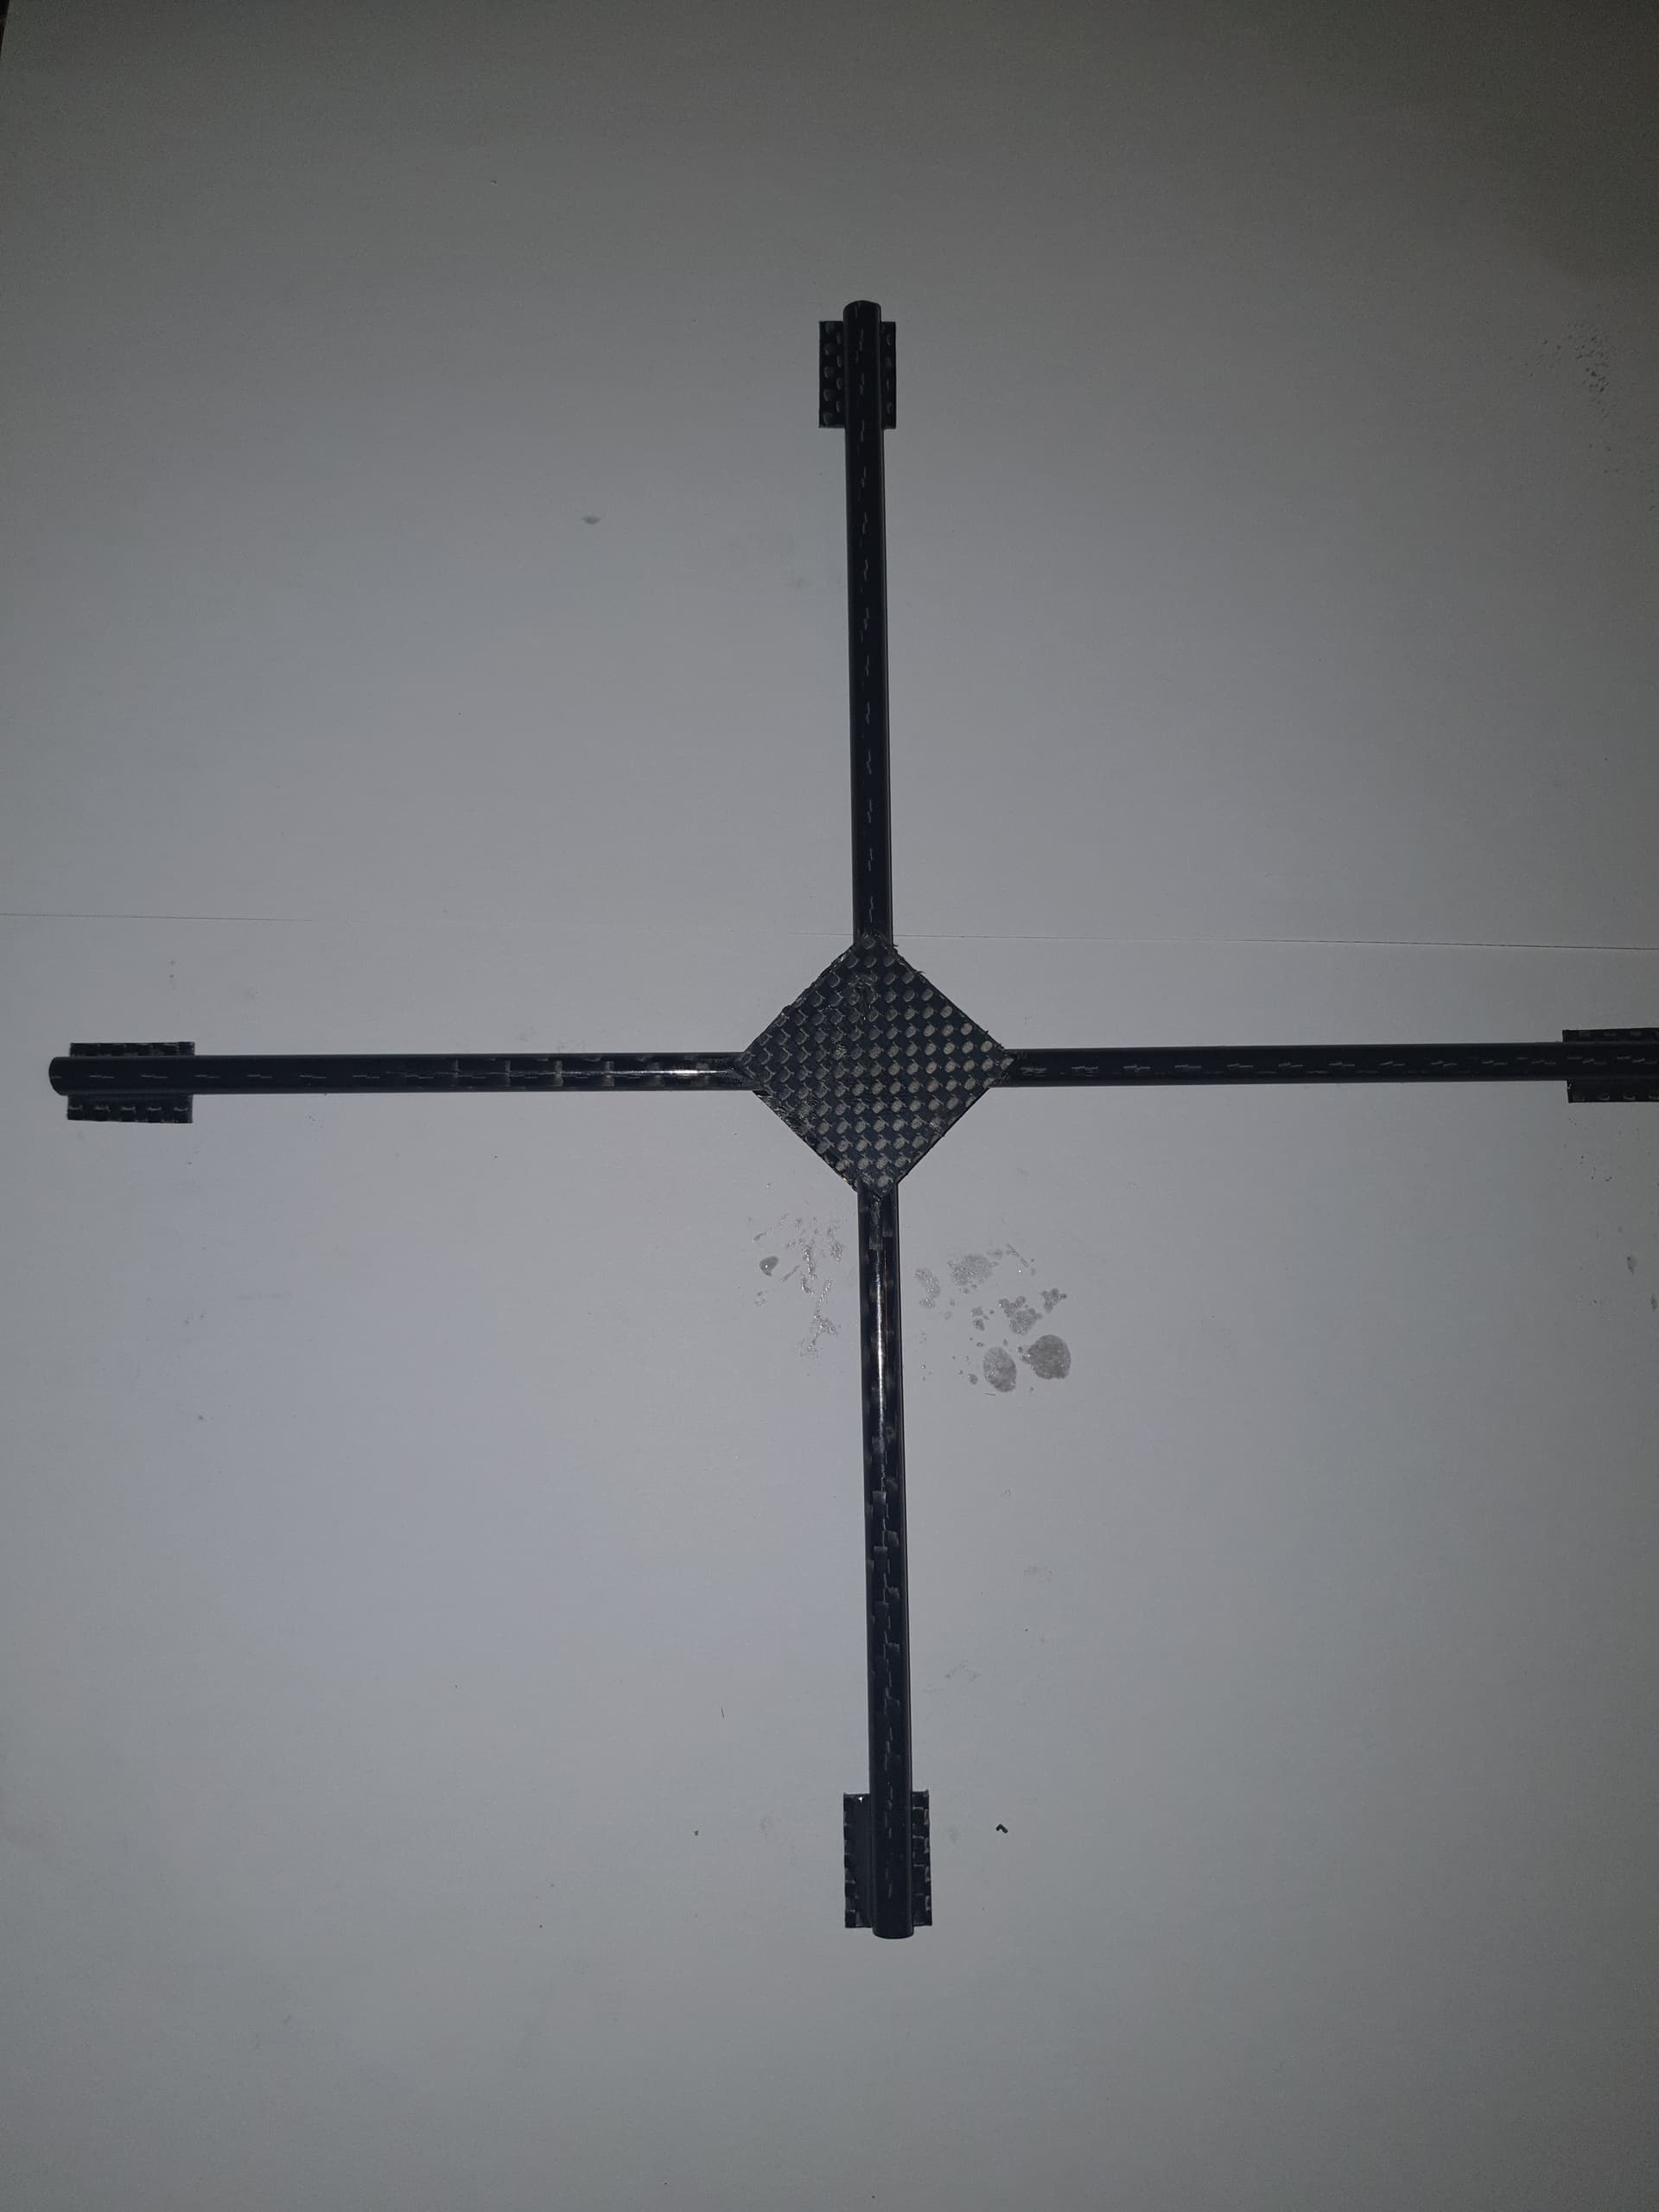
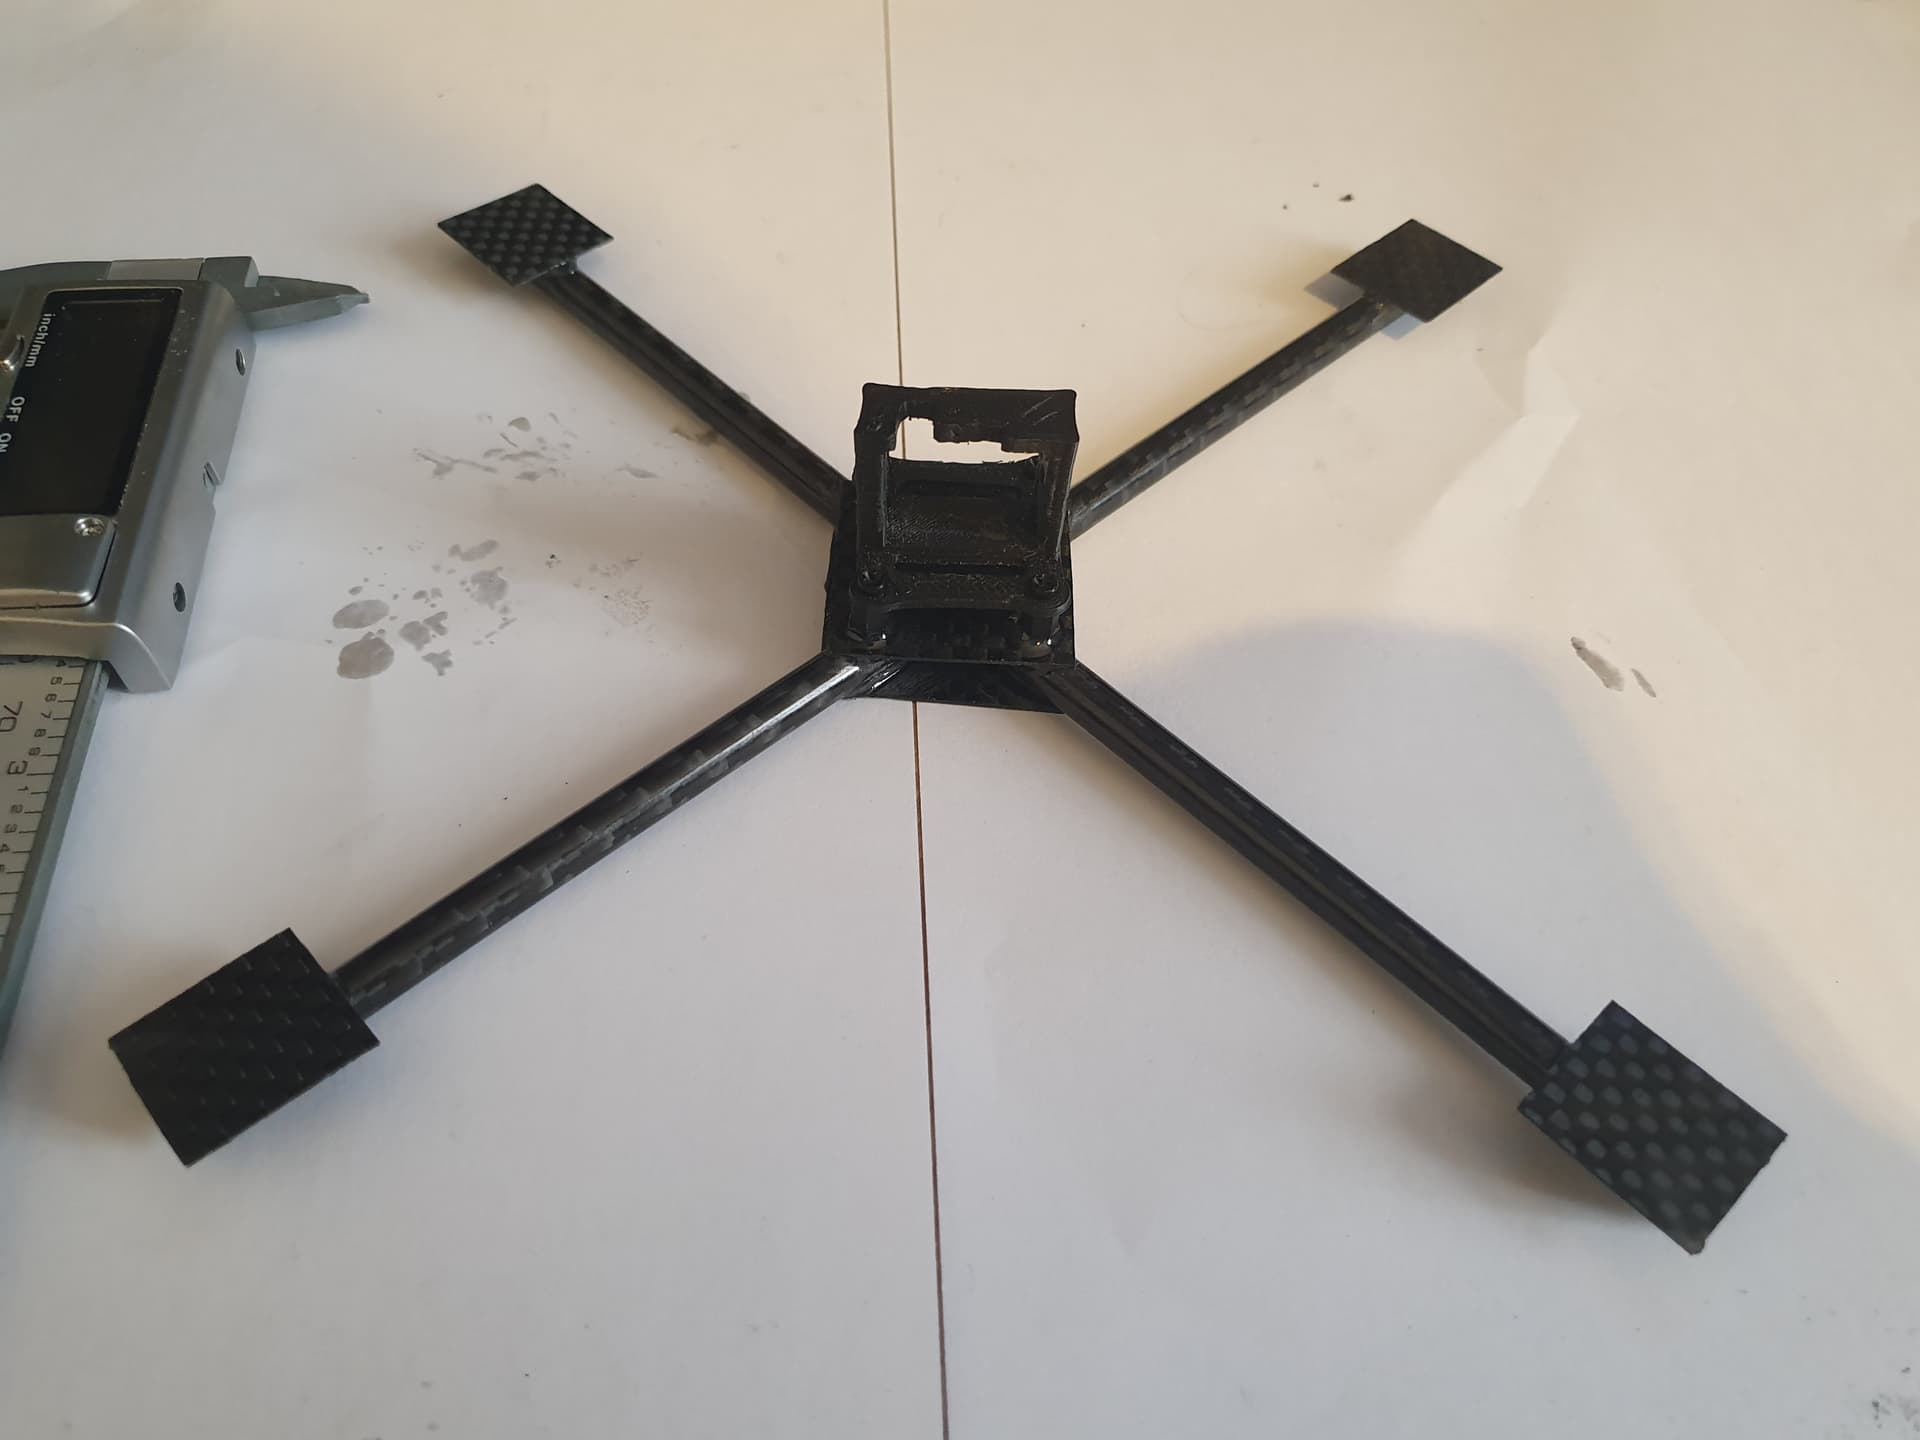
The lightest option for a frame I have found so far is a custom 6mm tube frame, by using 2 tubes in an X configuration then notching them so they interlock then re enforcing it with 0.5mm carbon plate and epoxy, we end up with a very light rigid frame.
3d printed camera and gps mount
can be found here About geofrancis - Thingiverse
Motors and propellers.
Basically we only want motors big enough to carry the quad any bigger is just added weight.
The motors I used are these 2750kv motors with 4.7" propellers from aliexpress, I believe they are off some kind of Mavic mini clone but they are very cheap and good enough for an hour.
be careful when tightening the screws for the propeller, you just want it tight enough and no more, if you tighten it down too far it deforms the hub and it ends up vibrating.
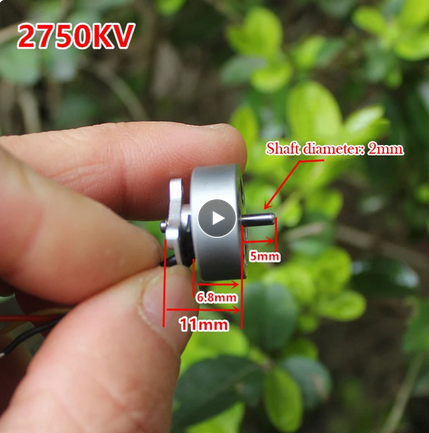
https://www.aliexpress.com/item/1005005402767389.html
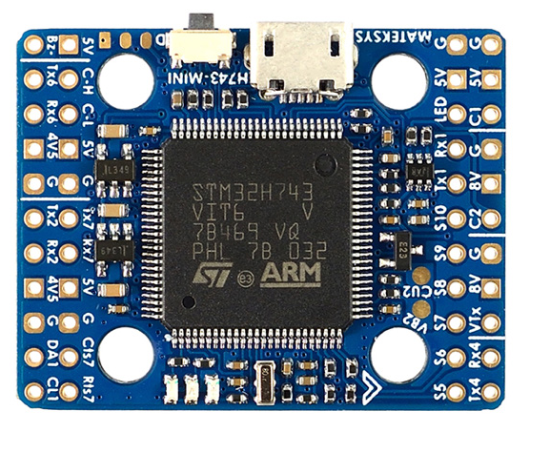
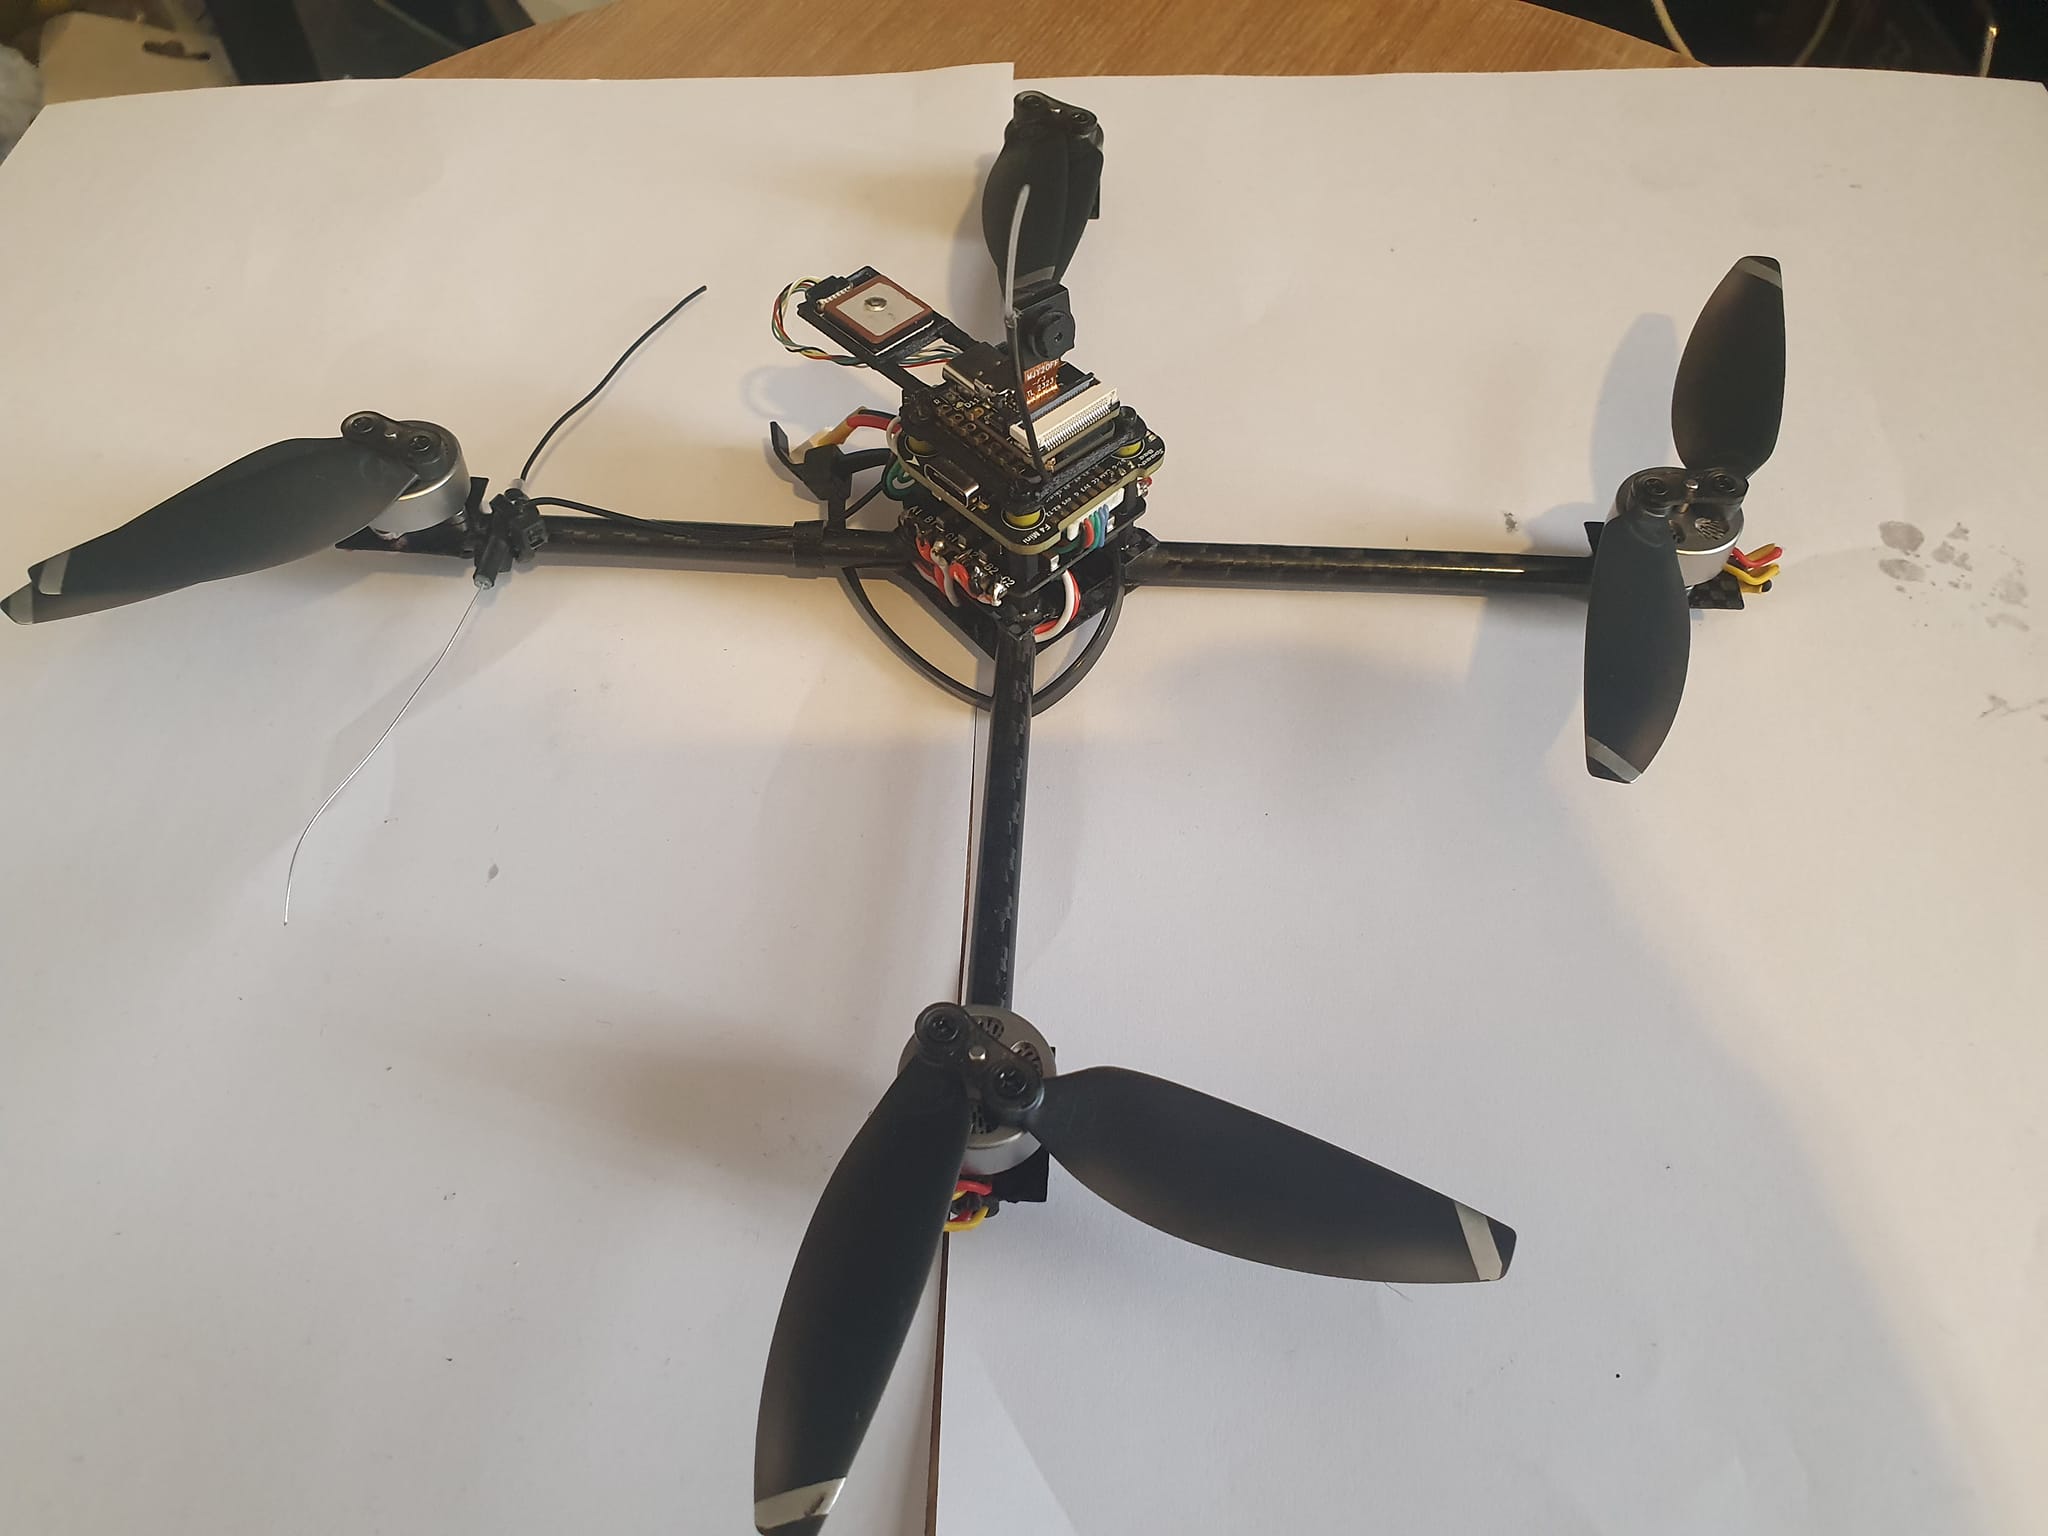
Flight controller
There are a lot of flight controllers out there but there are very few that tick the correct boxes for this build.
It needs to be f405 or h743 based, f722 chips don’t have enough memory for Ardupilot
it needs to be 20x20 anything bigger is just too heavy
I used the speedybeef405 mini its cheap and does the essentials.
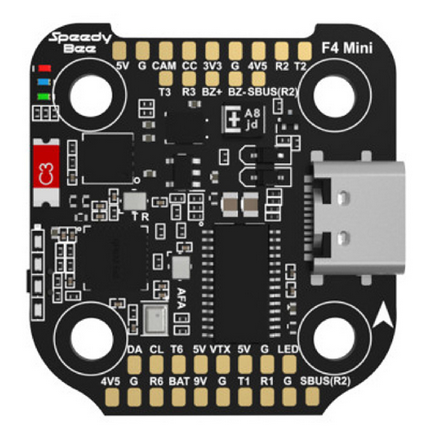
If you want to run LUA or a SD card then the Matek H743 mini is the only option.
GPS,
If you want to hit 1 hour then the only option is the GOKU GM10 Nano V3 GPS w/compass, at 2.6g its about half the weight of anything else i can find.
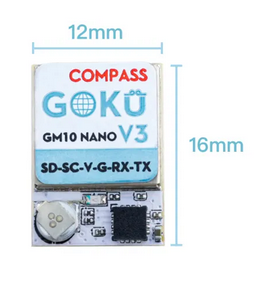
https://flywoo.net/products/goku-gm10-nano-v3-gps-w-compass
ESC
For ESCs we really don’t need much, the quad flies only using around 6A total, that’s only about 1.5A per motor so a 6A 4 in 1 ESC is more than enough to run it. A bigger ESC is just going to add weight.

https://www.aliexpress.com/item/1005002517283290.html
Battery
There are 2 options for cells, there is the 21700 5000mah and the 6000mah.
you can get a 5000mah littokala cell for around £3 and get around 55 minutes

https://www.aliexpress.com/item/1005002490628974.html
or you can get the Vapcell F60 21700 6000mah for £9-£13 depending on how many you buy and get around 65 minutes.
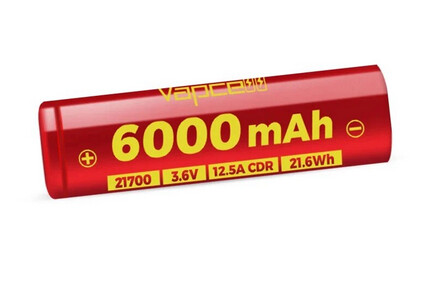
https://www.aliexpress.com/item/1005006117697035.html
If your on a budget or have never made a battery before get the 5000mah cells with the tabs but if you want over an hour get the 6000mah to make the 2s pack. There are lots of guides and videos on how to make battery packs online, welding is better but you can solder them if your fast and use a damp rag to cool the cell down once the solder has solidified to limit any internal damage. use some pre wired 3pin 1.25 jst connectors to make a balance lead as they will be much lighter. for main power we will be using a BT2.0 Connector and 22AWG wire.
Wire
The battery you will need 22awg red and black wire.
The motors use 26awg servo wire.
You will need some kind of solid core wire you can use for pulling the motor wires through the arms.
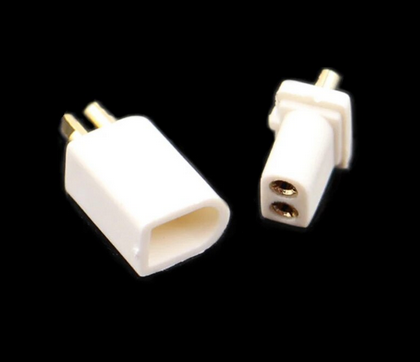
Connectors,
XT30 is too heavy, the best option I have found is the BT2.0 connector, its basically a micro XT style connector that was designed for tiny woop builds.
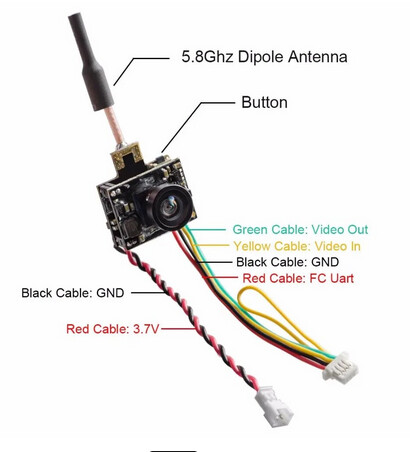
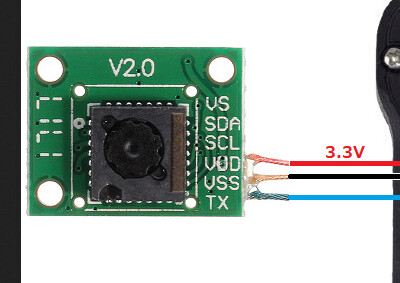
Camera
The easiest lightest option with decent range is an analogue 200mw AIO 5.8g camera, the 25mw is a fraction of a gram lighter but I don’t think its worth it for the massive range reduction.
https://www.aliexpress.com/item/1005002884221689.html
RC & Telemetry
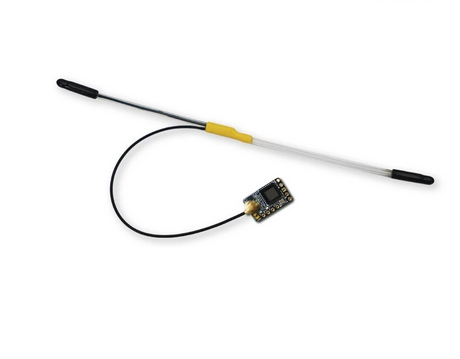
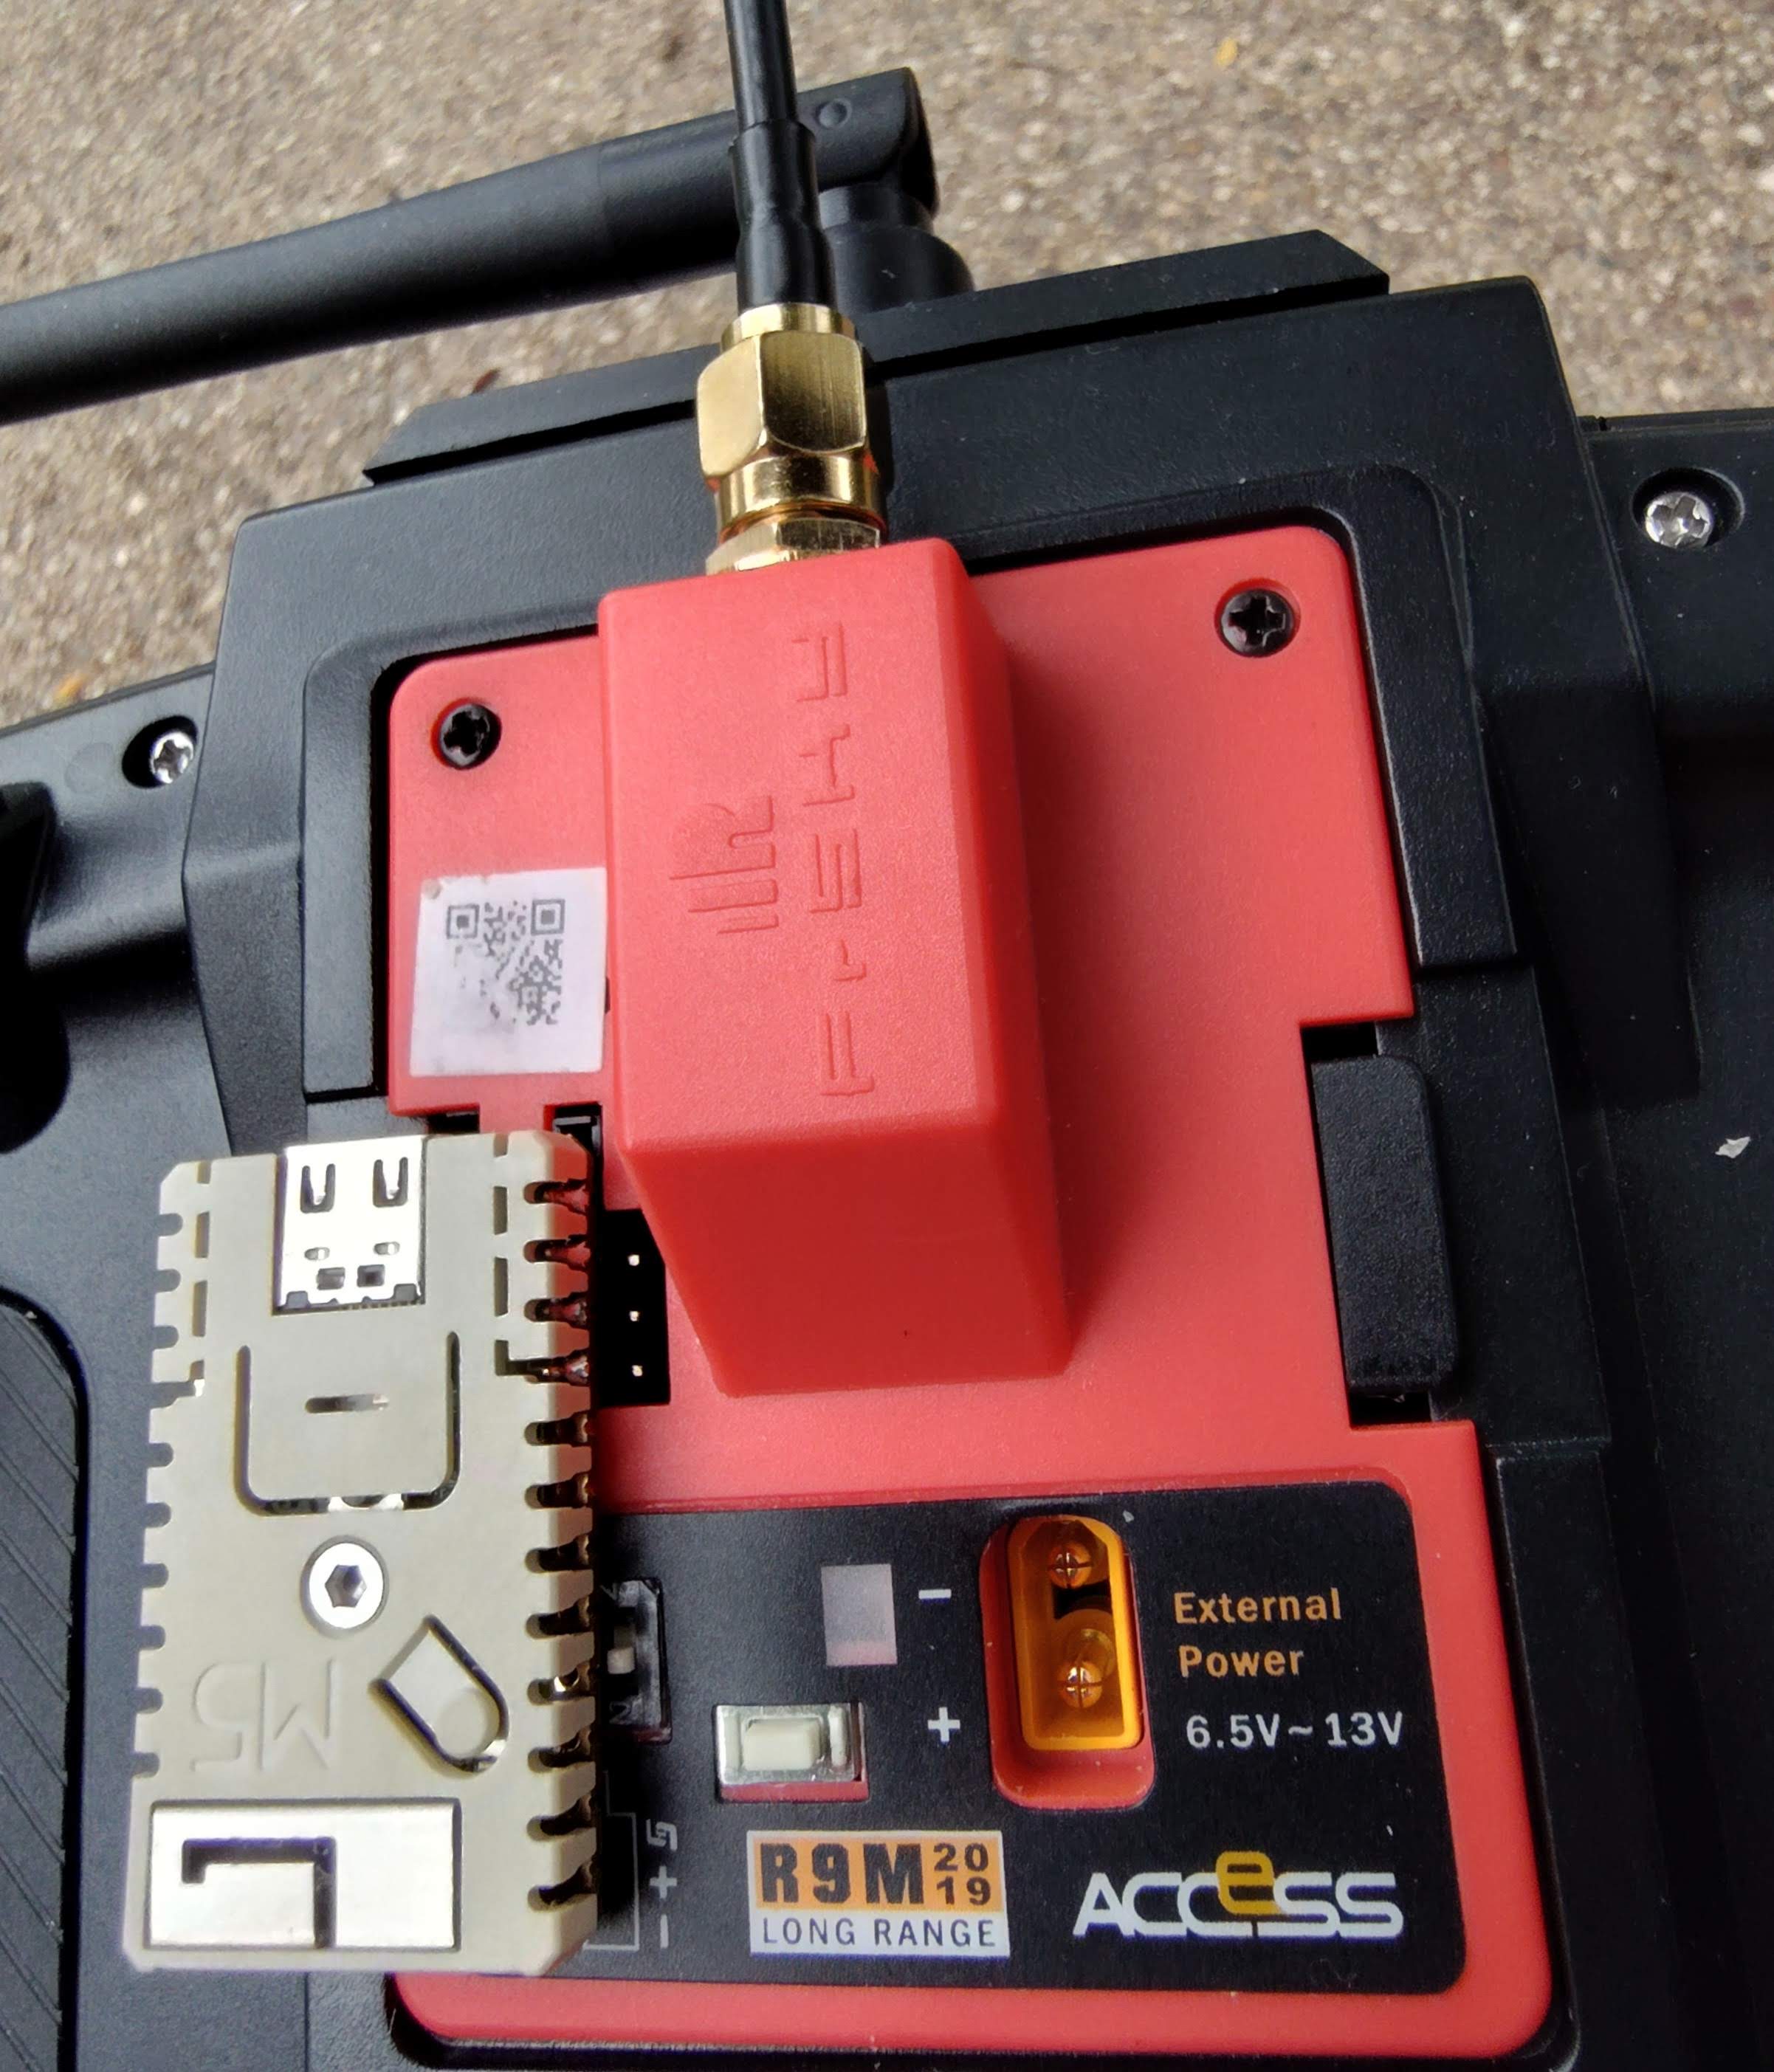
For RC and Telemetry there is really only one option that is viable at this weight that gives RC and mavlink telemetry and thats mLRS running on a Frsky r9m module and r9mm receiver. mLRS has made a lot of advancements recently making it a lot more user friendly, mLRS does CRSF telemetry passthrough so all the yapuu scripts work, It has full mavlink telemetry compatibility and you can configure it with the lua script. In order to connect mission planner you install a ESP32 backpack onto the frsky module that will work in either WIFI or bluetooth mode. There really is nothing else with this price, weight and range that can do both mavlink, yapuu and 16 channel RC.
Flashing the R9M Tx module and R9MM its basically the same process as updating the frsky firmware or installing ELRS, you just download the firmware to your radio, insert the module and flash the firmware from the SD card menu of your radio. for the receiver its essentially the same process but you need to connect the wires individually to the pins in the radio module bay.
To operate the module you set the radio external module bay to CRSF 400k then you can use the mLRS lua script to configure the power levels and options.
To get mavlink telemetry to your phone or laptop you need to flash an esp32 module to the backpack firmware and that will give you either bluetooth or wifi connectivity. the stamp m5 is the neatest option, it just slots onto the frsky module with no modifications to it.
An alternative for mavlink would probably be something like crossfire but you looking at 3x the cost with less than ideal mavlink support. ELRS have mavlink coming soon but there is no documentation for anything yet. you could also use something else like fsrky etc but you wont have mavlink and adding a second radio will use power and add weight.
Building the frame.
in order to build the carbon tube frame we need some components
500mm of 6mm carbon tube,
0,5mm carbon plate
araldite epoxy
sandpaper or file.
1.5mm drill bit
2.0mm drill bit
sharpie pen
nylon m2 standoffs
First we need to cut the carbon tube into 2 equal size pieces, for 5 inch propellers i would recommend between 210mm and 220mm for 6 inch propellers 230mm-240mm
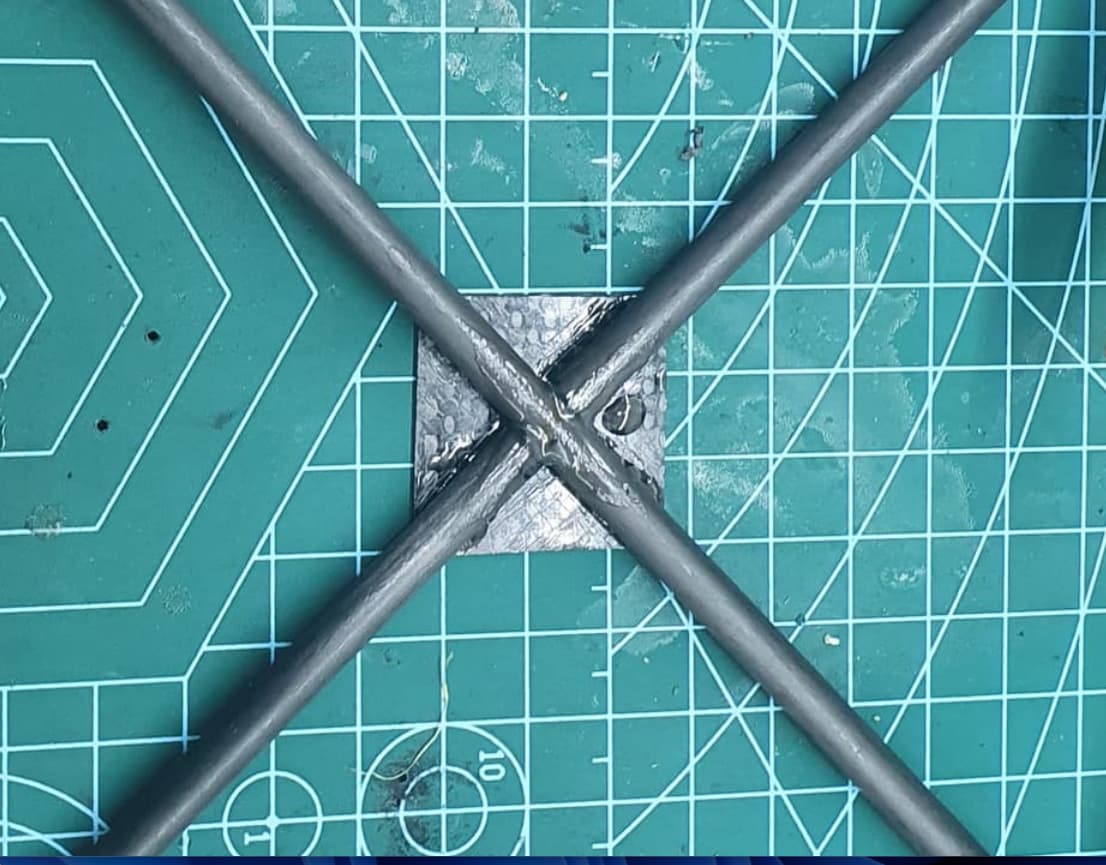
We then need to cut a notch into both tubes to join them, we need to mark the center of the tube then mark 3mm each side of that, then mark 50% though the tube and cut out the 6mm wide notch with a dremmel bit or a hacksaw and file. The cuts need to be square so that the tubes will interlock with each other, this keeps a lot of the tube’s strength and stiffness compared to trying to glue 4 individual tubes to a center plate.
We need to then cut out the square plates that will strengthen the frame and plates to hold the motors flat. I used 0.5mm plate but if you want to fly aggressively or think you might crash then changing it to 1mm should make it more durable. The center plates should be a bit larger than the flight controller, 2x 30x30mm squares should be enough. For the motors you only need about 20mmx20mm squares
Prepare the carbon by sanding or lightly filing all the surfaces that will be getting epoxy on them to key the surface, if you miss this step it will just break apart with little to no force.
Apply epoxy to the notch where the tubes join to seal it then add some to the tubes and lay them flat on top of the top plate and motor squares, use the grid on the build mat to get all the parts aligned and use tape to secure it until the epoxy dries. Araldite takes about 12 hours before you can pick it up.
Make sure the surface is perfectly flat if the motors plates end up squint your going to end up with yaw issues.
Once that is dry you can pick it up and epoxy the bottom plate on.
Once all the epoxy is dry, to mount the flight controller stack I used the ESC mounting holes and a sharpie pen to mark out the 2mm holes for the flight controller stack . I lined the holes up with the arms underneath. so when I drilled then epoxied the nylon m2 stand-offs in place they were bonded to the arms and not just the plates in order to reduce vibration. The standoffs don’t need to be very deep so you can trim them short if you plan run the wires under them.
Mounting the motors and wires.
components required:
4x motors
4x8mm + 8x 4mm bolts for motors. M2 for aliexpress motors and M1.6 for DJI mini motors.
26AWG servo wire.
solid core wire
pin
The DJI motors and the clones use a 3 bolt mounting system, so we can’t just use a pair of bolts to attach it to the arm, so what I do is I drill a single hole through the motor plate all the way though the centre of the arm, for the first bolt. I then temporarily mount the motor with that single 8mm M1.6 bolt and use a sharpie to draw around the base of the motor to mark out the location of the other 2 bolts, then I drill the motor plate and attach the motor using the 8mm bolt and 2x 4mm bolts, I could just use 4mm bolts and only attach it to the carbon plate but I like the 8mm bolt through the arm as insurance.
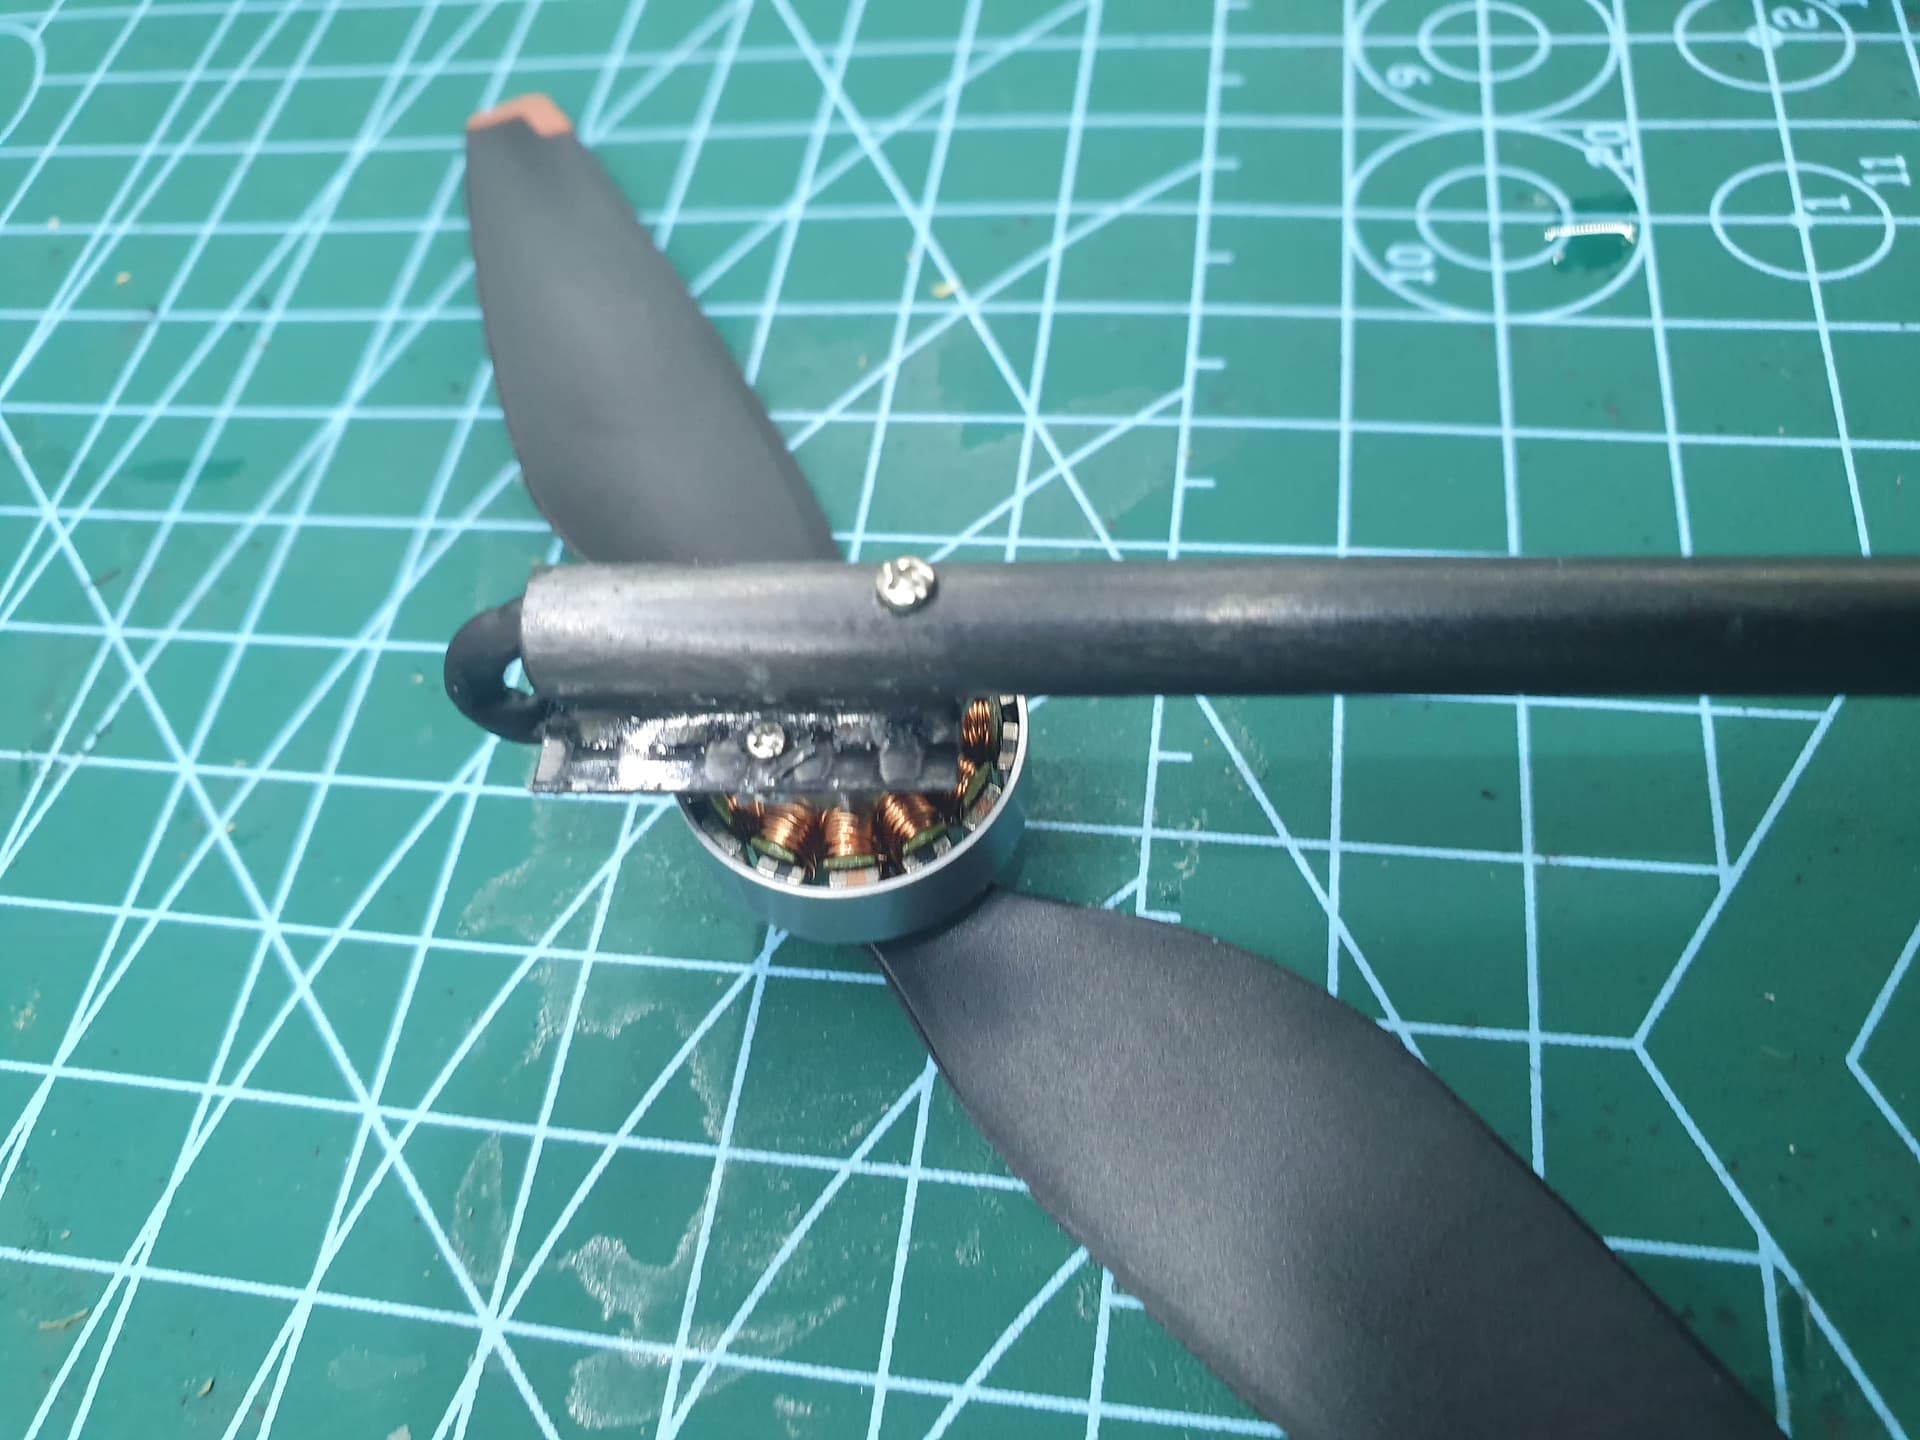
In order to get the wires into the arms we need to drill a hole into the carbon tube, I went through the side but it might be neater to go though the top plate, just make sure the stand-offs you glued in are short if you want to put the wires through the arm under them.
To wire up the motors first take out the 8mm center motor bolt so we can feed the wire through. I am just using 26awg servo wire for the motors and to get it into the arms I used a piece of solid kynar wire that is easier to feed up the tube, once i had it though i twisted the 3 ends of the servo wire together and soldered it to the kynar wire and used that to pull the servo wire though the arm.
Because of the narrow tube there isn’t enough space for 3 wires with heat shrink side by side so you need to trim the motor wires different lengths with about 10mm different from each other, that way the heat-shrink joints will be offset in a line and will actually fit in the arm, you will also need to un twist the motor wire so you can feed the motor bolt back in between the wires in the arm as its too narrow for them all to be at one side. use something like a pin or sim card tool to move the wires to the side for the bolt to fit don’t just jam it back in or you risk damaging the wire insulation.
Wiring the stack
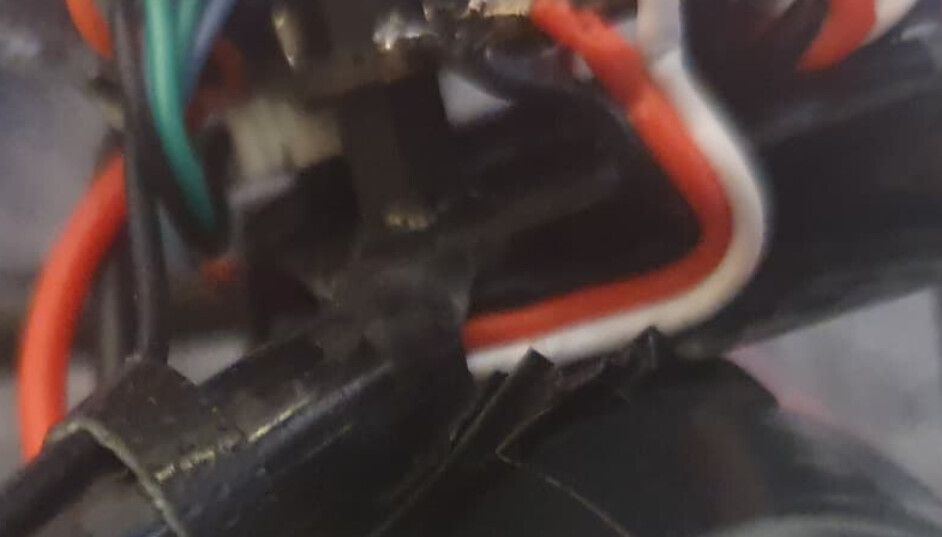
Solder the ends of the servo wire coming from the motors to the esc board.
Solder the BT2.0 Connector to some 26AWG wire then to the flight controller, dont make it too long as its weight will reduce flight time.
WARNING! check the pinout for the flight controller ESC output and the ESC inputs, the wire order isnt standard so you will probably need to repin it to get them to line up, if you connect Vbat to any of the servo channels your flight controller is toast.
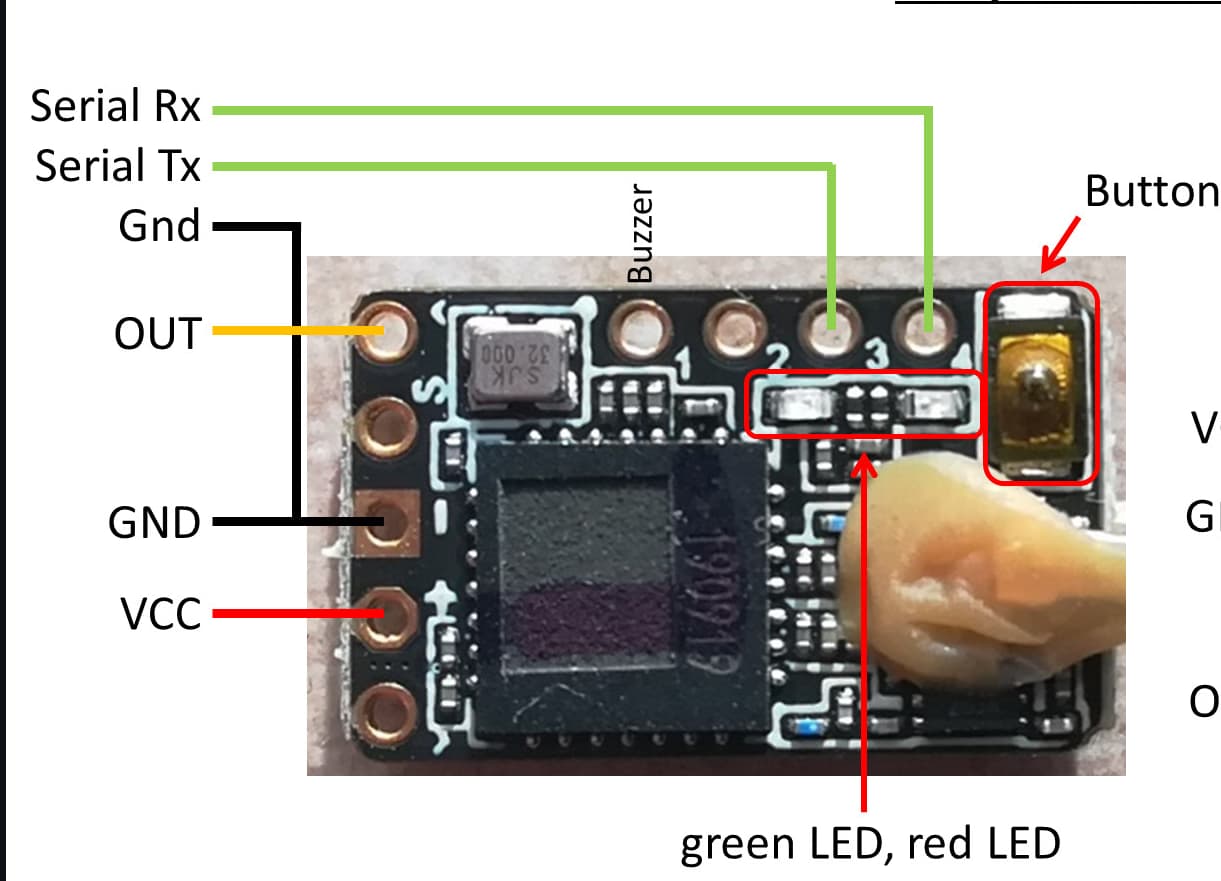
Solder the 5v ground tx rx sda scl wires from the GPS module to the flight controller serial port and i2c, remember tx to rx and rx to tx.
Solder the 5v ground video in and video out from your camera to the flight controller, connect the smart audio wire to a serial port TX pin if you camera supports it to enable VTX control.
Connect the R9MM and solder the sbus output wire to your flight controllers RC input and solder the the RX and TX pads to a serial port set to mavlink 2 @ 57600. (note that ardupilot serial port numbers don’t always correspond to the serial port numbers on the board).
Mounting the stack
Place the ESCover the standoffs you installed in the frame and secure it down using more m2 standoffs. take a long m2 nylon bolt and place it though the top plate that the camera mounts to then through the flight controller and secure into the standoff below.
Use some double sided tape to secure the receiver to the plate under the ESC and use cable ties to secure the RC antenna to the end of one of the rear arms. use some thin strips of tape to secure the coax to the arm.
Place the camera into its mount, to secure it melt the mount a little and bend the back of it in so it cant move or fall out out, a small dab of hot glue or small screws would also work (but more weight). then secure the mount to the top plate with some glue. offset the camera so that your lens is centre and not the camera itsself, super glue works but a small dab of epoxy would be better as super glue tends to crack and leave white marks.
Mounting the battery
This is really important on a quad as light as this the battery makes up 65% of the weight of the quad, so if it is allowed to move at all the quad will start to shake almost uncontrollably and loose its ability to hold altitude since the pids will be controlling a quad effectively a third of the weight and will massively over-correct. I used a pair of cable ties to hold the battery tight to the bottom plate so it cannot move.
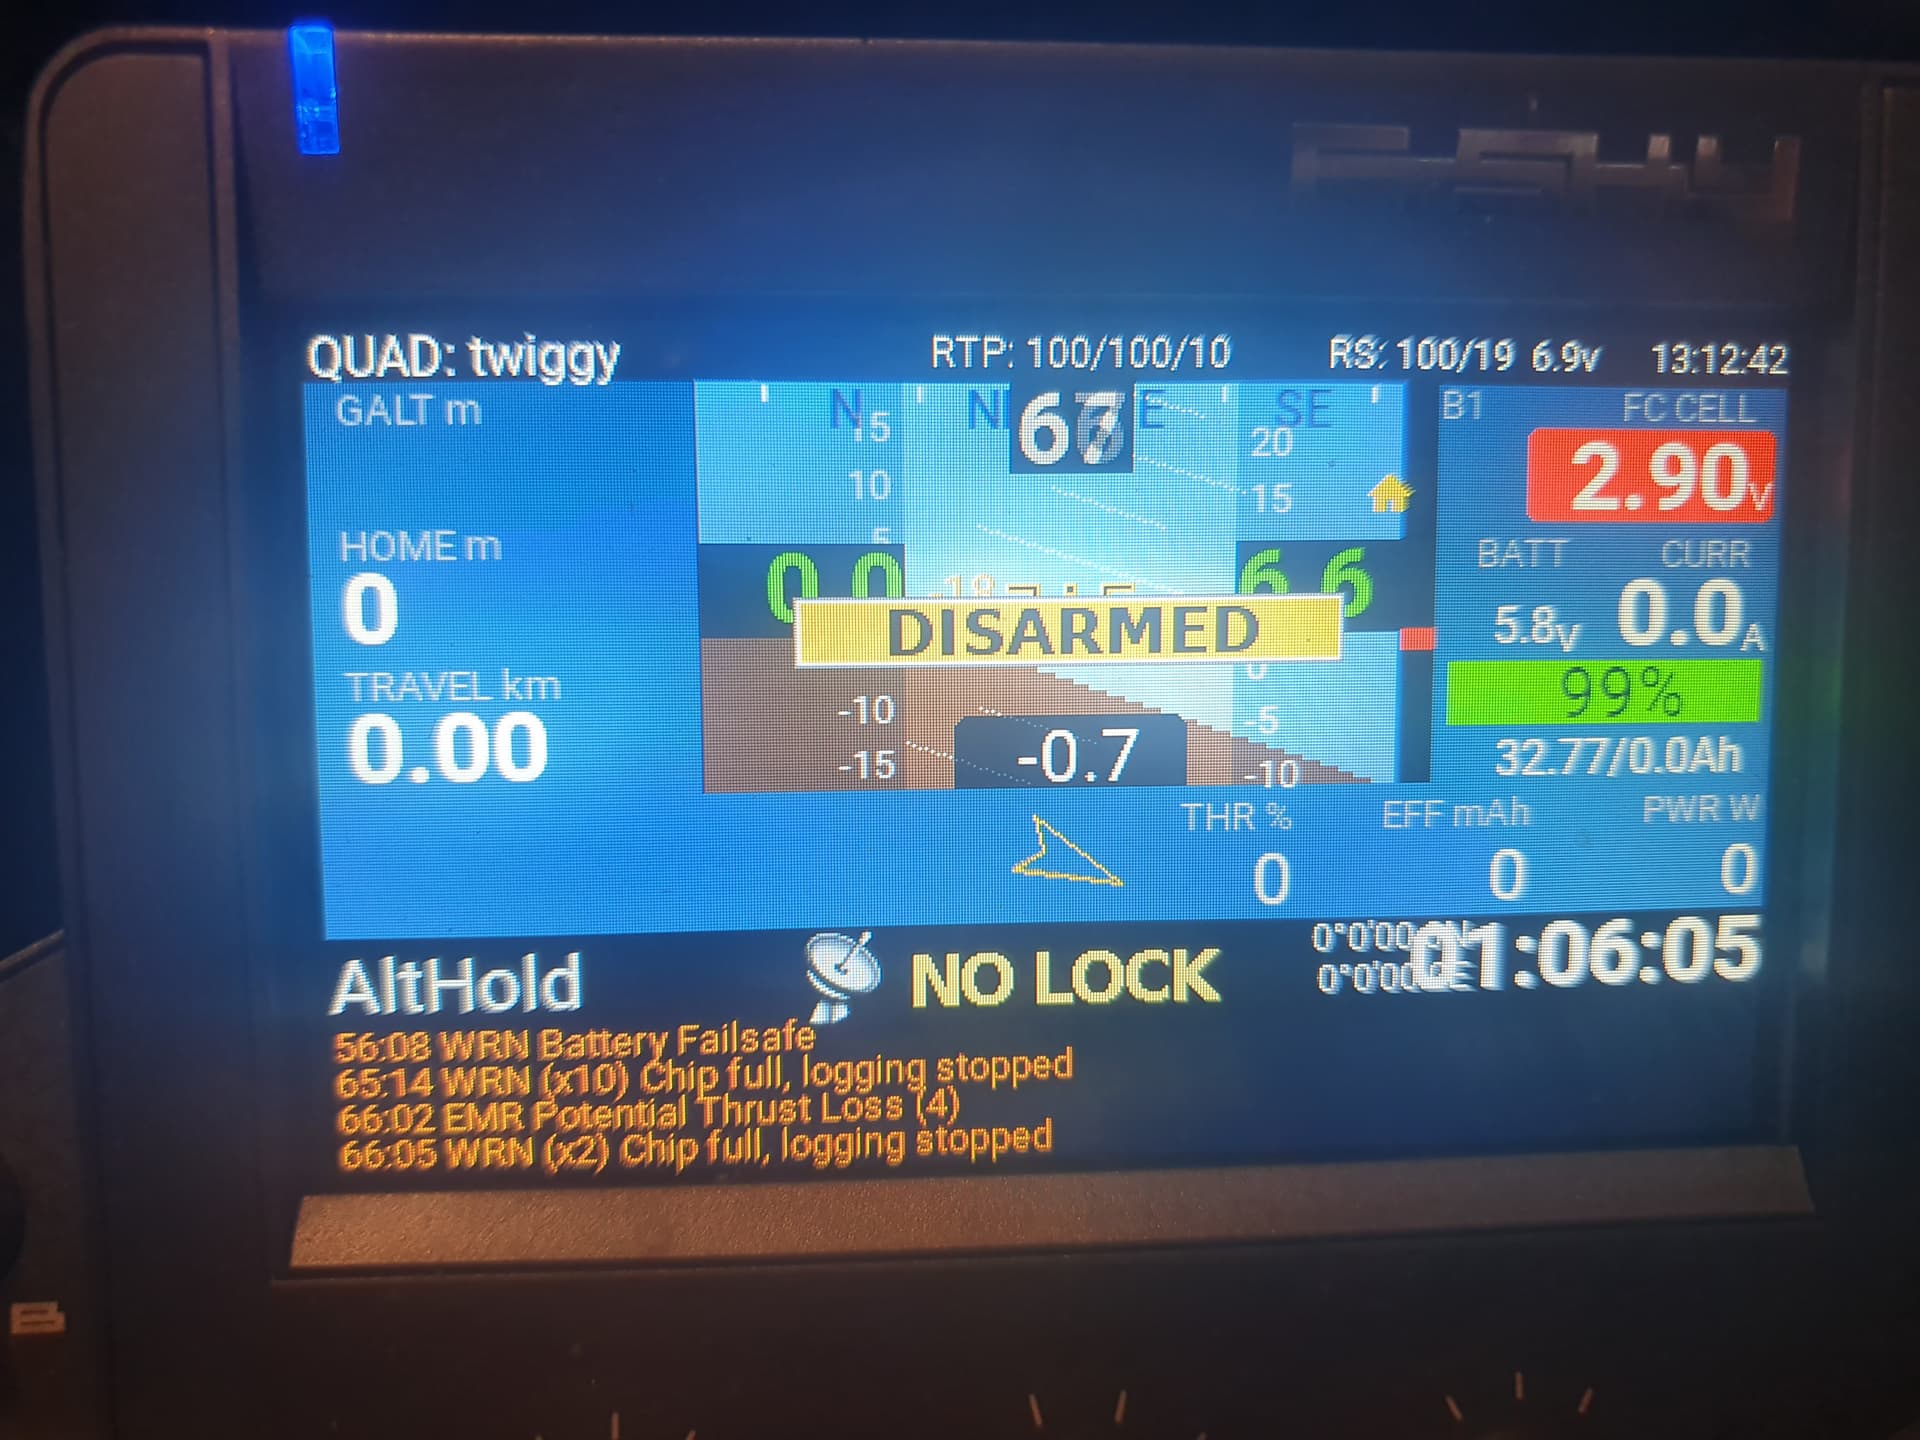
Verify you are getting telemetry from the flight controller by detecting sensors on your radio you should get link statistics and ardupilot data like GPS, voltages etc. if you are getting link data but no vehicle data then check what serial port your connected to and that its set for mavlink 2 @ 57600.
Verify your GPS and compass are working, you should see changing value for “magfield” and your GPS should say “no fix” rather than “no gps”
follow the mandatory hardware setup
https://ardupilot.org/copter/docs/configuring-hardware.html
Follow the methodical tuning setup guide. you can flash the esc with blujay firmware to enable BDSHOT on blheli-s ESCs.
with that built it should fly for over 1 hour at 233g with the 6000mah 2s pack.
Advanced
For more advanced builders there are some more options you can use to increase the flight time even more.
You can get ultralight carbon tube that will cut the weight of the frame from around 17g down to 9g, That should get another 3 or 4 minutes flight time.
Titanium M1.6 motor screws are about half the weight of steel screws, replacing all of them will loose around 1.5g
mount the battery pack edge on so it stays out of the prop wash.
Better motors would be from the DJI mavic mini series of quads, pretty much any of them will be good enough for an hour but for maximum flight time motors from the mini 3 pro or mini 4 pro would be the ones to get, they come with 6 inch propellers so you will need to make sure the frame you make has clearance for them.
AIO flight controller will save around 8g.
The cheapest lightest digital system at only 4.7g is a ESP32S3-cam running a wifi-broadcast style transmission on 2.4ghz @100mw using packet injection, with it running at 800x600 @ 30fps its very good for the price with a range of around 500meters, the camera doesn’t have great contrast so struggles with direct sunlight or darkness. For a ground station you need a raspberry pi with a pair of wifi adapters, the pi has HDMI and analog output, so you can plug it into whatever you have, usb HDMI capture cards can be found for under £10 if you want to connect it to a laptop tablet or phone. its currently a work in progress.
The CX-OF optical flow sensor is only around 1g so its something that would be suited to a build like this.
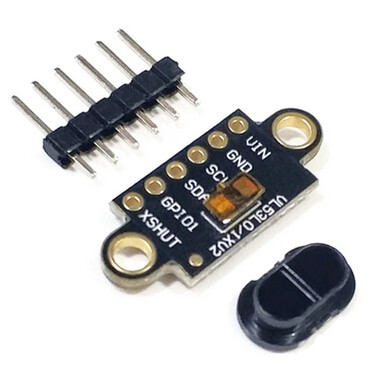
The only Lidar rangefinder I could find that was suitable was the VL53l1X as its the only one under 1g that has any significant range.
This is still a work in progress so it will be updated.
As it sits this is what I paid.
£10 6mm carbon tube
£8 0.5mm carbon plate,
£5 Araldite epoxy
£2* 4mm and 8mm M2 bolts.
£2* nylon m2 standoffs
£27 to build the frame, *approximate
£16 4x motors and propellers
£18 200mw AIO fpv camera
£21 GOKU GPS
£15 6A ESC
£17 2x 6000mah 21700
£ 2 BT2.0 connector
£20 r9mm receiver.
£32 speedybee F405mini
£ 1 heatshrink
£142 for the electronics including the battery
Frsky R9M modules can be found new for around £50 but I usually just pick them up off ebay for 30-40. and the backpack for it is around £5-20 depending on what version you want and how plug and play you want it.
so you can save money here if you look around or don’t mind doing some DIY.
£12 optical flow
£6 lidar
All those prices have import tax and shipping included so if outside the UK your should expect to pay around 20% less. £1 = 1.25$ usd so it should be close to usd.
I have been getting messages saying that this is impossible, another way to look at it is a mavic mini flies for 30 minutes with a 2500mah 2s battery at 250g, so if we take those motors and propellers then attach them to the lightest possible frame and electronics it leaves enough margin to double the battery without it weighing more than 250g. so if we double the battery without increasing the total weight above 250g then it will double the flight time giving 1 hour+.