I wasn’t going to share this publicly - it was more of a little family project and an opportunity for me to dive a little deeper into the ArduPilot ecosystem. But…I’m so incredibly impressed by ArduCopter’s out-of-the-box performance that I really wanted to share my experience. This first post might be a little longwinded - I hope it’s a good read.
I am a pilot by trade, but I don’t have much RC stick time. I’ve built and crashed a very small handful of cheap (and one expensive) planes, but none of them had more than a mildly functional gyro for basic “get out of jail” functionality. I’ve flown the cheap little toy helis with some degree of success. But I’ve never owned or flown a fully featured drone, and I wanted to try it out, with the end goal of having a half decent aerial video platform.
Enter this:
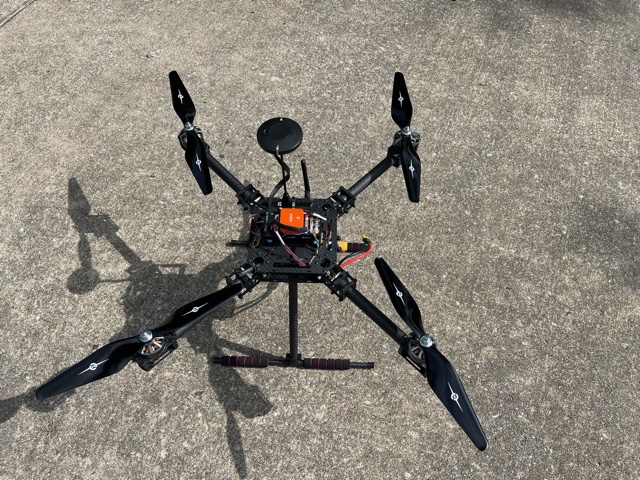
For a first build, I dove in pretty deep, I think! It’s a semi-scratch built 550mm series quad (if I understand the scale terminology correctly) with the obligatory Cube Orange running 4.0 (maybe 4.1 soon). It’s a mix of cheap, mid-range, and a few higher dollar components, some of which I already had on hand after multiple iterations of robot lawnmower experimentation. I included Amazon links to all the components below.
The physical build was very straightforward. It only took me a few days of off and on tinkering to cobble it all together. I spent more time than I care to admit learning about BlHeli, DSHOT, and the associated parameters, but that all came together nicely, and my ESCs now play Van Halen when I plug them in.
I was incredibly nervous to take a 2kg machine with 12" props and fling it into the air with a flight controller I’ve only ever used for 2D navigation. I expected one of two outcomes: I chose props that were too small, and it would barely fly…or it would immediately flip and send ~$1,000 of my hard earned ducats up in smoke. But…and this is why I’m writing…it f***ing worked like a champ!!!
The first flight was just a quick 3’ hover in Stablilize mode that I managed to land softly. After a few tweaks and some more confidence, I was flying it a little higher and a little farther with only the settings recommended in the documentation and no further tuning. I experienced a few mild toppled landings but really didn’t suffer any damage. After slightly more practice, that’s a thing of the past. Without tuning more, I figured I’d try AltHold and Loiter…again…success without any real tuning (in 8-12mph wind with occasional gusts!). It’s honestly astounding what the dev team has created here.
My only ArduPilot related hiccup was autotuning. I don’t know if the documentation is a little dated or if I’m just doing something wrong, but I was unable to test the new vs old PID settings as suggested on the autotuning page. If I made ANY flight mode change or switched out of autotune mode after receiving the “Autotune: Success” message, the algorithm would quit, and the settings would not save upon landing/dearm. I had to keep autotune enabled, leave it in whatever mode I used to tune, and land (at which point I discovered the beauty of landing in AltHold). All’s well that ends well, but I used a lot more battery than I expected through multiple, slightly painful cycles of autotune (cue T-Pain).
Ok, enough rambling for tonight - here’s the build sheet:
- Cube Orange (ADSB enabled) and this shock mount
- Here+ M8P RTK GPS module (no longer available - was a mower holdover)
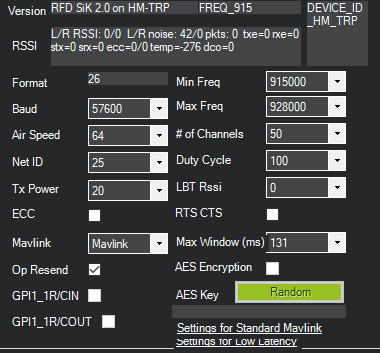
- SIK Telemetry Radios (plus these antennas - NOTE: you’ll need a SMA/RP-SMA adapters to use these antennas on the radios linked above- see follow on discussion below, including my silly mistake of not recognizing that at first!)
- This chincy GPS antenna mount (they work ok)
- ReadyToSky ZD550 Frame (watch this video)
- Lumenier Elite 60A BlHeli32 ESC
- Gartt ML3508 Brushless Motors
- Master Airscrew 1245 Props
- DuBro Prop Balancer (I have some thoughts on prop balancing for another post…)
- Yaapu Telemetry Cable (you don’t need this with the Cube Orange, but it makes it easy to switch between different serial devices without changing lots of settings)
- TBS Unify Pro 32 VTX
- TBS Triumph Pro FPV Antenna
- FrSky X8R Receiver (love this receiver - I also use it on my mower along with a Horus X12S transmitter)
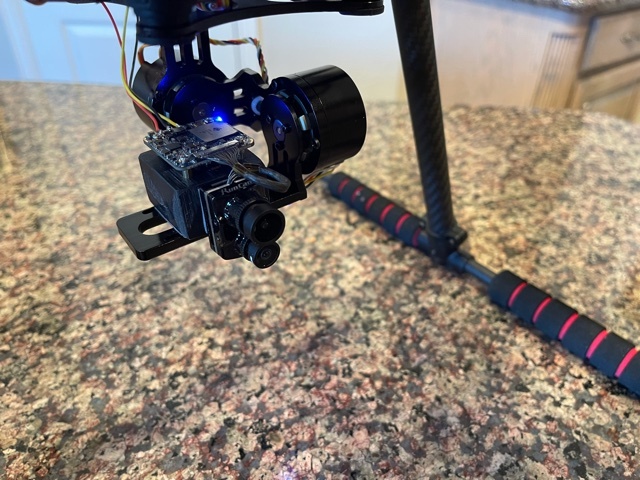
- RunCam Hybrid 2 FPV + HD Camera
- Cheap/knockoff BaseCam gimbal (jury is still out on this one)
- This stupid AVR programmer to deal with the BaseCam clone board’s firmware
- MinimOSD (hasn’t arrived yet - no idea if this is a good vendor)
- This FPV monitor
- Zeee 7000mAh 4S batteries
- Various assorted metric fasteners, lock nuts, LocTite, and JST/GH/XT60/servo connectors