The following is an experiment in building a cheap visual-navigation rover, with reasonable accuracy.
The rover is based around a Raspberry Pi running an Apriltag navigation system (see Aprilmav: Indoor Navigation for ArduPilot for details) and provides position and velocity information to ArduPilot. No other sensors (apart from the flight controller’s IMU) are required.
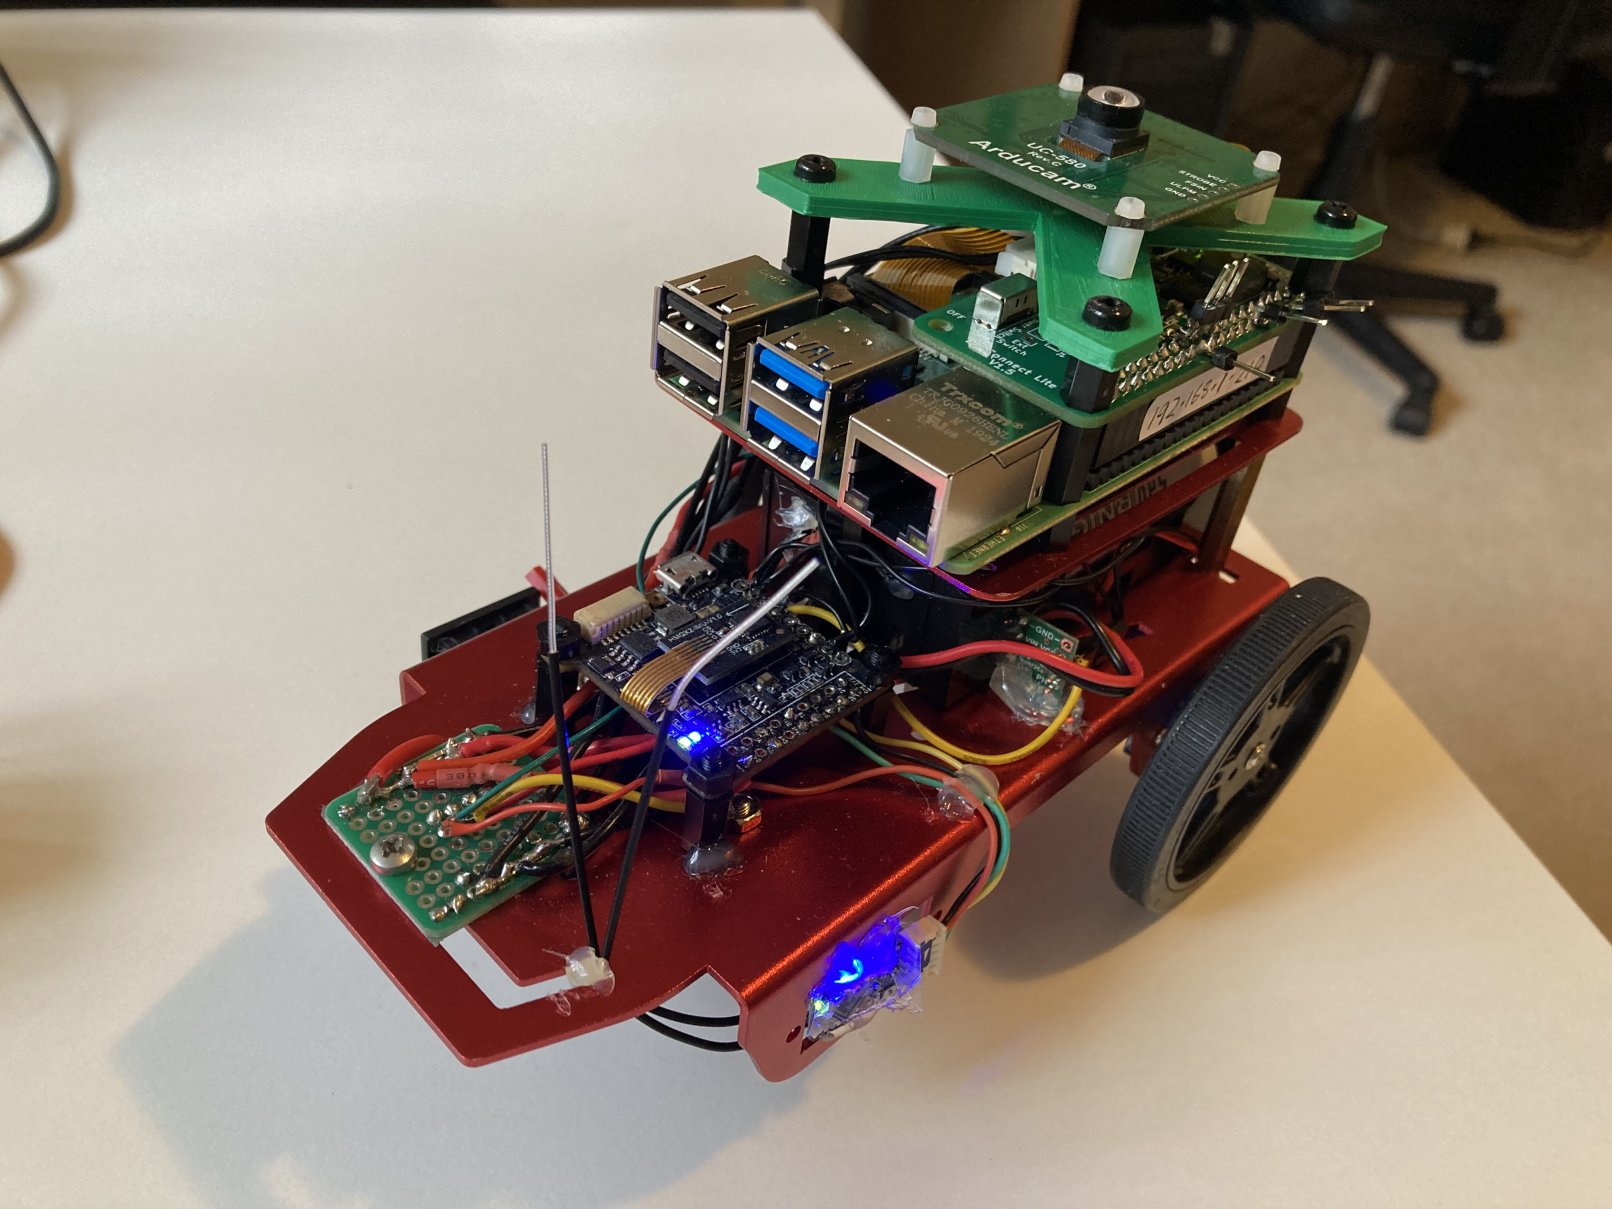
The hardware:
• Mini-Metal rover frame
• Raspberry Pi 4B (plus Pi-Connect Lite)
• ArduCam OV9281 camera
• KakuteF4 (or similar) flight controller
• 2x 18650 batteries & case
• RC receiver of your choice
• 2x DRV8838 motor controllers
Optionally, a power switch can be added at the battery.
Total cost should be around $300 AUD, noting that the Raspberry Pi’s price has risen significantly in some cases and may add an extra $50-$100.
Power
The 2x 18650 batteries should be connected in parallel to provide 7.4V power to the KakuteF4, motor controllers and Raspberry Pi (via Pi-Connect Lite).
Motor Connections
KakuteF4 PWM1 – DRV8838 EN (Left)
KakuteF4 PWM2 – DRV8838 PH (Left)
KakuteF4 PWM3 – DRV8838 EN (Right)
KakuteF4 PWM4 – DRV8838 PH (Right)
KakuteF4 +5V – DRV8838 VCC (Left and Right)
Battery + - DRV8838 VIN (Left and Right)
Battery GND - DRV8838 GND (Left and Right)
Other connections
The KakuteF4’s UART should be connected to the Raspberry Pi’s UART
RC Receiver as per Ardupilot Wiki
Loading firmware
As the KakuteF4 does not, by default, include support for Visual Navigation, the custom firmware generator can be used (https://custom.ardupilot.org/). Ensure the AHRS→Enable Visual Odometry and AHRS→Enable External Navigation for EKF3 options are ticked.
Normally, the KakuteF4 does not have enough free flash memory for these additional components. However, the rover firmware uses less memory than plane or copter. So there is a small amount of memory available.
ArduPilot Parameters
The motors are brushed-DC, in a skid-steer configuration:
MOT_PWM_TYPE     3
SERVO1_FUNCTION  73
SERVO2_FUNCTION  -1
SERVO3_FUNCTION  74
SERVO4_FUNCTION  -1
RELAY_PIN        51
RELAY_PIN2       53
The MAVLink telemetry connection between the Pi and KakuteF4, noting that alternate serial ports can be used if desired. A baud rate of at least 230400 is recommended in order to stream the visual navigation messages from the Raspberry Pi to KakuteF4.
SERIAL1_BAUD     230400
SERIAL1_PROTOCOL 2
Visual Navigation parameters:
VISO_DELAY_MS    150
VISO_POS_M_NSE   0.1
VISO_SCALE       1
VISO_TYPE        1
VISO_VEL_M_NSE   0.2
VISO_YAW_M_NSE   0.2

EK3_SRC1_POSXY   6
EK3_SRC1_POSZ    1
EK3_SRC1_VELXY   6
EK3_SRC1_VELZ    6
EK3_SRC1_YAW     6
Disable GPS and compass:
GPS_TYPE         0
GPS_TYPE2        0
COMPASS_USE      0
COMPASS_USE2     0
COMPASS_USE3     0
Using AprilMAV
The full instructions for getting started with Aprilmav are at GitHub - stephendade/aprilmav: Indoor navigation via Apriltags over MAVLink
In general, Aprilmav will determine the rover’s position and velocity measurements from the Apriltag positions. These measurements will be sent over MAVLink to the flight controller, where the EKF will fuse them with the IMU measurements.
Tuning
I found the following parameters good for throttle and steering:
ATC_SPEED_P      0.24
ATC_STR_ACC_MAX  180
ATC_STR_ANG_P    2
ATC_STR_RAT_FF   0.085
ATC_STR_RAT_MAX  180
ATC_STR_RAT_P    0.085
WP_PIVOT_ANGLE   60
WP_PIVOT_RATE    120
WP_RADIUS        0.1
WP_SPEED         0.12
CRUISE_SPEED     0.12
CRUISE_THROTTLE  26
Performance

The navigation accuracy is around 13cm, is shown in the above video. The stickers on the ground show the actual locations of the waypoints (1x1m square).
The limiting factor of the navigation accuracy is the velocity measurements. Aprilmav gives fairly noisy velocity measurements. Accuracy could potentially be increased by using a higher resolution camera (must be a global shutter camera, not a Pi Cam), however the Raspberry Pi 4 is at it’s processing limits with the OV9281 1MP camera. So it would be necessary to find a faster companion computer.
The second option would be to use wheel encoders for the velocity measurements, as shown in a previous post, gave slight better waypoint navigation accuracy.
As a <$300 platform it’s a solid setup for experimenting with visual navigation. Particularly when some flight controllers or visual sensors on their own may cost more that $300!