Unlimited range HD streaming with LTE

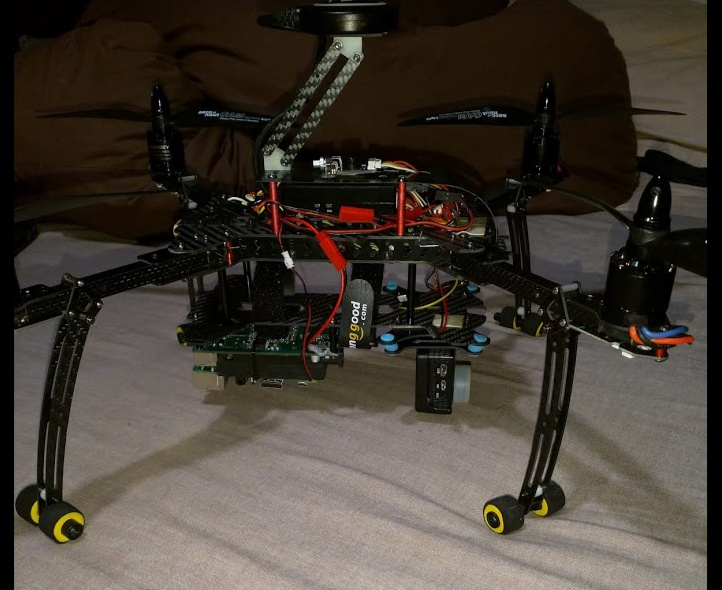
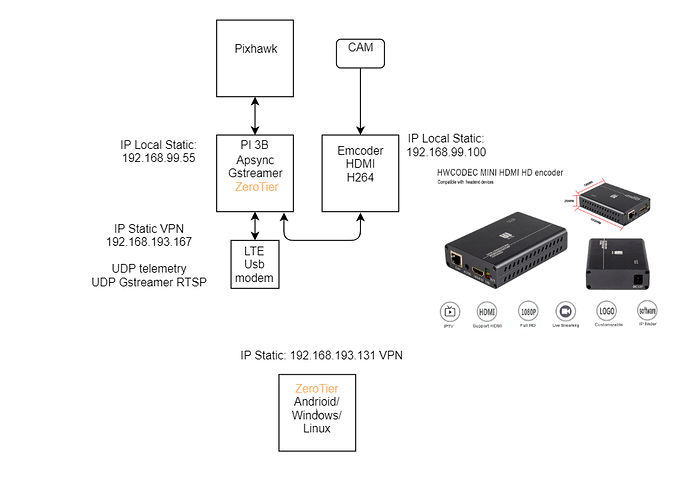
I successful build a quadcopter capable to comunicate with LTE Modem, Raspberry PI3 and encoder HDMI
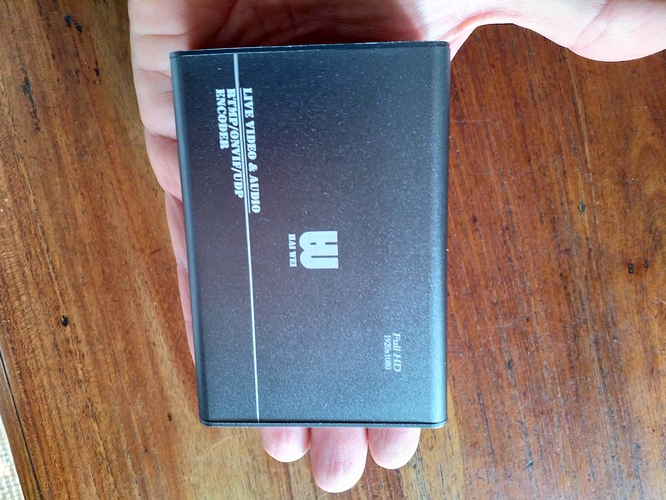
An Hardware encoder is used to compress an HDMI input to H.264 format
The protocols supported are : HTTP, RTSP, RTP, TCP, RTMP ,RTMPS , HLS, UDP multicast, unicast
Encoded size: Up to 1920*1080 60FPS
Video bit rate:5-60 fps
The VPN is created by ZeroTier , an awesome service to create a virtual lan in one step !
You can install on different platform , is available for Android/Windows/Linux

Raspberry run on Apsync image , and some changes are necessary

  1. Apsync installed on RPI3
  2. Disabled Wifi radio to prevent interference with RC 2.4G receiver
  3. Enabled port forwarding
  4. Added Iptables to route Encoder HDMI web configuration
  5. Added a Gstreamer pipeline to stream video from Encoder (RTSP) to UDP

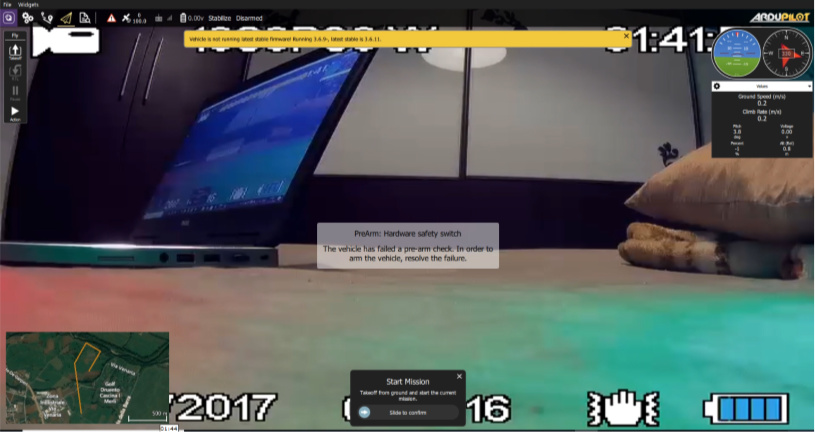
I tested telemetry and streaming on QCG (Android and Windows )
Streaming video also available on http ( VLC)

I’m pretty satisfied about the result ,the outdoor test is ok. The target were to have an HD streaming and telemetry without buy expensive radio devices. In the past I tried Wifibroadcast but I think is more easy and powerful assembly an LTE system.
Of course there are cons (3G/4G signals , latency ) , but in some situation can be considerate as alternative to other radio systems and theoretically it has an unlimited range.

Drone 4G LTE Ardupilot

13 Likes

Can you give more details into how you got this setup working. Thanks!

Part 1 - Apsync installation on Raspberry PI3

First you need to install Apysnc image on Raspberry PI3
Follow the instructions:
APSync — Dev documentation

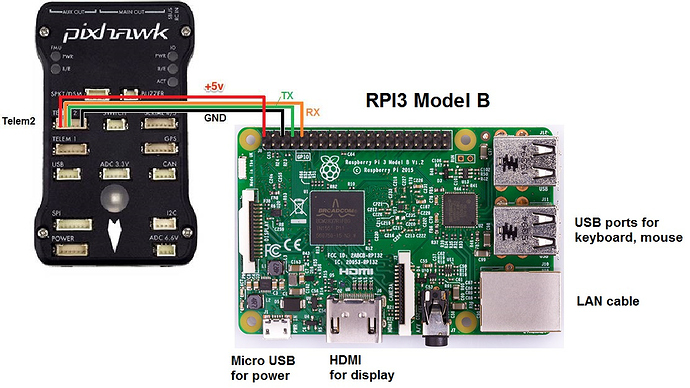
Wiring the telemety port ( Telem1,2, …) to RPI3 depend about your flight controller

When installed you can connect to the PI3 with a terminal emulator such as BitVise (Bitvise SSH Client | Bitvise) by connecting to the board’s wifi access point and then ssh to 10.0.1.128
username: apsync, password: apsync

BitVise : You can edit the scripts without use the terminal

Once connected to the WiFi network browse to http://10.0.1.128 (Configurations page)
If everything Is ok check the communication to the ground station
You can use Mission Planner or Qground control
By default the telemetry is sent from RPI3 by UDP port 14550 and baudrate is 921 (921600)
You must modify the baud rate of you telemetry port connected

The script used to configure the communication is under …\start_cmavnode \cmavnode.conf

The section used to configure UDP is

[to_14550]
type=udpbcast
sim_enable=false
bcastport=14550
bcastip=10.0.1.255
bcastlock=1

Note:
Next we will modify the section to change from broadcast to a static IP address (ZeroTier Network)

Part 2 -Check Video Streaming

When the first part is done , and everything work we need to check the gstreamer section
You can do test also without a CAM . Gstreamer is installed by default with Apsync

Check on console :

gst-launch-1.0 --version

The video streaming can be started from http://10.0.1.128:8000
We need to stop and disable the autostreaming

Note:
When you start the streaming from web page , the IP address of your client will be associated
So , if you change the client , you need to stop and start to join a new IP address

The script is under …\start_cherrypy\start_udp_stream
By default this script is used to start with a raspicam , we need to add new pipeline

Open the file ( If you have installed Bitvise you can edit without use the console )

Comment or remove the section raspvid

raspivid -t 0 -h 720 -w 1024 -fps 25 -hf -b 2000000 -o - |
gst-launch-1.0 -v fdsrc !
h264parse !
rtph264pay config-interval=1 pt=96 !
udpsink host=$STREAM_TO_IP port=$STREAM_TO_PORT

Add a new pipeline

gst-launch-1.0 videotestsrc is-live=true ! \
video/x-raw,framerate=30/1 ! \
videoconvert ! x264enc ! \
h264parse ! rtph264pay pt=96 ! \
udpsink host=$STREAM_TO_IP port=$STREAM_TO_PORT

Now you can start the streaming from web page
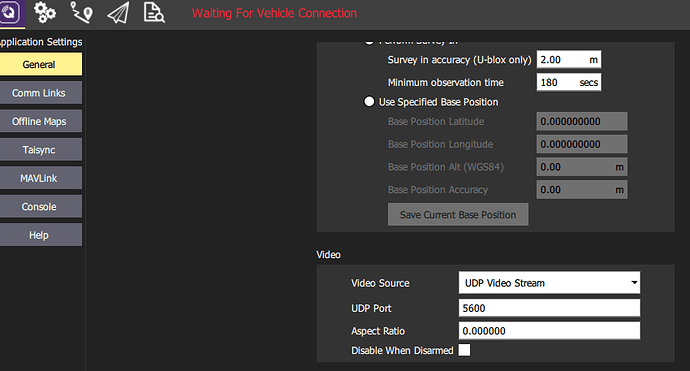
To test with ground control , I prefer QQC , there is a section to configure the video
By default the port is 5600 (Apsync)

If everything work go to the main page of QGC and you will se the test signal video

If you want to test a streming video It’s neccesary to have a USB Cam or raspicam
You can read UAVCast documentation to check the hardware requirment
https://docs.uavmatrix.com/hardware/

At the begin I used GIT2 Cam as PC cam
The compression is an hard job to do , better have a compressed H264 signal (not raspicam)

Next step i will explain:
Connect a LTE Usb modem ( Huawei E3372-153 )
Check internet connection
Install ZeroTier on RPI
Install ZeroTier on PC or another device
Modify the script cmavnode to send telemetry on VLAN
Modify the script start_udp_stream to join a cam or encoder H264

I suggest to buy an encoder when you will be able to have a good result with a CAM and LTE
5 Likes

Is this essentially the same thing as UAVcast?

Uavcast is a software to do same things but is not free. Uavcast encode the video with raspberry , i use a dedicate hardware.

1 Like

This is the cheapest way, but connecting all the components could be a mess and the total weight is quite high. Some thorough selection of the parts you can have a quite compact an lightweight system, which can have external antennas as well.

  • some u.fl/SMA pigtails and two decent LTE antennas and an 5V/3A BEC

This makes a quite small a compact LTE video and telemetry package. You can omit the HDMI CSI-2 converter board and use a raspberry cam, but the quality is quite potato and the cable is akward to route.

If you are not familiar with linux or just dont want to fiddle with it, then you can get UAVCast-pro which indeed not free but provides a well tought package for the same functionality. Of course free is king and getting the experience to put together a setup above is worthwhile.

Just keep in mind that LTE is not supposed to work correctly above 3-400meters. Plus be prepared to deal with small 1-5sec outages during flight caused by coverage and/or cell handover.

5 Likes

If you want to stream a video in HD you need to have a good compression , need to change parameters in a easy way
to adapt the best setings at your network. This encoder have two channel, one channel work as main stream 1080p (max) and a second channel
at 720p (max)
You can use both, for example the first channell coudl be used for live streaming ( you tube , facebook) or any RTMP server.
Raspberry maybe will have enough resource to do another jobs , dronekit or opencv

HWCODEC Full HD 1080P H.264 Encoder HDMI Encoder IP Encoder for YouTube, Facebook and Twich Live Streaming


I chose this device for size , light weight.

3 Likes

I agree with you about about the problems of a LTE system , also how to reduce the weight to build a light system. Personally i prefer don’t spend money in sofware as Apsync and ZeroTier do the same job then UAVCast (well done). I wanted save money to buy new hardware, and in my case the target was to improve the quality of video and have a long range . This is the demonstration how great is the our community and how everyone can start to developer something with the resources of ardupilot :wink:

2 Likes

@DomenicoPatella, this is one of the such guides that so many of us guys out here was waiting for. Good going :slightly_smiling_face::clap:

Now waiting for you to walk us through the second part of your guide regarding LTE, zerotier, Streaming etc…

There is one issue with the IP encoder. Rapsberry’s ethernet controller (before PI4) is connected to CPU via the internal USB2 HUB and shares bandwidth with all other USB devices, such as the LTE modem.
IN theory the bandwidth is enough to serve both but it put additional load on the processor.
On the other hand the internal GPU has a full H264 encoder which directly connected to the CPU.
So from CPU load perspective, using a HDMI/CSI-2 converter and the internal H264 encoder is more efficient than an external IP encoder.
An alternative to the IP encoder is an USB encoder which is V4L2 compatible, is shares USB bandwidth as well, but does not add the load of de-packing ip stream. (and cheaper :D) https://www.aliexpress.com/item/32918474933.html

2 Likes

I tried to read some information about CPU using and Bandwidth during the streaming, seems better than when raspberry encode the video. Anyway i’m not able to do some techincal comparison
This is a great information , i didn’t know about this issue with ethernet controller. The USB encoder is V4L2 compatible , antother great information … more cheaper and less weight !
I’m curious to try it

Hello,

I have a Navio2 with my Raspberry3. It use a customised Raspbian Strecht image (Emlid kernel).

Is there a way to manually install Apsync and settings, without need of your image?

Thanks for your work

I don’t have experience with navio . Pobably the best way is add files manually in your image . If you want streaming video you need to install Gstreamer . If you can connect GCS in ethernet is a good point to start add LTE modem and video.

Great writeup @DomenicoPatella.
Few comments:

  • For LTE modem, use a Huawei HiLink, typically E3372H That will save you allot of trouble as the HiLink are Plug & Play.

  • If you want to stream video to multiple destination you can add multiudpsink to the pipeline
    Example:

     raspivid -n -w 1280 -h 720 -b 1000000 -fps 15 -t 0 -o - | \
              gst-launch-1.0 --gst-debug-level=0 -v \
              fdsrc do-timestamp=1 ! \
              h264parse ! \
              rtph264pay config-interval=10 pt=96 ! \
              multiudpsink clients=192.168.1.100:5600,192.168.1.101:5600,192.168.1.102:5600 
    
  • For those who use Zerotier behind a multi NAT network may experience pixalating frames or grey overlay in the HUD. In mission planner you can add the bellow rtpjitterbuffer snippet to the HUD=>Video => Set Gstreamer source

     udpsrc port=5600 caps = "application/x-rtp, media=video, clock-rate=90000, encoding-name=H264, payload=96" ! rtpjitterbuffer ! rtph264depay ! avdec_h264 ! videoconvert ! video/x-raw,format=BGRA ! appsink name=outsink
    

    There is no solution for this in QGC yet, but hopefully soon.
    https://github.com/mavlink/qgroundcontrol/issues/5721#issuecomment-524446059

3 Likes

Thank @Sinamics for your valuable advices , you have developed Uavcast , a great software to offer LTE experience . Anyway the pixalating frames or grey overlay is a little annoying. True the rtpjitterbuffer solved the problem, i hope will be fixed in some next release of QGC . With the encoder H.264 i tried to change some parameter , with VBR and low key interval the result has been good.

1 Like

Does UAVcast use the GPU in the Raspberry Pi for H.264 encoding? Does the RPi 4B give markedly better performance than RPi 3?

I’m new to all of this. I’m just looking for a way to build a project where I don’t have to buy a monthly subscription to anything besides my home internet that I already have. Is that the case with your setup (or the OP’s setup for that matter?)

1 Like

I’ll tell you what’s amazing to me, besides the fact that we, the unwashed masses, have access to this amazing technology, but that here’s a guy that developed UAVcast, getting paid for subscriptions, yet he’s STILL here helping out people that want to do it this way. What an amazing community.

6 Likes

Will this also allow Control/telemetry over LTE?