QGC 4.4-rc5 is now available for beta testing.
The list of Pull Requests (aka PRs) included in this release vs 4.3 can be seen in the release PR and I’ve also attempted to list the most relevant below.
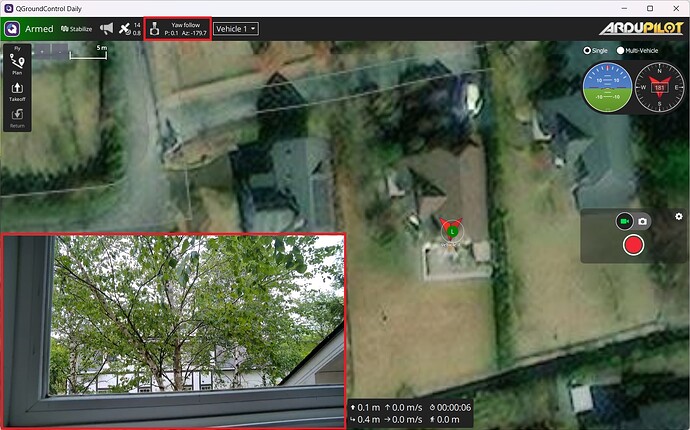
- Camera gimbal control screen (see below)
- Camera tracking functionality (PR)
- Firmware upload supports for Control Zero Classic (PR) and FMUv6x-RT ProductID (PR)
- GPS: init fix for RTK F9P driver when GPS is connected to GCS (PR)
- Joystick landing gear button support (PR)
- Offline map settings dragging fix (PR)
- Offline map fix for exported tile set file extention (PR)
- Polygon edge lengths shown when dragging vertex (PR)
- PID Tuning: charts remain visible on mobile (PR)
- RemoteId: validates EU operator ID (PR)
- Vehicle: display distance to next WP (PR)
How to Install
The release candidate 5 includes “Artifacts” including installers for Windows, Linux and MacOS. Herelink’s apk can be found here. To make it easier I have provided links below.
- Windows PC users can download and install QGroundControl-installer.exe.zip from here
- Linux/Ubuntu users should download QGroundControl.AppImage from here and then follow the regular installation instructions
- MacOS users should download QGroundControl.dmg from here and then follow the regular installation instructions found here
- Herelink users should download QGroundControl-Herelink.apk from here and then install similar to what is shown in this YouTube video.
We cannot currently provide betas for beta testing on Siyi MK15 and MK32, etc but hope to in the future.
Testing the new Camera Gimbal controls
All testing is appreciated In particular we would like help testing out the first item, the new camera gimbal control screen. Below are instructions for how it should work.
-
Ensure the autopilot is running ArduPilot Copter, Rover or Plane 4.5.2 (or higher)
-
Setup a camera gimbal as described on the wiki and confirm it can be controlled using RC. We have instructions for controlling using Mission Planner here and here. Once beta testing is complete we will add more instructions for using QGC.
-
Connect with QGC and confirm the new control tool bar appears along with live video. If you’ve never setup live-video with QGC before then it is likely both camera gimbal and QGC configuration is required which should be done outside the scope of this beta testing (e.g. let’s not confuse beta testing with first time setup issues).
-
Test the “Click-to-point” feature
- Click on the video thumbnail to make it the main view (e.g. big video, small map)
- Click on the Tool bar to display
- Click on Settings, Enable on Screen Camera Control, Click to Point and enter the camera’s FOV
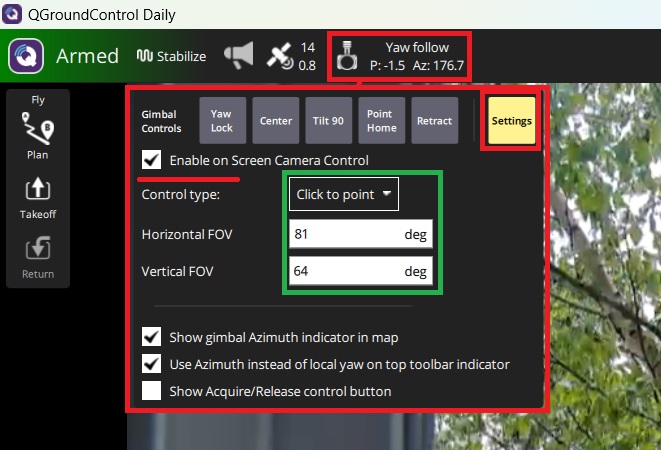
- Click on the video feed and confirm that the camera moves to point at what you click on
-
Test the “click and drag” feature:
- Click on the Tool bar to display
- Click on Settings, Enable on Screen Camera Control, click and drag and enter a “Max speed”
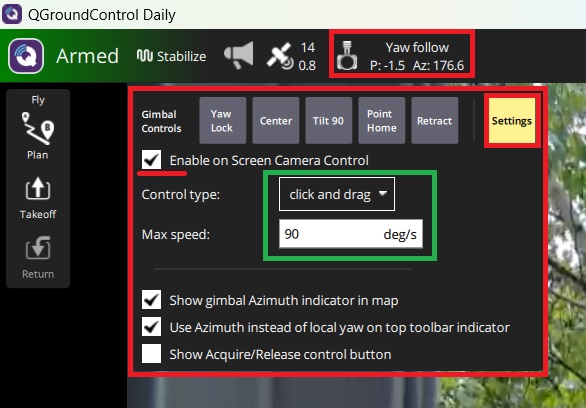
- Click and hold on the center of the video, move the mouse up, down, left and right and confirm the gimbal moves in the same direction as the mouse
-
Test the other buttons on the tool bar
- Yaw Lock / Yaw Follow: controls whether yaw is “locked” (e.g does not move with vehicle) or “follow” (moves with vehicles). This mostly only applies when using RC control.
- Center: gimbal points forward and changes to “follow” (e.g. rotates with the vehicle)
- Tilt 90: points straight down
- Point Home: points towards home. You can test this by clicking on the QGC map (away from the vehicle) and selecting “Set home here”. When a slider appears move it to the right. Next select this “Point Home” button and the gimbal should attempt to point towards the new home location.
- Retract: moves the gimbal to the angles in the MNTx_RETRACT_X (roll), Y (aka pitch), Z (aka yaw) parameters.
-
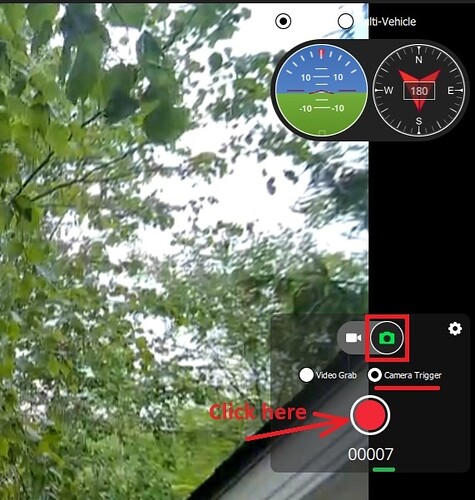
Test triggering taking a picture using the right-side camera controls as shown below. Each time a picture is successfully taken the number at the bottom of the control should increase.
-
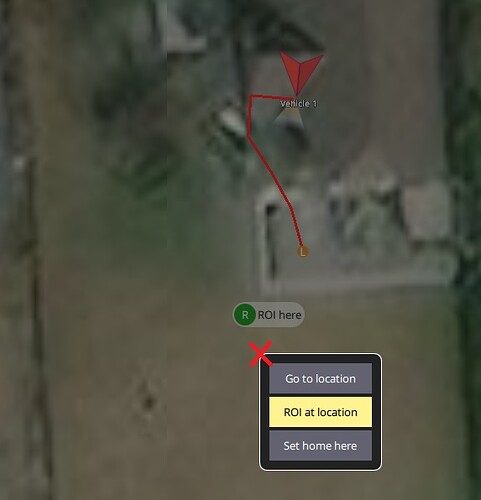
Test ROI by ensuring the vehicle is flying, then click on the map and select “ROI at location”. A “ROI here” icon should appear on the map and the gimbal should point at the location. If you click on the “ROI here” icon you may “Cancel ROI” or “Edit Position”.
-
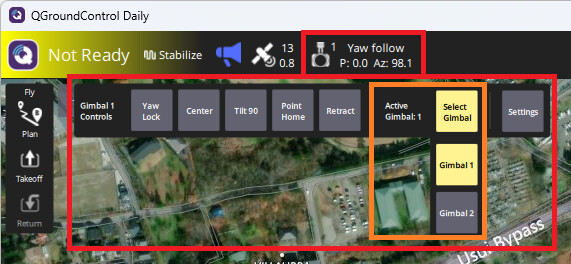
Test support for multiple gimbals by connecting and configuring two gimbals (e.g. set MNT1_TYPE, MNT2_TYPE). Once connected a new “Select Gimbal” drop-down should appear on the tool bar. Note that unfortunately we’ve found a bug in AP that may make it impossible to setup two Siyi or ViewPro gimbals.
Known Issues
Issues are being tracked on this QGC issue.
“Point Home” ROI can’t be cancelled, remains on map
“Point Home” appears not to use the correct altitude (camera points up or down)
Cannot trigger recording video from the camera controls
Reporting problems
All feedback both positive and negative is very welcome.
If you find issues please post them below or better yet, create a new topic within this category and ideally prefix it with “QGC 4.4” (or similar) so that I can quickly see if the report is related to this beta or not.
Thanks very much!
