")
1. Introduction
The GSoC 2019 project has added to ArduPilot’s arsenal full support for the Intel RealSense Tracking Camera T265 to be used as a plug-and-play Visual-Inertial Odometry (VIO) sensor to achieve accurate localization and navigation. Hence freeing up resources for the onboard computer to utilize for other high-level tasks, which would pave the way for even more amazing applications to be built upon.
We now have a suite of sensors at our disposal:
- Standalone 6-dof (200Hz)
- Accel (200Hz) & Gyro (62.5Hz)
- Dual fisheye monochrome (8-bit) streams @ 848x800 30FPS
(For additional info, here is the device’s datasheet).
In this project, we wil try our hand at a very old topic: precision landing. In a nutshell, image stream from one of the T265’s cameras will be processed to detect AprilTag visual marker, then we will follow MAVLink’s Landing Target Protocol that is supported by ArduPilot to perform precision landing. We will do it without (part 1, this blog) and with Robot Operating System (ROS) (part 2).
Let’s get started.
2. Prerequisite
Hardware
- A copter frame of choice.
- An onboard computer capable of polling image data from the T265, thus USB3 port is required. The Up board is what I am using, but the Jetson Nano or RPi 4 are also suitable alternatives for low budget setup. Unfortunately, the Raspberry Pi 3 which was used in previous blog posts is not suitable for this project.
- A downward facing Realsense T265 camera, with USB port pointing to the right of the vehicle. Different camera orientations can be used as well, however some modifications are involved.
Software
-
Follow the VIO camera for non-GPS navigation wiki until you have a stable system capable of hovering in Loiter. Regarding general troubleshooting and tuning, please post questions on the forum https://discuss.ardupilot.org/ or below the corresponding blog post.
-
Before you move on, make sure that you have a system with:
- MAVLink connection between onboard computer and ArduPilot.
- Working
librealsenseandpyrealsense.
3. How does it work?
How to perform localization and navigation
The main script t265_precland_apriltags.py is built on top of the existing t265_to_mavlink.py script, the content of which is thoroughly explained in this blog post, so check it out for explainations on how to attain accurate localization and navigation.
How to perform precision landing
Here’s an overview of the steps needed to add precision landing capabilities to our system:
-
First, we follow the
t265_stereo.pyexample to optain the undistorted images from T265 fisheye images, intrinsic and extrinsic params in OpenCV.


-
Next, AprilTag detection algorithm is run on the undistorted images to obtain the tag’s pose relative to the fisheye lens. We will use the duckietown’s Python wrapper for AprilTag 3 to ease up the workflow in Python.

-
If the landing tag is detected in the image, precision landing is performed following MAVLink’s landing target protocol. For ArduPilot, only
LANDING_TARGETfields relative to the captured image are supported.
Note: It is implicitly assumed that the camera’s x axis is aligned with the vehicle’s y axis (to the right) while the camera’s y axis aligned with the vehicle’s -x (to the back). This is the same as pitching the camera down 90 degrees from facing forward. If your camera is oriented differently, then a transformation is mandatory. For reference, here’s the T265’s coordinates (note the fisheye’s axes), whereas the FCU’s local frame is (X Forward, Y Right and Z Down).
- Finally, follow the ArduPilot precision landing with IR-Lock wiki for instructions on how to actuate the landing process.
4. Instructions
Prepare the tag
We will use the tag image as provided in rs-pose-apriltag sample in librealsense. Here is the link for the pdf.
Print the pdf file above on a letter size paper. The tag size (the black part of the tag) on the paper should be 0.144m. Fix the tag to some landing pad or fix the tag to the ground. Make sure the tag won’t get blown away when the copter is descending.
It goes without saying that the tag size and id can be anything according to your requirements. All you need to do is modify the corresponding params, which we will discuss later on.
A stupendous amount of other tag options can be found here.
Install AprilTag 3 library
Clone the official repo and install the library with:
cd ~
git clone https://github.com/AprilRobotics/apriltag.git
cd apriltag
cmake .
sudo make install
The default installation will place headers in /usr/local/include and shared library in /usr/local/lib. Python wrapper will also be installed if python3 is installed.
Install other required packages
pip3 install transformations
pip3 install dronekit
pip3 install apscheduler
Download the scripts
cd /path/to/some/directory
wget https://raw.githubusercontent.com/duckietown/apriltags3-py/master/apriltags3.py
wget https://raw.githubusercontent.com/thien94/vision_to_mavros/master/scripts/t265_precland_apriltags.py

chmod +x t265_precland_apriltags.py
Modify the main script t265_precland_apriltags.py
-
If you have sucessfully followed the VIO wiki, all of the params that you use in the
t265_to_mavlink.pyscript can be brought over. -
The following new params are related to AprilTag detection:
tag_landing_id, default is0. We will only land on the tag with this id.tag_landing_size, default is0.144. This is the tag’s border size, measured in meter. Change it to your specific tag setup. Reminder: for AprilTag, the tag size is the dimension of the black part of the tag.tag_image_source, default is"right". For the Realsense T265, we can useleftorrightcamera. You might find it useful to choose the camera with the least obstruction in its view, for example the landing gear.landing_target_msg_hz_default, default is20. This is the rate at which theLANDING_TARGETMAVLink message will be sent to the flight controller. As noted in the MAVLink wiki, the rate depends on the landing speed and desired accuracy; start with rates between 10 Hz and 50 Hz and tune performance as needed.
Viewing the AprilTag detection image
If you have a monitor connected to the companion computer:
- Run the script with
visualizationoption enabled:python3 t265_precland_apriltags.py --visualization 1 - A window will pop up, showing the already processed image. If the tag is in the image’s view, there will be the tag’s id and a bordering rectangle in the image as well.
If you don’t have a monitor connected:
You can view the image through the ssh connection with X11 Forwarding.
- First, enable desktop sharing option on the companion computer, here’s an example. Depends on your setup, you might need to tinker around a bit.
- Next,
sshto the companion computer from your host computer. Work best with Ubuntu host computer.ssh -Y <username>:<ip> - Now you can run the script with
visualizationoption enabled:python3 t265_precland_apriltags.py --visualization 1
ArduPilot params
- The params required to facilitate VIO flight are documented in this wiki.
- Set the following parameters through Mission Planner (or other GCS) to enable the precision landing feature and then reboot the flight controller.
PLND_ENABLED = 1 PLND_TYPE = 1 - Setup the vehicle with one of the flight modes to
LAND.
Run the script
-
For serial connection: set udev rules in order to get the USB available and allow permission to serial:
sudo chmod 666 /dev/ttyUSB0 -
When all params are set correctly:
python3 t265_precland_apriltags.py
5. Ground and Flight test
Ground test
Hold the vehicle on top of the landing tag and check on your GCS:
Verify that ArduPilot is receiving landing_target data
- In the
sshterminal: when the tag is in the camera’s view, there will be a stream of messages begin withINFO: Detected landing tagfollowed by the tag’s position in the camera’s frame. - Check that ArduPilot is receiving position data by viewing the topic
LANDING_TARGETon GCS. For Mission Planner, pressCtrl+Fand click onMAVLink Inspector, you should be able to see data coming in underVehicle 1.
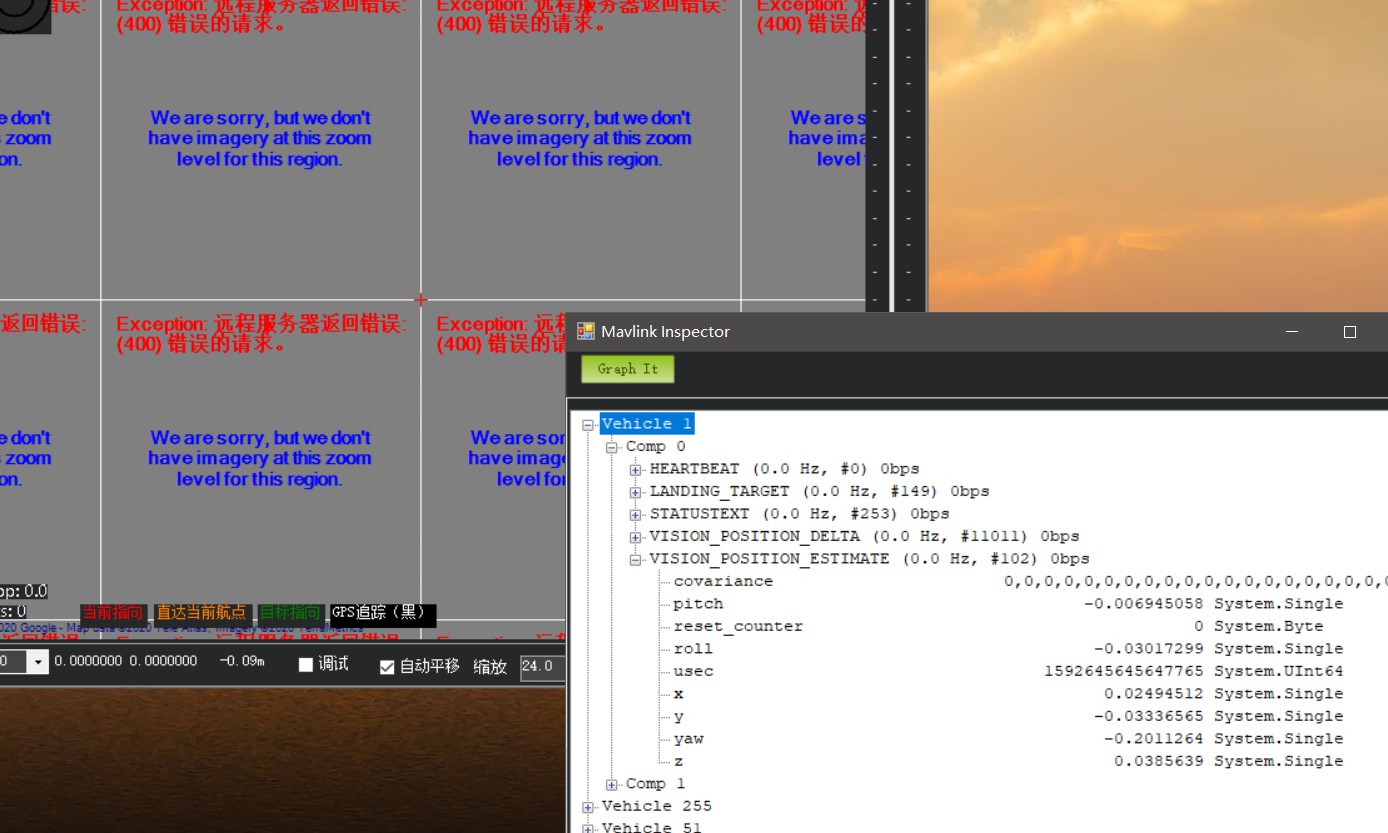
Verify that ArduPilot is receiving pose data
- Similarly, check that the message
VISION_POSITION_ESTIMATEis coming through to the flight controller.
Verify that ArduPilot is receiving confidence_level data
- View the topic
VISION_POSITION_DELTAon GCS, fieldconfidenceshould show the remapped value of confidence level. The confidence level should start atMediumand change toHighafter
Flight test
- For downfacing configuration of the Realsense T265, there is a problem with inconsistent yaw angle between runs. The temporary fix is to tilt the nose up a little, so that the camera is not facing flat down, when the script starts. Once the FCU starts receiving vision messages, the vehicle can be put flat on the ground.

- Take-off and hover above the target.
- When target is detected (see above about verifying that ArduPilot is receiving
landing_targetdata), you can switch the vehicle toLAND. - If everything is working properly, the copter should move towards, then land on the tag.
- As usual, be prepared to retake control if there are sudden unexpected movements (Change mode to Stabilize, AltHold or Loiter).
- If all is well, some successful tests can be seen below:
6. Next time
We will explore how to achieve the same goal in ROS. Thanks to ROS’s modularity, the software components are really easy to learn and modify. However, not everything is ready-to-go for our use case, and some developments are still required on our part.
7. Useful links
- A quick overview of AprilTag: link
- Many useful infos regarding precision landing are gathered in this discussion: How to use Precision Landing feature with companion computer?
- More tuning instructions related to precision landing can be found in the wiki: Precision Landing and Loiter — Copter documentation