I would like to show my work (in progress) on a simple system capable to realize indoor autonomous flight.
The system is based on a quadcopter with a camera that stream video (and telemetry) to a desktop PC and receive pose estimation message and command from the same PC.
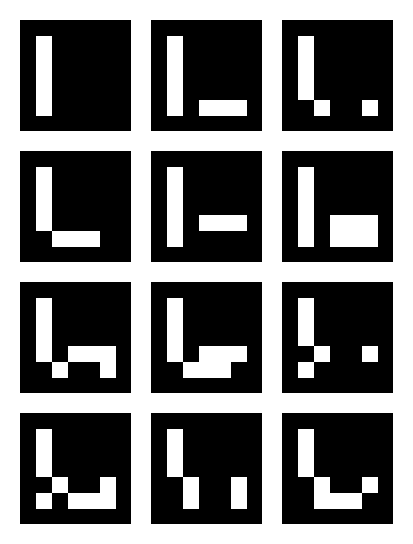
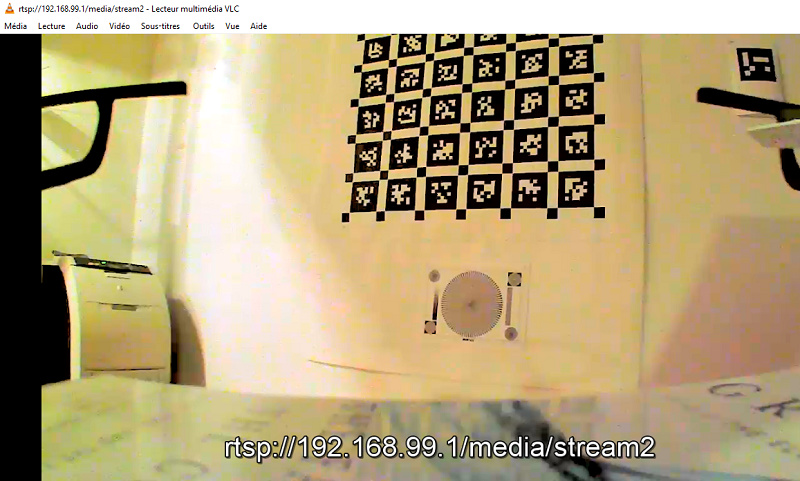
The camera is downward looking and on the floor there is an Aruco Boards like this:
The pose estimation is calculated by aruco_gridboard ROS package on the PC and the relevant messages are sent back to the quadcopter using mavros ROS package.
The Flight Controller and the Raspberry Pi 0 on the quadcopter are connected via serial port whereas the Rapsberry Pi 0 and the desktop PC are connected via WiFi.
Some more info on my system:
A little quadcopter (130mm) with RevoMini FC with Arducopter 3.7-dev with @chobitsfanPR. Some relevant parameters on my quad:
AHRS_EKF_TYPE 2
EKF2_ENABLE 1
EKF3_ENABLE 0
EK2_GPS_TYPE 3
EK2_POSNE_M_NSE 0.1
EK2_EXTNAV_DELAY 80
GPS_TYPE 0
COMPASS_USE 0
VISO_TYPE 0
On the quadcopter there is a Raspberry Pi 0 (connected to FC with serial port) and a Raspberry Cam streaming video to Desktop PC via WiFi
on mavros/mavros/launch/apm.launch change the fcu_url to communicate with telemetry port on FC via ser2net proxy (see above) <arg name="fcu_url" default="tcp://192.168.10.16:2000" />
The video is streamed from Raspberry Pi with gstreamer and, on the PC, the node gscam get this stream and publish camera/image_raw and camera/camera_info topics.
On the PC aruco_gridboard (slightly modified by me) subscribe to the above topics and publish a camera_pose message to the mavros/vision_pose/pose topic.
SET_GPS_GLOBAL_ORIGIN and SET_HOME_POSITION messages (similar to this 1) are sent before starting to use the system.
Excellent progress and nice blog that makes it easy to replicate , congratulation !!
Thanks as well to @chobitsfan and @Subodh_Mishra for their collaboration on this.
Just bought a Skyviper Scout to implement as a ‘‘standard’’ indoor test platform, so anyone can start experiment. (I think @chobitsfan is flying with this model as well ?).
Note: I didn’t criticize or review skyviper scout here. I just share my experiment. Scout is really a good, very affordable copter.
I found flash size in scout seems smaller than v2450 (only 512k, I think). It seems not possible to flash current master to scout even disable all features in APM_Config.h. After removing unused libraries, I was able to flash current master to scout. But flying performance with external navigation data (ATT_POST_MOCAP) seems very poor, in the same setup and compare to v2450. I am still testing it.
@Subodh_Mishra yes now I use aruco_gridboard which detect aruco board of markers with less noisy pose estimation. aruco_mapping use more then one marker to map the environment in which they are posed (this is a feature that aruco_gridboard doesn’t have) but the pose is estimated from a single marker each time and so is noisier.
It surely would be. It’s probably a little bit complicated in one single video. There is ROS to setup, explain mavros, explain gstreamer. Not to mention the “non-standard” versions of the autopilot to flash.
I’m thinking to go towards ROS installation and setup for one of the next videos and let’s start from there.
Sounds like a good start, revisiting your latest lab; aruco the ‘‘ROS Way’’ with usb_cam & monocular calibration & aruco Tag (or board). May I suggest you go with catkin build (much easier than catkin_make) .
Then gstreamer over wifi (@fnoop could certainly help on this) capture to openCV python.
Last would the process and control loop, there is still some work to do here, but for the sake of standardization MavROS would be the preferred path. As for the ‘‘special build’’ hopefully this will be in master with DELAY parameters or an automatic sync with the EKF using time from the camera pose system.
What makes this type of lab really interesting is the fact that the processing is not onboard , making it affordable to run from a variety of vehicles on a desktop/laptop and it much easier to build as most of the modules are apt-get install type.
@ppoirier and @tiffo I don’t know if all the step delineated by @ppoirier will become video tutorials anyway I will be available to provide further details.
Beginning with gstreamer over WiFi part:
I’am using a dedicated router as access point, with only my desktop PC on ethernet and the Raspberry Pi as WiFi client. From my test this configuration gives less latency then that in which the Raspberry Pi is configured as access point and the desktop PC connect via USB-WiFi device.
On The Raspberry Pi I launch this gstreamer pipeline: gst-launch-1.0 -v rpicamsrc bitrate=10000000 rotation=180 exposure-mode=10 awb-mode=0 awb-gain-red=1 awb-gain-blue=2 iso=800 shutter-speed=10000 contrast=50 ! "image/jpeg,width=640,height=480,framerate=30/1" ! udpsink host=192.168.10.16 port=9000
rotation=180 is due to the way my cam is mounted and the other parameter serves to have fixed value for exposure and gain and high contrast that gives a better marker detection.
On desktop PC gscam ROS node has the following parameter to receive the stream: <env name=“GSCAM_CONFIG” value=“udpsrc port=9000 ! jpegdec ! videoconvert”/>