Hello everyone. I am excited to share the midterm result of the custom controller implementation. First I would like to thank my mentors @iampete and @tridge for their valuable feedback and help through the project.
This blog post explains the custom controller implementation’s first half result. The first half aim was to allow a systematic and easy way to implement custom controllers by hand coding. Multiple custom controller implementations are also made to be used as an example.
Summary
Custom controller library allows you to implement and run your own controller inside ArduPilot in a systematic way. Original-primary-mains means existing controller and custom-secondary means new controller. This library aimed to not interfere with other parts of the main controller or vehicle level code. The controller output is sent to the control allocation library, known as the mixer, the same way the main controller does.
Features
The custom controller has the following feature to allow flexible and safe testing.
- In-flight switching between main and custom controller with RC switch, option 109.
- Bitmask to choose which axis to use the custom controller output
- Filter, integrator reset mechanism when switching between controller
- Bumpless transfer when switching from custom to the main controller
- Ground and in-flight spool state separation to avoid build-up during arming and take-off with the custom controller
- Frontend-backend separation that allows adding a new controller with very little overhead
- Flag to compile out custom controller related code
- Proper parameter table implementation that allows adding new custom controller parameter table without corruption
- Single parameter to switch between different custom controllers, reboot required
- Multiple checks to avoid accidentally running mis-un/configured custom controller with RC switch
- Custom controller parameters start with
CSC_in the GCS.
The frontend library has the following parameters
-
CSC_CONT_TYPE: choose which custom controller backend to use, reboot required.- Setting it to 0 will turn this feature off, GCS will not display parameters related to the custom controller
-
CSC_AXIS_MASK: choose which axis to use custom controller output- This is a bitmask type parameter. Set 7 to use all output
Interaction With Main Controller
The custom controller update function is called after the main rate controller is run and before the motor output library is called. This placement allows overriding motor library mixer input, namely _roll_in, _pitch_in, _yaw_in values, without causing functional change inside the motor library. This is the same way the main controller sends its output to the control allocation library, known as a mixer. This reduces latency to the minimum level.
The custom controller library uses the same target attitude as the main controller. Most of the code inside AC_AttitudeControl library is related to input shapings such as how to interpret pilot commands depending on the flight mode or high-level position controller output. For example, in STABILIZE mode pilot RC commands are scaled based on maximum lean angle and yaw rate parameters, these values are passed to input_euler_angle_roll_pitch_euler_rate_yaw function. The pilot command is fed into a first-order input shaping algorithm to smooth out any jitter due to RC link and to generate an acceleration-limited attitude target. Later, attitude controller attitude_controller_run_quat is called and attitude error is calculated based on acceleration limited _attitude_target value, and target rate is generated. Even if acceleration limiting is turned off by setting ATC_RATE_FF_ENAB to 0, the target attitude is still presented with _attitude_target variable.
Every input shaping function inside AC_AttitudeControl calls attitude_controller_run_quat at the end to run the attitude controller, except when flying in ACRO mode with the acro option set to rate only. Even in this case _attitude_target is updated properly and pilot command can be accessed via rate_bf_targets() function.
By default, the input shaping algorithm is turned on which produces kinematically consistent attitude target and rate feed-forward values. Take a look at the custom PID backend to see how rate feed-forward is added to attitude controller output. It is advised to use the rate feed-forward value if ATC_RATE_FF_ENAB is enabled, otherwise the pilot might feel significant lag between RC command and vehicle response.
After running the custom controller, mixer input is sent to the motor library via set_roll, set_pitch, set_yaw functions.
Bumpless Transfer
When switching from the custom controller to the main controller it is important to reset the main controller target, error, d-term filters and set each axis integrator properly. Otherwise, a sudden jump in the controller error signal or motor output will be observed, which could result in a jerky motion. To allow a smooth transition between controllers, the main controller reset function is called when switching out of the custom controller reset all three axis of the main controller.
The attitude target and rate target are also made equal to the current attitude and gyro rate to make the error signal grow from zero. In order to avoid impulse input to the controller, the target resetting is not performed when the feedforward is disabled by setting ATC_RATE_FF_ENAB parameter to 0.
The reset is performed inside reset_atti_controller function. An example of reset per axis is given here.
_atti_control->get_rate_roll_pid().reset_filter();
_atti_control->get_rate_roll_pid().set_integrator(_atti_control->rate_bf_targets().x - gyro_latest.x, _motors->get_roll());
Example of bumpless transfer when switching between controllers is given below. The 400 Hz attitude logging is enabled for this test. The SITL test is conducted while flying in CIRCLE mode since the aircraft a has constant motion on all axis.
This graph shows the rate controller error signal when switching from the custom controller to the main controller. Each axis’s target values are reset to the current attitude and rate which makes the error signal zero.
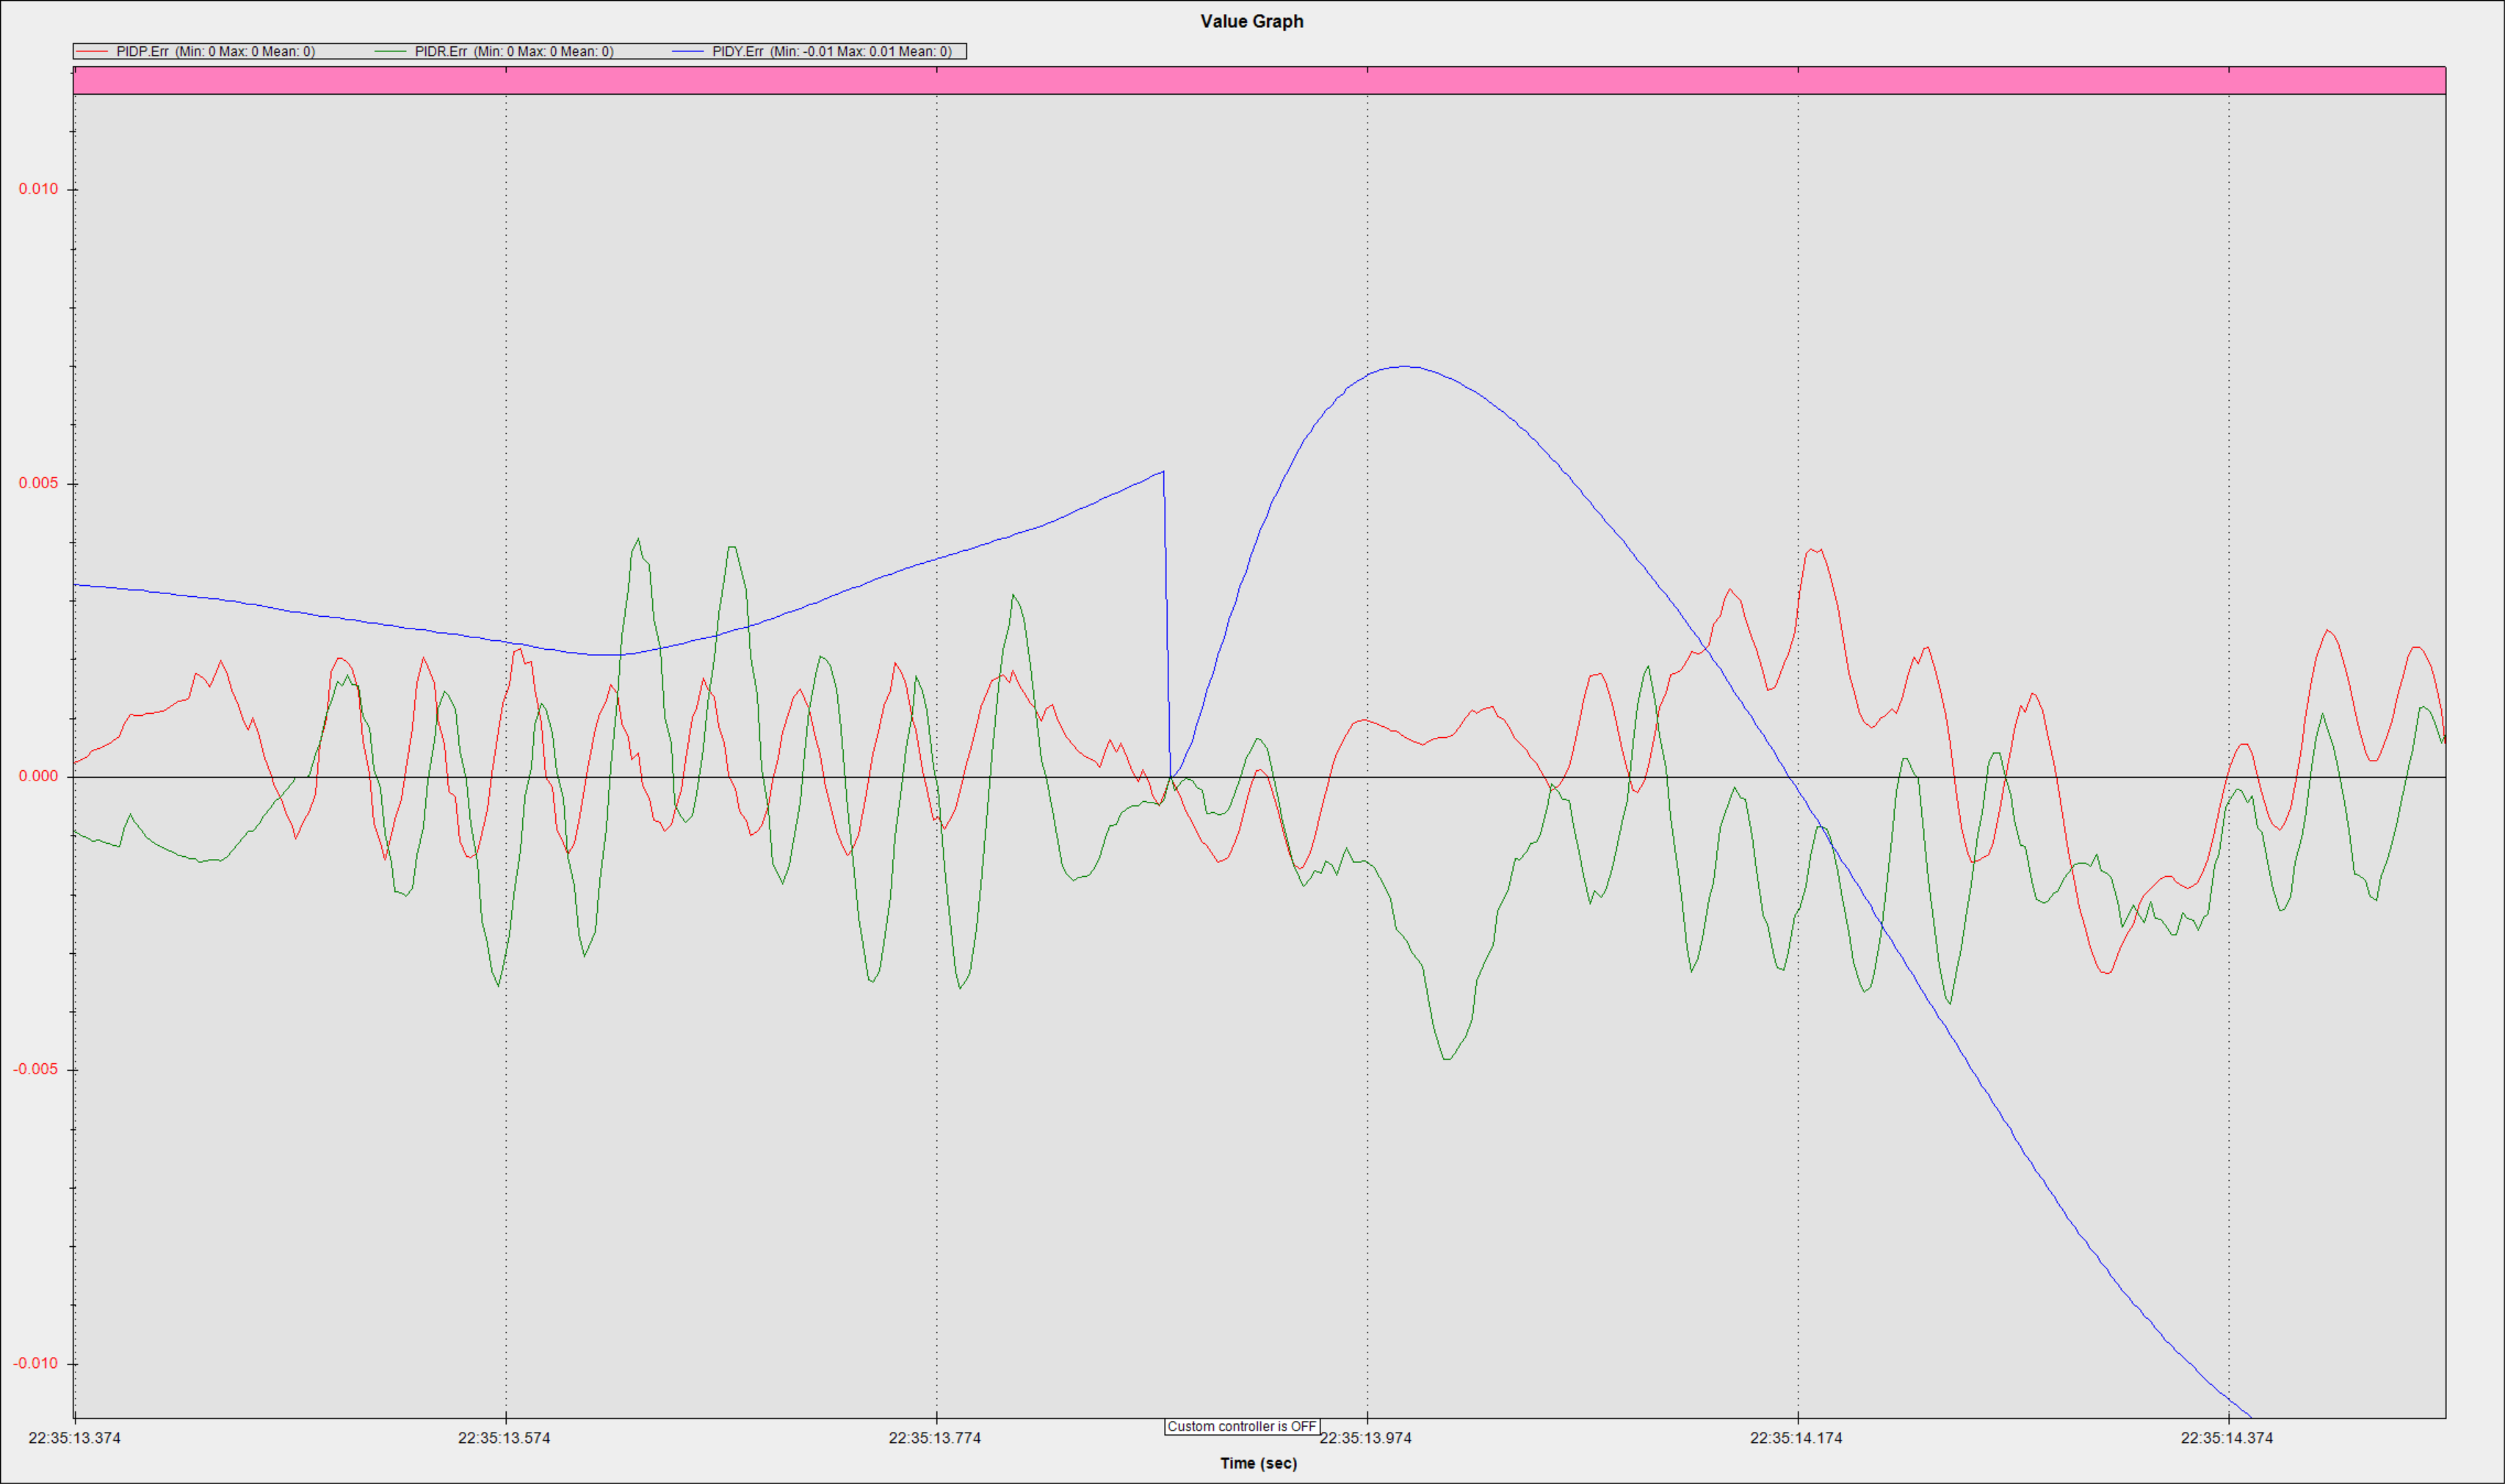
The motor output values don’t show step changes.
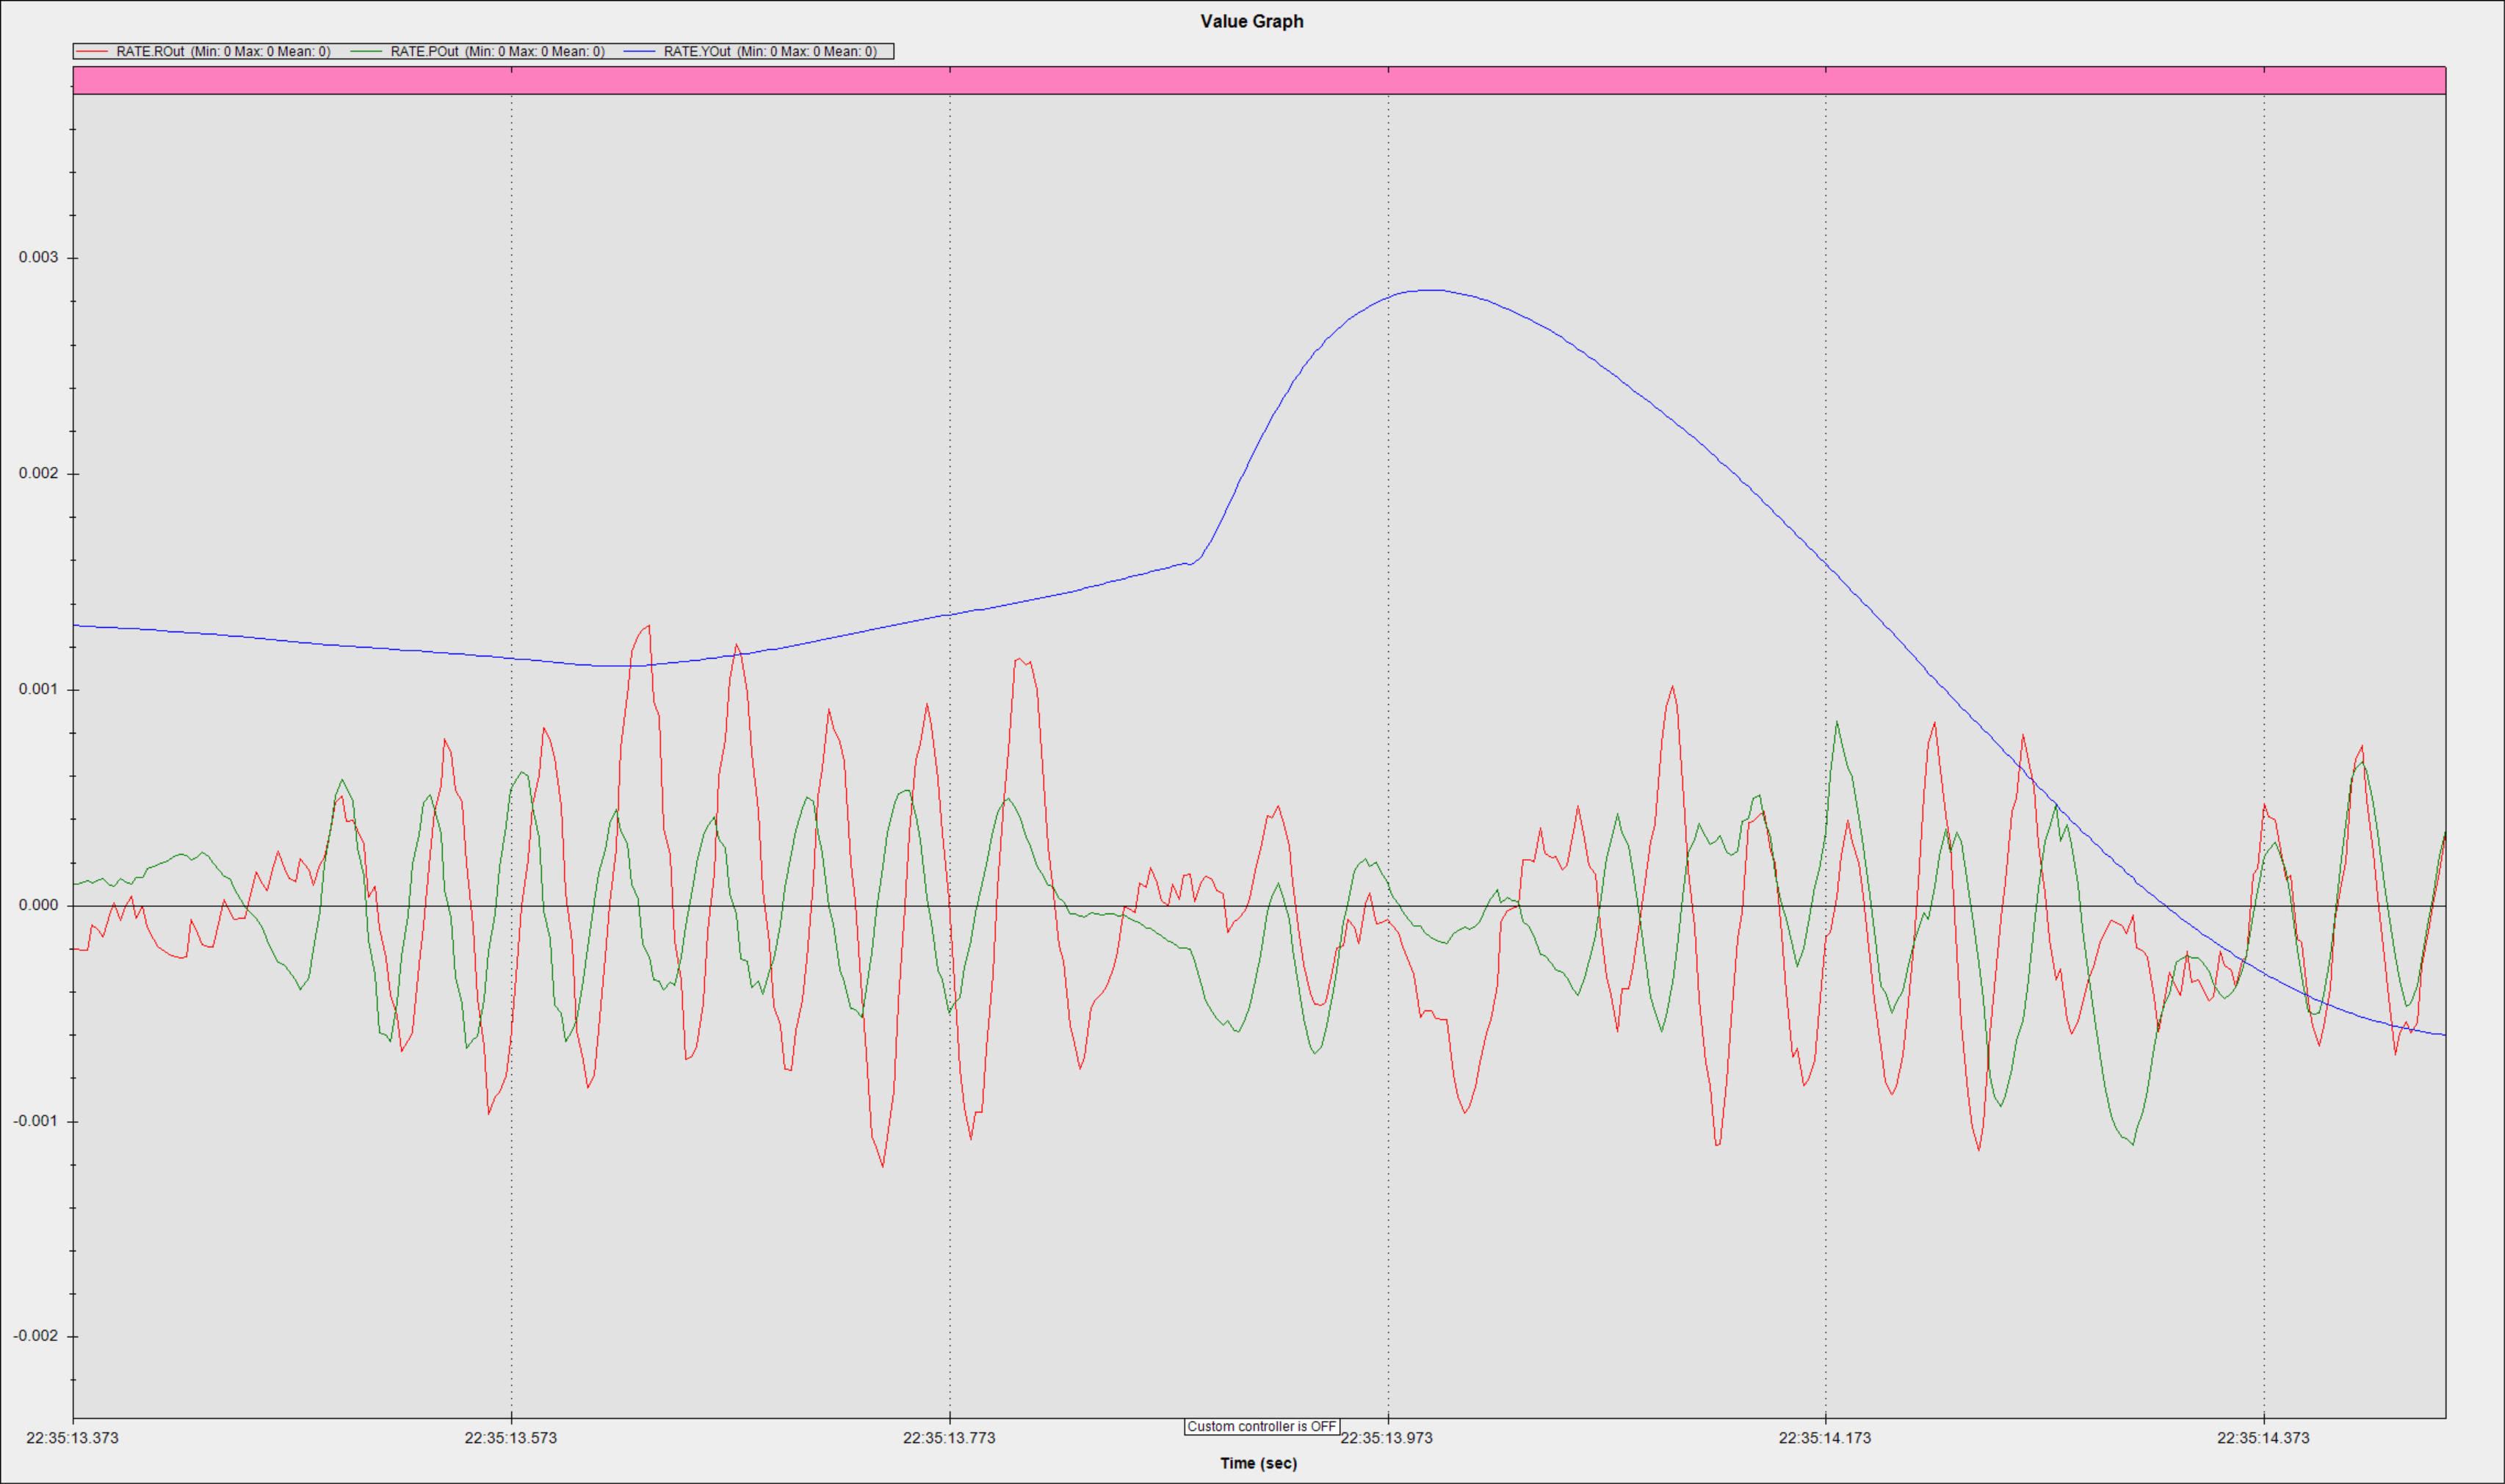
When switching from the main controller to the custom PID controller, the motor outputs values shows step changes because of a lack of target resetting and not setting integrator properly. This is a bad example of resetting.
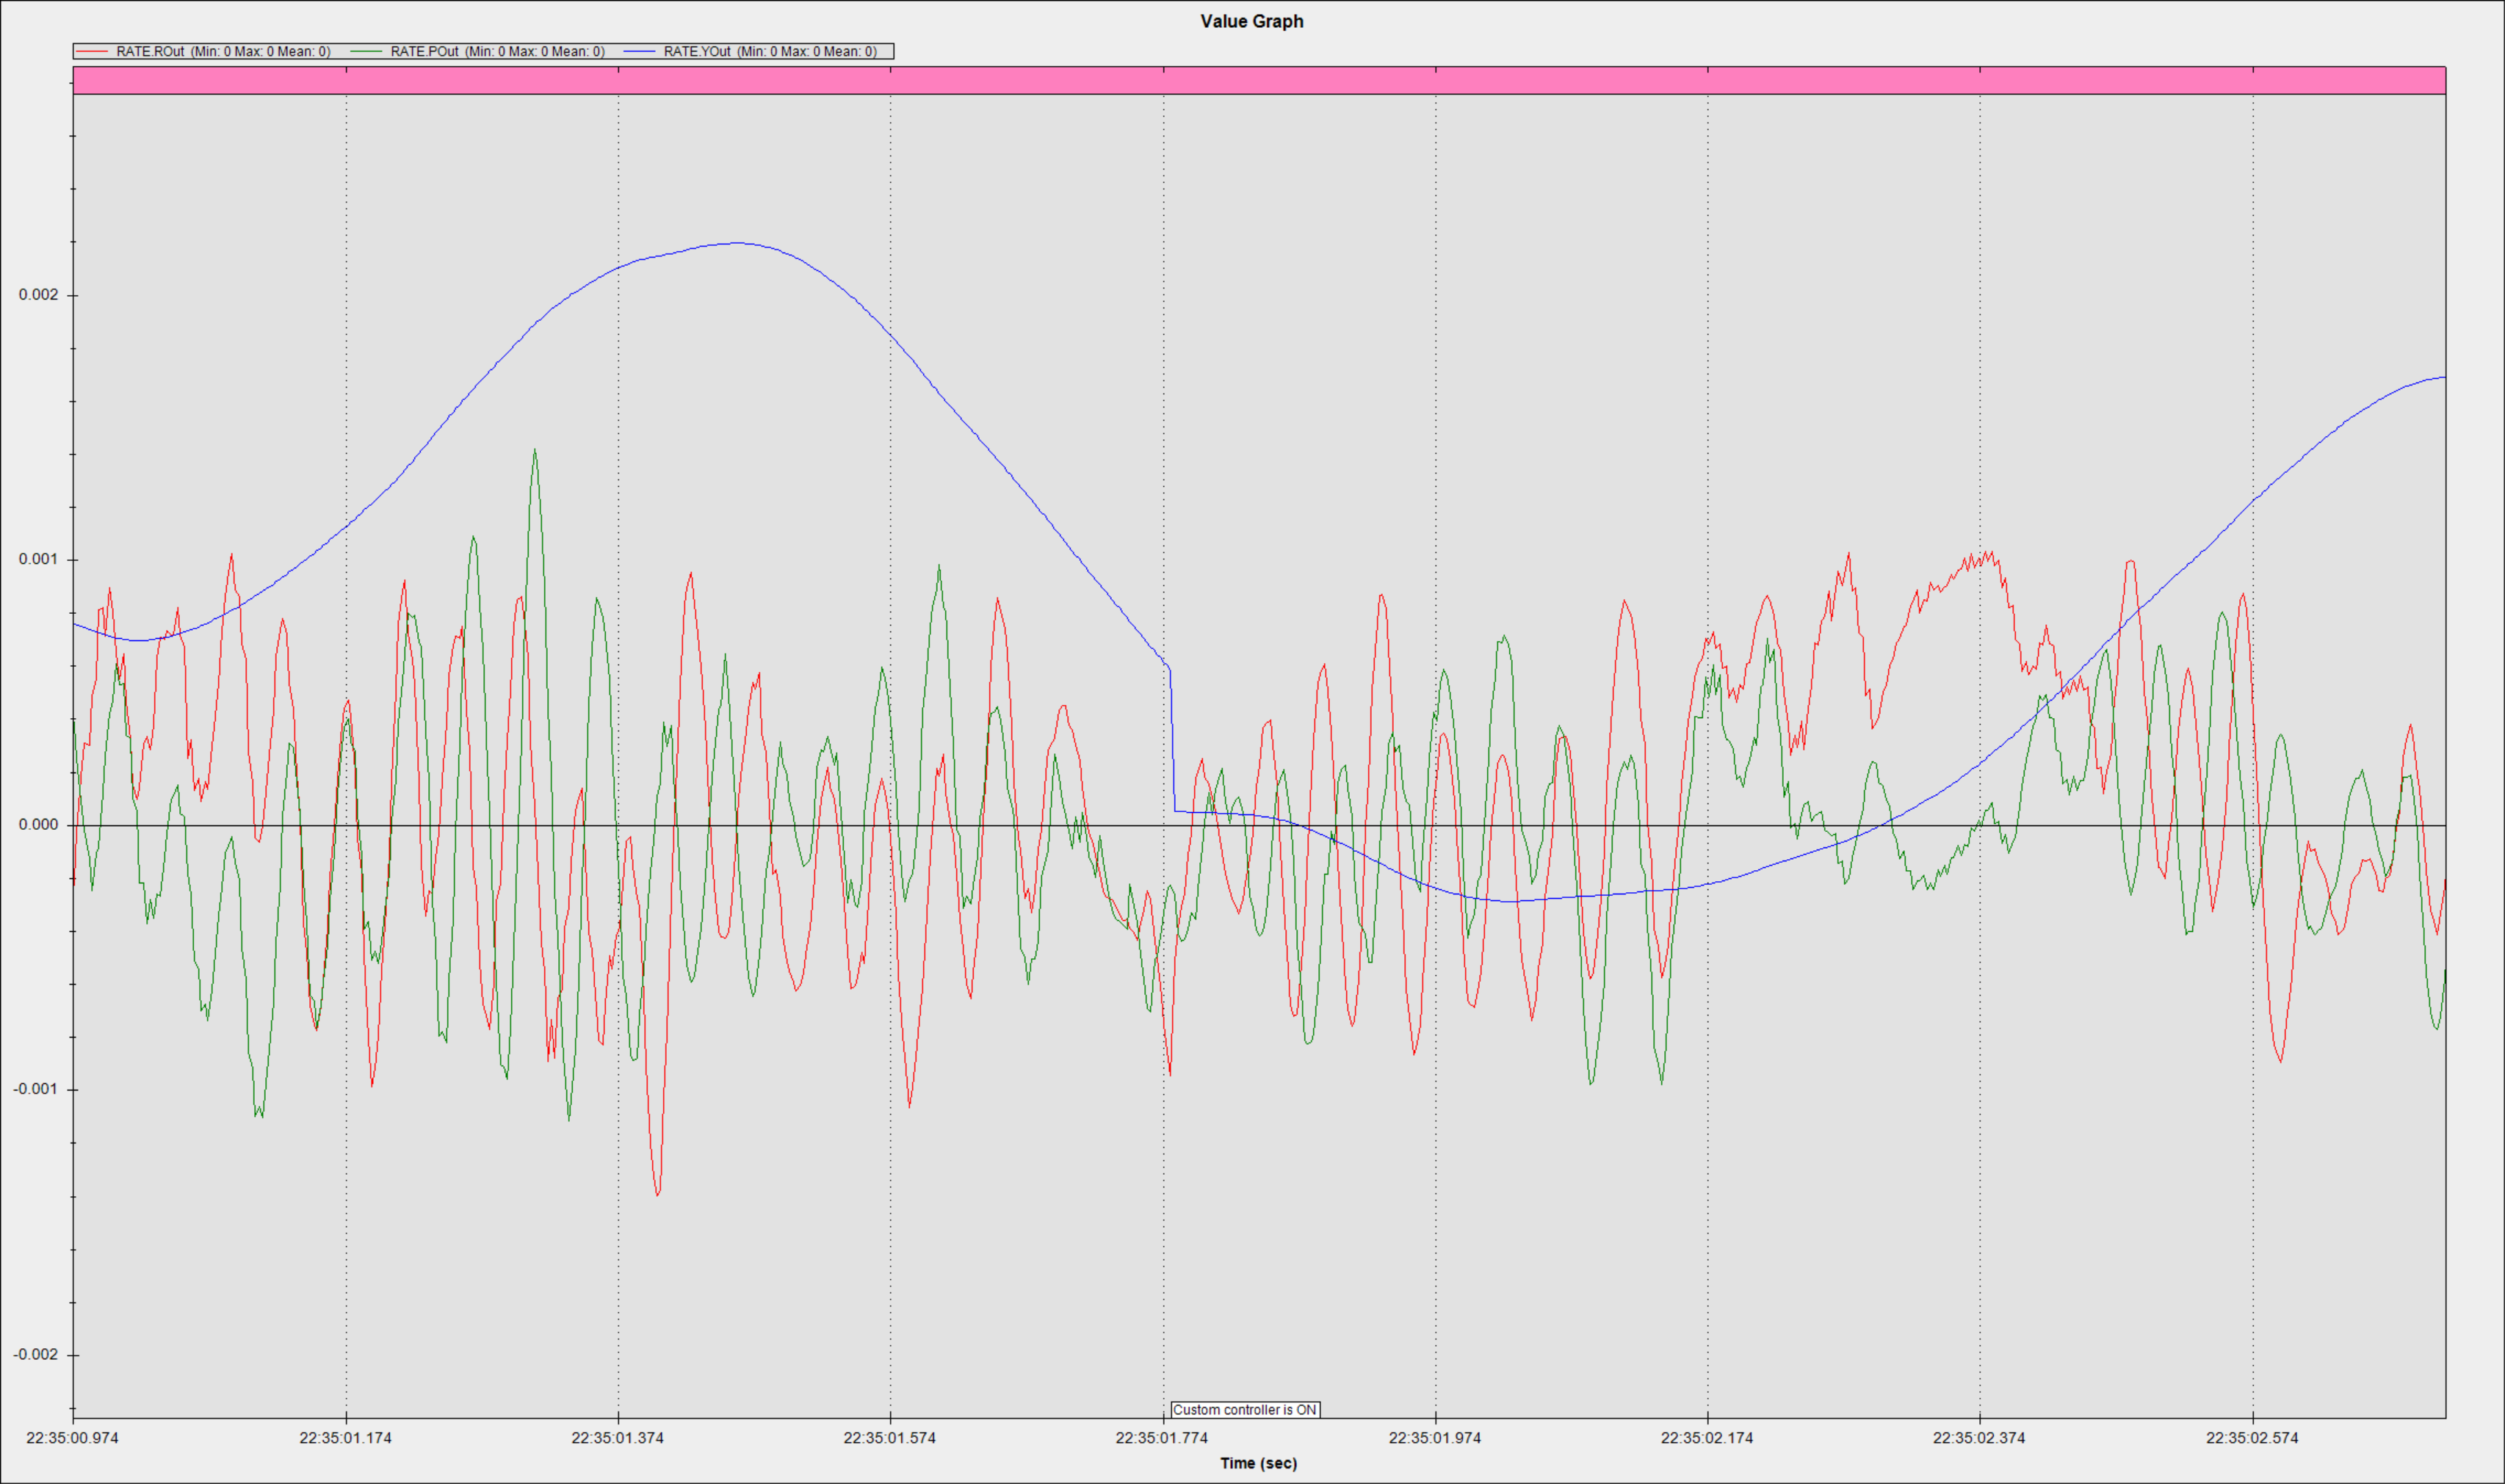
The jump is much more dominant when target resetting is not performed and large error remain from the previous controller and the custom controller is aggressively tuned, such as the INDI controller example below.

Backend Type
Currently, there 4 custom controller backend available. These are
- Empty backend
CSC_CONT_TYPE= 1 - PID backend
CSC_CONT_TYPE= 2 - INDI backend
CSC_CONT_TYPE= 3 - ADRC backend
CSC_CONT_TYPE= 4
Empty Controller - CSC_CONT_TYPE = 1
The empty controller does not do any calculations. It is created to make it easier to copy and implement your new controller. The main controller is not reset when switching from an empty controller.
PID Controller - CSC_CONT_TYPE = 2
PID controller backend has the same controller architecture as the main controller. It doesn’t have any safeguarding mechanism such as acceleration limiting or rate limiting. The default gains are scaled 0.9 times to differentiate the custom controller response from the main one. Since this controller does not have acceleration limiting, specifically a square root controller, it would be safer to give a gentle command while flying with it. Although it has the same architecture as the main one, a proper reset functionality is not implemented intentionally to make it easier to detect the effect of improper resetting.
INDI Controller - CSC_CONT_TYPE = 3
Incremental Nonlinear Dynamic Inversion(INDI) is a nonlinear control method. Although the SITL rpm measurement feature is not implemented, this controller can fly the default SITL model. Take a look at this PR #20511 for further detail.
ADRC Controller - CSC_CONT_TYPE = 4
Active Disturbance Rejection Control(ADRC) is a nonlinear control method. This controller can fly the default SITL model. Take a look at this PR #20243 for further detail.
How To Use It
You can test the custom controller in SITL using either PID, INDI or ADRC backend.
- First change the following flag from
#define CUSTOMCONTROL_ENABLED (!HAL_MINIMIZE_FEATURES && !defined(HAL_BUILD_AP_PERIPH) && BOARD_FLASH_SIZE > 1024 && 0)`
to
#define CUSTOMCONTROL_ENABLED (!HAL_MINIMIZE_FEATURES && !defined(HAL_BUILD_AP_PERIPH) && BOARD_FLASH_SIZE > 1024 && 1)`
to compile the custom controller.
- Compile and run the default SITL model. In the GCS, choose the custom controller type and set which RC switch to activate the custom controller. Reboot autopilot. For example in mavproxy,
param set CSC_CONT_TYPE 2
param set RC6_OPTION 109
reboot
- Run the following command to display backend parameters. These would be under
CSC_2_for PID backend.
param set CSC_2*
- Arm and take-off. While at the hover flight, switch RC6 to high. In mavproxy, you can do this with
rc 6 2000
-
You should be prompted with
Custom controller is ONmessage on GCS to indicate that the custom controller is running. -
Set RC6 to low to switch back to the main controller. You should be prompted with
Custom controller is OFFmessage on GCS.
Real Flight Testing
It is recommended that you always arm, take-off, land, and disarm while the main controller is running. You should switch to the custom controller while the vehicle is hovering steadily. This will reduce the effect of improper filter resetting. You should arm and take off with the custom controller only if proper ground idling is implemented.
Note that the custom controller feature is intended to be used in boards with 2 MB flash capacity. You can bypass this limitation by changing the following line. You might have to disable other features to stay under 1 MB flash size.
#define CUSTOMCONTROL_ENABLED (!HAL_MINIMIZE_FEATURES && !defined(HAL_BUILD_AP_PERIPH) && BOARD_FLASH_SIZE > 1024 && 0)`
How To Add New Custom Controller
You can add your own custom controller backend with the following steps. Let’s assume we are adding the 5th custom controller.
- Generate a copy of
AC_CustomControl_Empty.cppandAC_CustomControl_Empty.hwithinAC_CustomControlfolder. The folder tree would look like this,
AC_CustomControl.cpp
AC_CustomControl.h
AC_CustomControl_Backend.h
AC_CustomControl_Empty.cpp
AC_CustomControl_Empty.h
AC_CustomControl_Empty - Copy.cpp
AC_CustomControl_Empty - Copy.h
.
.
.
PID, INDI, ADRC, and README files are omitted to keep it simple.
- Change
Empty - Copysuffix with your own choice, let’s called itXYZ, which would look like
AC_CustomControl.cpp
AC_CustomControl.h
AC_CustomControl_Backend.h
AC_CustomControl_Empty.cpp
AC_CustomControl_Empty.h
AC_CustomControl_XYZ.cpp
AC_CustomControl_XYZ.h
.
.
.
- Change every class name, function definition etc. from
AC_CustomControl_EmptytoAC_CustomControl_XYZinsideAC_CustomControl_XYZ.cppandAC_CustomControl_XYZ.hfiles. This would look like this for the header file
#pragma once

#include "AC_CustomControl_Backend.h"

class AC_CustomControl_XYZ : public AC_CustomControl_Backend {
public:
    AC_CustomControl_XYZ(AC_CustomControl &frontend, AP_AHRS_View*& ahrs, AC_AttitudeControl_Multi*& atti_control, AP_MotorsMulticopter*& motors, float dt);

    Vector3f update(void) override;
    void reset(void) override;

    // user settable parameters

    static const struct AP_Param::GroupInfo var_info[];

protected:

    // declare parameters here
    AP_Float param1;
    AP_Float param2;
    AP_Float param3;
};
- Increase the maximum number of custom control variables by one and update the custom control type enum
from
#define CUSTOMCONTROL_MAX_TYPES 4
to
#define CUSTOMCONTROL_MAX_TYPES 5
enum class CustomControlType : uint8_t {
    CONT_NONE            = 0,
    CONT_EMPTY           = 1,
    CONT_PID             = 2,
    CONT_INDI            = 3,
    CONT_ADRC            = 4,
    CONT_XYZ             = 5,
};            // controller that should be used
- Add a new backend header in
AC_CustomControl.cppfile. Place it under other backend includes.
#include "AC_CustomControl_Backend.h"
#include "AC_CustomControl_Empty.h"
#include "AC_CustomControl_PID.h"
#include "AC_CustomControl_INDI.h"
#include "AC_CustomControl_ADRC.h"
#include "AC_CustomControl_XYZ.h"
- Add new backend parameter in
AC_CustomControl.cppfile. Increment_backend,_backend_var_infoarray index by one and also increment backend parameter prefix and parameter table index by one. Place it under the other backend’s parameters.
.
.
.
    // parameters for empty controller
    AP_SUBGROUPVARPTR(_backend[0], "1_", 6, AC_CustomControl, _backend_var_info[0]),

    // parameters for PID controller
    AP_SUBGROUPVARPTR(_backend[1], "2_", 7, AC_CustomControl, _backend_var_info[1]),

    // parameters for INDI controller
    AP_SUBGROUPVARPTR(_backend[2], "3_", 8, AC_CustomControl, _backend_var_info[2]),

    // parameters for ADRC controller
    AP_SUBGROUPVARPTR(_backend[3], "4_", 9, AC_CustomControl, _backend_var_info[3]),

    // parameters for XYZ controller
    AP_SUBGROUPVARPTR(_backend[4], "5_", 10, AC_CustomControl, _backend_var_info[4]),

    AP_GROUPEND
};
- Allow creating new backend class in
AC_CustomControl.cppfile insideinitfunction.
.
.
.
case CustomControlType::CONT_PID:
    _backend[get_type()] = new AC_CustomControl_PID(*this, _ahrs, _atti_control, _motors, _dt);
    _backend_var_info[get_type()] = AC_CustomControl_PID::var_info;
    break;
case CustomControlType::CONT_INDI:
    _backend[get_type()] = new AC_CustomControl_INDI(*this, _ahrs, _atti_control, _motors, _dt);
    _backend_var_info[get_type()] = AC_CustomControl_INDI::var_info;
    break;
case CustomControlType::CONT_ADRC:
    _backend[get_type()] = new AC_CustomControl_ADRC(*this, _ahrs, _atti_control, _motors, _dt);
    _backend_var_info[get_type()] = AC_CustomControl_ADRC::var_info;
    break;
case CustomControlType::CONT_XYZ:
    _backend[get_type()] = new AC_CustomControl_XYZ(*this, _ahrs, _atti_control, _motors, _dt);
    _backend_var_info[get_type()] = AC_CustomControl_XYZ::var_info;
    break;
default:
    return;
}
-
This is the bare minimum to compile and run your custom controller. You can add controller related code to
AC_CustomControl_XYZfile without changing anything else. -
You can add new parameters by following the directions in this Adding a parameter to a library wiki page.
-
Initialize the class object in the backend’s constructor. For example in PID backend
    // put controller related variable here

    // angle P controller  objects
    AC_P                _p_angle_roll2;
    AC_P                _p_angle_pitch2;
    AC_P                _p_angle_yaw2;

    // rate PID controller  objects
    AC_PID _pid_atti_rate_roll;
    AC_PID _pid_atti_rate_pitch;
    AC_PID _pid_atti_rate_yaw;
above P or PID classes are initialized in the backend’s constructors,
AC_CustomControl_PID::AC_CustomControl_PID(AC_CustomControl &frontend, AP_AHRS_View*& ahrs, AC_AttitudeControl_Multi*& atti_control, AP_MotorsMulticopter*& motors, float dt) :
    AC_CustomControl_Backend(frontend, ahrs, atti_control, motors, dt),
    _p_angle_roll2(AC_ATTITUDE_CONTROL_ANGLE_P * 0.90f),
    _p_angle_pitch2(AC_ATTITUDE_CONTROL_ANGLE_P * 0.90f),
    _p_angle_yaw2(AC_ATTITUDE_CONTROL_ANGLE_P * 0.90f),
    _pid_atti_rate_roll(AC_ATC_MULTI_RATE_RP_P * 0.90f, AC_ATC_MULTI_RATE_RP_I * 0.90f, AC_ATC_MULTI_RATE_RP_D * 0.90f, 0.0f, AC_ATC_MULTI_RATE_RP_IMAX * 0.90f, AC_ATC_MULTI_RATE_RP_FILT_HZ * 0.90f, 0.0f, AC_ATC_MULTI_RATE_RP_FILT_HZ * 0.90f, dt),
    _pid_atti_rate_pitch(AC_ATC_MULTI_RATE_RP_P * 0.90f, AC_ATC_MULTI_RATE_RP_I * 0.90f, AC_ATC_MULTI_RATE_RP_D * 0.90f, 0.0f, AC_ATC_MULTI_RATE_RP_IMAX * 0.90f, AC_ATC_MULTI_RATE_RP_FILT_HZ * 0.90f, 0.0f, AC_ATC_MULTI_RATE_RP_FILT_HZ * 0.90f, dt),
    _pid_atti_rate_yaw(AC_ATC_MULTI_RATE_YAW_P * 0.90f, AC_ATC_MULTI_RATE_YAW_I * 0.90f, AC_ATC_MULTI_RATE_YAW_D * 0.90f, 0.0f, AC_ATC_MULTI_RATE_YAW_IMAX * 0.90f, AC_ATC_MULTI_RATE_RP_FILT_HZ * 0.90f, AC_ATC_MULTI_RATE_YAW_FILT_HZ * 0.90f, 0.0f, dt)
{
    AP_Param::setup_object_defaults(this, var_info);
}
-
Add your controller inside
updatefunction ofAC_CustomControl_XYZ.cppfile. This function returns a 3-dimensional vector consisting of roll pitch yaw mixer input, respectively. -
Add reset functionality inside
resetfunction ofAC_CustomControl_XYZ.cppfile. It is user’s responsibility to add proper controller resetting functionality. This highly depends on the controller and it should not be copy-pasted from another backend without testing it in SITL. -
You can access target attitude and target rate values using
atti_control->get_attitude_target_quat()andatti_control->rate_bf_targets()functions, respectively. You can also access latest gyro measurement using_ahrs->get_gyro_latest()function. Take a look at other backends