[Updates]:
- A new wiki page for the Realsense Depth Camera summarizing the relevant blog posts.
- APSync instructions for the UP2 board.
1. Introduction
In this blog post, we will attempt to extend ArduPilot’s obstacle avoidance ability with the Intel Realsense depth camera.
2. Prerequisite
Harware
- Onboard computer with at least one USB 3.0 port.
- x86-based CPU is recommended for compatibility with Intel’s libraries and hardware. I am using the Up Squared SoC board. For other boards of other architecture (RPi, Jetson etc.), you might encounter troubles with installation the packages below.
- Since we are processing depth images to some degree, it might be the case the processing speed will vary greatly between the RPi4, Up2, Jetson Nano/TX/Xavier etc. So keep that in mind to tune the system if the performance is not satisfactory to you.
- Sensor: we are using the Realsense D435 depth camera, but presumably you can also use the program with the D415 or D435i without any modifications (except for general settings).
- The camera is assumed to be facing forward. For other orientations, you need to change the code, but the process is straightforward, as will be explain in the discussion section.
- Vehicle:
- Any DIY copter of your choosing. The content of this post has been tested with copter. For rover, the AP’s parameters should be changed following the corresponding wikis.
- Configuration: rangefinder and optical flow sensors would be necessary for stable flight. I am using the TeraRanger One and PX4Flow.
Software
- OS: Ubuntu 18.04. Highly recommended as this release is the most up-to-date with the required libraries.
- Please note that we will provide support exclusively on this version. For earlier version of Ubuntu, you need to modify each installation step to work for your case (in case of too many conflicting installations, you may find Anaconda to be helpful).
- Python 3.6 and above, which is also the standard for Ubuntu 18.04. Check with
$ python3 -V, you should see the version, something likePython 3.6.9. librealsense: download or install from source.
3. Installation
- Installation of supporting packages:
pip3 install pyrealsense2
pip3 install transformations
pip3 install dronekit
pip3 install apscheduler
pip3 install pyserial # For serial connection
pip3 install opencv-python

# Only necessary if you installed the minimal version of Ubuntu
sudo apt install python3-opencv
- Download the script, or clone the ROS node if you are using ROS (although we won’t cover ROS in this blog post):
# Clone the package in the ROS workspace or any location if you don't use ROS
cd ~/catkin_ws/src
git clone https://github.com/hoangthien94/vision_to_mavros.git
cd vision_to_mavros/script
chmod +x d4xx_to_mavlink.py
chmod +x opencv_depth_filtering.py
- The main script to be used with AP is
d4xx_to_mavlink.py. The second script,opencv_depth_filtering.pyis used to test out different filtering options, which is explained in more details in the final discussion section.
4. Parameters modification
4.1 Companion computer side
Within the script d4xx_to_mavlink.py, find the following parameters and reconfigure them if need to:
- Connection to the flight controller:
# Default configurations for connection to the FCU
connection_string_default = '/dev/ttyUSB0'
connection_baudrate_default = 921600
- General settings for the depth camera, check the datasheet to make sure your combination of w x h x fps is supported:
WIDTH  = 640              # Defines the number of columns for each frame or zero for auto resolve
HEIGHT = 480              # Defines the number of lines for each frame or zero for auto resolve
FPS    = 30               # Defines the rate of frames per second
- Make sure the
OBSTACLE_DISTANCEmessage is enabled and change the default data frequency if need to:
enable_msg_obstacle_distance = True
obstacle_distance_msg_hz_default = 15
- For debugging purpose with a monitor, enable the debug option:
debug_enable_default = True
- Additionally, there are more elaborate configurations that I recommend to test them out after you get the system to run at least once:
- Visual preset to improve the depth data provided by the camera,
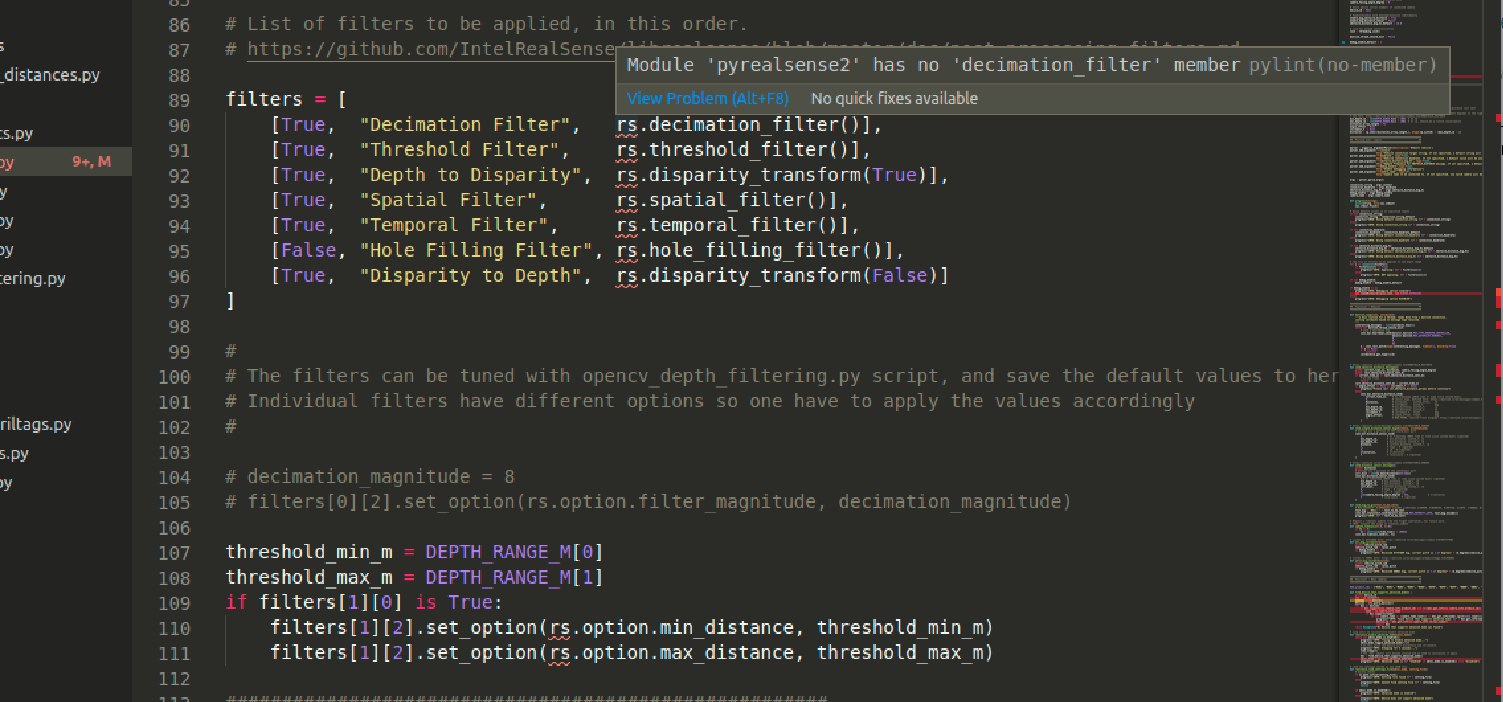
USE_PRESET_FILE = True PRESET_FILE = "../cfg/d4xx-default.json"- Post-processing filters to enhance the quality of depth data and reduce noise levels.
#List of filters to be applied, in this order.
#https://github.com/IntelRealSense/librealsense/blob/master/doc/post-processing-filters.md
filters = [
  [True, "Decimation Filter",     rs.decimation_filter()],
  [True, "Threshold Filter",      rs.threshold_filter()],
  [True, "Depth to Disparity",    rs.disparity_transform(True)],
  [True, "Spatial Filter",        rs.spatial_filter()],
  [True, "Temporal Filter",       rs.temporal_filter()],
  [True, "Hole Filling Filter",   rs.hole_filling_filter()],
  [True, "Disparity to Depth",    rs.disparity_transform(False)]
]
4.2 ArduPilot side
- The serial port & baudrate should be modified according to your setup:
SERIAL5_BAUD = 921 # the serial port used for connection
SERIAL5_PROTOCOL = 2 # for MAVLink 2
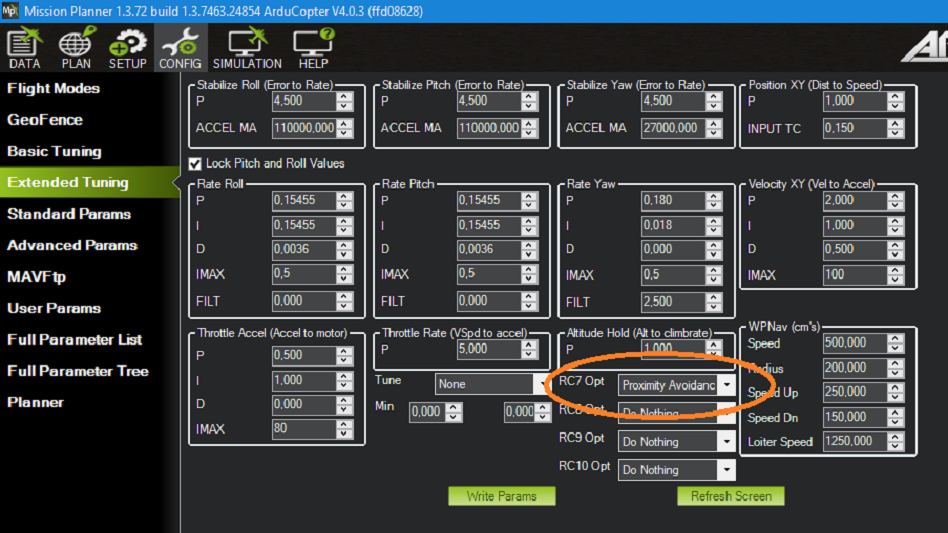
- Enable simple avoidance behavior, also descibed in this wiki. Note that if
PRX_TYPEis not set, the Proximity view in the following section will not show anything:
PRX_TYPE = 2 # MAVLink
- Configure avoidance behavior. AP supports different strategies to avoid the obstacle. In this blog post, we will focus on the simple “stop” behaviour as our baseline. Change the following parameters to fit better to your environment and vehicle’s size:
AVOID_ENABLE = 7     # (“All”) to use all sources of barrier information including “Proximity” sensors

# For Loiter mode:
AVOID_MARGIN = 1.5   # How many meters from the barrier the vehicle will attempt to stop or try to slide along it
AVOID_BEHAVE = 1     # Whether the vehicle should simply Stop (1) in front of the barrier or Slide (0) around it

# For AltHold mode:
AVOID_DIST_MAX = 1.5 # How far from a barrier the vehicle starts leaning away from the barrier in AltHold
AVOID_ANGLE_MAX = 3000 # How far the vehicle will try to lean away from the barrier
- Optional: You can assign an RC switch to enable Avoidance instead of always on by default. Example: setting RC7 to switch Avoidance on in Mission Planner
5. Ground test
-
If you don’t have a monitor plugged in, disable the debug option in the script by setting
debug_enable_default = Falseor add the argument--debug_enable 0when running the script. -
Run the script with:
cd /path/to/script python3 d4xx_to_mavlink.py- If the debugging option is enabled, wait until the input and processed depth images are shown. The processing speed (fps) can be seen in the top right corner:

- If the debugging option is enabled, wait until the input and processed depth images are shown. The processing speed (fps) can be seen in the top right corner:
-
Check that the
OBSTACLE_DISTANCEMAVLink message is being received (Ctrl-F → MAVLink Inspector):

-
If you have a stable telemetry connection, the data frequency for
OBSTACLE_DISTANCEmessage should be close toobstacle_distance_msg_hz_default. If not, use a USB cable to connect AP and GCS to verify whether the obstacle avoidance data is being received as intended by the FCU at least. -
Within Mission Planner, open the Proximity view (Ctrl-F → Proximity):
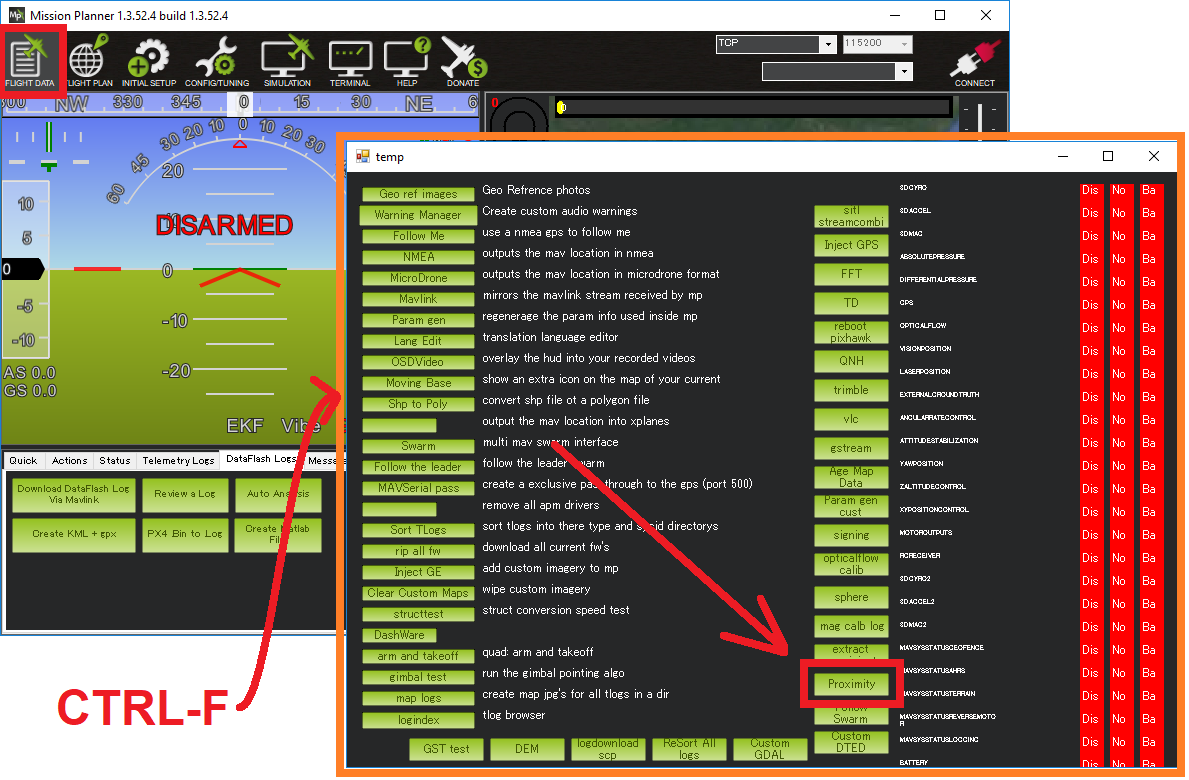
-
Put the vehicle/depth camera in front of some obstacles, check that the distance to the nearest obstacle is accurate is shown in the Proximity view:

Note: as of this writing the proximity view of Mission Planner for
OBSTACLE_DISTANCEmessage will group every distances within 45-degrees arc together (in total 8 quadrants around the vehicle), so at most only 2 distances will be shown at any one time on the Proximity window (since the camera’s FOV is less then 90 degrees).
6. Flight test
6.1 Procedure
-
Make sure the debug option is disable:
debug_enable_default = False -
Flight test:
- Process: Take-off → AltHold / Loiter → Move toward the obstacle.
- Expected behavior: The vehicle should stop/slide (set by
AVOID_BEHAVE) at a certain distance away the obstacle (set byAVOID_MARGIN/AVOID_DIST_MAXdepending on the flight mode). - For the first few tests, only push the vehicle gently and observe the reactions. Then you can speed up and fly more aggressive to test the limits.
-
Since the camera has limited FOV and min/max depth range, it is important to test the limits to ensure safety for your vehicle. Make sure you have a rough estimate of these margins and put some overheads into the parameters.
-
Demo video testing the behavior as well as the FOV and minimum safety margin that works for my vehicle. The flights were conducted in Loiter:

6.2 Review the log
-
In the dataflash log, the most relevant messages are
PRX.CAnandPRX.CDist, which stand for angle and distance of the closest object, respectively. You can also view the distance data in each quadrant (D0 and D315 - or 0degree and 315degree - in this case). Note that the range of CAn is 360 degrees while for CDist and the other Dangle it is only a few meters, so it’s best to view them separately. -
In the below picture for
PRX.CDist, I have conducted two flights with the threshold of 1.5m. You can see the oscillation around that threshold, when I tried to push the vehicle towards the obstacle but AP controlled it back.

7. How does it work?
-
In a nutshell, we need to find a way to convert the depth image provided by the Realsense camera into distances to obstacles. AP supports
DISTANCE_SENSORandOBSTACLE_DISTANCEMAVLink message, with the former carries a single distance and the latter carries an array of distances.OBSTACLE_DISTANCEallows us to send up to 72 distances at once, so it will be used. -
It is important to apply some form of filters on the raw depth image to avoid black holes, noises and generally improve the data to obtain more stable results. Here is full list of filters that are incorporated in our code, which you can enable individually. To test the settings for different filters, you can use the
rs-depth-qualityexample provided bylibrealsenseor run theopencv_depth_filtering.pyscript.# Run the script. You can enable/disable each filter and modify the settings in the pop-up window. python3 opencv_depth_filtering.py
-
Our input data is this processed depth image, and what we want is an array of distances. The distances need to be on the same horizontal line since the message contains no field to distinguish different pitch angle. We devide the horizontal field of view of the camera into 72 evenly spaced rays. Along each ray, we select the pixel corresponding to the end of the ray and pick out the depth value.
-
The next question is how to actually populate the message. The main key takeaways are:
- Choose the direction with which to fill out the array (clockwise or counter-clockwise).
- Calculate the
angle_offsetandincrement_fso that the 72 distances cover the whole FOV (field-of-view) of the sensor. - Example, for clockwise direction
angle_offset = camera_facing_angle - FOV/2andincrement_f = FOV / 72. For forward facing camera,camera_facing_angleis simply0. For other orientation, change this parameter accordingly. - If you reconfigure the array so that the array cover a larger area than the actual FOV, put
UINT16_MAXto any unknown elements.
-
The message should be sent at 10Hz or higher, depends on how fast the vehicle is moving.
8. Conclusion and next steps
The RealSense T265 tracking camera is already supported by ArduPilot to obtain accurate GPS-denied navigation, while the D435 enables obstacle avoidance. Together, the cameras enable a robot to create a map of its environment and navigate autonomously within the map. Combining the power of the two is our next target in this GSoC 2020 project. Stay tuned!

Useful resources
- Recommendation to improve D4xx depth data for drone: web article, paper, github.
- List of post processing filters: link.
- Avoidance Experiments with the POC and Benewake TFMINI
- Avoidance experiments with the new POC and Benewake TFmini-S