Four-Servo Swashplate Support

Bill and I have written four-servo swashplate support for TradHeli. Along with this comes new pre-defined swashplate types so you don’t have to use the settable servo positions any longer.

Test firmware, built on Copter 3.6.5 is available here for popular controllers

Instructions for setup:
The ground stations are not yet aware of the new swashplate type selections. They are:
0 - the old settable servo position configuration which everyone except for H3-140 users are currently using
1 - H1 swashplate
2 - H3-140
3 - H3-120
4 - H4-90
5 - H4-45

For all the pre-defined swashplate types the settable servo position parameters will no longer appear in your full parameter list. While in ArduPilot any SERVOx_FUNCTION can be assigned to any motor, we now have specified motor positions for the servos like multicopters have for setup:

  1. For three-servo 120/135/140 swashplates with elevator servo in the rear the left side servo is Motor1, right side servo Motor2, elevator servo is Motor3
  2. For all reverse configuration three-servo 120/135/140 with elevator servo in the front, this is reversed. Right servo is Motor1, left is Motor2, elevator is in front. Use the appropriate H3-120 or H3-140 and simply reverse the servo directions and collective direction for front elevator swashplate
  3. H1, as it’s always been, has no CCPM mixing and is used with downstream FBL units
  4. For H3-90 swashplates, this is the same as H4-90 with one servo missing, so you simply use the H4-90 plate type and don’t use one servo output for which ever servo is missing
  5. H4-90 left side servo is Motor1, right side Motor2, rear elevator Motor3, front elevator Motor5
  6. for H4-45 (sometimes called HX-90 or H4X-90) LF servo is Motor1, RF servo is Motor2, LR servo is Motor3, RR servo is Motor5

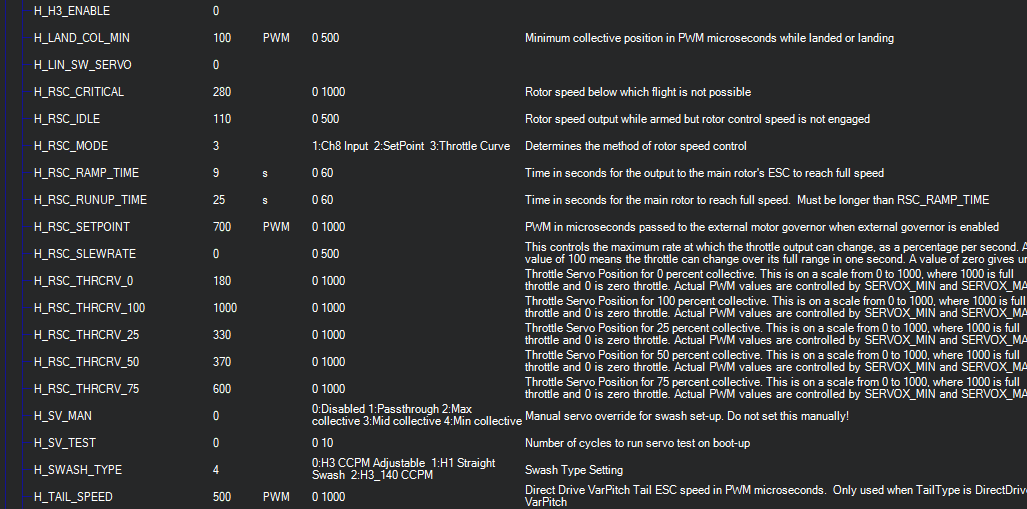
There is a couple new parameters you have not seen before. One is H_H3_ENABLE. Do not set this manually. It will set itself depending on which swashplate type you select. The other is H_LIN_SW_SERVO. These new params are shown here in Mission Planner for reference, along with the Swash Type set to 4, for H4-90 four-servo swash.

The H_LIN_SW_SERVO is set to 0 by default. What this setting does is linearize the output of your servos, primarily to prevent binding of opposite servos for four-servo swashplates. If you get binding with your four-servo swash, set this param to 1 and will fix it. This setting also has other uses and perhaps @bnsgeyer will want to expand on that, as he wrote the code for this part.

For all three-servo helicopters, after selecting your swashplate type the rest of the setup is identical to what it always has been.

Setup for four-servo swashplates:
The setup for four-servo swashplates is probably well-understood by people that have flown them. But I’ll go over it here anyway.

With four-servo always disconnect one of the elevator servo swash links before firing the system up the first time. This will prevent broken links or binding until you get the servo directions properly set, swashplate leveled, and linkage geometry adjusted.

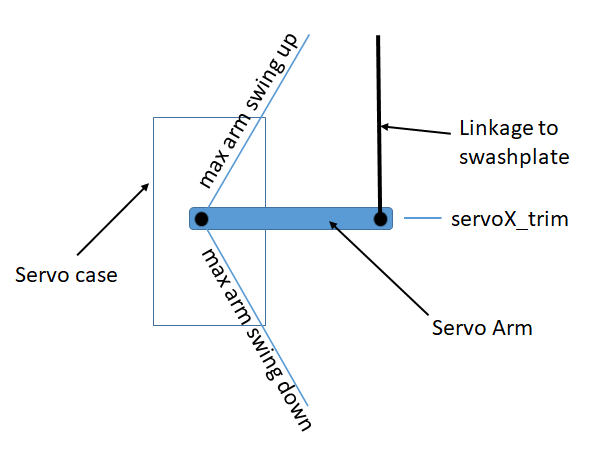
  1. The geometry of the linkage is very important with four-servo. Your servos should be at center trim, horns at 90 degrees to the servo case, links at 90 degrees to the horns, and the lengths of the links adjusted to get hover collective pitch with the servos and linkages in this configuration. You can set the H_COL_MID later to whatever it takes for zero pitch, but this configuration will provide the best geometry for flight with no servo binding.
  2. After the mechanical setup of the linkages and swashplate, pitch limit and cyclic limit set in the software, now you must test for binding.
  3. Place the swashplate at H_COL_MID and see if the link on the disconnected servo will easily go on. If it does, operate the cyclic thru it’s full range at H_COL_MID to see if it binds or not.
  4. Place the pitch at minimum and do the same test as step three.
  5. Place the pitch at maximum and do the same test as step three.

If the geometry is all correct it should be fine. If you get binding, set H_LIN_SW_SERVO to 1 and it should fix the linkage/servo binding issue. You can choose to use linear servo outputs before you even begin setup if you want. Some servos are not splined the same, there may be manufacturing anomaly where the default geometry is incorrect, etc. If you’ve set your four-servo heli up before with a FBL unit, you’ll know about this, and know whether or not you need to use the linear servo outputs.

This firmware is mainly for people that have four-servo heli’s to bench test it and see how it works for your heli, and provide us with feedback for any changes we may need to make. Anybody can use the firmware and fly it - it has been tested and flown by me. And it’s built on Copter 3.6.5 so you don’t have worry about other undocumented “features” that may be in Copter master. The only difference between this firmware and the current stable is the swashplate code.

Also note that your ground station will seem to take a long time to download params with this firmware after you select a swashplate type because it’s looking for some params that no longer exist after you reboot the controller. And a reboot is necessary after selecting your swash type. If it gets to the end of downloading params and seems to “hang” just hit cancel and proceed with setup. It will not make a difference.

Final note is that the old adjustable servo position setup is only being preserved in this firmware for backwards compatibility for upgraders. It will eventually disappear from the setup unless somebody can demonstrate some weird reason it must be retained. And some strange swash type is not a valid reason - if it exists we can write a mixer for it and add it as a swashplate type because this is all in a new swashplate library.

Any questions or comments, feel free. I’m sure maybe Bill will have more to add that I may have forgotten.

2 Likes

@ChrisOlson thanks for writing this up. Good explanation however I want to clarify exactly how the linear swashplate servo feature works. It is very important to understand how this differs from the way the wiki currently explains the servo setup. Currently the wiki has you using the servoX_trim parameter for the swashplate servos to level the swashplate. You can not use that set up procedure when using the linear swashplate servo feature. this feature assumes that the servo is centered on its physical throw. You’ll use the servoX_trim parameter to adjust the center position of the servo arm for the physical throw. If you can’t get the servoX_trim parameter to be 1500 then try to get it as close as possible with the servo arm centered in it physical throw.
Once you get that set up, then like Chris says set your linkages so that the swashplate is in its mid position which will give you hover collective. Also adjust the linkage (not servoX_trim) to get the swashplate level.
image

Hopefully everyone understands this. Let me know if you have any questions.

Thanks for the clarification on the linear servo output, Bill. Would also like to mention that although it’s not usually a problem with three-servo swashplates, this can also be used with three-servo if folks prefer to use it.

The documentation for all this still needs to be written for the wiki, we need swashplate diagrams etc, similar to the motor layouts for multicopter. Although most of it is pretty self-explanatory.

The binaries in the test firmware link in the first post have been rebuilt with a fix for the servo linearization for four-servo swashplates.

Many thanks to Aris at Velos Rotors for testing this for us in a Velos UAV helicopter.

I appreciate the effort that went in to this as well! My Airstar International helis were origionally designed for a 4 servo swash setup. Luckily I have the option to run 3 servos as well in the meantime.

Hi. Your firmware URL is broken.

Thanks for pointing that out. There was some changes made to the servo linearization for four-servo and forgot to update the link when I uploaded the testing binaries. It is now updated.

Good job.

I did a test flight today, updated from 3.6.0 rc12
and switched to
H_SWASH_TYPE 3

no other changes. Everything as expeced!

Thanks for the report! There will be a few changes in the code yet for the PR to Copter 3.7, but related to parameter handling, not in the actual mixers.

Hi.
Your firmware URL is broken.

That original post was not editable anymore. This is the link ->

The new swash library is also in master now (3.7-Dev)

Thanks Cris, i will test soon.

Hi, I upload the ArduHeli-3.6-Dev-fmuv2 but don’t apper these functions H_H3_ENABLE and H_LIN_SW_SERVO.

My helicopter is Vario XLC v2 with 4 servo on swashplate, I use the DJI Wookong H but this controller is very limited in functions.

Can you help me?

I will try in a Pixhawk Cube.

The XLC Carrier has a H4-45 swash, so set H_SW_TYPE to 5 for H4-45. For servo hookup use the following:
LF servo is Motor1, goes to SERVO1 output on your controller
RF servo is Motor2, goes to SERVO2 on your controller
LR servo is Motor3, goes to SERVO3 on your controller
RR servo is Motor5, goes to SERVO5 on your controller

tail servo is Motor4, goes to SERVO4 on the controller

Turn on the H_LIN_SW_SERVO by setting it to 1. This is important to prevent servo binding.

Now, follow this very carefully, and make sure the link is off one of the cyclic servos before you proceed. You can put it on after you get everything adjusted.

When you do your setup set the collective to manual mid with the H_SV_MAN set to 3, make sure all the servos are trimmed to 1500 pwm with the SERVOx_TRIM settings, make sure the arms are at 90 deg to the swash link, and make sure this corresponds to zero pitch. You will have to adjust your swash links by turning the turnbuckles to get the swash leveled and trimmed at zero pitch.

Be careful moving the swashplate with cyclic until you get the above all set.

Now, set the minimum and maximum collective you want with the H_COL_MIN and H_COL_MAX settings, set your cyclic range with H_CYC_MAX, etc…

After you get all this done, try your one link you have removed at full collective and cyclic range and see if it fits properly without stretching or binding anything. If it does, you’re good to go, put it on. If it doesn’t fit or appears to bind at some point, then re-check your setup geometry.

There is very little room for error with four-servo swashplates. So if you must move a SERVOx_TRIM away from 1500 pwm to get it leveled at zero pitch with the 90deg geometry, then you do not have the right length swash links.

Do you have the JetCat SPT5 turboshaft engine in it? The throttle control for the FADEC goes to SERVO8 on the controller. This engine and FADEC has a built-in governor. So select H_RSC_MODE and set it to 3 for just throttle curve. Adjust the five throttle curve settings to what you need for flight idle to full power.

For ground idle, set the H_RSC_IDLE to what it requires to idle your engine with the clutch disengaged. This is also the starting idle setting.

To start it, do the following:

  1. collective at bottom
  2. arm the controller.
  3. turn off throttle hold
  4. wait for the number of seconds you have the H_RSC_RAMP_TIME set to
  5. advance the collective all the way to the top
  6. within two seconds move the collective all the way to the bottom and turn on throttle hold

This will initialize your engine’s FADEC and the start sequence. Monitor for hot or hung start and if it over-temps or the gas generator fails to accelerate properly, disarm to abort the start.

If you get a good start and the engine settles into stable idle, turn off throttle hold to engage the clutch and advance it to flight idle power. MAKE SURE FLIGHT IDLE IS HIGH ENOUGH TO PREVENT FLAMEOUT IN FLIGHT AND MAINTAIN AT LEAST 340C NGT - or you will be in autorotation. Set the H_RSC_RAMP to what it takes to accelerate the engine to flight idle without over-fueling it and getting flame on the tail-pipe. The RAMP set too short will burn the N2 section and make it glow red. If you see it over-temping abort the spoolup and set the RAMP longer.

One final warning with turbine power - do not try any auto takeoff or landing stuff with a turbine. It requires a human pilot to start one, bring up to speed and shut it down. Once you get it running and flying, you can engage Auto Flight Mode and fly waypoints all you want. But the autopilot cannot handle safely starting and shutting down a turbine engine.