FireFLY6 VTOL with APM Plane

Hi,

Leveraging Tridge’s work on tilt-rotor features in Plane v3.8.2 and his testing of the BirdsEyeView Aerobotics FireFLY6 VTOL wing using APM, I decided to convert my DIY15 3s model from AvA to Plane v3.8.2. If I like it then I will convert my DIY25 6s model as well.

I’ll transfer information pertaining to the FF6 from the rather large tilt-rotor thread in the Developers forum so this thread can stay focused on setup and testing of this specific model. I will try to keep all the information needed to convert from AvA to APM in this first post so it will evolve over time.

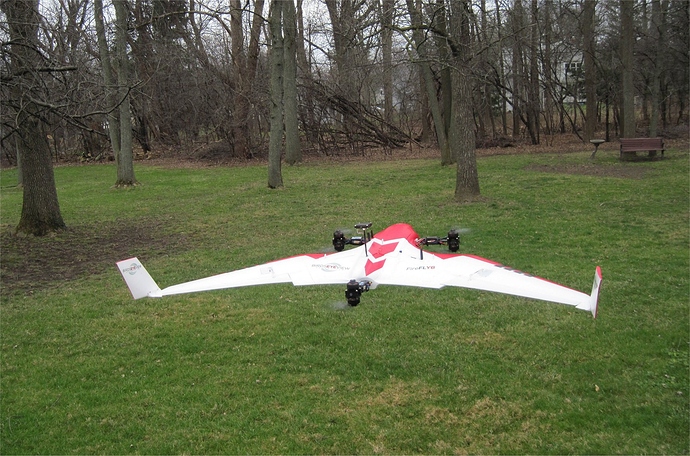
Here is what the FF6 looks like hovering with the gear up. It can carry a 2.5lb (1134g) payload underneath.

Tridge’s initial .param file (posted below) for the FF6 DIY15 using Plane v3.8.2 was for Pixhawk2, not Pixhawk so I am creating my own and will post it when tested. Some critical parameter differences between the two Pixhawks are AHRS_ORIENTATION and BRD_TYPE.

When loading a QuadPlane enabled .param file for the first time after a firmware upgrade, you will encounter many errors due to the Q_ENABLE transition from 0 to 1. Simply re-load the .param file a second time after first re-booting the Pixhawk.
APMfirefly6.param (23.9 KB)

Tridge’s param file above flew with these gain settings:

  • Q_A_RAT_PIT_D 0.003600
  • Q_A_RAT_PIT_I 0.250000
  • Q_A_RAT_PIT_P 0.250000
  • Q_A_RAT_RLL_I 0.300000
  • Q_A_RAT_RLL_P 0.300000
  • Q_A_RAT_YAW_I 0.018000
  • Q_A_RAT_YAW_P 0.180000

Tridge’s latest tuning below resulted in a bit higher gains for the multicopter. I’ll be using these settings in my .param file.

  • Q_A_RAT_PIT_D 0.003600
  • Q_A_RAT_PIT_I 0.400000
  • Q_A_RAT_PIT_P 0.400000
  • Q_A_RAT_RLL_I 0.500000
  • Q_A_RAT_RLL_P 0.500000
  • Q_A_RAT_YAW_I 0.060000
  • Q_A_RAT_YAW_P 0.350000

Tridge also added the Y6F (for “FireFly6”) layout to ArduPilot 3.8.x so that there is no change in motor direction or connection to the Pixhawk. Very nice! (Q_FRAME_CLASS = 5, Q_FRAME_TYPE = 11)

The layout is:

  • Motor1: rear-CCW
  • Motor2: front-rght-CCW
  • Motor3: front-left-CCW
  • Motor4: rear-CW
  • Motor5: front-right-CW
  • Motor6: front-left-CW

The main mapping and connections to the Pixhawk mimic the AvA setup:

  • Left Elevon = Servo 1 = 77 = MainOutput1
  • Rightt Elevon = Servo 2 = 78 = MainOutput2
  • Motor 1 = Servo 3 = 33 = MainOutput3
  • Motor 2 = Servo 4 = 34 = MainOutput4
  • Motor 3 = Servo 5 = 35 = MainOutput5
  • Motor 4 = Servo 6 = 36 = MainOutput6
  • Motor 5 = Servo 7 = 37 = MainOutput7
  • Motor 6 = Servo 8 = 38 = MainOutput8
  • Retracts = Servo 10 = 57 = AUX2
  • Tilt Servo = Servo 11 = 41 = AUX3 (Note that this is normally AUX1 on AvA setups)

Here is my initial .param file for the Pixhawk 1 that hovered nicely in my backyard using a FrSky Taranis. I will post my Taranis .eepe model file soon.
GregsFF6wAPM_Hover1.param (16.0 KB)
Slight changes after re-calibrating the radio and re-testing a good hover.
GregsFF6wAPM_Hover2.param (16.0 KB)
Corrected tail-heavy CG and also changed:
PTCH2SRV_P from 1.1 to 1.8
EK2_IMU_MASK from 1 to 3
GregsFF6wAPM_Hover3.param (16.0 KB)
Q_RTL_MODE = 1
THR_FS_VALUE = 950
GregsFF6wAPM_Hover4.param (16.0 KB)

Taranis X9D+ with 6-position Flight Mode Switch (ZIPed .eepe file)
FireFLY6withAPM.zip (6.9 KB)

My second flight of the FireFLY6 using APM Plane v3.8.2 was as good as the maiden flight. Transitions seemed flawless and I had better turning capability than when using AvA because it can be set to the user’s needs.

I took off and landed in our tiny mowed opening surrounded by hazards. Once airborne, I had a large wild field to fly over. Landing can be tricky when the wind is blowing because the take-off and approach are from the same direction. Other than a little prop turbulence during my descent, the flight was great!

Interesting Links:
Original FireFLY6 Thread on RCG

3 Likes

I got the tilt servo to work once I discovered that Tridge put it on AUX3 instead of the stock FireFLY6 AUX1 position. A simple connector change fixed that and I can then change the Servo 11 Max/Min settings to align with hover and forward flight modes per the FF6 manual.

I also changed my servo min settings from 1100 to 1000 (and a few of them to 950) but the ESCs still beep continuously. I mapped all the outputs to the appropriate servo number and function and they all seemed to be correct. I’m not sure why the ESCs are not arming at this point.

Left Elevon = Servo 1 = 77 = MainOutput1
Rightt Elevon = Servo 2 = 78 = MainOutput2
Motor 1 = Servo 3 = 33 = MainOutput3
Motor 2 = Servo 4 = 34 = MainOutput4
Motor 3 = Servo 5 = 35 = MainOutput5
Motor 4 = Servo 6 = 36 = MainOutput6
Motor 5 = Servo 7 = 37 = MainOutput7
Motor 6 = Servo 8 = 38 = MainOutput8
Retracts = Servo 10 = 57 = AUX2
Tilt Servo = Servo 11 = 41 = AUX3

The disarmed PWM for the motors isn’t controlled by the per-servo MIN/MAX values. Instead it is controlled by Q_M_PWM_MIN and Q_M_PWM_MAX. I had my min set to 1050, so if you loaded my parameter file yours will be the same. It may be a bit high for your ESCs.
Cheers, Tridge

Thanks, Tridge, that was it!

I changed Q_M_PWM_MIN from 0 to 950 (because 1000 didn’t work) and now all 6 ESCs are silent and ready to go!

I’ll verify the hover angle tomorrow (it already looks good) and do a test hover in my backyard.

Thanks again!

great. Make sure you set a good MAX value as well.
Normally you should do an ESC calibration, but I’m guessing your ESCs are already calibrated, in which case you should slowly raise Q_M_PWM_MIN until it is a value which is about 25 PWM below the point at which the motors start turning.

This is what I love about this community - members taking time to share lessons learned, best-practicies,parm settings, ETC. I am grateful to all the folks that contribute to this project.

Thanks to all,

Dave

1 Like

Dave,

Tridge wrote the book on APM and he shares his knowledge unselfishly.

I leveled the FF6 per the manual and then calibrated the ACC for level. Next, I straightened out my compensation direction issue making changes to my Taranis and the Radio Calibration Reverse boxes in Mission Planner. Lastly, RC1_TRIM and RC2_TRIM settings were changed to make the 5/8" elevon offset required in the manual. I also set SERVO11_MIN and SERVO11_MAX to provide correct tiltrotor orientation for hover and forward flight modes. Again, the correct positions are described in the FF6 AvA manual.

The result was my first successful hover in QSTABILIZE mode in my backyard. I need a larger field to test QHOVER and QLOITER before trying my first transition to forward flight. So far, so good!

GregsFF6wAPM_Hover1.param (16.0 KB)

you shouldn’t use RC trim for that, use SERVO1_TRIM and SERVO2_TRIM.
The RC1_TRIM should be set according to your transmitter, and has nothing to do with the servo outputs. The SERVO1_TRIM and SERVO2_TRIM are what control trim of the elevons.
Alternatively you could use SERVO_AUTO_TRIM=1 and it will learn the correct trim while flying.

Tridge,

Let me see if I got this correct. By using RC1_TRIM and RC2_TRIM settings instead of SERVO1_TRIM and SERVO2_TRIM, if I decide to re-calibrate the radio settings in Mission Planner, I will lose my alignment?

SERVO_AUTO_TRIM is set to one based on using your .param file. According to the Wiki, that makes me an Advanced User. :grinning:

Cheers!

changing RC1_TRIM changes the roll trim from the transmitter. That makes no difference at all in AUTO mode, and very little difference in FBWA. It is telling ArduPilot that when your stick is a bit off-center that its actually centered. So it is about pilot input, not servo output.
The right parameters to use to trim a servo position is the SERVOn_TRIM value.
Cheers, Tridge

Tridge,

Ok, this new mapping for v3.8.x has me confused again.

So, for quadcopter ESC settings, don’t use the SERVOx_ outputs but use Q_M_PWM settings.

For plane control surface settings, don’t use the RCx settings, use the SERVOx output settings.

I assume the exception here is when a QuadPlane has a forward thrust motor like the mini Talon…then you use the RC3 settings.

How does Manual Mode work then for the FireFLY6? I can trim it in flight and use TRIM_AUTO to pass the settings to FBWA mode?

Thanks!

I re-calibrated my radio in mission planner and adjusted the elevons using SERVO1_TRIM and SERVO2_TRIM. Very little change was needed. I then had another nice hover in my backyard so I am ready to test different modes this weekend. I’ll save these files in the first post.

GregsFF6wAPM_Hover2.param (16.0 KB)

Taranis X9D+ with 6-position Flight Mode Switch (ZIPed .eepe file)
FireFLY6withAPM.zip (6.9 KB)

The reason we don’t use SERVO* for multi-rotor ESC settings is you really want all ESCs to have the same range. Otherwise users would end up with different ranges on their motors and it would fly badly.
I’m guessing that you were thinking of using RC* values because that is what was used for trim in 3.7.x and earlier. It was a terrible idea, as it meant that changing your transmitter settings changed how the plane would fly. It really made no sense, especially when we try to provide parameter files for particular airframes. You and me both have a FireFly6, but we very likely have different transmitters.
So we split the throw and trim into separate parameters - the RC parameters are just for your radio inputs. The SERVO* parameters are for servo outputs.

no, RC settings are only for your radio (RC == “radio control”).

you can, but I don’t recommend it. If you did use TRIM_AUTO then it would copy the servo trims at the time you switch from MANUAL to another mode into SERVO1_TRIM and SERVO2_TRIM.
The reason I don’t recommend it is twofold. First off, flying a FireFly6 in MANUAL is not something I recommend. You would have no safety with Q_ASSIST and I suspect it will be a pretty tricky plane to fly in full manual with no stability at all.
The 2nd reason I don’t recommend it is that SERVO_AUTO_TRIM will already be learning the trim for you. Whenever you are flying it will slowly learn what trims you need and adjust SERVO1_TRIM and SERVO2_TRIM. So if you did switch to MANUAL it should already be trimmed for you if you have flown for a couple of minutes.
Cheers, Tridge

sounds like you are good to go!
I assume you’ve checked it is stabilising in the right direction in FBWA? (ie. roll and pitch plane, and it should try to correct with elevons).

Yes, thanks, Tridge. It is stabilizing correctly.

I’m really starting to like the SERVO_AUTO_TRIM feature. On my mini Talon, using v3.8.0, I had no need to try Manual Mode. It hovered great in QSTABILIZE after some PID tuning and flew great in FBWA mode the first time! I’ll use the same approach for the FireFLY6 after I first test the BARO and GPS hover modes.

Hi @GregCovey, I just realised I forgot to tell you about my last flight test with my FF6. I had three issues.
The first issue was the chain mechanism caught up a bit during the fwd transition. There was a loud “thunk” as the servo pulled it free. Testing later on the ground shows the links are catching on the cog somehow. It didn’t affect flight (as the period when the motor tilt was stuck was quite short), but I will need to try to sort it out, as if the servo didn’t have enough power it would have been stuck half transitioned.
The second issue was that it didn’t have enough pitch authority in forward flight in AUTO mode to climb to the 1st waypoint. I had PTCH2SRV_P set to 1.1, and after looking at the logs I plan to use 1.8 for the next flight. I’d recommend you use 1.8 as well. We may need a higher value based on more flights.
The 3rd issue was when it was coming in for the auto landing, and something fell off the plane, and the plane rolled over badly, then recovered. It ended up landing fine, and after landing we saw this:
New photo by Andrew Tridgell
the rear-top prop had come off! The Y6 stability code did amazingly well to continue the flight and land OK. I really should pay more attention to making sure everything is tightened up on the plane. I couldn’t find the prop, but I ordered some more and will fly again soon.
Cheers, Tridge

Tridge,

Thanks for the information. I have not had a chain issue with the COG (on either FF6) so check the alignment between the servo spline and the main transition spline. One other possibility is that the nylon servo spline is worn on the inside where it meets the metal servo gear. I have replaced those splines after a crash that jams the tilt rotors.

My DIY25 with 6s SunnySky motors uses t-style carbon props so I don’t have to tighten them. However, my DIY15 model that I converted to use APM uses the stock 3s power system like yours. I have been diligent about checking those prop adapters so far.

Somewhere I have the specs for altitude changes along with others so I’ll look for them and report back. In Mission Planner, you can use a maximum gradient that I used to know. I’ll find it and report back…

Tridge,

Here is some information I had from the stock FF6 with AvA. I ordered two of the same packs that you did, in the last bullet, since the 3s setup draws more current and my hover test times for demos are much longer than a typical autonomous flight. It’s a nice compromise.

  • In zero wind condition, the plane can maintain about a 38-40% climb gradient with payload
  • The FireFLY6 will hover at around 600 watts on 6s.
  • The 6s setup (DIY25) is more efficient than the 3s (DIY15) setup.
  • On 6s, the current draw is 30amps total for all 6 motors combined.
  • The 6s current is about 19amps in FF mode.
  • A 5200mAh 3S 10C Multistar pack is $32, weighs only 331 grams, and fits nicely in the stock battery bays.
  • You can also use a Turnigy 4000mAh 3S 30C Lipo Pack w/XT-60 for $26 that weighs 347g.

My first flight was a total success! My video guy was sick so no video but I’ll post the log later this week.

I took off from a very small open area in QSTABILIZE mode and then switched to QLOITER once I was high enough and clear of the trees. This small area is next to a large wild field with no trees so I love to make use of my VTOL aircraft in this area because it’s only 5 minutes drive from my house. My Bix3 and mini Talon QuadPlanes have also had successful flights here.

The FireFLY6 QLOITERed well and the transition to FBWA was flawless! I’m used to the AvA firmware and it seemed that the transition took longer this time but it was fine. The wing flew great! I can finally turn sharper than the AvA firmware would ever allow so I felt more in control. It’s time to add an air speed sensor.

Transition back to QSTABILZE mode seemed great. The only issue I had was when I switched from QSTABILZE to QLOITER on the return trip, the slight wind was at the tail and the plane swung side to side until I switched back to QSTABILIZE mode, then it was fine. One disadvantage of my little clearing area is that the take-offs and landings are both to/from the East so I often catch a breeze and sometimes back my way into a hover landing.

Great job with the firmware, Tridge! I’ll post the log and get more flights in soon. The flight only used 50% of my new Turnigy 3s 30C Lipo packs and they were not even warm!

great!

you can control that by setting Q_TILT_RATE_DN to a higher value. I had it set to a very conservative 20 degrees per second, but it will probably work fine with 40 or more. If you transition too fast then you can get some instability, so increase it incrementally until you are happy with it.

yes, the FireFly really doesn’t like wind on its tail. I think we could improve that a bit by disabling the elevons when wind is from behind, but it’s a surprisingly tricky problem to get right (especially without an airspeed sensor).
So glad it went well for you!
Cheers, Tridge