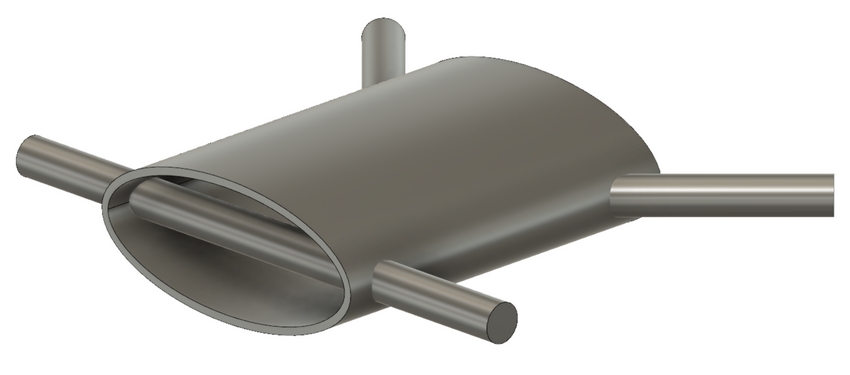
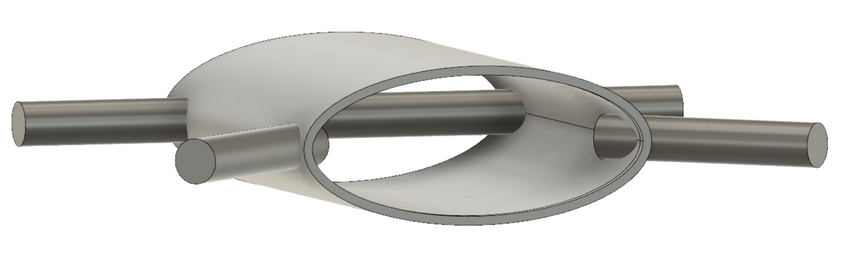
I actually love this idea and I’ve thought about it a lot! I’d really like an elliptical (flattened) tube. Then I could put all of the electronics on a board that I could slide in and out of the back end for access. The front arms would be a single tube going straight through at a 90 degree angle, while the rear arms would go through two sides of the tube as in your picture (they would not extend forward, just backwards).
The problem is, I can’t find any readily available materials that would work for the main tube. PVC is way too heavy. I couldn’t find any carbon fiber tubing with a large enough diameter, that isn’t also too heavy and too expensive.
This solution could be realized with a 3D printer or by making a custom shell with carbon fiber cloth and resin. But that is currently outside of my capabilities at the moment. I do plan to buy a 3D printer in the next few months but I’m trying to keep this as DIY friendly as possible, especially for people with a limited budget.
I definitely want to revisit this tube body design in the future. Besides being more aerodynamic, it would provide an enclosure to protect all of the electronics. I would also make a custom nose piece to hold a gimbal or camera, and perhaps several interchangeable designs so you could select whether you wanted a gimbal or just an FPV camera.
Robert, I can print you 3D bodies to try them out. If you provide me with some drawings of what you have in mind, I will transpose it to fusion360 and print it.
Yes, that’s pretty much what I was thinking, except I might want the bottom to have a flat surface. I haven’t worked out all of the details yet. This will definitely be a separate project from the one I’m building now. I’m planning to do a bunch of experiments with my current frame design that will be useful for more complex designs in the future. I’ll email you!
As promised, I’ve been building the frame while filming it to make tutorial videos. Its more work than I thought it was going to be. I could easily build the entire frame in a single day, but filming each step seems to take forever. Here are the first two…
After posting the first one, it took me two weeks to post the second one (earlier today). I either had to work or the weather wasn’t cooperating for me to film certain scenes outdoors. The good news is that I already have half of the footage I need for the third video.
I welcome all feedback. I’m trying to keep each video under 5 minutes. I also want to minimize the dialog when possible. Do you like less talking or should I talk more? If you have comments or suggestions, I’d prefer if you post them on the relevant video in YouTube. If you don’t have a YouTube account, you’re certainly welcome to post here or you can send me a PM.
If you do have a YouTube account, please subscribe to my channel.
Love the videos. Very slick. I am inspired. I will build one of these. But I am lazy/busy enough to get the frame cut by someone with a CNC. So when you think it is ready I will see if anyone else is interested.
Also I think a 3D camera would be my payload. The electronic stabilization is getting really good.
I am also thinking a DJI E600 quad set I have laying around might be well suited to this – for some reason the DJI sets always have smaller props that you think optimal – the props are only 12*4.2 yet the motors are 3508-415kv
Maybe wait until I post a couple more videos. I’m still optimizing the cutouts. You could build the frame with no cutouts and just mount all the electronics on top but I’m trying to make cutouts that allow you to mount some of the electronics inside the hollow sections of the frame and run the motor wires through the arms.
Videos are informative and look great. The introduction photography (ski boat) is fantastic. One question - with the saw you are using how clean is the edge you get; i.e. do you later have to sand them or plane. Or, given the assembly method you use, do perfectly clean edges not matter so much? Great job with this!
The blades I recommend in the second video give a very clean cut on both wood and carbon fiber. It took a LOT of trial and error to find those blades. It kind of makes sense since they are designed for cutting laminates. That saw also gives me nice, straight cuts. I do use a sanding block on the edges, but very lightly with usually just a single pass on each edge to remove any little pieces/splinters that are still hanging on after a cut. I don’t want to round the edges that will be glued. I like to keep them square.
Third video is coming soon!! The Holidays and my work schedule have killed my free time.
Just posted part 4. The entire video is just about attaching the motor arms to the bottom plate, but I’m trying to show techniques for building that will help students develop good habits. I should be able to edit PART 5 sooner now that the Holidays are over!! Comments are always welcome!
Hi Robert and all,
Very glad to have registered to this blog
You have been providing a lot of very interesting informations for people who are starting
in this hobby
Best regards from France,
JC
Here are parts 5 and 6 of my frame tutorial. At the end of part 7 we’ll have a complete frame, but we won’t be finished because there will be stress tests and further modifications.
In part 5, I’m using a Dremel to make cutouts in W1 and W3. At the end, W1 and W3 and attached to the frame. You’ll need the Dremel router attachment that comes with most kits, and a Dremel 561 Multi-purpose bit. We’re cutting holes in W1 and W3 so we can run wires through them later. If we didn’t cut the holes now, it would be almost impossible to do it later, once the frame is glued together. The technique shown in this video is useful for cutting out different shapes in thin materials. It isn’t the most precise way to do it, but its an easy solution if you don’t own, or have access to, a CNC router.
In part 6, I’m attaching the rest of the 25mm tall pieces to the frame- S1, S2, L1-L4, X1, X2, E1, E2. At the end of this video, the basic frame is pretty much complete, except for the top plate. In part 7, I’ll be attaching the top plate and we’ll have a complete frame.
Here’s part 7 of my frame tutorial. When you finish these steps, you will have a complete frame, ready for motors and electronics. The completed frame weighs 187g.
This frame:
is very light for its size. It is less than half the weight of some commercial frames for 15 inch props.
is stiffer in torsion than most commercial frames, including “X” frames, yet will flex enough to absorb small impacts.
is transparent to radio signals because the body is made of wood, not carbon fiber. This means you have more flexibility in where radios can be mounted.
is less expensive to build than if it was made from all carbon fiber.
is easier to build because the wood is easier to cut and easier to glue.
has a general purpose layout. I designed it for a front mounted camera with no props in view, but it could easily take a center mounted, underslung gimbal. Large, flat areas on top and bottom allow for a variety of mounting configurations. ESCs can be mounted on the sides of the main body as well.
Overall, this frame is lighter and stiffer than almost any commercial frame made for 15 inch props. It is also easier to build and repair.
But WAIT, I’m NOT DONE…
I’ll be making a series of cutouts in the frame to make it even lighter.
I’m trying to design the cutouts so I can run the majority of the wiring (and maybe some of the electronics) inside the frame.
I’ll be adding 10mm tubes in front to support a camera gimbal.
I’m going to add some lightweight landing gear. Drone landing gear tends to add quite a bit of weight. Mine will not add much weight and will be designed to fail on hard impacts.
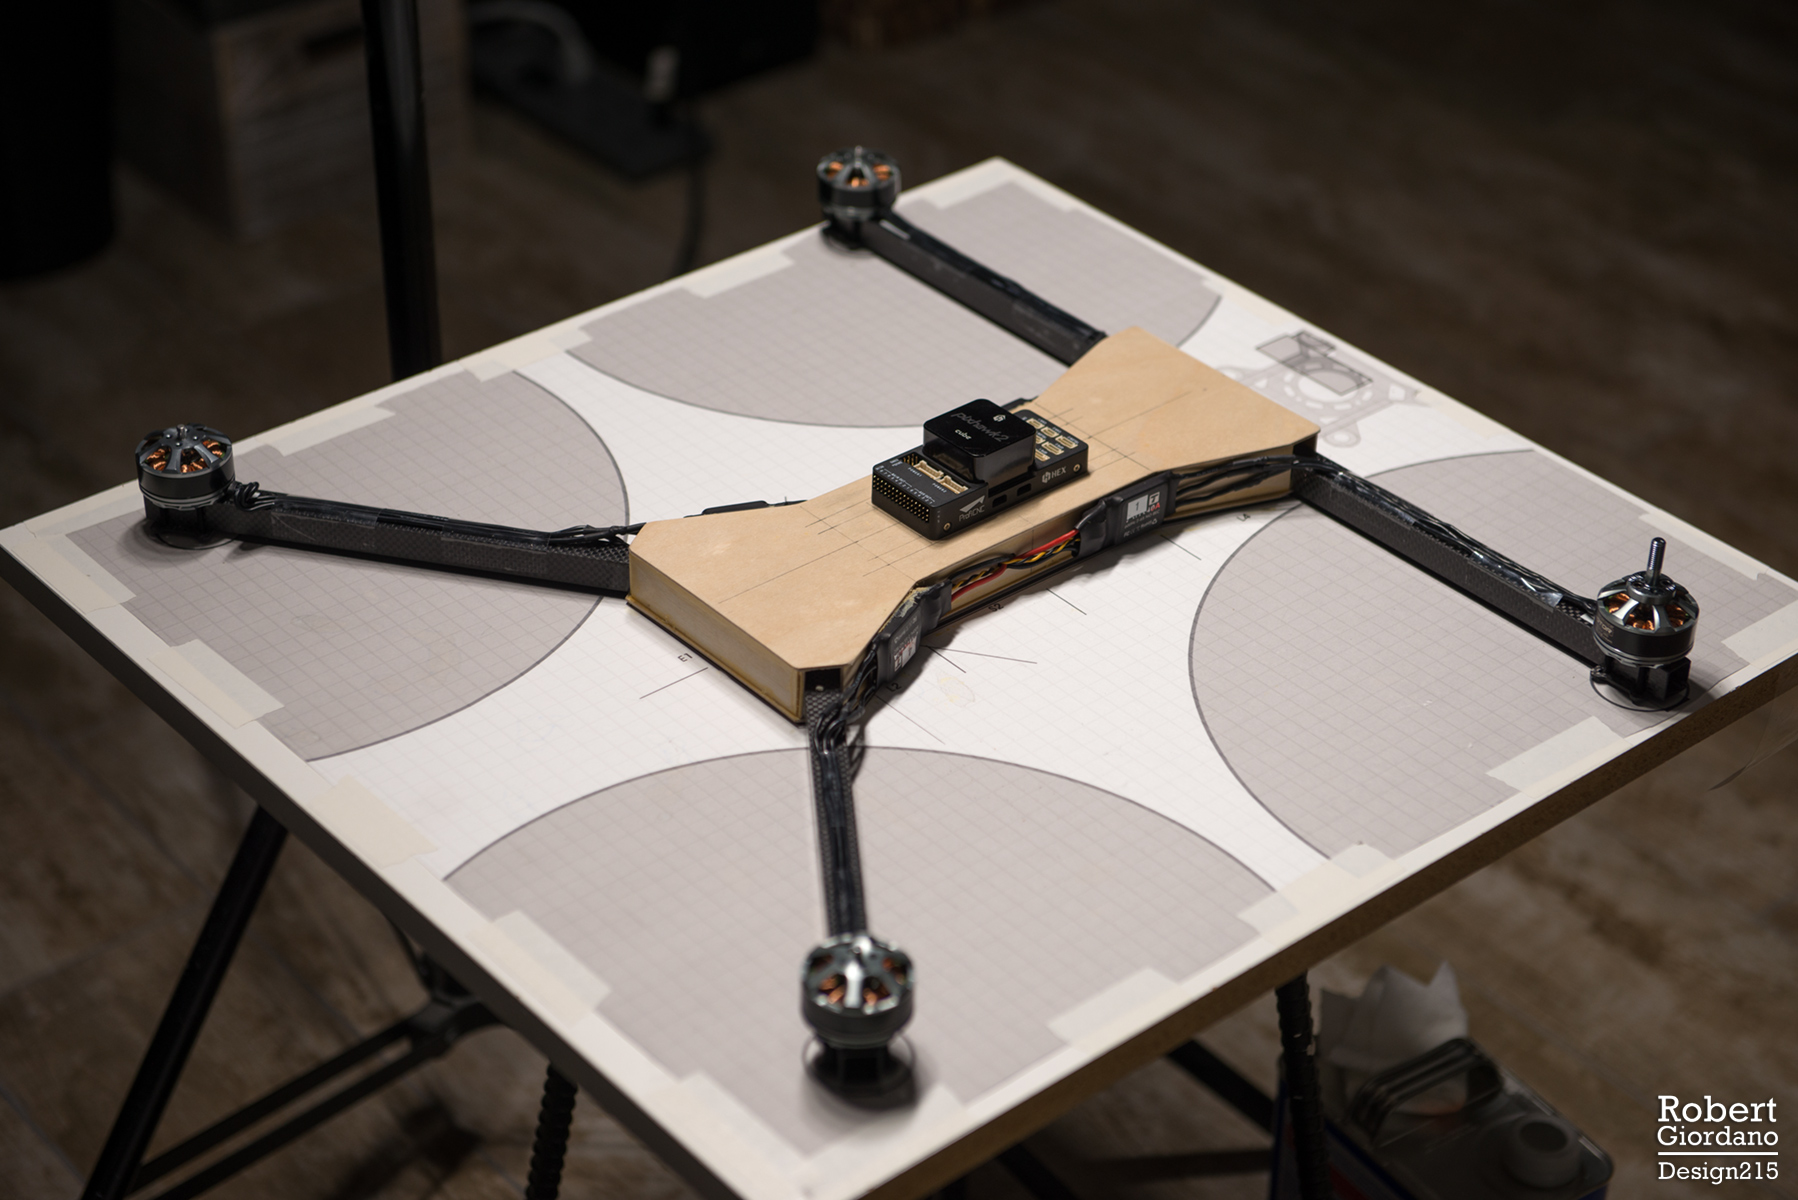
Its been a month since my last post and I just wanted to post a photo of my build progress. I’ve done some stress testing and I shot some video showing how to attach the motors. I’ve had a lot of work lately so I just haven’t had time to do the editing. Anyway, here’s the completed frame with the motors and ESCs attached. I just set the Pixhawk Cube on top but that’s pretty much where it will be attached.
On the underside, there are cutouts that allow me to mount a standard 36mm x 36mm PDB inside the frame, along with a bunch of the wiring. I’ll have a lot more info soon. I just wanted to post this photo from last night.