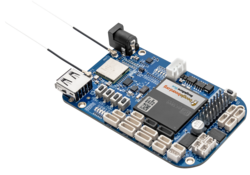
I spent some time this week dodging the summer heat wave and having a go with the BeagleBone Blue. Based on the amount of frustration I’ve perceived by reading others’ experiences with the board, I was not motivated to try one for myself. However, @geofrancis pointed out the current low price and excellent availability of these boards, which piqued my interest. So, I decided that maybe I could help alleviate some of the community’s frustration.
Much of this text can likely be incorporated into the wiki, but it is a significant departure from the existing guide(s), so it warrants some community/developer feedback before making significant edits there.
Physical Connection Notes
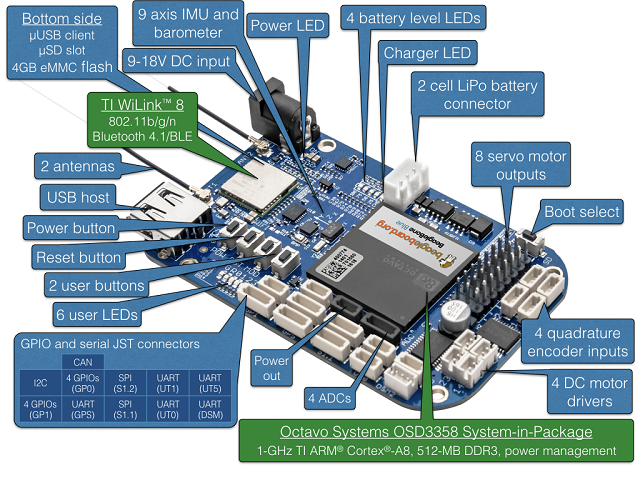
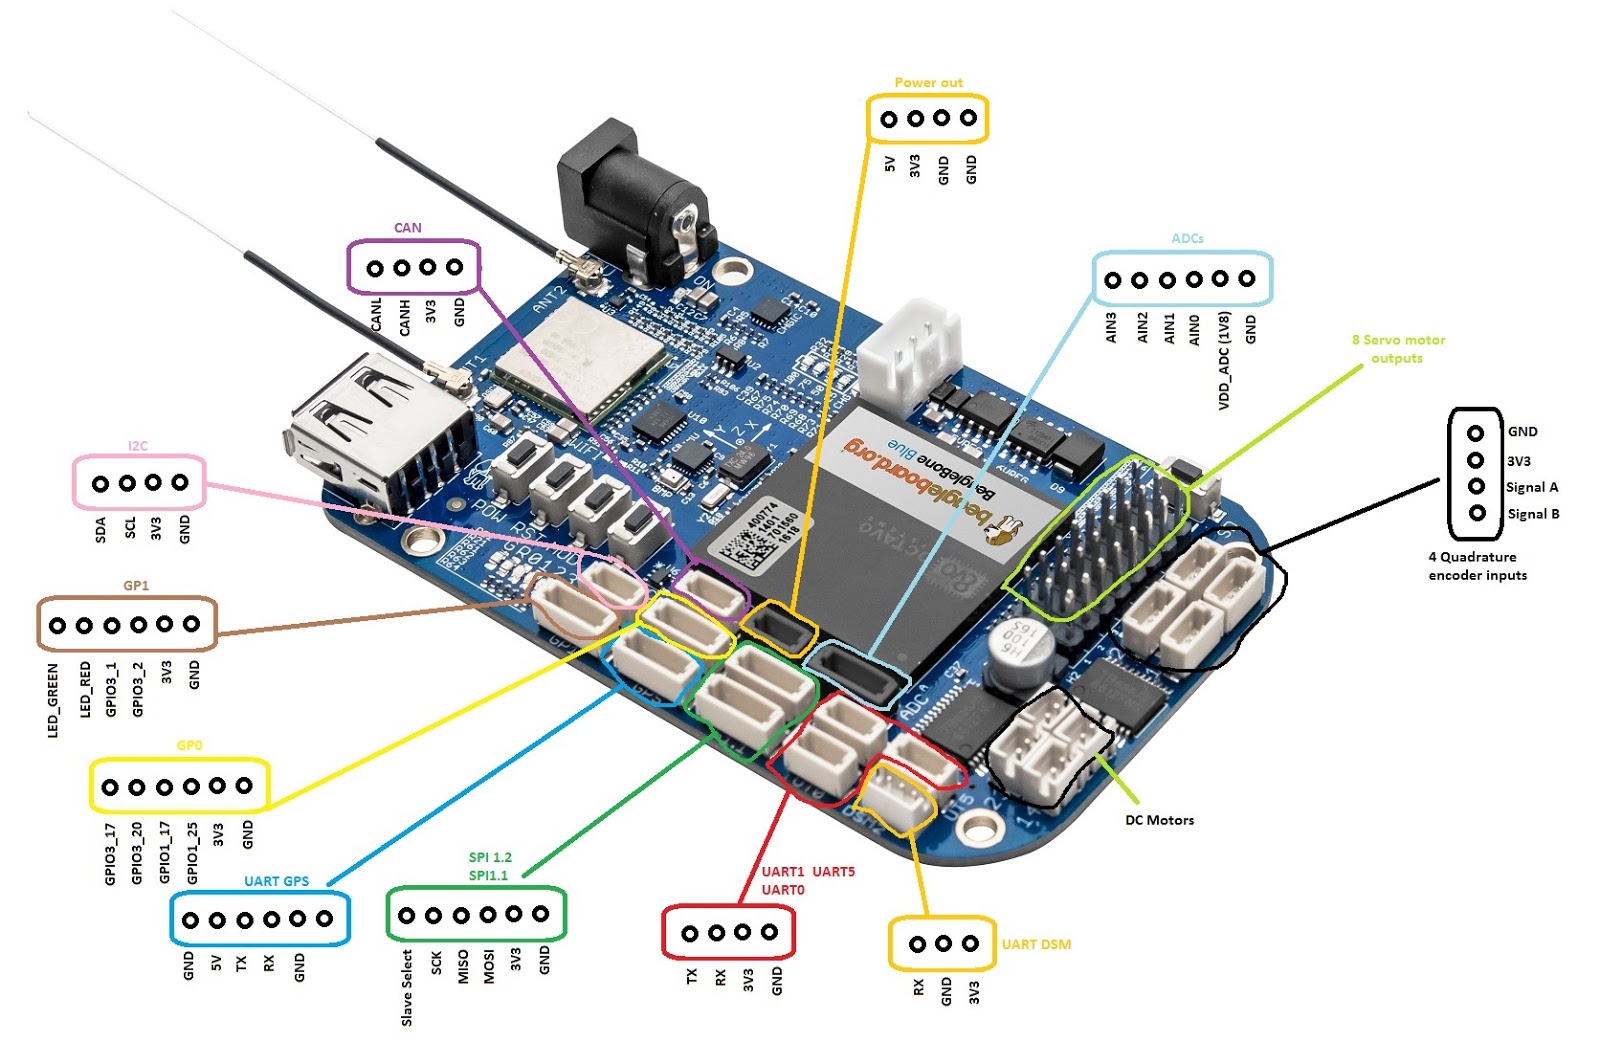
The BeagleBone Blue uses JST-SH connectors for most peripherals. These very small 1.0mm pitch connectors ARE NOT compatible with the 1.25mm pitch DF13 connectors on older Pixhawk autopilots nor the 1.25mm pitch JST-GH connectors common on newer autopilot boards.
Servo outputs are standard 0.1" (2.54mm) pitch DuPont headers compatible with most hobby servos and ESCs.
The DSM2 port (UART4) and motor drivers use 1.5mm pitch JST-ZH connectors.
The LiPo battery connector is a 2.5mm pitch JST-XH connector, intended for use with a 2S 7.4 volt LiPo battery.
The barrel jack is a 5.5x2.5mm jack and will accept 9-18VDC for board power and/or LiPo charging.
The 5V and 3v3 outputs on peripheral ports may not be powered when the board is powered via USB. Use a 2S LiPo or the barrel jack to ensure that peripheral devices receive power when you get to the point where you need to configure them.
NOTE: Be sure to carefully turn the antennas outboard from their inboard/as shipped positions, as they will perform significantly better once they are oriented away from the board’s components and ground plane.
Building from Source
ArduPilot firmware building is not covered in this text. Instructions are available in the ArduPilot Wiki. Highly recommend using pre-built binaries, but if custom firmware is a requirement, one should develop and build on a reasonably powerful computer with a cross-compilation environment rather than attempting to build from source directly on the BeagleBone, which will likely prove slow, cumbersome, and possibly very frustrating.
Setup Guides
I used bits and pieces from each of these guides. They are each reasonably complete, but each contains a bit of nuance that the others do not, and they each refer to differing version numbers. I have updated this guide to the latest versions to the best of my ability (as of July 2022).
SD Card Prep
Recommend using a good quality SDHC card (32GB max). I used a SanDisk Ultra A1 32GB card which is almost certainly significant overkill for the storage requirement (4GB would be plenty). I achieved success with a 64GB SDXC card as well, though the extra storage really isn’t necessary.
Download a compatible OS image from this repository. Look for a ~150MB file prefixed bone-debian-xx.xx-console-armhf. I used the March 2022 Buster console image.
NOTE : As of this writing, more recent debian-10.12 builds do not have networking provisioned and will require a USB-serial adapter for initial log in and configuration.
Use Balena Etcher to flash the SD card (or use the dd utility under Linux).
NOTE : Be sure to fully seat the SD card into the BBB. I may have bricked a board by partially seating the card, though that board likely shipped with a corrupt ROM bootloader.
First Boot
Connect to a computer via USB. The board should show up as a network adapter on its own subnet. Wait a few moments and then connect via ssh (password: temppwd):
ssh debian@192.168.7.2
If the board is unreachable at 192.168.7.2, try 192.168.6.2.
NOTE : Be sure that you are using the image from the SD card (which should boot by default). If
cat /etc/dogtagdoes not show the distro you flashed to the SD card, you have probably booted into the onboard eMMC image, which is likely out of date. Double check SD card compatibility and that you have flashed the correct OS image.
Use passwd to change the default password.
If you don’t want to enter your password often during the next steps, eliminate the need for it when using sudo:
echo "debian ALL=(ALL) NOPASSWD: ALL" | sudo tee -a /etc/sudoers.d/debian >/dev/null
If USB Networking is Unavailable (debian-10.12):
Rather than proceeding with a USB-serial adapter, recommend trying a different disk image.
If the USB network adapter fails to show up on the client computer, it is still possible to log in via a 3v3 USB-serial adapter (FTDI) connected to UART0. Connect a 4 pin JST-SH connector to TX, RX, and ground, and use a terminal application like minicom, picocom, RealTerm, or Putty. Execute
sudo dpkg-reconfigure openssh-serverto enable ssh.
Connect to WiFi
Execute this command and copy the output (something like wifi_abc123_321bca_managed_psk).
connmanctl services | grep 'YOUR_SSID' | grep -Po 'wifi_[^ ]+'
Now provide a configuration file for connman.
sudo nano /var/lib/connman/wifi.config
Once in the editor, create this file:
[service_<OUTPUT-FROM-CONNMANCTL-COMMAND>]
Type = wifi
Security = wpa2
Name = YOUR_SSID
Passphrase = YOUR_WIFI_PASSWORD
Ctrl-O then Ctrl-X will save and exit the editor.
If the WiFi network is available, a bright green LED should light up almost immediately, indicating a successful WiFi connection.
You may wish to limit read access to this file:
sudo chmod 0600 /var/lib/connman/wifi.config
To note the IP address for future ssh or telemetry connections, execute the following command and look for the IP address shown under wlan0.
ip addr
The BeagleBone should connect to this network automatically any time it is available.
Update/Install Software
Update your OS and install requisite software packages. Choose a UTF-8 locale (like en_US.UTF-8) unless you specifically require another language codeset.
sudo apt update
sudo apt -y dist-upgrade
sudo apt install -y git cpufrequtils locales lsb-release
sudo dpkg-reconfigure locales
cd /opt/scripts && git pull && cd ~
If /opt/scripts Does Not Exist (debian-10.12):
Some images may not include the /opt/scripts directory. It’s an easy fix.
cd ~
git clone https://github.com/RobertCNelson/boot-scripts.git
sudo mv boot-scripts /opt/scripts
Configure Hardware/Kernel
Configure the board to use a realtime kernel at 1GHz (“performance”) clock speed. Refer to kernel options if you’d like to use a different/newer version. 5.10-LTS is the latest as of this writing.
In some of the guides, there are references to specifying PRU drivers. Recent builds should make these steps obsolete, and I have omitted them.
Using the March 2022 debian-5.11 image, I found that I had to grow the SD card partition prior to updating the kernel to gain enough free space (sudo /opt/scripts/tools/grow_partition.sh followed by rebooting).
sudo sed -i 's/GOVERNOR="ondemand"/GOVERNOR="performance"/g' /etc/init.d/cpufrequtils
sudo /opt/scripts/tools/update_kernel.sh --bone-rt-kernel --lts-5_10
sudo sed -i 's/#dtb=/dtb=am335x-boneblue.dtb/g' /boot/uEnv.txt
NOTE: After updating the kernel, you may find that a warning is presented on the client terminal when attempting to ssh into the board again. Follow the on screen prompt to remove the stored keys. The required command will look something like this:
ssh-keygen -f "/home/user/.ssh/known_hosts" -R "<IP ADDRESS>"
If you wish to continue running the OS and software from the SD card after this initial setup (instead of flashing to eMMC), you may wish to grow the SD card partition to take advantage of full storage size.
sudo /opt/scripts/tools/grow_partition.sh
sudo reboot;exit
Install/Configure ArduPilot
In the following commands, replace ardurover with arducopter, arduplane, etc, as desired.
Create an environment file to define the serial ports in use.
sudo nano /etc/default/ardurover
Paste the following and change <target IP address> to the one for the computer to which telemetry will be connected.
# WiFi Telemetry
SERIAL0="-A udp:<target IP address>:14550"

# Radio Telemetry (UART1 - "UT1")
SERIAL1="-C /dev/ttyS1"

# GPS1 (UART2 - "GPS")
SERIAL3="-B /dev/ttyS2"
Ctrl-O then Ctrl-X to save and exit.
Create a service for ArduPilot.
sudo nano /lib/systemd/system/ardurover.service
Paste the following:
[Unit]
Description=ArduRover Service
BindsTo=sys-subsystem-net-devices-wlan0.device
After=sys-subsystem-net-devices-wlan0.device
StartLimitIntervalSec=0
Conflicts=arducopter.service arduplane.service antennatracker.service

[Service]
EnvironmentFile=/etc/default/ardurover
ExecStart=/usr/bin/ardupilot/ardurover $SERIAL0 $SERIAL1 $SERIAL3
Restart=on-failure
RestartSec=1

[Install]
WantedBy=multi-user.target
Ctrl-O then Ctrl-X to save and exit.
NOTE : This
ardurover.servicefile differs from those in the other guides because I found that it was beneficial to wait for the WiFi device to be available (even if it goes unused) before starting ArduPilot. Using this method, boot time is approximately 40 seconds. By contrast, usingAfter=networking.serviceslows the entire boot sequence due to the resource heavy initialization of ArduPilot - it can take up to 5 minutes to fully boot, and ethernet/wifi telemetry becomes unstable.
Install the binaries for the ArduPilot version of choice (latest dev version is the example here).
sudo mkdir -p /usr/bin/ardupilot
sudo wget -O /usr/bin/ardupilot/ardurover https://firmware.ardupilot.org/Rover/latest/blue/ardurover
sudo chmod 0755 /usr/bin/ardupilot/ardurover
sudo systemctl enable ardurover.service
sudo reboot;exit
It may take a bit of time to reboot and reconnect to wifi, but as long as you succeeded at using connman above, the green LED should eventually illuminate, and a GCS connection via UDP port 14550 should be possible.
Flash SD Card Image to eMMC
The BeagleBone has its own onboard storage similar to a solid state hard drive. It may be preferable and possibly faster to run the OS from the onboard eMMC rather than from the SD card.
In testing various SD cards, including an A2 class card, it seems the upper limit for SD card I/O on the BeagleBone Blue is about 22 MB/s. My BeagleBone Blue from Embest showed eMMC read/write speeds of 41 and 13 MB/s, respectively, suggesting that it is likely preferable to use eMMC for best performance.
Uncomment the line containing the eMMC flasher script in /boot/uEnv.txt:
sudo sed -i '/init-eMMC-flasher/s/^#//' /boot/uEnv.txt
Flashing takes more power than is typically available from the USB port, so power the board with a 2S LiPo or via the barrel jack and reboot.
sudo reboot;exit
The blue LEDs will blink for a few seconds and then begin a scan pattern. Wait for the scan pattern to stop (about 5 minutes, longer if using an older SD card). Only the power LEDs should remain lit before proceeding.
Remove power, remove the SD card, reapply power, and the board should boot from its internal storage.
NOTE: After flashing to eMMC, you may find that a warning is presented when attempting to ssh into the board again. Follow the on screen prompt to remove stored keys. The required command will look something like this:
ssh-keygen -f "/home/user/.ssh/known_hosts" -R "<IP ADDRESS>"
CAUTION: the SD card used for flashing will still be configured to flash eMMC after the process completes. You may wish to keep it as a backup, but DO NOT insert it into the board again unless you intend to overwrite eMMC with a fresh image!
Enable Lua Scripting
By default, scripts are located in the root directory under /scripts, and you must have root access to edit them. However, you can make a symbolic link to your home directory and place/edit all desired scripts there without invoking root privileges.
cd ~
mkdir scripts
sudo ln -s /home/debian/scripts /scripts
Connect via GCS and set the parameter SCR_ENABLE=1. Reboot, and scripting should work. You may see an error that says Lua: open directory (@ROMFS/scripts) failed, but it appears to be a nuisance warning and does not prevent scripts from loading.
Enable Bluetooth Telemetry
NOTE: This proved more difficult than it probably should have been. I discovered that following any of the guides on the subject resulted in either forcing a failure of the Bluetooth service to start, or a failure of ArduPilot to successfully connect to the virtual serial port prior to its instantiation. There is likely room for improvement to this method, but it does work reliably.
The following instructions are fairly lengthy and more complex than most of the rest of what I’ve written so far. Take care to keep your place as you go to avoid missing steps.
Stop the ArduPilot service, then install pip3 and required packages/modules:
sudo systemctl stop ardurover.service
sudo apt update
sudo apt -y install python3-pip libbluetooth-dev
sudo pip3 install pybluez
sudo pip3 install pyserial
Create a Python script to manage a virtual serial port (/dev/pts/0):
sudo mkdir /usr/bin/bluetooth-serial
sudo nano /usr/bin/bluetooth-serial/bluetooth-serial.py
Paste the following:
import os, pty, serial, time
from bluetooth import *
import threading


def receive(client, master):
    try:
        while True:
            received_data = os.read(master, 1024)
            client.send(received_data)
    except:
        print("cannot receive, connection closed")


def send(client, master):
    try:
        while True:
            data = client.recv(1024) #128
            written = os.write(master, data)
    except:
        print("cannot send, connection closed")


def start_server_and_listen(master):
    service_uuid = "00001101-0000-1000-8000-00805F9B34FB"
    server = BluetoothSocket(RFCOMM)
    server.bind(("", PORT_ANY))
    server.listen(1)
    port = server.getsockname()[1]
    advertise_service(server, "BBBlue-MAVLink", service_id=service_uuid,
                      service_classes=[service_uuid, SERIAL_PORT_CLASS],
                      profiles=[SERIAL_PORT_PROFILE])
    client, client_info = server.accept()
    receive_thread = threading.Thread(target=receive, args=(client, master))
    send_thread = threading.Thread(target=send, args=(client, master))
    receive_thread.start()
    send_thread.start()
    receive_thread.join()
    send_thread.join()
    server.close()
    client.close()


master, slave = pty.openpty()
s_name = os.ttyname(slave)
print(s_name)
ser = serial.Serial(port=s_name, baudrate=57600, stopbits=serial.STOPBITS_TWO)

while 1:
    try:
        start_server_and_listen(master)
    except:
        print("Exception occurred, restarting server...")

client.close()
server.close()
Ctrl-O then Ctrl-X to save and exit.
Modify /etc/bluetooth/main.conf to make the board discoverable at boot:
sudo sed -i -E '/^#? ?DiscoverableTimeout ?=/c\DiscoverableTimeout = 0' /etc/bluetooth/main.conf
sudo sed -i -E '/^#? ?AutoEnable ?=/c\AutoEnable=true' /etc/bluetooth/main.conf
Create an override file for the Bluetooth service to skip an uninstalled plugin and start in compatibility mode:
sudo mkdir  /etc/systemd/system/bluetooth.service.d
sudo nano 01-disable-sap-plugin.conf
Paste the following (the two ExecStart= lines are not a typo):
[Service]
ExecStart=
ExecStart=/usr/lib/bluetooth/bluetoothd -C --noplugin=sap
Ctrl-O then Ctrl-X to save and exit.
Create a service to start the Python script:
sudo nano /lib/systemd/system/bluetooth-serial.service
Paste the following:
[Unit]
Description=Bluetooth Serial Service
After=networking.target
StartLimitIntervalSec=0

[Service]
Type=simple
ExecStartPre=/usr/bin/timeout 1s /bin/bash -c 'bluetoothctl show' | /bin/grep "Discoverable: yes"
ExecStart=/usr/bin/python3 /usr/bin/bluetooth-serial/bluetooth-serial.py
Restart=always
RestartSec=1

[Install]
WantedBy=multi-user.target
Ctrl-O then Ctrl-X to save and exit.
Modify the environment file to use the virtual serial port for telemetry:
sudo nano /etc/default/ardurover
Comment the line for WiFi telemetry (add a # character) and add the lines for Bluetooth telemetry:
# WiFi Telemetry
#SERIAL0="-A udp:xxx.xxx.xxx.xxx:14550"

# Bluetooth Telemetry
VIRTUALPORT="/dev/pts/0"
SERIAL0="-A /dev/pts/0"

# Radio Telemetry (UART1 - "UT1")
SERIAL1="-C /dev/ttyS1"

# GPS1 (UART2 - "GPS")
SERIAL3="-B /dev/ttyS2"
Ctrl-O then Ctrl-X to save and exit.
Modify the ardurover service to start after the bluetooth-serial service:
sudo nano /lib/systemd/system/ardurover.service
You can simply delete everything and paste the following:
[Unit]
Description=ArduRover Service
#BindsTo=sys-subsystem-net-devices-wlan0.device
#After=sys-subsystem-net-devices-wlan0.device
After=bluetooth-serial.service
StartLimitIntervalSec=0
Conflicts=arducopter.service arduplane.service antennatracker.service

[Service]
EnvironmentFile=/etc/default/ardurover
ExecStartPre=/bin/ls $VIRTUALPORT
ExecStart=/usr/bin/ardupilot/ardurover $SERIAL0 $SERIAL1 $SERIAL3
Restart=on-failure
RestartSec=1

[Install]
WantedBy=multi-user.target
Ctrl-O then Ctrl-X to save and exit.
Enable the bluetooth-serial service, reboot, and you should be able to pair your client computer/device to a Bluetooth device named “beaglebone.” A virtual serial (COM) port should appear, and you can use it to connect a GCS like Mission Planner.
sudo systemctl enable bluetooth-serial.service
sudo reboot;exit