Yonah Ops Ground Control (OGC) - Part 0

Introduction

Hello everyone. Last year, we successfully test flew our Nemo cargo drone, designed to ferry a 3kg vaccine box and other medical supplies over a delivery radius of 100-150km. We shared some of our experience and insights when we finally reached autonomous flight here. Following that milestone, we pushed on to validate the reliability of our system. Prior to the pandemic, we managed an unbroken count of 29 sorties, on a single aircraft, without invasive maintenance intervention. We defined 1 x sortie as a set of takeoff-flight-landing. Flight time varied from mins to an hour. Time in between sorties also varied from 15mins to 1 hour with refuel and some no-refuels, payload-on and payload-off in between. We also managed to rehearse doing “remote” landing operations. This involved recce, pre-landing flight and 1st landing flight in a spot far away in our test field, using only GPS coordinates from our smartphone to waypoint the landing.

nemo

With a system designed for an operational range of 150km, the next step was to ensure that we could maintain reliable communication with the drone over that distance. Not surprisingly, conventional point-to-point radios such as the RfD900 wouldn’t cut it. Instead, for our 1st iteration, we employed a cellular data solution: forwarding MAVlink telemetry via a free tier EC2 instance to and fro aircraft and a ground control station running MAVProxy.

Not so graceful but it works. For flight testing, this was good enough. It gave us low-latency, reliable data to monitor our drones in real-time, and our developers had no issues navigating through the terminal-heavy environment of MAVProxy.

But in a fast-paced, medical delivery operations where efficiency is key, such a solution is too clunky. While there were other GUI based alternatives such as Mission Planner and QGroundControl, neither could they fulfill Yonah’s operational requirements. These GCS were designed, largely, for the mission profile of a single aircraft and mostly surveillance-ish missions (i.e. take-off and landing from the same spot). Yes, there is stuff from FlytBase but we didn’t have time to look too deep - pricing was hard to find and we already have critical mass of skill to work with ROS and customize it to our needs. As such, we looked towards designing a custom Ground Control Station that fulfilled the following:

  1. User-friendly: At the end of the day, the ground controllers only needed a subset of information and commands to do their job; acccess to all MAVlink data is not essential. A efficient, user-friendly interface was more important.
  2. Multi-aircraft handling: Provide the ability to monitor and control several aircraft from a single GCS
  3. Flexible, long-range comms: Provide reliable, long-range communication that could adapt to the hostile conditions of rural areas; for example, regions without cellular coverage.

After 3 months of programming amidst pandemic-induced measures, we are happy to release our beta version of Yonah’s OGC. We decided to share our insights, both to seek guidance from the open-source community and in the hope that our work might benefit someone out there working on similar projects - if not the code then hopefully the design insights for such a mission profile.

The full documentation of our code can be found on our Github Wiki. In today’s post, we provide a brief overview of the overall architecture as well as our insights, and will make frequent references to the documentation.

Target users

We set ourselves a two-stage goal for the development of our Ops Ground Control:

Stage 1: The OGC should be usable by any of Yonah’s team members, regardless of whether they were mechanical, electrical or software trained.

That meant that anyone with a basic engineering education, but may not be familiar with software and terminal-based commands, should find our system simple to use.

This was based on the premise that Yonah’s field operations in the near future would be handled by our own engineers; they had to be comfortable with using our system with minimal help from the software team.

Stage 2: The OGC should be usable by non-engineering-trained personnel, such as a healthcare worker working in a rural hospital.

In the future, Yonah’s delivery services established in rural areas would be operated by the local community rather than our own engineers; we had to train the local populace how to operate our system. Not surprisingly, that called for a very user-friendly ground control system.

In this beta release, our efforts were geared towards the fulfillment of Stage 1.

Pre-requisites

We refer to the aircraft as the air side and the ground control station as the ground side

In our system, each aircraft operates a Cube Black Autopilot connected to a Beaglebone Black Industrial Companion Computer, which runs the bulk of the OGC software on the air side. The actual telemetry is handled by a RUT955 Cellular Router and Rockblock 9603 modem. Because of its complexity and cost, we deliberated a long time before deciding on including satellite communications into our system. Besides RockBlock 9603, there wasn’t other affordable choice for Short Burst Data service over Iridium’s network. Having observed other players’ (i.e. Zipline and Swoop) operational experience, we concluded that we cannot run away from the satellite mode of communication.

Of course, having redundant modes of communication without redundant power going feeding into the communication hardware. That will be touched on in another post.

The ground side runs a corresponding RUT955 and Rockblock 9603, connected to any Linux-based laptop that runs the bulk of the OGC ground side software.

See the required hardware and software sections for a full breakdown of the packages that we use.

Architecture

Our system is designed around the ROS framework in a Linux environment, and interfaces with MAVlink based autopilots through the MAVROS package.

  • Highlighted in green is the triple-redundant, dissimilar link system consisting of Cellular Data, SMS, and Satellite communication.
    • The Telegram package handles communication over cellular data, using the Telegram API. This is the primary, low-latency link of the system when there is internet access
    • The SMS package handles communication over SMS. This serves as a medium-latency backup when internet access is down.
    • The SBD package handles communication via Iridium Short-Burst-Data (SBD) Satellite Telemetry. This is a high-latency backup when both internet and cellular connection are down.
  • Highlighted in red are the despatcher packages. They serve as the “central unit” of the OGC system, where telemetry is consolidated to and from the three links.
    • Fun fact: The despatcher package was originally meant to be called “dispatcher”, but one of us mispelled it, found that it was an recognized word anyway; hence the name stuck
  • Highlighted in yellow are the endpoint packages: MAVROS for the air side, and RQT for the ground side
    • MAVROS bridges the gap between the autopilot and the OGC packages by converting MAVlink data into “ROS format”, and vice-versa. This allows us to pick and choose the subset of MAVlink data and commands that the system should have access to. The despatchers communicate with the autopilot via MAVROS topics and services
    • The RQT is the ground based Graphical User Interface which the ground operators use to operate the system
  • Highlighted in blue are miscellaneous packages which perform a variety of “back-end” work, such as filtering messages, checking for authorized devices, etc.

Insights

Here are some takeaways that we had at the architectural level (more detailed insights will be talked about in subsequent follow-up posts)

MAVROS is a flexible and robust package that served our needs, but does not give us all the MAVlink info that we desire. For example, we would love a ROS topic giving the EKF status (similar to how Mission Planner displays the EKF status in a pop-up menu). That said, we currently have no bandwidth to consider messing around with MAVROS.

Developing the system in the middle of a pandemic, with limited access to the workshop, was a challenge. There were many times when we had to test the communication system remotely, with different hardware components in different teammates’ houses spread out across Singapore. At least, this was testament to the long-range nature of our system.

One thing that greatly accelerated our testing was the integration of ROS with SITL, which was a lot easier to test remotely than having to set up actual hardware.

Making something that works is the simple part. Making it simple to use is the difficult part.

Conclusion

This wraps up the introduction to Yonah’s Ops Ground Control (beta). We will describe our triple-redundant, dissimilar link system in greater detail in a follow-up post.

Our list of contributors can be found here

Signing out,

@disgruntled-patzer
@rumesh986
@huachen24
@ZeGrandmaster

Yonah

9 Likes

Yonah Ops Ground Control (OGC): Part 1

In our previous post, we provided an overview of our Ops Ground Control architecture. Today, we go through the workings of the triple-redundant link system in greater detail.

Triple-redundant link system

As mentioned previously, one of the requirements of Yonah’s OGC was to provide reliable, long-range communication that can operate in rural conditions. Could it survive without Internet? Or worse still, when cellular coverage is intermittent? Our design had to accommodate for such scenarios.

We settled on the following three links:

Telegram: Handles communication over cellular data, using the Telegram API. This is the primary, low-latency link of the system when there is internet access

SMS: Handles communication over SMS. This serves as a medium-latency backup when internet access is down.

SBD: Handles communication via Iridium Short-Burst-Data (SBD) Satellite Telemetry. This is a high-latency backup when both internet and cellular connection are down.


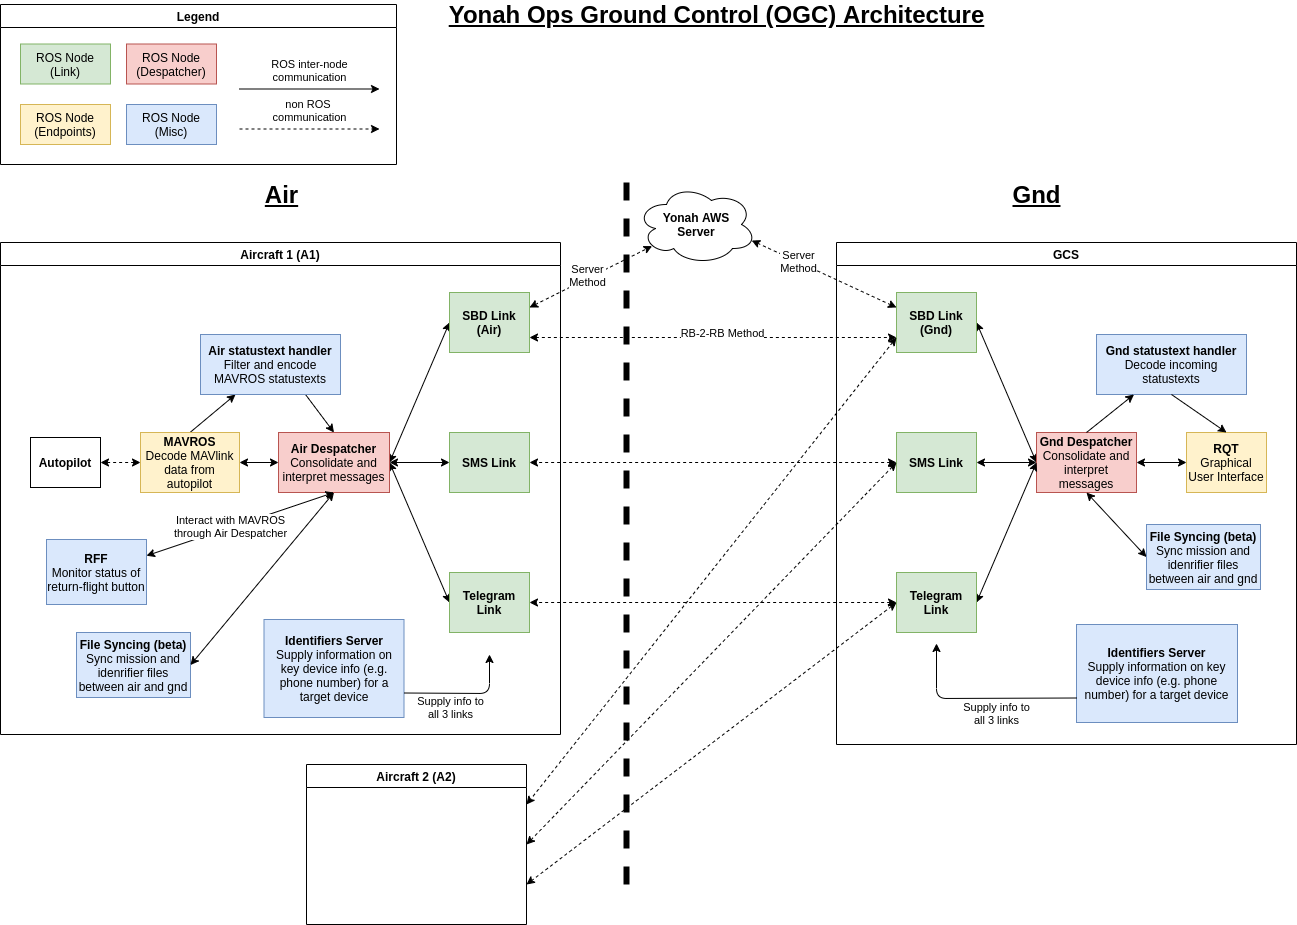
Our triple-redundant link system highlighted in green

Telegram

The ideal communication link would be low latency and low cost. We decided to use Telegram as our backend for this link as it was free and open source. Considering the popularity of Telegram as a platform, we could also count on its reliability. While playing around with the API, we found that Telegram could also be a lot more flexible than regular SMS - there was no character limit, could send files, and could send a high volume of messages at minimal cost (we apologize to the people we spammed while testing this link).

The full details of the Telegram link are documented in our Wiki; today we share more insights into the development journey.

The start of the journey

The first issue we had to tackle was deciding how to identify our various accounts. Telegram internally uses its own user_id or chat_id. This was not easy to find without diving into the code so we decided to use phone numbers to identify the devices. This meant we could use the same identifying information for both SMS and Telegram links (phone number).

Unfortunately, just using phone numbers was not that easy; we needed the aforementioned user_id to actually send a message to another account. The first challenge was getting the user_id. In the early days of this work, the link initialization was convoluted. There were no guarantees for the link to start up properly because it depended on too many factors. Here is a short description of how the link started up:

  1. Link starts
  2. Get the 10 most recent chats
  3. Get details about each chat
  4. If chat is a private conversation, check the phone number of the account
  5. If phone number matches, get the user_id and finish initialization
  6. Otherwise go to step 2

There were obviously many issues with the way this worked. If the phone number we want to talk to was not within the first 10 chats, the link would not start. If there was no prior conversations between the two numbers, the link would not start. If the phone number was hidden because of the other end’s privacy settings, the link would not start.

How can we improve the terrible first version

The first step to improve this behaviour was to search the account’s contacts instead of the chats. Searching the contacts meant we did not need to care about the receiving ends privacy settings (if the phone number is stored in the contacts). This still required the phone number to be added to the contacts in the first place. The next step was to add numbers to the contacts if it was not already there.

These changes fixed majority of the problems with the first Telegram link, but it still needed to query Telegram everytime it initialized. There was no way around this until we started working on the Identifiers package, which gave us a permanent method of storing and accessing link related data. Storing the user_id into the identifiers file meant the link no longer had to query Telegram everytime it started, unless it needed to. We will talk more about identifiers in Part 3 of this series.

The end of the journey

In the current setup, the Identifiers node checks which phone numbers do not have an associated user_id available and request Telegram for these numbers. As a result, the link is now guaranteed to start and it does so much faster than before.

There were two instances during this journey where we were pleasantly surprised by how fast the link worked. The first was our first test for the link where the messages were received almost instantaneously and the second was how fast the link started after implementing all the above changes. This was also the only time we removed so much code without feeling like we were removing features.

Despite all of Telegram’s benefits, there was one major disadvantage that we must account for: Telegram requires Internet connection to work. Additionally, although messages were sent almost instantaneously in our tests, the actual conditions in a rural environment could be expected to be much worse than our testing conditions (think of regions that still rely on 2G!). Thus, we still needed other links as a backup form of communication.

SMS

SMS is the second line of defense in our triple-redundant link system. Short Message Service is globally available, albeit losing out in popularity to Internet based messaging services such as Telegram, Whatsapp and the likes. Despite this, it is still reliable and has a low enough latency to serve as our backup in the event that the Telegram link fails. The documentation for the SMS link can be found here.

We selected the Teltonika RUT955 cellular router to manage this link, due to its in-built SMS functions (RuTOS) that could be accessed through a command line interface instead of a web UI. This was crucial in allowing us to manipulate SMS commands programmatically.

Slow, but secure

The very first version of this link used the python ‘subprocess’ library to execute command line actions from within the code. This allowed us to securely enter the router’s OS via SSH and send messages. However there were some problems that surfaced with this iteration.

  1. The router’s SMS management system appended new messages to the list instead of being pushed up to the top, which meant that given that it can only store 30 messages, message numbers may change once the 31st message is received and the first message is deleted, shifting all the messages 1 number up.

    We found this to be inconvenient as there would always need to be checks for the largest message number with a message. Instead, we decided to always work on an empty message list. Since messages are time sensitive (we don’t want to receive outdated commands and still execute them), we would delete messages once they are read so that the first message will always be the newest message.

  2. Subprocess closed each SSH connection once the line of code was executed. This caused initialisation of the node to be slow, as we had to iteratively delete all messages in storage after the aircraft has started up in order to start on a clean slate. Each delete command would require an SSH connection to be established with the router and then delete the message, taking roughly 1 second each. Hence, 30 seconds were spent during startup waiting for all messages to be deleted, before being able to properly receive messages.

Fast and secure

After experiencing the pain of the 30-second startup time in the field (live testing), we made the switch to Paramiko, a SSH-based python library which we also used in RFF development (RFF, or Return-From-Remote, will be talked about in Part 3 of our release). Paramiko allowed us to open a SSH session into the router and keep it alive until we finish executing all desired commands. This eliminated the time required to establish a new SSH session for every command. After “upgrading” the SMS link from subprocess to paramiko, we observed a significant decrease in the amount of time taken for the node to start up.

That said, the main limitations of both SMS and Telegram are that they both require cellular coverage, and also require the router to be working in order to function properly. There is a need for a third method in the event that the router fails, or the plane flies into an area with low cellular coverage. This leads us to the final link, the SBD link.

SBD

Iridium Short-Burst-Data. The final line of defense, when all other forms of communication have broken down. The SBD link takes advantage of Iridium’s global satellite network to offer truly global communication even in regions without cellular coverage.

In our setup, we chose the Rockblock 9603 satellite modem, which was recommended by other projects such as SPL Global Telemetry and PX4.

With its small form factor, relatively low cost (compared to other satellite modems!) and ease of operation, it is not difficult to see why the 9603 is so popular among hobbyists. Most satellite modems in the market were designed for large scale, industrial usage - they were too bulky to be fitted on our drones, had minimum-order-quantities (MOQs) running into the hundreds, and their APIs were closed-source. Rock Seven’s solution was one of the few that catered to hobby and R&D purposes. See here for the comparison table that we built as we did our sourcing.

The Rockblock 9603 modem uses the Iridium Short-Burst-Data technology provided by Rock Seven Mobile Services. Interaction with the modem is done using AT commands.

The documentation for our SBD package can be found here. In short, we employed 2 different methods of communication:

  1. Communication between an aircraft-based Rockblock and our web-hosting solution. Lower latency, and used when there is ground-based internet connection
  2. Communication between and aircraft-based Rockblock and GCS-based Rockblock. Higher latency than Method 1, and used when there is no ground-based internet connection.

To accommodate these asynchronous communication methods, our SBD package is split into two nodes; an air node and a ground node.

Makersnake’s pyRockblock

While figuring out how to integrate the Rockblock into our system, we came across this excellent tutorial by Makersnake, alongside his pyRockblock module. His work proved to be of enormous help to our development, as it handled the nitty-gritty of interfacing with the Rockblock through AT commands, allowing us to focus on “higher-level” logic.

Nevertheless, we did have to modify certain parts of the module before integrating it, for example:

  1. Converting the code to Python 3
  2. Figuring out how to pack the data in binary format before sending it to the modem
  3. Implementing a messaging service between two Rockblocks

In particular, the 2nd and 3rd point proved to be a real pain, as elaborated below.

Sending binary-compressed data between two Rockblocks

There were instructions on how to binary-pack the data. There were also instructions on how to send plaintext messages between two Rockblocks. But how about sending binary-compressed data between two Rockblocks? That was something that took us a long time to decipher.

There were simple instructions on Rock Seven’s documentation on how this should be done:

Binary Message Prerequisites

In the binary message that will be streamed, it is mandatory to include:

  • The RB prefix (“5242” in Hex)
  • The exact serial number of the unit (ex. if “1234” then “0004d2” in Hex)
  • The message body (ex. if “Hello” then “48656c6c6f” in Hex)

But what would have made our lives easier were concrete examples on how to implement this. Searching around on Github revealed insufficient data; most projects simply circumvented the problem by sending data in plaintext. This wasn’t an option for us; we needed to compress our data to save money! (Rock Seven charges one credit for every 50 bytes transferred)

Eventually, we deciphered this mystery (you can see our implementation on Github); when sending binary data between Rockblocks, the key was that the receipient’s serial number had to be packed into 3 bytes, in big endian format. Heads-up if you are implementing such a solution for your own projects!

Balancing between latency and cost

Another thing we realized was that every Iridium mailbox check, regardless of whether any data was transferred or not, would cost at least one credit. This meant that we could not indiscriminately poll the Iridium service around the clock to check for messages (like what was done in the SMS link), else there would be massive cost overruns. Rock Seven’s customer service even warned us against setting too low a latency when we enquired about it!

Ring Alerts were a possibility, except that they were viable only if the Rockblock was in the last known location detected by the Iridium constellation. For a modem mounted on a drone zipping through the air at 100km/h, this did not seem like a very safe bet…

The method we settled upon was designed to balance between cost and latency; the system would periodically conduct Iridium mailbox checks to check for incoming messages, as well as deliver any queued outgoing messages. We recommend setting the time interval to anywhere between 5 - 10 minutes to balance between cost and latency.

Moving forward

There are two improvements which we need to make to our link system.

The first improvement is one of security. While all our links employed encryption, not all this encryption was end-to-end. Telegram only encrypts data from the user to the server, and server to recipient; any data passing within the server would be unencrypted and readable by Telegram itself. Similarly, SMS only provides encryption from the user to the cell tower. We effectively placed our trust in Telegram’s servers and the cell towers to safeguard our information…

Based on our threat model, is end-to-end encryption a must? If so, what is the best way to implement this; switch to more secure methods (e.g. Signal), or establish our own encrypted tunnel? This is something which we have yet to discover.

The next improvement is to design an intelligent link-switching algorithm to detect if a link has failed, so that the system would automatically fall over to the next available link. In the OGC’s present configuration, we can only manually configure (prior to initialization) which link the system would listen on during runtime, which is far from user-friendly. We are currently working on designing this; taking into account the costs and latencies involved, it seems that this task will be more complicated than expected…

Conclusion

Throughout the development of our link system, we were fortunate to receive much help from the following:

  1. The Tdlib API developers
  2. Teltonika’s well documented wiki
  3. Parmiko’s developers
  4. Makersnake for his excellent tutorial and pyRockblock module
  5. Rock Seven customer services for their prompt assistance when we needed it. Those guys were helpful and responsive!

This concludes our coverage of our triple-redundant link system. In the next part, we will shift our focus on the ground side of things - the RQT user interface.

Our list of contributors can be found here

Signing out,

@disgruntled-patzer
@rumesh986
@huachen24
@ZeGrandmaster

Yonah

5 Likes

Yonah Ops Ground Control (OGC): Part 2

In our earlier post, we talked about our triple-redundant communication system. Today, we shift our focus to the ground operator’s user interface - the RQT based GUI.

As mentioned earlier, Yonah used MavProxy as our GCS for flight tests. MAVProxy is a great tool, but it has a steep learning curve, especially when introduced to a layman who has no technical background. For example, you would need to be familiar with the basic Linux terminal commands to operate it. Since our end-goal is for our drone delivery system to be operated by users with little technical background, we had to create a more user-friendly interface that allows the operator to interact with the aircraft through buttons instead of command line; hence the birth of this project.

The frontend interface

Since our system uses the Robot Operating System (ROS), we decided to use the rqt to help us build the frontend interface. rqt is a software framework of ROS that implements the various GUI tools in the form of plugins. It is based on the Qt framework and users can write a custom plugin using python or C++.

There are a few reasons why we chose to use rqt for our GUI:

  1. It is based on ROS, which our system uses also
  2. The Qt framework has quite a large number of users, and also there are quite a few well-developed open-sourced rqt plugin available
  3. It is written in python or C++ — languages that are familiar to our avionics team.

Details

To install Yonah’s rqt, see procedure on our wiki page

A full documentation on Yonah’s rqt is also included in our wiki; here, we only share the crucial details and some insights.

Once you have rqt running and opened, you should see an interface that looks something like the previous figure

The User-Interface (UI) is segmented into 3 parts — waypoint window, command window and summary/aircraft info window. The names are quite explanatory – the waypoint window shows the current waypoint of the aircraft and the percentage completion of a mission. The command window is responsible for sending commands to the aircraft. The summary window contains condensed information of each aircraft whereas the tabs next to it are the aircraft info window, which contains the detailed information for every aircraft.

While the rqt is designed to work with Yonah’s triple-redundant link system, it can also be connected directly to MAVROS + SITL running on the same PC. This was used in the early days of testing, when the links were not ready to be tested alongside it. It still serves as a convenient way to test key parts of the interface (e.g. visual layout) if the required hardware to run the links are not immediately available.

To link rqt with SITL, simply run rqt and launch the SITL and the MAVROS scripts as instructed in Ardupilot’s documentation. You should see the “Aircraft 1” field getting populated. Note that in this setup, rqt only supports single aircraft usage and without the functionality of the command window (this is because command window is set to send the information through Yonah’s triple-redundant links, while SITL runs on our localhost).

Design Decision

There are a few design decisions made that led to this configuration. The few key factors are

  • It must be intuitive/easy to navigate through for users using the UI - a key requirement for OGC!
  • User can see the important information quickly (in case of emergencies)
  • Easy to see under less than ideal lighting conditions (e.g. under the bright sun)

Therefore, we decided to layout the rqt based on Figure 1.1. Human eyes tend to look from left to right, top to bottom, hence the most important information was placed on the top left: The waypoint information and percentage completion of the mission. Our target users are ground operators who are tasked to just fly the drone without a deep technical background; to them knowing the progress of the mission is more important than the airspeed, altitude, or even GPS coordinates of the aircraft (one reason why we opted not to use a map layout, unlike conventional ground control software).

The next instinctive segment to look at is the summary window/aircraft info. We used a summary window to allow the user to obtain crucial information about the aircraft (e.g. airspeed, altitude) without even clicking once. However, should the user need to see more detailed information, he can still do so by visiting the aircraft info window which is just one click away.

All the command buttons are centralised at the bottom of the window, where it won’t distract the user’s view angle so the user can focus on the top 2 important fields. The most important command buttons (Arming, disarming, and sending an aircraft on an autonomous mission) are located at the first row with the largest button sizes, allowing the user to quickly identify these buttons should emergency cases arise

Overall, the layout is designed such that the user can quickly see key information and send commands easily without having to search too long for the button. We briefly considered making a different colour scheme for rqt (see figure below), but considering the lighting conditions on the field, we decided a light theme is best suited for our purpose. Along with that, we also designed the colour of the field to change should it reach a certain threshold, e.g. if the airspeed fell below the stall speed of the aircraft, the text field would be highlighted in red.

Guarding against human mistakes

In a system, human mistakes are the most dangerous, yet most preventable cause of an accident. Therefore, rqt as a frontend needs to have safeguards to protect the system against as many human mistakes as possible. This is done through several methods such as confirmation windows and automated change.

A confirmation window will be triggered when the user makes certain important decisions or when the user skips certain steps. For example, ARM and DISARM buttons all have a confirmation window to prevent accidental clicks which can cause tragic accidents to happen. This confirmation window is also present when the user tries to ARM the aircraft before performing a pre-flight checklist.

Another preventive measure is the syncing of the aircraft info tab and the command window drop-down menu tab (see image below). When the user selects an aircraft info tab, the command window drop-down menu will automatically change to follow the aircraft info tab. This is to prevent the user from sending a command to the wrong aircraft because they are looking at the information of one aircraft but the command window is set to send to another aircraft.

Insights

Having worked on the user-interface for the past 3 months, our main rqt developer, Dani @ZeGrandmaster, having started from virtually zero skill in QT, would like to share some insights and tips from his development journey:

"I embarked on this process with basic knowledge on python, did only one project with ROS before and a complete stranger to Qt or rqt. But I think looking back there are a few tips that I wish I could tell myself developing this

  1. Follow the tutorial, but more importantly look at the developed rqt plugins and see how they do it. This is because the tutorial doesn’t really teach you a lot about the Qt framework part (for example, how to make a button do something, or assign data from a textbox to a variable). We have listed down some resources that I used and find it very helpful inside Annex A
  2. Generally, try not to use the .ui file if your application is very complex in terms of layout or if you are developing for a dynamic layout. In the tutorial, you will be guided to use a .ui file to generate your layout, but I would recommend to not use it if you have a lot of elements (like the rqt I am developing) because personally I find it really hard to add an element in a .ui file by manually modifying the file (you can try it for yourself!). I don’t know whether I am just not proficient enough in using .ui file, but I find it way easier to just declare a textbox on the python file itself. Also it makes it easier if you need to repeat elements which you can do easily by using a loop in python. I don’t know whether there is a shortcut to do this in a .ui file, but as far as I know, if you want to repeat elements in the .ui file you would need to write each element manually.
  3. DO NOT use Qt Designer. Qt designer is a developer tool that will automatically generate a .ui file just by dragging and dropping elements (such as textbox or buttons). Although it is a good first step to know what are the elements inside Qt, setting it up for ROS environment is a hassle that is not worth your time (at least from personal experience). Also in line with the previous point, I prefer adding the layout elements using python instead of modifying a .ui file (which is what Qt Designer does).
  4. If you are writing using python, google for pyqt instead of qt when you do a google search. This is because qt is written in c++ meanwhile pyqt is the python version of the Qt framework. (I know this sounds dumb, but it took me weeks before I realized this difference)
  5. Start with small steps! Try to achieve something small first (like putting a button in the layout and connecting it to a function that does something) before moving on to the bigger picture. Slowly work your way up and don’t be too intimidated reading the Qt documentation. If you are stuck try searching for code samples and see how they do it."

Moving forward

The following improvements need to be made to the existing rqt user interface:

Complete move away from using a .ui file. Right now, the interface still uses a .ui file for basic layout

Improvement on command window UI. As the OGC expands to include more features, the UI would inevitably become more cluttered with command buttons. One potential improvement would be to display only the most important commands (e.g. Arm, Disarm) in the main window, with a separate popup window reserved for other, less important commands.

Dynamic UI. The existing GUI will display up to 10 aircraft windows, even if there are less than 10 aircraft in the actual operation. In order to hide inactive windows, a dynamic UI configuration is required.

Proper data saving mechanism. Should the system crash and recover, rqt will start anew and will not keep any data from the previous run.

Further enhancements are also being tracked on our Github Issues tracker.

Conclusion

This concludes our coverage of the rqt based graphical user interface. In the next and final part, we will describe miscellaneous packages which perform hidden - but equally important - tasks in our Ops Ground Control.

Our list of contributors can be found here

Signing out,

@disgruntled-patzer
@rumesh986
@huachen24
@ZeGrandmaster

Yonah

Annex A

Useful rqt resources

7 Likes

Thank you for sharing all of this information :+1::+1: its a good read and a valuable overview.

2 Likes

Wow, I’m really impressed!

2 Likes

@TianChang_Yonah,
This is awesome! Thank you for sharing your hard work. May I use your Yonah GPS??
Best regards, Tony

1 Like

Hi ton999,

Thank you. Can i ask what do you mean “use Yonah GPS?” We don’t make GPS’es : We use 2 of the older Here1 GPS on each system. Hope this helps.

Ooops, I am sorry for my mistype, it should be GCS . Yonah is a GCS (Ground Control Sration) right?

@TianChang_Yonah, hello and great work. Is there any reason why you didn’t use a vpn channel instead of telegram?

regards,

Corrado

There was some pre-work done last year prior to this iteration. I did most of last year’s iteration before handing it over to a task force to carry it forward.

We did use VPN last year. From Strong’s VPN, we had to secure a global & unique IPv4 address to be able to channel mavlink telemetry. And one fine day, our connection got hacked right before our eyes and didn’t want to trust it again. I know we could run our own VPN servers but then it would only be enough for one mode of communications.

VPN has a per month fee while Telegram is essentially free.

Go ahead and use. Its open source. Feel free to fork it. Do note the hardware requirements. Though because it is in ROS, you should be able to adapt it fairly quickly. We have some ways to go to be truely abstracted from the hardware layer.

1 Like

Ok understand, thanks.

Corrado

Yonah Ops Ground Control (OGC) - Part 3

In our earlier posts, we talked about our triple-redundant link system, as well as the front-end user interface. In our final post, we will share about the rest of the system - namely, the back-end packages that perform hidden, but equally important tasks in the Ops Ground Control

Behind the scenes: OGC’s back-end packages


The red and blue portions are our main focus of today

The back-end work is handled by the following packages:

  • Despatchers: The central units of the OGC
  • Identifiers: The gatekeepers to our database of authorized devices
  • Mission Handlers (e.g. Rff): Handle autonomous waypoint flights (e.g. loading of new waypoint files after each flight)
  • Statustext Handlers: Filter, encode and decode selected Ardupilot statustext messages

Despatchers

The despatchers are the central units where all data must pass through. They are the bridge between the endpoints (MAVROS and RQT) and the links. Such a design allowed us to abstract any message handling logic (e.g. compilation and compression of messages) away from the links, so that the code did not become overdependent on any one link.

The full inner-workings of the despatcher package have been detailed in our documentation. For today, we share some learnings from the design of the despatcher packages.

The importance of modularization

Anyone who is familiar with basic programming will understand the importance of ensuring readable code. This is more so in a software engineering project. What if someone wanted to add a new ground-to-air command? Or a new entry in our regular payload? As our despatcher code expanded to accommodate more features, we had to take these into account; hence the presence of modules such as “G2A” and “Regular Payload”, consolidating common topics and making future development more streamlined.

Security vs Convenience

This is an age-old dilemma: The more secure you want the system to be, the more you need to sacrifice elements of convenience. We found this out after taking great pains to ensure that our despatchers could filter out any rogue messages, e.g.

  1. Ensuring that unauthorized devices could not send commands to our drones (see the Identifiers section below for more details)
  2. Rejecting messages that are deemed “too old” - the last thing we wanted was our drone powering up and receiving an “arm” command that was transmitted several days ago

But in the process of adding these restrictions, it also made our testing much less convenient, for we had to ensure that every test message adhered to the requirements that the despatcher nodes laid down.

Identifiers

This package is integral for all our communication links. During the early stages of the OGC, we had to specify the phone number for each device we were testing with. As we moved onto multiple aircraft control, this proved tedious. We also had to provide more than just the phone number; for example, the SBD link would require the Rockblock serial and IMEI numbers. All these data had to be manually input to the system. This was a potential source of error during actual ops: What if an operator input the wrong info or forgot to change the information for all the links? For these reasons, we decided to come up a simpler, consolidated addressing system.

The addressing system

The system we came up with used 2 numbers: A device type to indicate whether the device was an aircraft or a GCS, and a system ID which would uniquely identify each device. This information had to be appended to every message so that we could always identify the source of the message. We needed the addresses to be small as some of our links (especially SBD) had small length limits for each message.

message headers

Now the operator just has to enter a single number for each device to communicate with.

The full breakdown of each message header is documented here.

The address book

Now we had a way to uniquely identify all our systems, but also needed a way to know how to contact each of these devices. Each identifier should have some associated information with it. The solution to this is the Identifiers package, which is fully documented over here.

We decided to store all the information in a JSON file. In this file, each identifier would have the associated phone number, SBD IMEI and serial numbers stored. This also gave us the opportunity to store other device specific information if needed.

Initial work and improvements

The identifiers was initially implemented as a class, with each link had having its own instance of the class running at all times. This was inefficient and limiting; if the identifiers file was modified, each link had to refresh its copy of the identifier. Any new package would also need to have its own instance of the identifiers class running. This had the problem of having to specify the identifiers to each link we intended to launch. This was again a possible source of human error.

To fix this, the identifiers class was broken into its own package, with its data accessible by custom ROS services. With these changes, we only needed one instance of the identifiers class running at any time; the different services made would provide all the information any link would need. This made it possible to implement new services to edit the file itself, so operators could use our GUI to edit the identifiers file and without any need to access the raw JSON format unless something had gone wrong.

Now that we could write to the identifiers file directly, it became a lot easier to store any other information we would need. As mentioned in Part 1 of this series, the telegram link was greatly simplified and a lot unnecessary work was removed.

You might be wondering what was the point of editing the file if it would only stay on the device and not be shared with the other devices. This was a major concern for us right from the start and led us to work on syncing our files such that all our devices would have the latest version at all times. Although we do have a “working” version of the file syncing system, it is still a work in progress and so will not be included in this series of posts.

Mission Handling

Mission handling does not exist as a package by itself and is instead integrated into the other nodes. This was born as a result of not having a way to autonomously continue onto the next location after a landing; a limitation of the ArduPilot code. Such behaviour was critical to Yonah’s operations, where a single drone might be tasked to deliver to several villages within a single round trip. After the aircraft had landed at one delivery point and released its payload, how would it continue autonomously to the next delivery location?

Our implementation is explained here, but in short, we used the following two definitions:

  1. Waypoint file File which contained the waypoints of a particular flight. Similar to the waypoint files that Mission Planner/MAVProxy users are familiar with
  2. Mission file: File which contains the list of waypoint files to be executed consecutively.

To keep it simple, mission and waypoint files were kept human-readable and stored as text format, but this may change as we start integrating waypoint and mission functions into the GUI for easier visualisation and editing (think of the map and mission editor module in MAVProxy!)

RFF

After the mission handling logic was thought through, the question of how to safely take off again after a delivery was genesised. It was not possible to have trained operators at each receiving site, which would make it dangerous for the plane to arm itself without first making sure that the payload has been removed and the area is cleared for takeoff. We settled on integrating a button which the personnel receiving the payload could easily press. Once pressed, a system of lights and buzzers (inspired by CUAV’s button, LED and buzzer system used in the 2018 outback challenge) would warn people near the plane to stay clear and prepare for takeoff.

This button, LED and buzzer system was compiled into a RFF (“Return-from-flight”) package, with the documentation here. The RFF button uses one of the mission handling commands to upload the next waypoint file, while adding its own arm command and delay to provide sufficient time for people to clear the area.

Statustext Handling

In Yonah’s operations, where the plane may be travelling long distances to deliver a payload, it is crucial to have information on the status of the aircraft at all times. While ArduPilot does have a statustext information stream where almost all information on the aircraft is published (these are the texts which appear in Mission Planner’s “Messages” screen and MAVProxy’s console), there are some which are not important to us. It is good to filter selected statustexts so that they do not clutter our GUI and save cost on sending them. As such, we found the need to apply filtering to the statustexts coming from MAVROS to better suit our needs. Sending them as a text string would also cost a large sum of money if a character-limited link was used (e.g. SMS, SBD); thus there was also a need to convert them to unique but short codes that could be easily decoded.

Since the statustexts were hardcoded into the ArduPilot code, it was easy enough to figure out exactly how the statustexts will be phrased and map it to a code. This is then sent over one of our three links to the Ground Control Station and decoded using the same mapping system to convert it back to a human-readable string for display on the GUI. The limitation of such a system is that the node will need to be edited as development continues and the statustexts that we need change over time.

Moving Forward

While most of our backend code has been tested to our satisfaction, there are several areas that require further development.

The first is the design of the file syncing system, as mentioned earlier. Being able to sync files smoothly across all devices would provide us with a lot of potential; for example, we could also use it to sync waypoint/mission files between the aircraft and GCS prior to a delivery mission.

Next, while we have a working RFF package, we noted the safety issues which CUAV faced during the Outback challenge. In particular, the following statement caught our attention:

“Most importantly we will ensure that in future designs all safety-critical actions (including warning LEDs and warning sounds) are controlled fully by the autopilot itself and not by the companion computer.”

Looking back, our RFF package had the buzzer, LED and button all controlled by the companion computer! Definitely something we should move away from in the future. While we look forward to changes being made to Ardupilot to support such safety features, we as a team are not ready to modify and contribute to the Ardupilot code yet.

Third, our identifiers node made it easier for us to implement multiple aircraft handling (i.e. multiple aircraft communicating with one GCS). This was a key requirement of Yonah’s OGC as mentioned in Part 1. But what about multiple GCS? In the scenario that an aircraft was talking to two ground terminals - a likely situation, considering that one GCS may fail - how would it know which GCS to send data to? That is something that is also on our to-do list.

Conclusion

This wraps up our coverage of Yonah’s Ops Ground Control, beta release. As mentioned in our very first post, the OGC aimed to provide the following:

  1. User-friendly operation
  2. Multi-aircraft handling
  3. Flexible, long-range communication

Over the past 3 months of development, our team has learned a lot from this experience, and received a lot of help from the open-source community. Thus, we share our code, documentation, and insights here, in the hope that it may one day benefit someone out there who is working on similar projects.

Our list of contributors can be found here

Signing out,

@disgruntled-patzer
@rumesh986
@huachen24
@ZeGrandmaster

Yonah

4 Likes

Hi, we are developing new Iridium datalinks for Ardupilot environments are looking for customer inputs to help us to optimize the solutions. Take a look here: Jarno Puff on LinkedIn: #iridium #bvlos #dronedelivery | 16 comments

You can also join the actual conversation here: New Iridium SATCOM System beySAT-LCC - Customer inputs required

So looking forward to your replays!

Thanks, Jarno