Hello everyone from Turkey. I have prepared a guide for installing multiple TFLuna Lidar (6 Pin = Uart / I2C) sensors over I2C. I hope that will be useful.
.
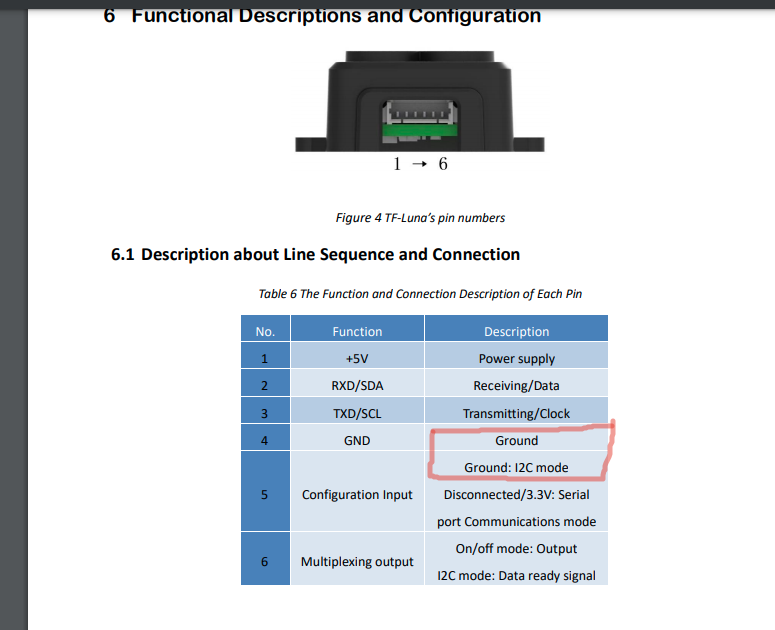
Solder / connect pin 4 and 5 for I2C.
.
TFLuna default address = 0x10 = (Binary = 16)
.
There is no need to make changes for one TFLuna.
.
ArduPilot Parameters
RNGFND1_TYPE = 25
RNGFND1_ADDR = 16
RNGFND1_MAX_CM = 300
RNGFND_MIN_CM = 10
.
To connect more than one TFLuan, you need to change the address of other sensors. Otherwise, there will be conflict.
.
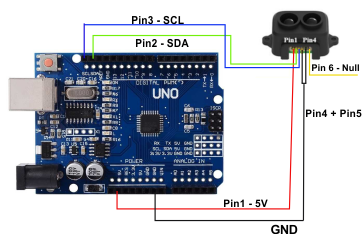
Connect the TFLuna sensor to Arduino.
.
Upload the code below to Arduino.
.
// This sketch changes the addresss of TF-Luna from 0x10 (Binary= 16) to 0x1E (Binary = 30)
#include <Wire.h>
void setup() {
Wire.begin(); // join i2c bus (address optional for master)
Serial.begin(115200); // start serial for output print
Serial.print(“Ready to Send command to TF-Luna\r\n”);
//pinMode(LED_BUILTIN, OUTPUT);//LED
// Change the address
Wire.beginTransmission(0x10);
Wire.write(0x5A);
Wire.write(0x05);
Wire.write(0x0B);
Wire.write(0x1E); // Change this line to change the address. (Hexadecimal , Example: 17 = 0X11, 18= 0X12, …)
Wire.write(0x00);
Wire.endTransmission(0);
delay(100);
// Save the address
Wire.beginTransmission(0x10);
Wire.write(0x5A);
Wire.write(0x04);
Wire.write(0x11);
Wire.write(0x6F);
Wire.endTransmission(0);
}
void loop() {
}
Using this code, change the address of each sensor you add.
.
Check the address change from serial monitor by loading the code below.
.
.
#include <Wire.h>
void setup()
{
Wire.begin();
Serial.begin(9600);
while (!Serial); // Leonardo: wait for serial monitor
Serial.println("\nI2C Scanner");
}
void loop()
{
byte error, address;
int nDevices;
Serial.println(“Scanning…”);
nDevices = 0;
for(address = 1; address < 127; address++ )
{
// The i2c_scanner uses the return value of
// the Write.endTransmisstion to see if
// a device did acknowledge to the address.
Wire.beginTransmission(address);
error = Wire.endTransmission();
if (error == 0)
{
  Serial.print("I2C device found at address 0x");
  if (address<16)
    Serial.print("0");
  Serial.print(address,HEX);
  Serial.println("  !");

  nDevices++;
}
else if (error==4)
{
  Serial.print("Unknown error at address 0x");
  if (address<16)
    Serial.print("0");
  Serial.println(address,HEX);
}
}
if (nDevices == 0)
Serial.println(“No I2C devices found\n”);
else
Serial.println(“done\n”);
delay(5000); // wait 5 seconds for next scan
}
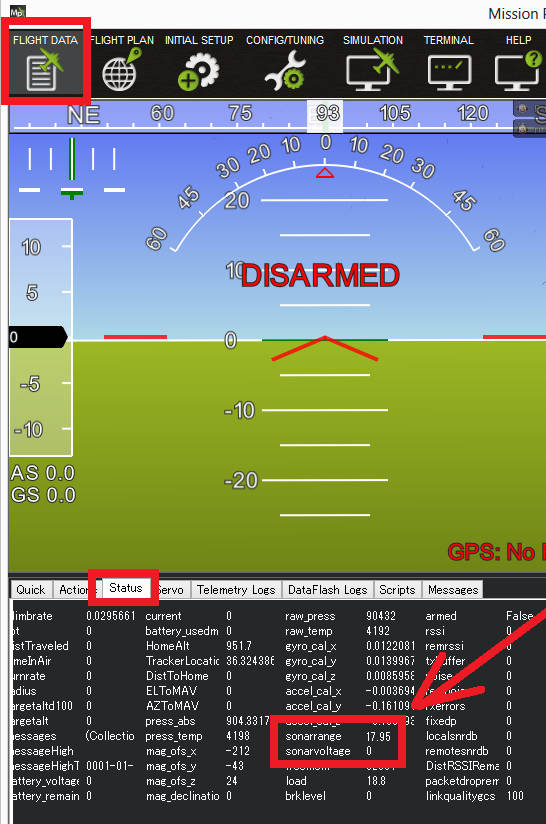
Sample picture

.
.
Activate the sensor.:
.
RNGFNDX_TYPE = 25 (RNGFND2_TYPE = 25 , RNGFND3_TYPE = 25, RNGFND4_TYPE = 25 …)
.
Using the parameter, enter the address of the sensors in ArduCopter. Enter the Binary equivalent of each sensor’s address.
.
RNGFNDX_ADDR : ( RNGFND1_ADDR , RNGFND2_ADDR, RNGFND3_ADDR … Sample: RNGFND2_ADDR = 17, RNGFND3_ADDR = 30 … )
.
Enter the maximum and minimum values for each sensor as follows
RNGFND2_MAX_CM = 300
RNGFND2_MIN_CM = 10
.
RNGFND3_MAX_CM = 300
RNGFND3_MIN_CM = 10
…
RNGFNDX_MAX_CM = 300
RNGFNDX_MIN_CM = 10
.
.
That’s the whole process. I tried it, it works fine…