This writeup will demonstrate that it is now possible to run a drone light show based on open-source components only, using a modified version of ArduCopter as the flight controller and Skybrush as the ground control station. During the course of this blog post, we will compile ArduCopter’s SITL simulator, then place 20 simulated quadcopters on the CMAC airfield, upload a drone light show (trajectories and light program) to them and launch a simulation. Of course if you have 20 or more real quadcopters with the required communication infrastructure, you can try the same thing in reality using the same set of software tools.
Preliminaries
The instructions below were tested on macOS Monterey, but most likely it works the same way in Linux as well. We assume that all the necessary developer tools (compiler toolchain, Python, waf and so on) are installed on your machine; if you can compile the stock ArduPilot firmware, chances are that you already have everything that you will need.
First things first: install Poetry
We are going to work with multiple Python projects; there will be the build-time dependencies of ArduCopter itself, then there will be a Python-based launcher for SITL swarms, and the server component of Skybrush that manages communication with the drones. To keep things nice and tidy, we will use Python virtualenvs for each project instead of messing up our system Python with the dependencies. Internally, Skybrush components use Poetry for managing their dependencies, so follow the installation instructions of Poetry before proceeding.
Compiling the ArduCopter SITL
Next, we need to compile the software-in-the-loop simulator version of ArduCopter, using the Skybrush fork that adds support for drone light shows. Check out the source code from Github first:
$ git clone https://github.com/skybrush-io/ardupilot
$ cd ardupilot
We need to switch to the CMCopter-4.2 branch as the master branch simply tracks upstream:
$ git checkout CMCopter-4.2
$ git submodule update --init --recursive
We will create a Python virtualenv for installing lxml, empy and all the other build-time Python dependencies to keep the system Python nice and tidy. ArduPilot does not contain a pyproject.toml file yet to specify the build-time dependencies, so we just do it manually:
$ python3 -m venv .venv
$ source .venv/bin/activate
$ pip install -U pip wheel
$ pip install future empy intelhex pexpect
Now it’s time to compile the SITL:
$ ./waf configure --debug --board sitl
$ ./waf copter
If everything went well, you should now have a working SITL executable in build/sitl/bin/arducopter:
$ build/sitl/bin/arducopter
You must specify a vehicle model.  Options are:
  quadplane
  xplane
  [...]
You can now deactivate the virtualenv and step out of the ardupilot folder:
$ deactivate
$ cd ..
Installing an ArduCopter SITL swarm launcher tool
We will need to launch multiple simulated drones on the same machine, configured in a way that the drones are laid out in a grid, just like they are placed on the ground before the takeoff sequence of a drone show. The Skybrush repositories contain a helper tool written in Python, so let’s check it out. Since we are still being nice and tidy, we install it in another Python virtualenv. Luckily, the ap-swarm-launcher repository provides us with a pyproject.toml file that lists all the dependencies, so you can just run poetry install to install them as well as the launcher itself into a separated virtualenv:
$ git clone https://github.com/skybrush-io/ap-swarm-launcher
$ cd ap-swarm-launcher
$ poetry install
Now you can launch a swarm from the virtualenv using poetry, and point it to the SITL executable we have just compiled to launch a small test swarm:
$ poetry run ap-sitl-swarm -n 9 ../ardupilot/build/sitl/bin/arducopter
If everything worked well, you should see 9 instances of the ArduCopter SITL starting up. These SITL instances are configured in a similar way as ordinary show drones would be, broadcasting heartbeat packets into the void until a ground station connects to them. Press Ctrl-C to stop the simulated swarm as we will now install Skybrush itself. Do not forget to step out of the ap-swarm-launcher folder:
cd ..
Installing Skybrush Server
Skybrush is based on a client-server architecture; the server is running in the background and managing the communication channels to drones, RTK base stations, weather providers and so on, while a frontend application called Skybrush Live provides a nice graphical user interface that you can interact with. Skybrush Live itself does not need to know what sort of drones it is communicating with – the server provides a module for handling MAVLink-based outdoor drones, and takes care of translating MAVLink-specific commands to a set of messages that Skybrush Live understands. The advantage is that if you are working with other types of drones that are not based on MAVLink messages, you can still keep on using the same GUI frontend.
The Skybrush homepage provides pre-compiled executables for the server that you can just download, install and run, but these executables are limited to at most 10 drones at the moment, and we will need more. However, since Skybrush Server is entirely open-source, you can check out the source code from Github and assemble it yourself and this version will not be limited by any means. So, let’s get started – yes, you guessed it, with yet another Python virtualenv:
$ git clone https://github.com/skybrush-io/skybrush-server
$ cd skybrush-server
$ poetry install
Once all the dependencies are installed, we can launch the server with the default configuration file for outdoor MAVLink-based drones:
$ poetry run skybrushd -c etc/conf/skybrush-outdoor.jsonc
You should now see something like this in the terminal:

Keep the server running in the terminal as now it’s time to install Skybrush Live, which needs a server to connect to.
Installing Skybrush Live
Unlike the Python projects so far, Skybrush Live is written in JavaScript (even though it is a desktop application). In theory, you could check out the source code and build Skybrush Live yourself (as I said, all components are open-source), but the pre-compiled executables on the Skybrush homepage contain absolutely no limitations, so it is probably just easier to grab the installer for your platform and run it. Here is the direct link to Skybrush Live downloads. Run the installer and start the application; it should find the server running in the background automatically and connect to it. You will know that the connection is successful if you see a small green dot in the header, in the upper right corner of the “plug” icon. If the connection was unsuccessful, you can click on the icon and connect to localhost, port 5000 manually.
Now we have all the components – time to run the show itself!
Running a drone light show
The largest area of the window of Skybrush Live is occupied by a map view by default, but the entire workspace is tabbed and reorganizable. Right above the map, there are multiple tabs that you can use to switch to a list / grid view for the drones connected to the system, or to a 3D view. Drag the tab labeled “UAVs” (this is the list / grid view) and attach it to the top of the map view so the map view gets split in half; the upper half of the window will then be occupied by the list / grid view and the lower half by the map itself. (Or, if you prefer any other layout, that’s fine, I just found it the easiest for this demo to have the map and the UAVs list visible at the same time).
The right hand side of the window contains a panel labeled Show control. This is the panel where we will spend most of our time. It is organized as a “check list” that you should go through in order to start a drone light show. Let’s start by clicking on the button that is currently labeled as “No show loaded; select or drop a show file here”, and opening the show file named demo-show-20.skyc that is attached to the bottom of this blog post. (The attachment is zipped because Discourse does not allow arbitrary file uploads; extract the ZIP first to get the .skyc file). The show file contains the trajectories and light programs for all the drones in the show in a compressed format. Opening the same show file in Skybrush Viewer yields a real-time 3D rendering of the show; feel free to play it in order to get an idea of what you should see on the sky when running the show with real drones. The visualization also reveals that the drones will start from a 4x5 grid with an initial spacing of 5 meters between drones.
Now that the show file is loaded, let us start a virtual drone swarm using ap-swarm-launcher from another terminal. We will configure the launcher to use 20 drones, arranged in a 4x5 grid with 5m spacing, and we also add a bit of noise to the positions and headings of the drones to simulate how they are likely to be arranged in reality:
$ cd ap-swarm-launcher
$ poetry run ap-sitl-swarm -n 20 --num-drones-per-row 5 --spacing 5 \
      --pos-noise 0.5 --yaw-noise 10 ../ardupilot/build/sitl/bin/arducopter
Switch back to Skybrush Live, and if you did everything correctly, the server should have already established connection with the 20 drones and posted their telemetry data to Live. The drones should be visible in the UAVs view and the drone tally widget in the header of the window should show 20 drones:
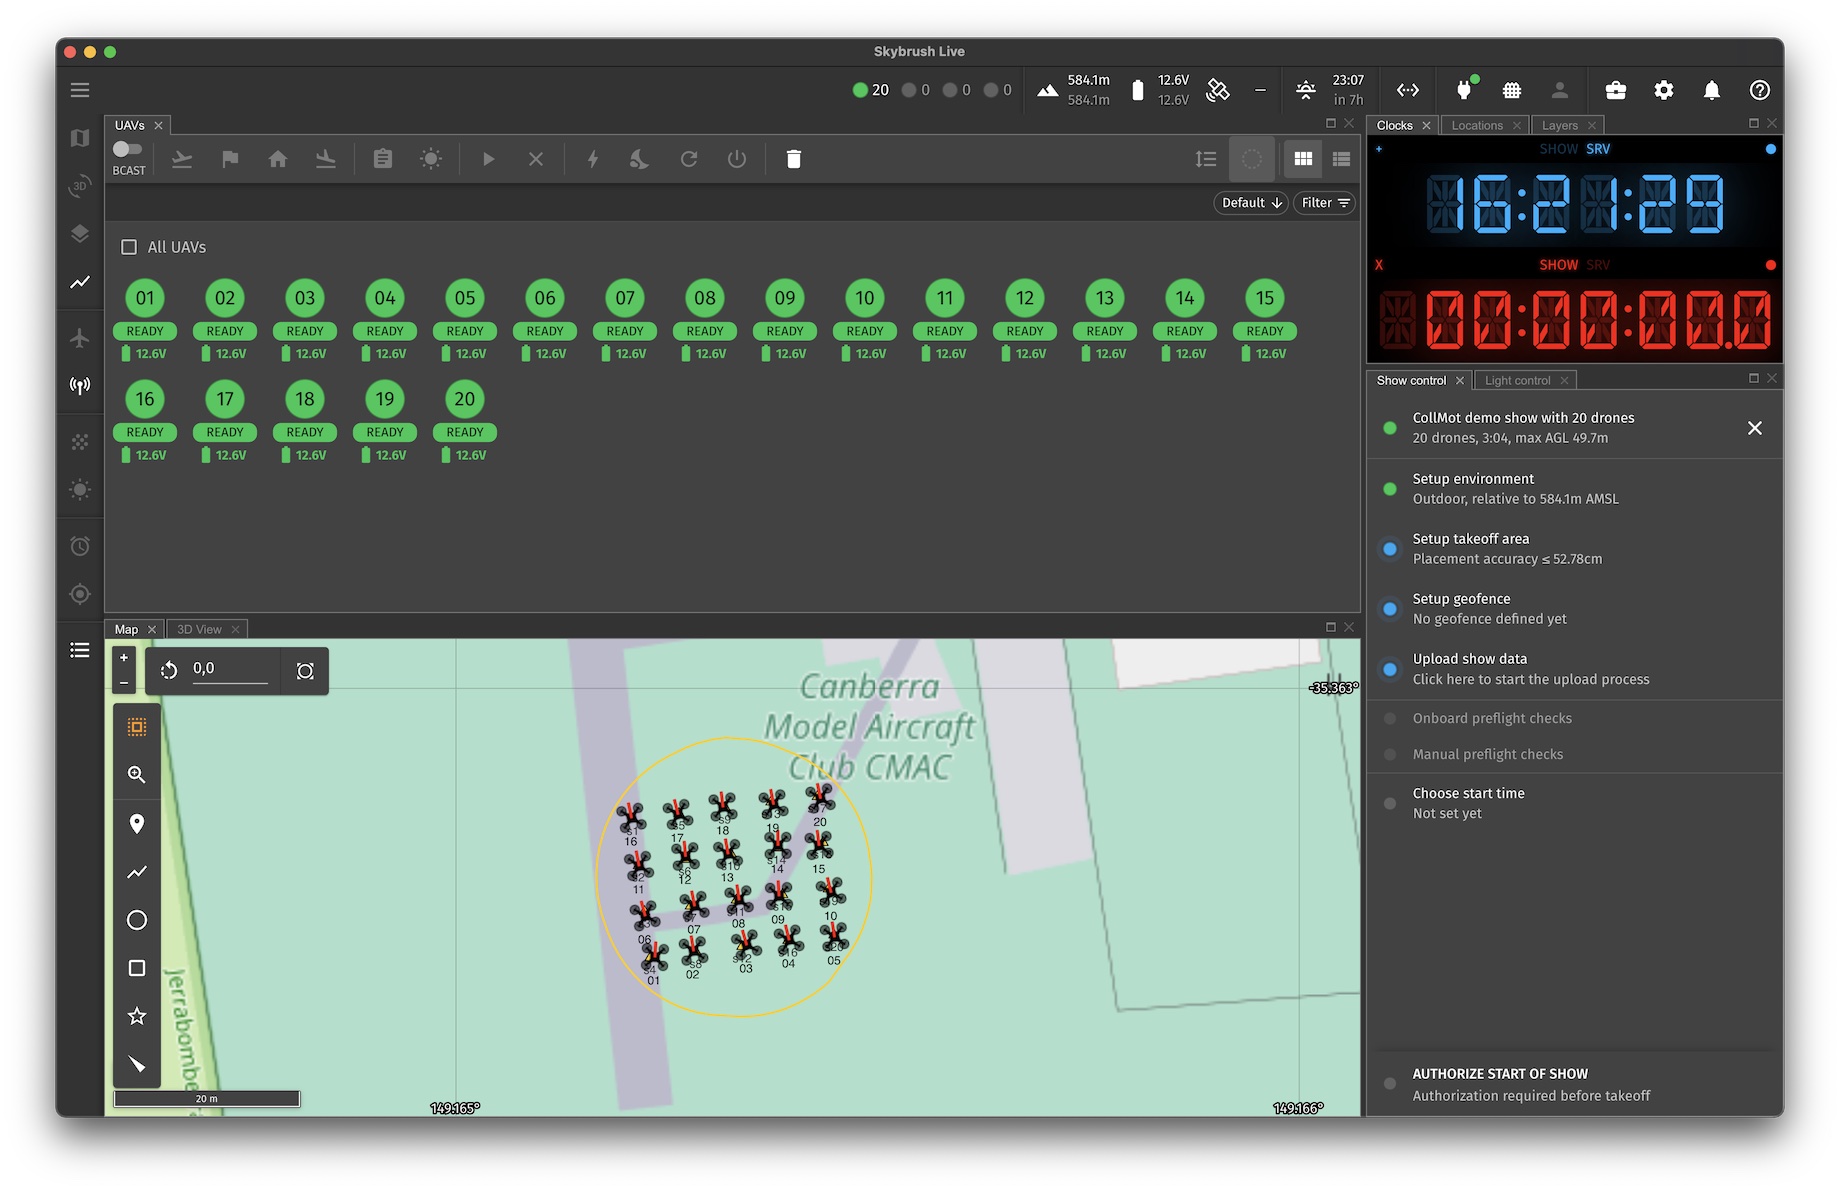
At this point you can switch the UAVs panel to a detailed list view with the button at the far right end of its own toolbar. If you click on the “Fit all drones” button in the horizontal toolbar overlay of the map view, the map should also scroll to the Canberra Model Aircraft Club, which is used as the default location in ap-sitl-swarm, and you should see the 20 drones arranged on the field. Zoom out a bit if you prefer. If you don’t see the drones for any reason, make sure that the server and the SITL simulators are both running the background, in separate terminals.
The next step in the Show control panel is the Setup environment button, which is used to set the origin and orientation of the show coordinate system that used to map the local XYZ coordinates of the show file to GPS coordinates. Click on the “magic wand” icon next to the text fields where the coordinate system is shown, and Live will automatically match the current coordinates of the drones with the takeoff layout of the show and calculate where you should put the origin and what orientation you should set. It also matches each drone to a takeoff position. Before closing the dialog, we need to do two extra things:
- select “Altitude above mean sea level (AMSL)” to ensure that the drones are controlled based on AMSL. The AMSL reference was already set earlier when we have fitted the show coordinate system to the positions of the drones.
- click on “Copy show origin to map origin” to ensure that the 3D view uses the center of the show as its own origin (otherwise you will not see anything on the 3D view when you switch to it)
Once the show coordinate system is set, a yellow polygon will appear on the map; this is the convex hull of the area in which the flight will take place. Within the polygon, “under” the drones, the map also shows small yellow triangles for the designated takeoff positions. (You can see these if you temporarily hide the UAVs layer in the Layers tab of the main window, in the upper right corner). Next up is the Setup takeoff area step in the Show control panel, but we can actually skip that for now because the system already matched the drones to their takeoff positions and we know that all of them are arranged facing the X axis of the coordinate system of the show. (In reality, you need to return to this step if you swap drones before the show starts due to sensor malfunctions or other issues).
Now that the drones are arranged, the show coordinate system has been set up and each drone has been matched to its designated takeoff position, we need to set up a geofence around the show area to ensure the safety of the audience. Click on the Setup geofence button in the checklist of the Show control panel, and simply press the Apply button at the bottom. Live will automatically expand the convex hull of the show by a few meters in each direction, simplify the new polygon so it does not have more than 10 points, and then draw it on the map with a red dashed outline. This will be the geofence of the show.
We can now upload the show trajectories and the geofence to the drones. This is done by clicking on the Upload show data button and then pressing the Start button in the upload dialog box:

Since we are working with simulated drones now, the upload is going to be fast and it should succeed for all the drones immediately, but in reality we sometimes need to try the upload multiple times if some of the drones are far from the GCS; the “Retry failed uploads automatically” checkbox comes in handy in such cases because Live will keep on trying to upload the trajectory to the drones, even if you close the dialog box and move on to do other preparations.
There are three remaining formalities before starting the show: we need to sign off on the Onboard preflight checks and the Manual preflight checks in the appropriate steps of the Show control panel. The “Onboard preflight checks” dialog is a summary of the error codes that the drones are transmitting to us; this is the panel where you can see if any of the drones are failing their pre-arm checks. The “Manual preflight checks” dialog is a list for items to be checked by the operator before starting the show that cannot be automated, like gauging wind speed and weather conditions, or checking whether the batteries of the RC transmitter (if any) are fully charged. You can tweak this according to your own routines and the requirements of the local CAA in the Settings dialog of the app (or even turn it off completely).
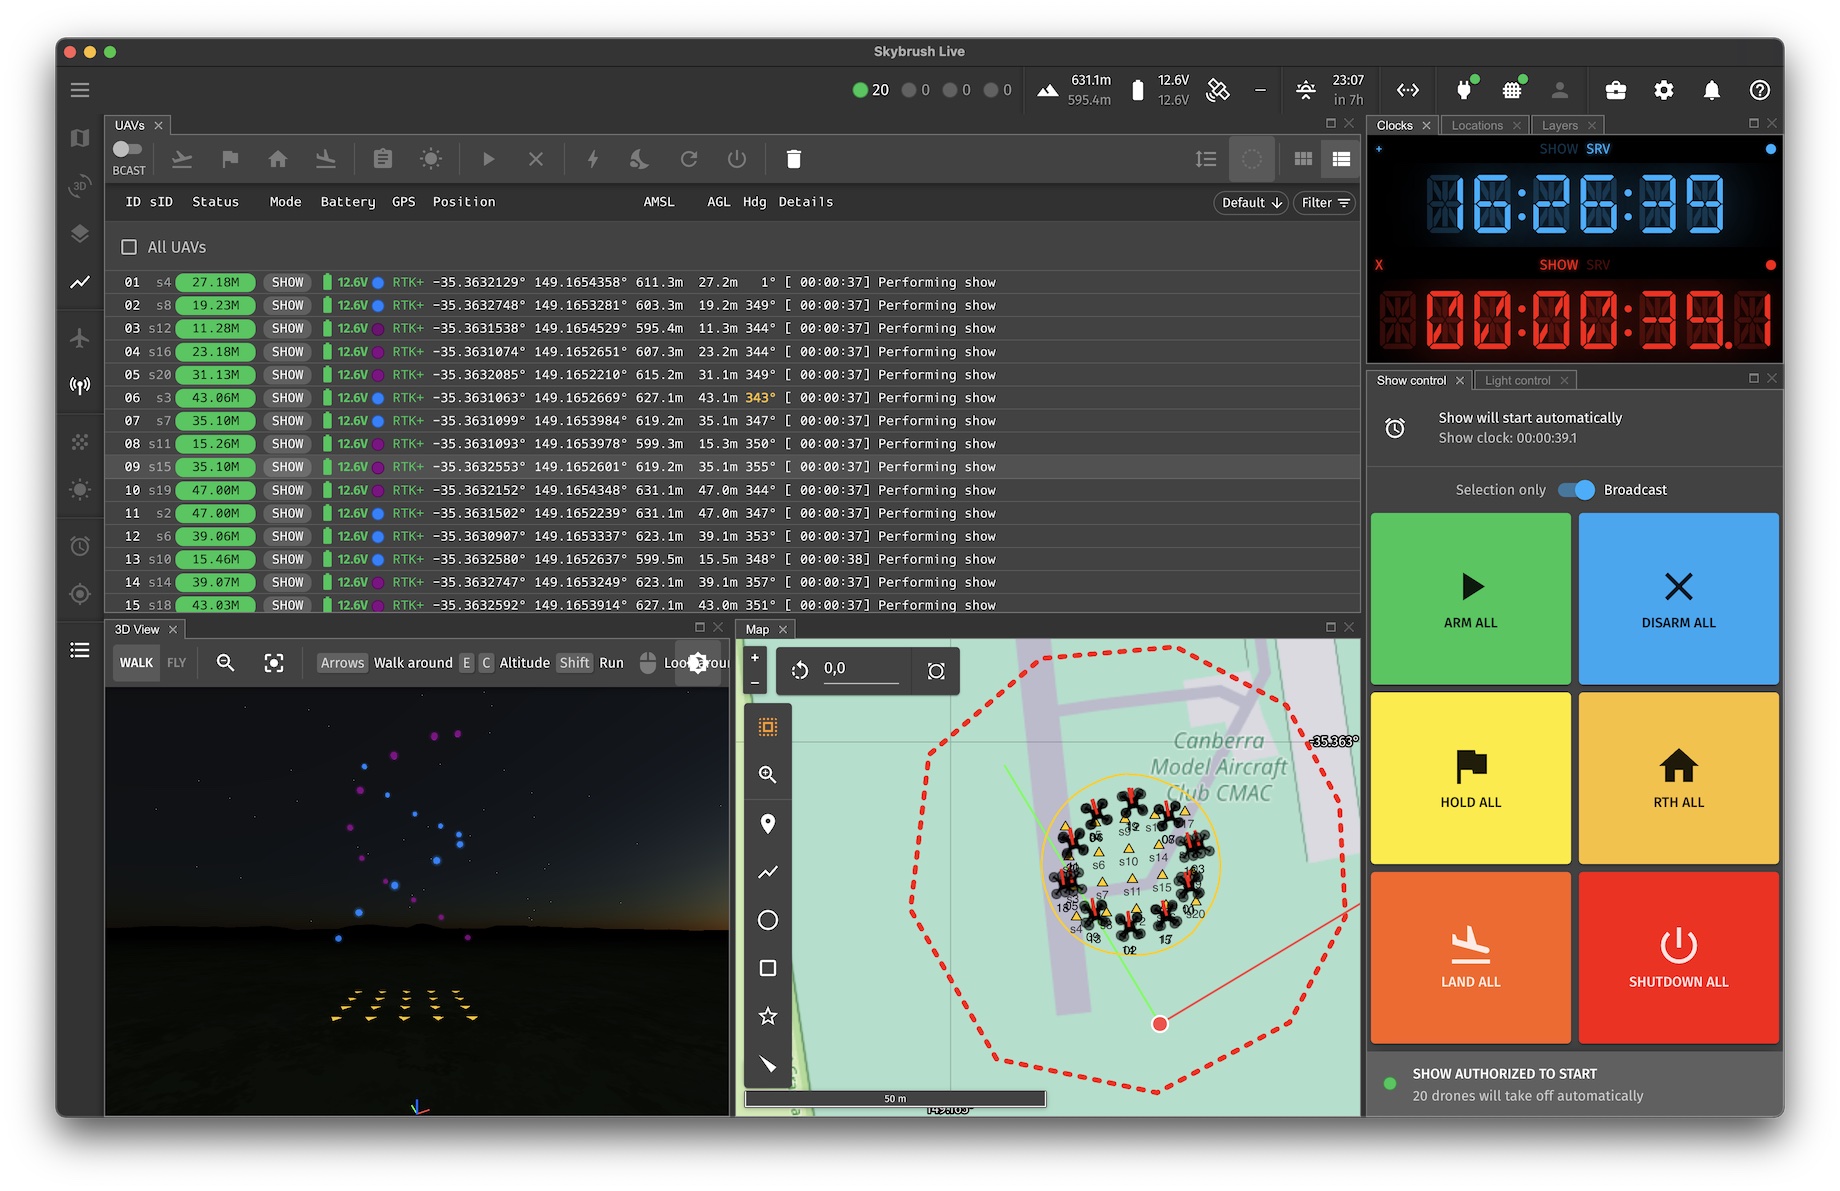
Once the preflight checks have been completed, it is time to set the start time of the show and grant the final authorization for the show start. Click on the Set start time dialog, set Start signal to “Start show automatically”, press then button labeled +30s to set the start time to 30 seconds into the future, click on Set new start time and then press the AUTHORIZE START OF SHOW button at the bottom of the show control panel. This last step is very important as it provides a single-click option for you to grant or revoke authorization any time.
After authorization, the entire show control panel disappears and gives way to a block of six large buttons for the most common operations that you might want to use during a show in case of emergencies - but normally, you can just sit back, relax and watch the show. The show uses a staged takeoff where drones take off in pairs, so you will have to wait a few seconds after the countdown hits zero before you start seeing some action in the UAVs list:
When the drones have landed at the end of the show, you can revoke authorization in the Show control panel, and then stop Skybrush Live, the server and the simulator instances.
Closing words
This demonstration used 20 drones only, but Skybrush Live and the server itself contain no built-in limits for the number of drones that it can manage. On my machine (a Macbook Pro with an Apple M1 CPU), I can easily run 100 instances of the SITL simulator and test shows with 100 drones. The server contains another “virtual drone” extension module that runs a simplified simulation of drones instead of relying on full SITL instances in the background, and with using this module I can easily manage 300 drones or more with a single machine. We are also routinely using Skybrush to run drone shows with our own fleet of 110 drones (see an example video here).
One potential limitation of the current architecture is that the MAVLink protocol uses a single byte only for the system ID of a drone. If you use MAVLink system IDs to identify drones, you are limited to about 250 drones in a single network (because you need to reserve at least one ID for ground stations, and system ID 0 is reserved for broadcasts). An easy workaround is to run multiple independent MAVLink networks with multiple routers, each router managing 250 drones at the same time, or to use the IP addresses of the drones in a larger IP network to distinguish them instead of their MAVLink IDs.
If you are interesting in learning more about the system, head over to the Skybrush homepage for more information, or join our Discord channel where we hang out regularly to discuss development plans, drone hardware for light shows and we also answer to generic support questions on a best-effort basis.
Also, do not hesitate to leave a comment below if the instructions above seem to be wrong, or if you managed to figure out how to do it on Windows.
Attachments
demo-show-20.skyc.zip (60.2 KB)