but every time i enter a new battery voltage it always reset to zero. I’ve tried to reset pixhawk (by removing all power and also pressing disconnect) after entering the measured voltage but still it resets to zero.
I can’t find a button to “write params” on the battery monitor:
It is necessary to reboot the flight controller after changing the Monitor and Sensor type, so it could have been that if you only just set those then tried to calibrate the voltage without rebooting.
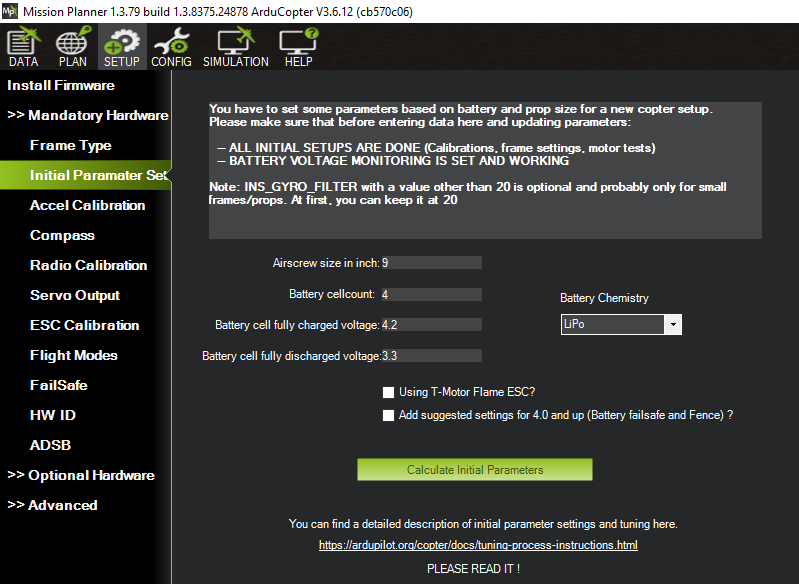
Once that is configured and working, use the Mandatory Hardware - Initial Parameters section, put in you r number of battery cells and prop size. Accept all that it offers including the “Suggested” params.
Yes, this is a reboot in our flight controller terms. There’s also a button in MissionPlanner to do a preflight reboot, but it’s easier to just pull the USB cable.
In the Initial Parameters screen each time you run it it just starts with default values - it doesnt read what you have set in the flight controller.
You only need to run it once, unless you change the battery or props.
You just change the cell count and airscrew size to match yours.
Dont change the cell voltage settings.
Put a check mark in the Add suggested settings
Check this parameter in Config / Full Parameter Tree
BATT_MONITOR,4
While in the Full Parameter Tree you can save your parameters to a file, do that and upload your param file to here for us to check.
I looked at the video, but just upload the param file.
You looked to be putting in 10 amps too, I think that’s wrong. EDIT
Actually I think you might have the method and presumptions wrong.
Entering the measured voltage and measured current is meant to be done “live” with a battery connected and significant current being drawn.
This makes it difficult to do the current value, but voltage is easy.
Anyway upload the param file, we can check it and I’ll run you through the process of accurately setting the current after you get this copter flying.
Does the copter need to be flying for this? I removed the gps module as i was troubleshooting and now its asking to do calibration again. Could that be the cause?
No, the GPS connected or not connected is unrelated.
That calibration message might go away when the GPS is connected again.
Also it is wise to do compass calibration once you have a good GPS 3D Fix.
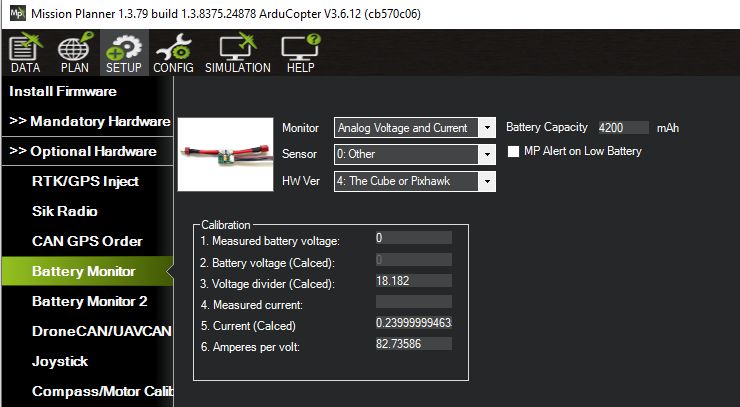
The easy fix for your voltage and current sensor is:
Use the Full Parameter Tree to put these standard values in for the type of sensor that should have come with that kit:
BATT_AMP_PERVLT,18
BATT_VOLT_MULT,10
BATT_FS_CRT_ACT,1
BATT_FS_LOW_ACT,3
The idea of setting entering those measured values is to improve the accuracy of the voltage and current readings by adjusting the multipliers over the standard values I’ve put here.
You could still improve the battery voltage reading by connecting the battery, measure it’s voltage (at the battery connector) with a digital multimeter and put that value in the “Measured battery voltage” field.
This is worth doing!
The current reading can be refined later after you’ve got the hang of it all and done a few flights.
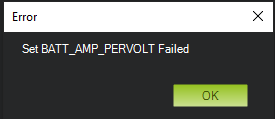
The reason it wasnt saving is the calculated value was out of range, since there was no battery connected. Think divide by zero…
The current multiplier did save, but it makes no sense for the above reason:
BATT_AMP_PERVLT,1770.479
I’ve set the following parameters as you said
BATT_AMP_PERVLT,18
BATT_VOLT_MULT,10
BATT_FS_CRT_ACT,1
BATT_FS_LOW_ACT,3
but the voltage still won’t save. Thing is i always had the battery plugged in in series with a watt meter. Now i removed the watt meter and it still won’t save
It doesnt “save” as such, it just modifies the multiplier so the battery voltage should then read correctly (more accurately) in the “Battery Voltage (calced)” field.
I PM’d about some other stuff, and also when using USB to connect to MissionPlanner set the connect speed to 115k instead of 56k
Oh i see. On the instructions for the drone i bought said that the firmware flashed is 3.9.12 and further flashes might cause failure i assume that is wrong? Meaning if i flash the new firmware would i be able to restore it to older version in case something goes wrong?
Yes you can certainly do the bootloader update, I would recommend it too.
It can appear to do nothing, dont be alarmed.
Check the Messages tab in MissionPlanner and it will say what happened: updated or update not needed
The parameter reset issue was really only with certain flight controllers, but there are MANY bug fixes and new features.
You should be on 4.3.2 now.
Just check and change those few things I sent to you in a PM
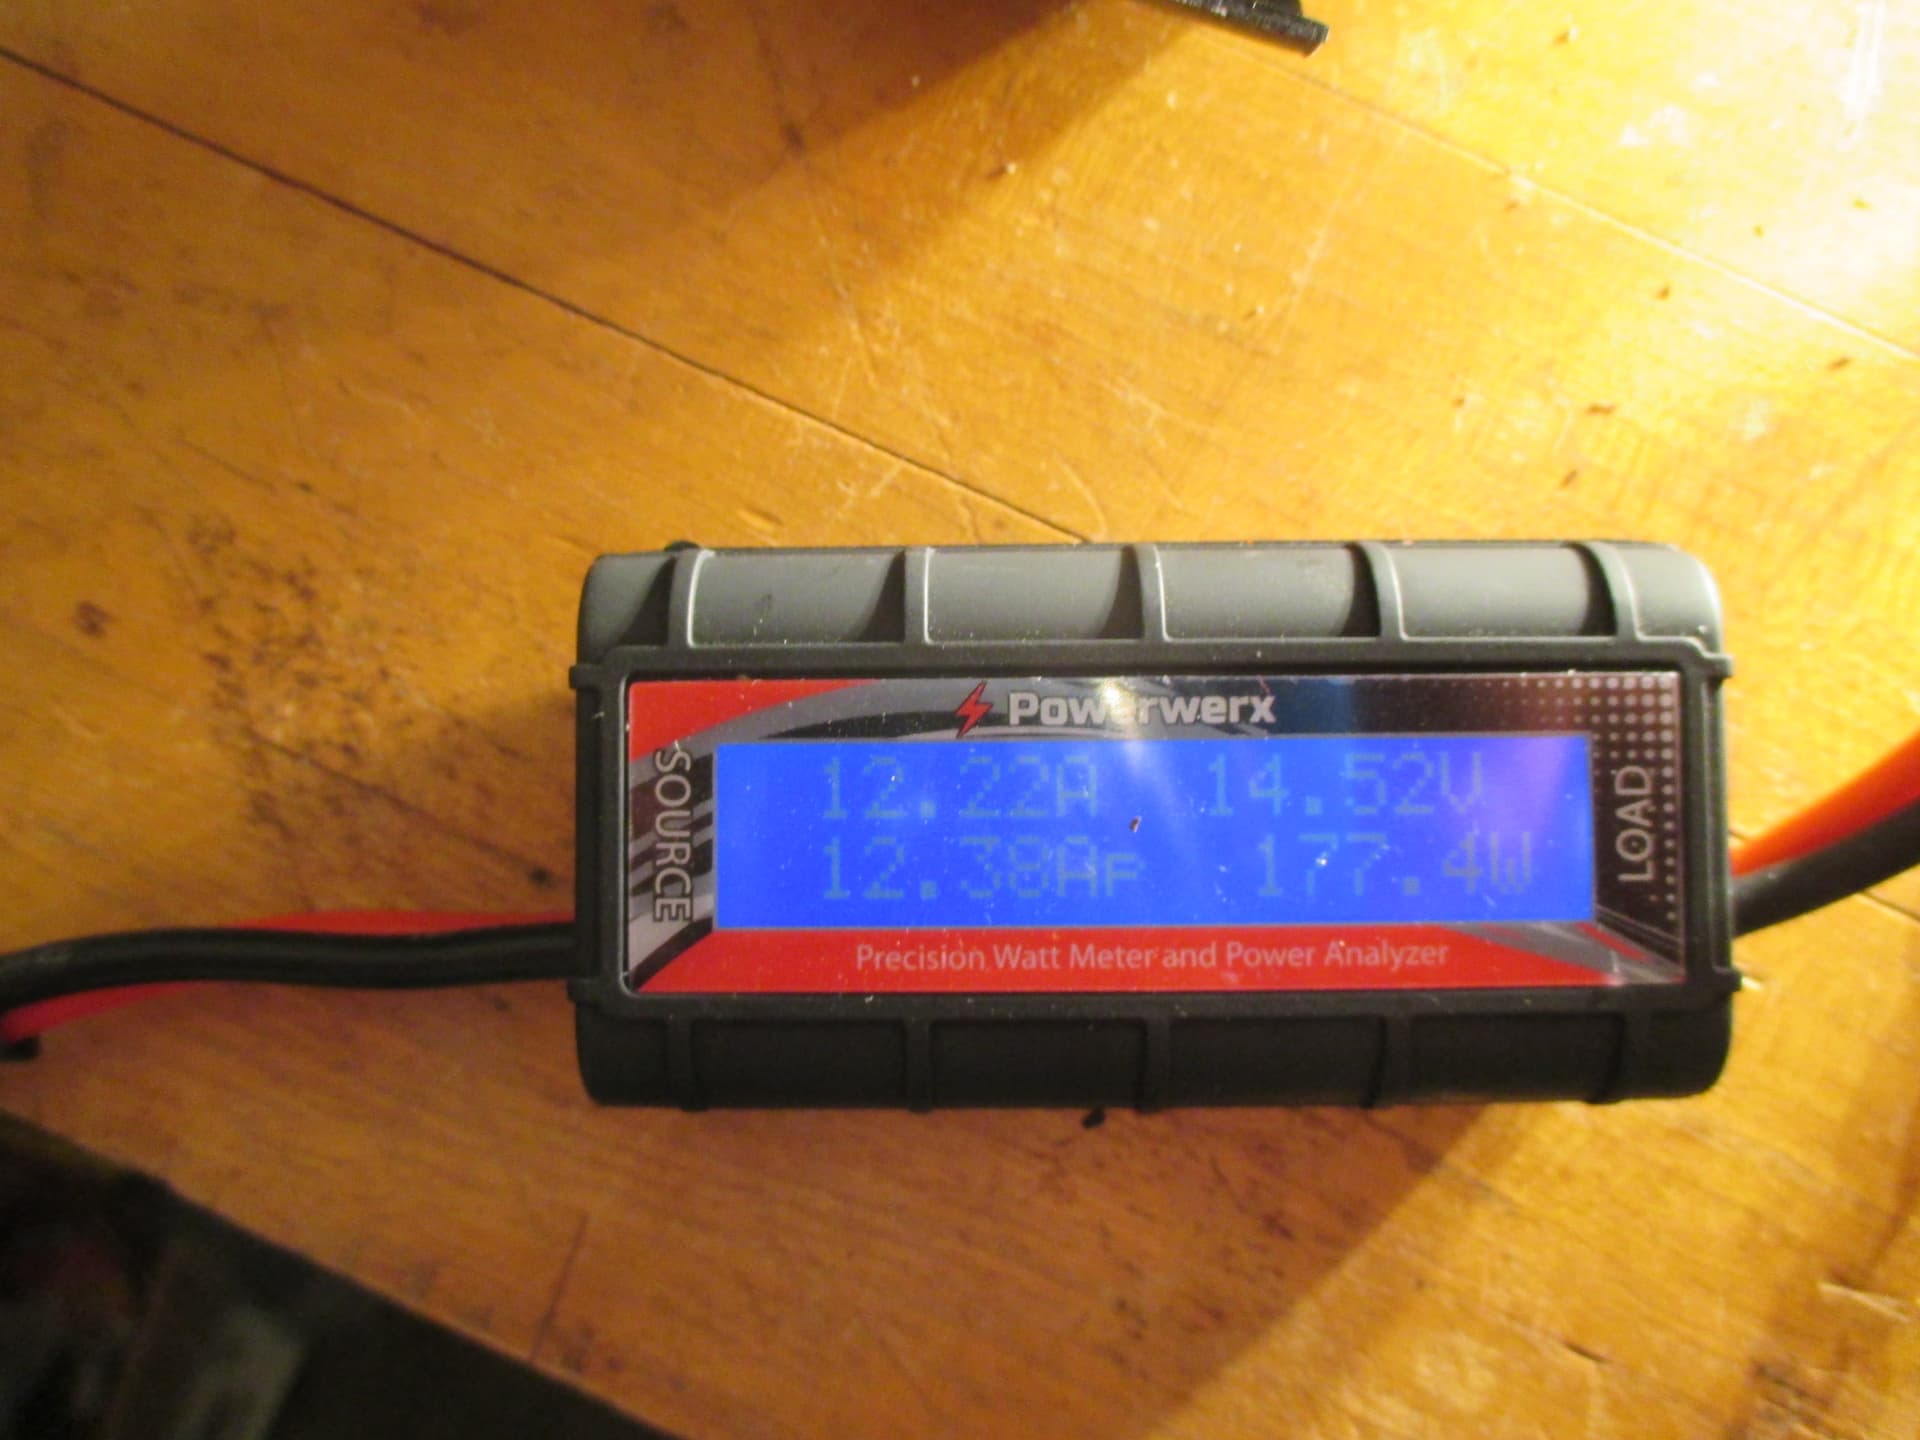
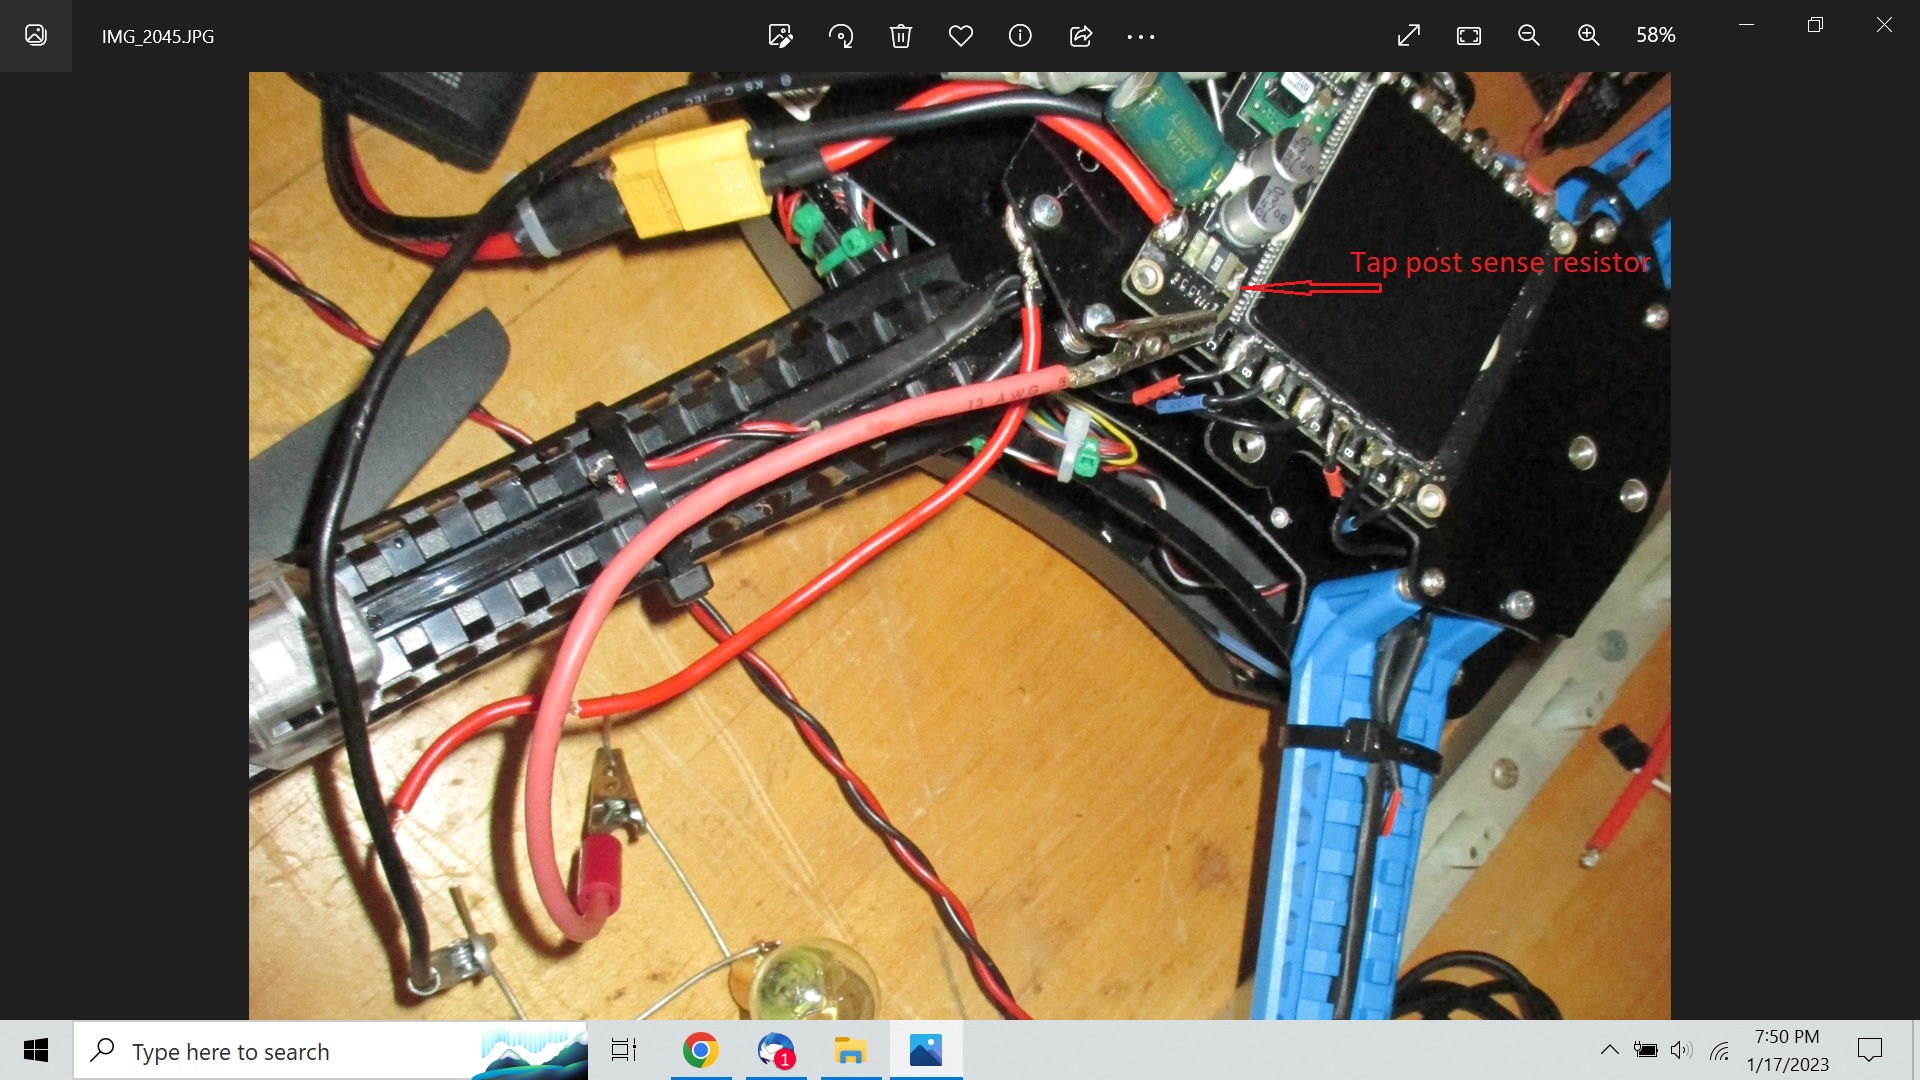
Kalid - calibrating a current sensor accurately is non-trivial, to kind of return to your original post. Having tried the ‘arrange props to blow upward’ method is a true pain, especially for one with blades with built-in prop nuts. I decided to calibrate using a fixed load consisting of old-style incandescent 12V tail light bulbs. The load in my case consists of six, #1076 21 W bulbs (Amazon 10 pack, cheap) in parallel. This load draws about 12A from a 4S pack at storage voltage.
The trick is to force the calibration current thru the sense resistor on the drone. My test bed is an IRIS+ quad, heavily modified for 4S. The current sense element is on the 3DR 4n1 ESC. The tap point is on the cold side of the sense resistor where it is soldered to the PCB - being careful not to damage or get solder on the resistor itself.
I used a short length of solid #14 wire.
A decent DC ampmeter is required with the capability of measuring your test current, which can be ‘adjusted’ by adding or deleting a light bulb.
The bulb bank is connected between the tap point created as above and flight battery ground, thus placing the lamps, sense resistor, battery and ampmeter is series.
With MP open to the calibration screen, attach the flight battery or power supply capable of the current required. Transfer the ampmeter reading into the Measured Current field and done. This method, IMHO, is far better and more accurate that torturing a drone trying to fly itself into the ground.
In closing, obviously one should be comfortable dealing with the described process and respect the massive energy that our flight packs can deliver.
That’s one way of doing the current sensor calibration, drawing lots of current through it - and that definitely works.
Here’s an easier way considering you’ve already assembled your copter and it’s flying OK.
Here’s how to adjust your Amps Per Volt
Plug in a fresh battery and do a hover flight for 5 minutes or until you’ve used a signifcant amount of battery capacity
Immediately unplug the battery and charge it, note how many mah’s it took to charge. Let’s say that was 1,500 mah
Download your log and look at maximum CurrTot. Let’s say it was 1,300 mah
Get your existing BATT_AMP_PERVOLT setting from Mission Planner
NEW_AMPS_PER_VOLT = OLD_AMPS_PER_VOLT x CHARGED_MAH / LOGGED_MAH With my example numbers, you’d get NEW_AMPS_PER_VOLT = 17 x 1,500 / 1,300 = 19.61
Set the new value in the BATT_AMP_PERVOLT parameter and save to your copter
Fly to check, repeat until you’re happy the new value gives consistent readings
This is all you need to know to calibrate the current sensor. It’s amazing to me the hoops people jump thru to perform such a simple task. Make a few flights , tweak the value, its good.