Great. I’ll be able to look at it tomorrow morning.
Hello Christian
It’s working here using your TLog.

Could you please try the latest version on GitHub, and if you still have the problem post the debug output with these two lines activated. 
Hi Eric, I am trying to Compile a Hex file, that I will send to my colleague who has the teensy board. (remote working)
I do not have a Teensy Board with me. When I compile, I get errors:
D:\Program Files (x86)\Arduino\arduino-builder -dump-prefs -logger=machine -hardware D:\Program Files (x86)\Arduino\hardware -tools D:\Program Files (x86)\Arduino\tools-builder -tools D:\Program Files (x86)\Arduino\hardware\tools\avr -built-in-libraries D:\Program Files (x86)\Arduino\libraries -libraries C:\Users\grane\Documents\Arduino\libraries -fqbn=teensy:avr:teensy31:usb=serial,speed=96,opt=o2std,keys=en-us -ide-version=10812 -build-path C:\Users\grane\AppData\Local\Temp\arduino_build_123320 -warnings=none -build-cache C:\Users\grane\AppData\Local\Temp\arduino_cache_447144 -verbose C:\Users\grane\Desktop\TEENSY\MavlinkToPassthru-master\MavToPass_v2.59.1\MavToPass_v2.59.1.ino
D:\Program Files (x86)\Arduino\arduino-builder -compile -logger=machine -hardware D:\Program Files (x86)\Arduino\hardware -tools D:\Program Files (x86)\Arduino\tools-builder -tools D:\Program Files (x86)\Arduino\hardware\tools\avr -built-in-libraries D:\Program Files (x86)\Arduino\libraries -libraries C:\Users\grane\Documents\Arduino\libraries -fqbn=teensy:avr:teensy31:usb=serial,speed=96,opt=o2std,keys=en-us -ide-version=10812 -build-path C:\Users\grane\AppData\Local\Temp\arduino_build_123320 -warnings=none -build-cache C:\Users\grane\AppData\Local\Temp\arduino_cache_447144 -verbose C:\Users\grane\Desktop\TEENSY\MavlinkToPassthru-master\MavToPass_v2.59.1\MavToPass_v2.59.1.ino
Using board ‘teensy31’ from platform in folder: D:\Program Files (x86)\Arduino\hardware\teensy\avr
Using core ‘teensy3’ from platform in folder: D:\Program Files (x86)\Arduino\hardware\teensy\avr
Detecting libraries used…
“D:\Program Files (x86)\Arduino\hardware\teensy/…/tools/arm/bin/arm-none-eabi-g++” -E -CC -x c++ -w -g -Wall -ffunction-sections -fdata-sections -nostdlib -fno-exceptions -fpermissive -felide-constructors -std=gnu++14 -Wno-error=narrowing -fno-rtti -mthumb -mcpu=cortex-m4 -fsingle-precision-constant -D__MK20DX256__ -DTEENSYDUINO=151 -DARDUINO=10812 -DARDUINO_TEENSY32 -DF_CPU=96000000 -DUSB_SERIAL -DLAYOUT_US_ENGLISH “-ID:\Program Files (x86)\Arduino\hardware\teensy\avr\cores\teensy3” “C:\Users\grane\AppData\Local\Temp\arduino_build_123320\sketch\MavToPass_v2.59.1.ino.cpp” -o nul
Alternatives for CircularBuffer.h: []
C:\Users\grane\Desktop\TEENSY\MavlinkToPassthru-master\MavToPass_v2.59.1\MavToPass_v2.59.1.ino:142:28: fatal error: CircularBuffer.h: No such file or directory
ResolveLibrary(CircularBuffer.h)
compilation terminated.
-> candidates: []
Error compiling for board Teensy 3.2 / 3.1.
I am assuming that this error is because I do not have the actual board connected?
Is this correct? or what am I missing? Thanks
Hi Graham, no you can compile successfully without the board. You need to move all the libraries in my GitHub library folder into your Arduino library folder. Also click the link to the Mavlic C library, download it and add it to your library file.
1 Like
Question
i am using yaapu script on x12s
why is it i only get flight mode packets after contenting to mission planer on my laptop
@yak-54 Works fine for me. Try using mavlink 2 and check your data rates. Mine are:
SERIAL1_PROTOCOL,2
SR1_ADSB,0
SR1_EXT_STAT,1
SR1_EXTRA1,3
SR1_EXTRA2,3
SR1_EXTRA3,1
SR1_PARAMS,0
SR1_POSITION,3
SR1_RAW_CTRL,0
SR1_RAW_SENS,0
SR1_RC_CHAN,0
@Eric_Stockenstrom Does your code with the ESP-F support hardware flow control? I believe the cts, rts lines are wired in the TXMOD module. RFDesign recommends using HW flow control.
Good question David. I know the RFD900x has optional flow control for the telemetry path between the two transceivers, on the ground and in the air. That is where it is most needed. Now, when telemetry arrives at the ground trx, we divert it to the GCS using WiFi. So there is a second telemetry path from ground trx to GCS, where different flow control might apply. The first hop is from the trx UART to the ESP-F board, on a few cms of copper, and the second hop from the WiFi radio modem to the GCS using UDP (or TCP) with their own protocol. UDP will not have flow control.
I have not tried to support rts/cts on the first hop (of the second path), as I doubt it matters there. But I’m open to ideas and guidance.
On earlier versions I only sent frame type a few times early on after booting, as the information is static and I wanted to save bandwidth. But if you only connect later, the LUA script never gets frame type, so does not show flight mode. Flight mode is dependent on frame type.
Fixed in later versions. See Change Log. Hope that helps.
I was thinking about flow control on a very basic level, like only allow to trasmit/receive, when the serial buffers are not full. I have no idea how often the serial buffers are full in practice, but that´s my understanding how it should work on a basic level.
Also something different: I noticed, that I can only connect to the ESP-F wifi after I have powered on my drone. Does this also happen with your setup?
I’m guessing that it’s waiting on the Mavlink telemetry serial.begin(). Mine waits a second or two if there is no telemetry yet.
Perhaps your circumstances are different in some way. My RDF900 is not presently hooked up, but perhaps you could check if it’s waiting on the serial.begin()? I’ll check it when I get the chance Which version number, and did you flash my binary or build from scratch? We need to be careful that the debug port is not set to serial (uart0) in the IDE
#if (defined ESP32)
  // system can wait here for a few seconds (timeout) if there is no telemetry in
  mvSerialFC.begin(set.baud, SERIAL_8N1, FC_Mav_rxPin, FC_Mav_txPin);   //  rx,tx, cts, rts
#else
  mvSerialFC.begin(set.baud);
#endif
Debug.printf("Mavlink serial input on pins rx = %d and tx = %d\n", FC_Mav_rxPin, FC_Mav_txPin);
}
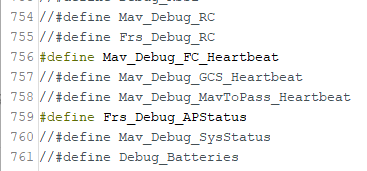
Most likely it is waiting for serial before the wifi is fully initialized. I am using the latest 2.59.3 built from scratch, but only modified some settings like passwords, etc. The debug port is set to Serial1, like in MavlinkToPassthru/RFD900X TX-Mod docs/Ardunio IDE board setup 2.jpg
David, I checked this now on my setup. With the drone (and radio) powered down, I can still connect to the hotspot on 192.168.4.1 and get the login screen immediately.
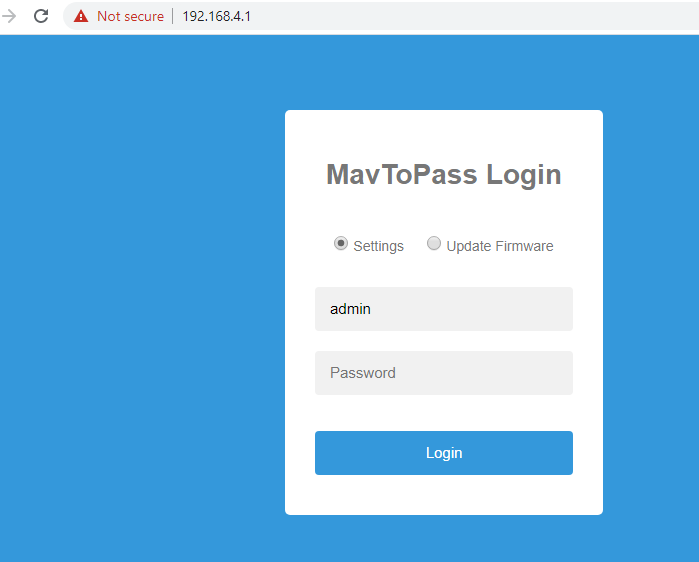
Great, so this only happens to me. I have two setups, both txmod flashed with v2.59.3 and I can only connect to the wifi network after I have powered on the drone.
After the drone is on and connected to the Horus, I can do everything as expected.
It might be worth a look at serial1 for debug messages.
I believe there are different TXMOD board revisions, but I don’t know that for sure. Do you have any free standing ESP-F (barebones) boards you can try? Or ESP-12E/F should be the same.
Just to be shure… at the moment, broadcasts on UDP are only be done in access point mode, but not in station mode?
Is there any special cause for that? Or am I overseeing something?
Hi Stefan, no I use it in STA with UDP all the time. But broadcasts only occur until a client connects, then we know to which single IP to send UDP packets…
David, make sure you do NOT have Autobaud activated. It will wait there forever for a serial signal.
So, the udp mavlink forward broadcasts in STA and in AP, until a client connects to the default port? Port 14550 or 14555? AP is clear to me.
In STA mode, what broadcast IP does it use? Can you give me a small hint, where to find that in the code? Thank you very much …
port 14550
EDIT:
but udp_remote is declared and initialised on line 627
IPAddress udp_remoteIP(192, 168, 1, 255); // Declare UDP broadcast on your likely LAN subnet
At line 515 function EDIT: for AP mode only
void SetupWiFi() {
go down to line 638
  if (set.wfproto == udp)  {      // UDP
      UDP.begin(set.udp_localPort);
      Debug.printf("UDP started, listening on IP %s, UDP port %d \n", WiFi.softAPIP().toString().c_str(), set.udp_localPort);
      OledPrint("UDP port = ");  OledPrintln(String(set.udp_localPort));
      udp_remoteIP[2] = 4;
      udp_remoteIP[3] = 255;    // UDP broadcast on the AP 192.168.4/ subnet
  }
In function
bool Read_UDP(mavlink_message_t* msgptr) {
go down to line 1101
            udp_remoteIP = UDP.remoteIP();  // remember which remote client sent this packet so we can target it
            PrintRemoteIP();
If you want to continue broadcasting remove the two lines above, but remember this will cause a bit of extra traffic on your LAN.