This post is an explainer on the telemetry datarates in ArduPilot, plus information and data on how to configure the datarate to fit in lower-bandwidth radio systems.
All datarates in this article are averages and are rounded to 1 decimal place. Does not include actions such as downloading parameters or waypoints. All datarates are in the Vehicle → GCS direction.
ArduPilot telemetry is a series of MAVLink messages output from a UART (or serial) port on the flight controller.
The MAVLink messages may be a streamed message (message is emitted at some regular rate), such as the vehicle’s GPS position or hardware status. Other messages are emitted in response to a command or query from the ground station, such as downloading parameters or a confirmation of a flight mode change.
The following table shows the average datarate of the default streamed messages from the different ArduPilot firmwares at the default rate of 4Hz. Note the datarate whilst the vehicle is armed is slightly higher, as additional streamed messages (such as NAV_CONTROLLER_OUTPUT) are active. The datarate will vary depending on the vehicle hardware and configuration, as additional sensors (such as a 2nd GPS) will increase the datarate.
| Firmware | Datarate when disarmed | Datarate when armed |
|---|---|---|
| Plane | 3.5 kbytes/sec | 4 kbytes/sec |
| Copter | 3.5 kbytes/sec | 3.7 kbytes/sec |
| Rover | 3.4 kbytes/sec | 3.9 kbytes/sec |
On a typical 57600 baud RF telemetry radio, this equates to 59%-69% of the available radio datarate being used.
If you are using a lower baud RF link, then ArduPilot’s streaming datarates may need to be trimmed down. There are several methods to do this.
The easiest method is to lower the rate of the streams. By default, a GCS will ask ArduPilot to stream at 4 Hz. This can be changed in Mission Planner in Config→Planner→Telemetry Rates or in MAVProxy via the --streamrate=n commandline option.
So, lowering the streamrates down to 1Hz gives the following average datarates:
| Firmware | Datarate when disarmed | Datarate when armed |
|---|---|---|
| Plane | 0.9 kbytes/sec | 1.0 kbytes/sec |
| Copter | 0.9 kbytes/sec | 0.9 kbytes/sec |
| Rover | 0.9 kbytes/sec | 1.0 kbytes/sec |
Taking this further, streams can be disabled. For example, you may not want raw sensor readings or RC channel values. In that case, set the “Sensor” and “RC” streams to “0” in Mission Planner. At this time, MAVProxy does not support setting individual streamrates.
If preferred, these streamrates can be set on ArduPilot instead of the GCS.
The average datarates are now:
| Firmware | Datarate when disarmed | Datarate when armed |
|---|---|---|
| Plane | 0.7 kbytes/sec | 0.8 kbytes/sec |
| Copter | 0.6 kbytes/sec | 0.7 kbytes/sec |
| Rover | 0.6 kbytes/sec | 0.8 kbytes/sec |
If finer grained control of which MAVLink messages are streamed is desired, the individual messages and rates can be controlled. There are a few methods for doing this.
For this example, a file containing the message ID’s and rate (in milliseconds) is placed in the SD card’s root directory:
message-intervals-chan0.txt
33 200
1 1000
74 2000
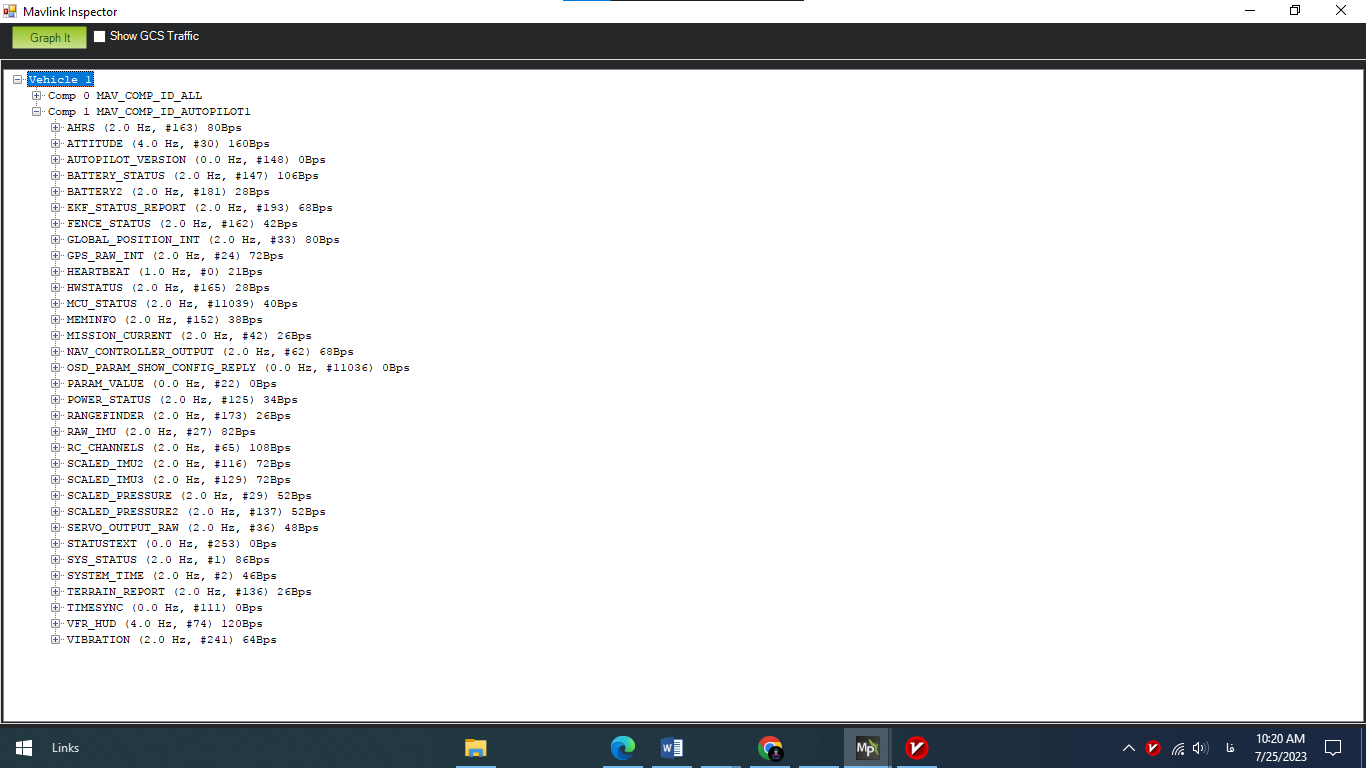
The above file tells ArduPilot that chan0 should stream message 33 (GLOBAL_POSITION_INT) at 5 Hz, message 1 (SYS_STATUS) at 1 Hz and message 74 (VFR_HUD) at 0.5 Hz. This gives basic information of the vehicle’s state and position.
Using this file, the telemetry datarate is lowered to 0.3 kbyte/sec. This sort of datarate would be suitable for radios operating at 2400 baud and above.
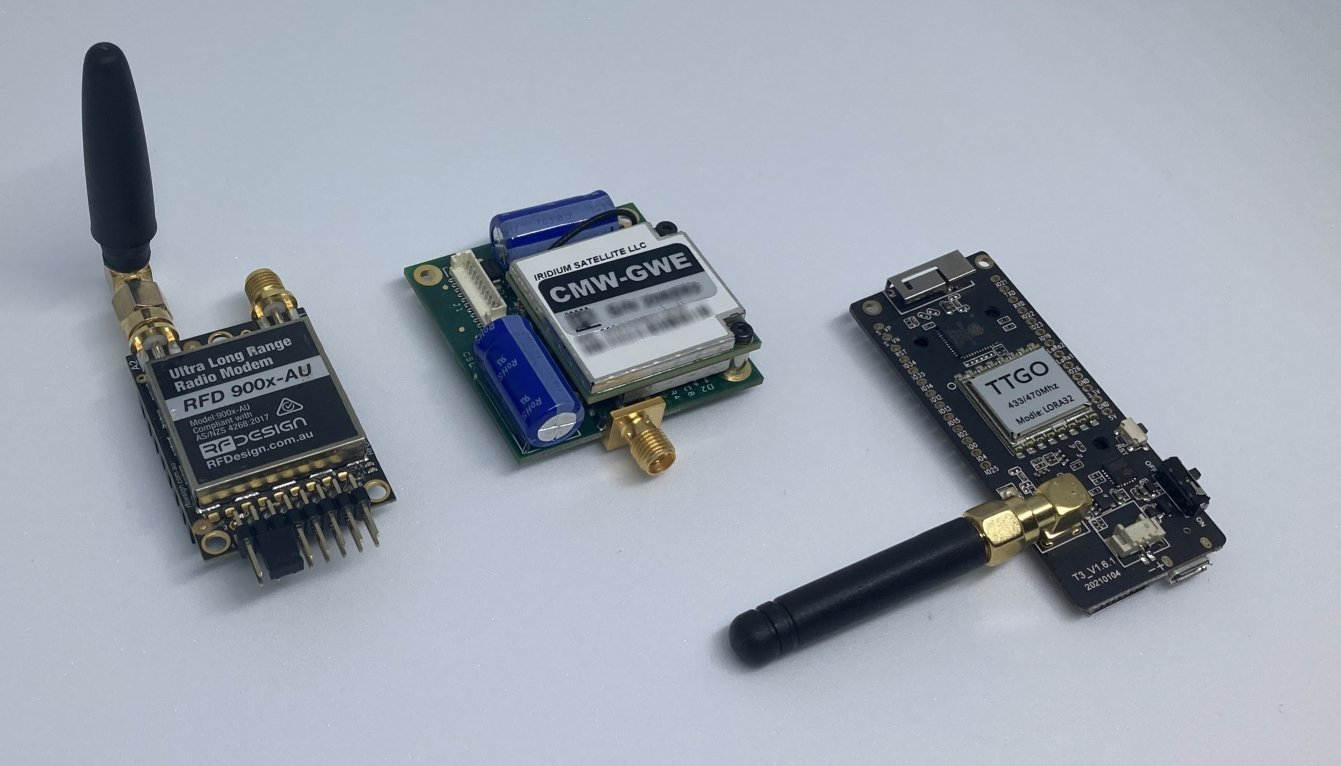
If you are working with very low datarate radios (<100 bytes/sec), you may wish to lower the datarate even further. For this, the new “MAVLinkHL” serial protocol option will be of interest. MAVLinkHL is an implementation of the High Latency MAVLink protocol and is designed primarily for low datarate satellite systems (such as SBD modems, such as Iridium Short Burst Data (SBD) | Iridium Satellite Communications). This protocol sends out a HIGH_LATENCY2 MAVLink message at 0.2 Hz (by default) in place of a HEARTBEAT packet.
The HIGH_LATENCY2 message contains a summary of the vehicle’s state and status in a single message, replacing the need to stream multiple different messages to get similar information.
To use High Latency MAVLink, set the relevant SERIALn_PROTOCOL to 43.
By default, this connection does not stream any data. It needs to be activated first. In MAVProxy, this can be done via the link hl on|off commands. Otherwise, the message can be requested via the MAV_CMD_CONTROL_HIGH_LATENCY or SET_MESSAGE_INTERVAL commands. The MAV_CMD_CONTROL_HIGH_LATENCY command can be sent over any link to ArduPilot – it does not need to be sent via the High Latency link.
Via this method, the telemetry datarate is reduced to 0.01 kbyte/sec!
So, for those running low datarate modems or radio systems, ArduPilot has a number of tools to reduce the telemetry datarate. This includes lowering the frequency of message updates and not sending less-useful messages.
EDIT:
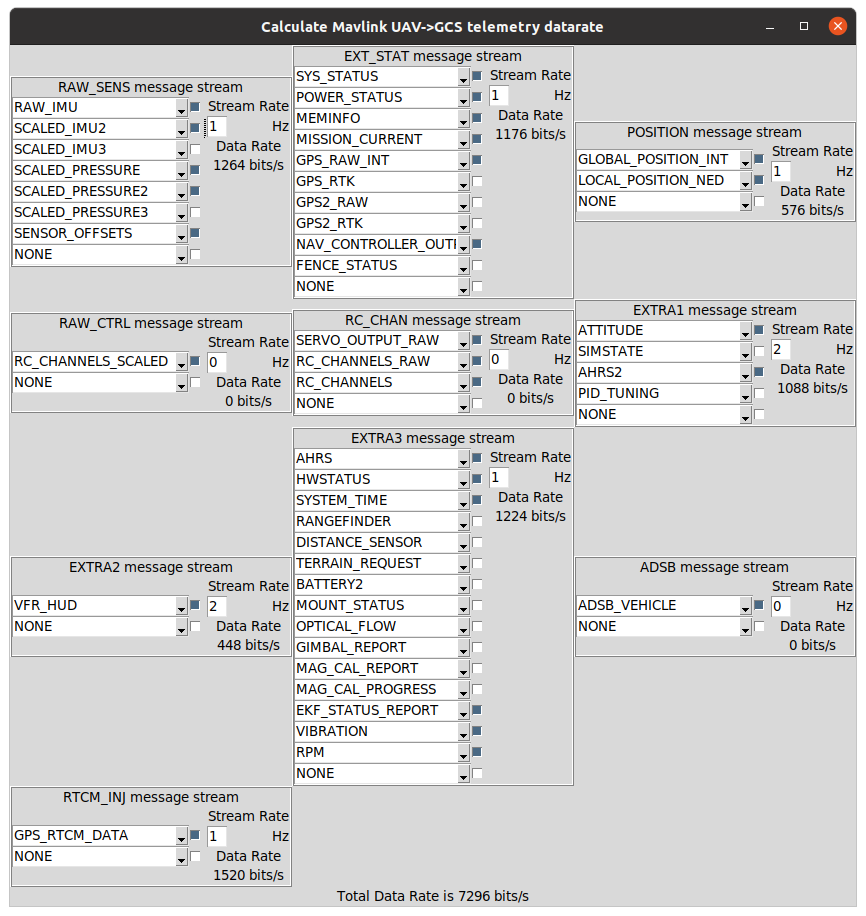
For those interested in exploring the different message data throughputs, there is an excellent tool in the pymavlink repository: pymavlink/mavtelemetry_datarates.py at master · ArduPilot/pymavlink · GitHub