Hexacopter Crash Log Analysis - 2 Crashes

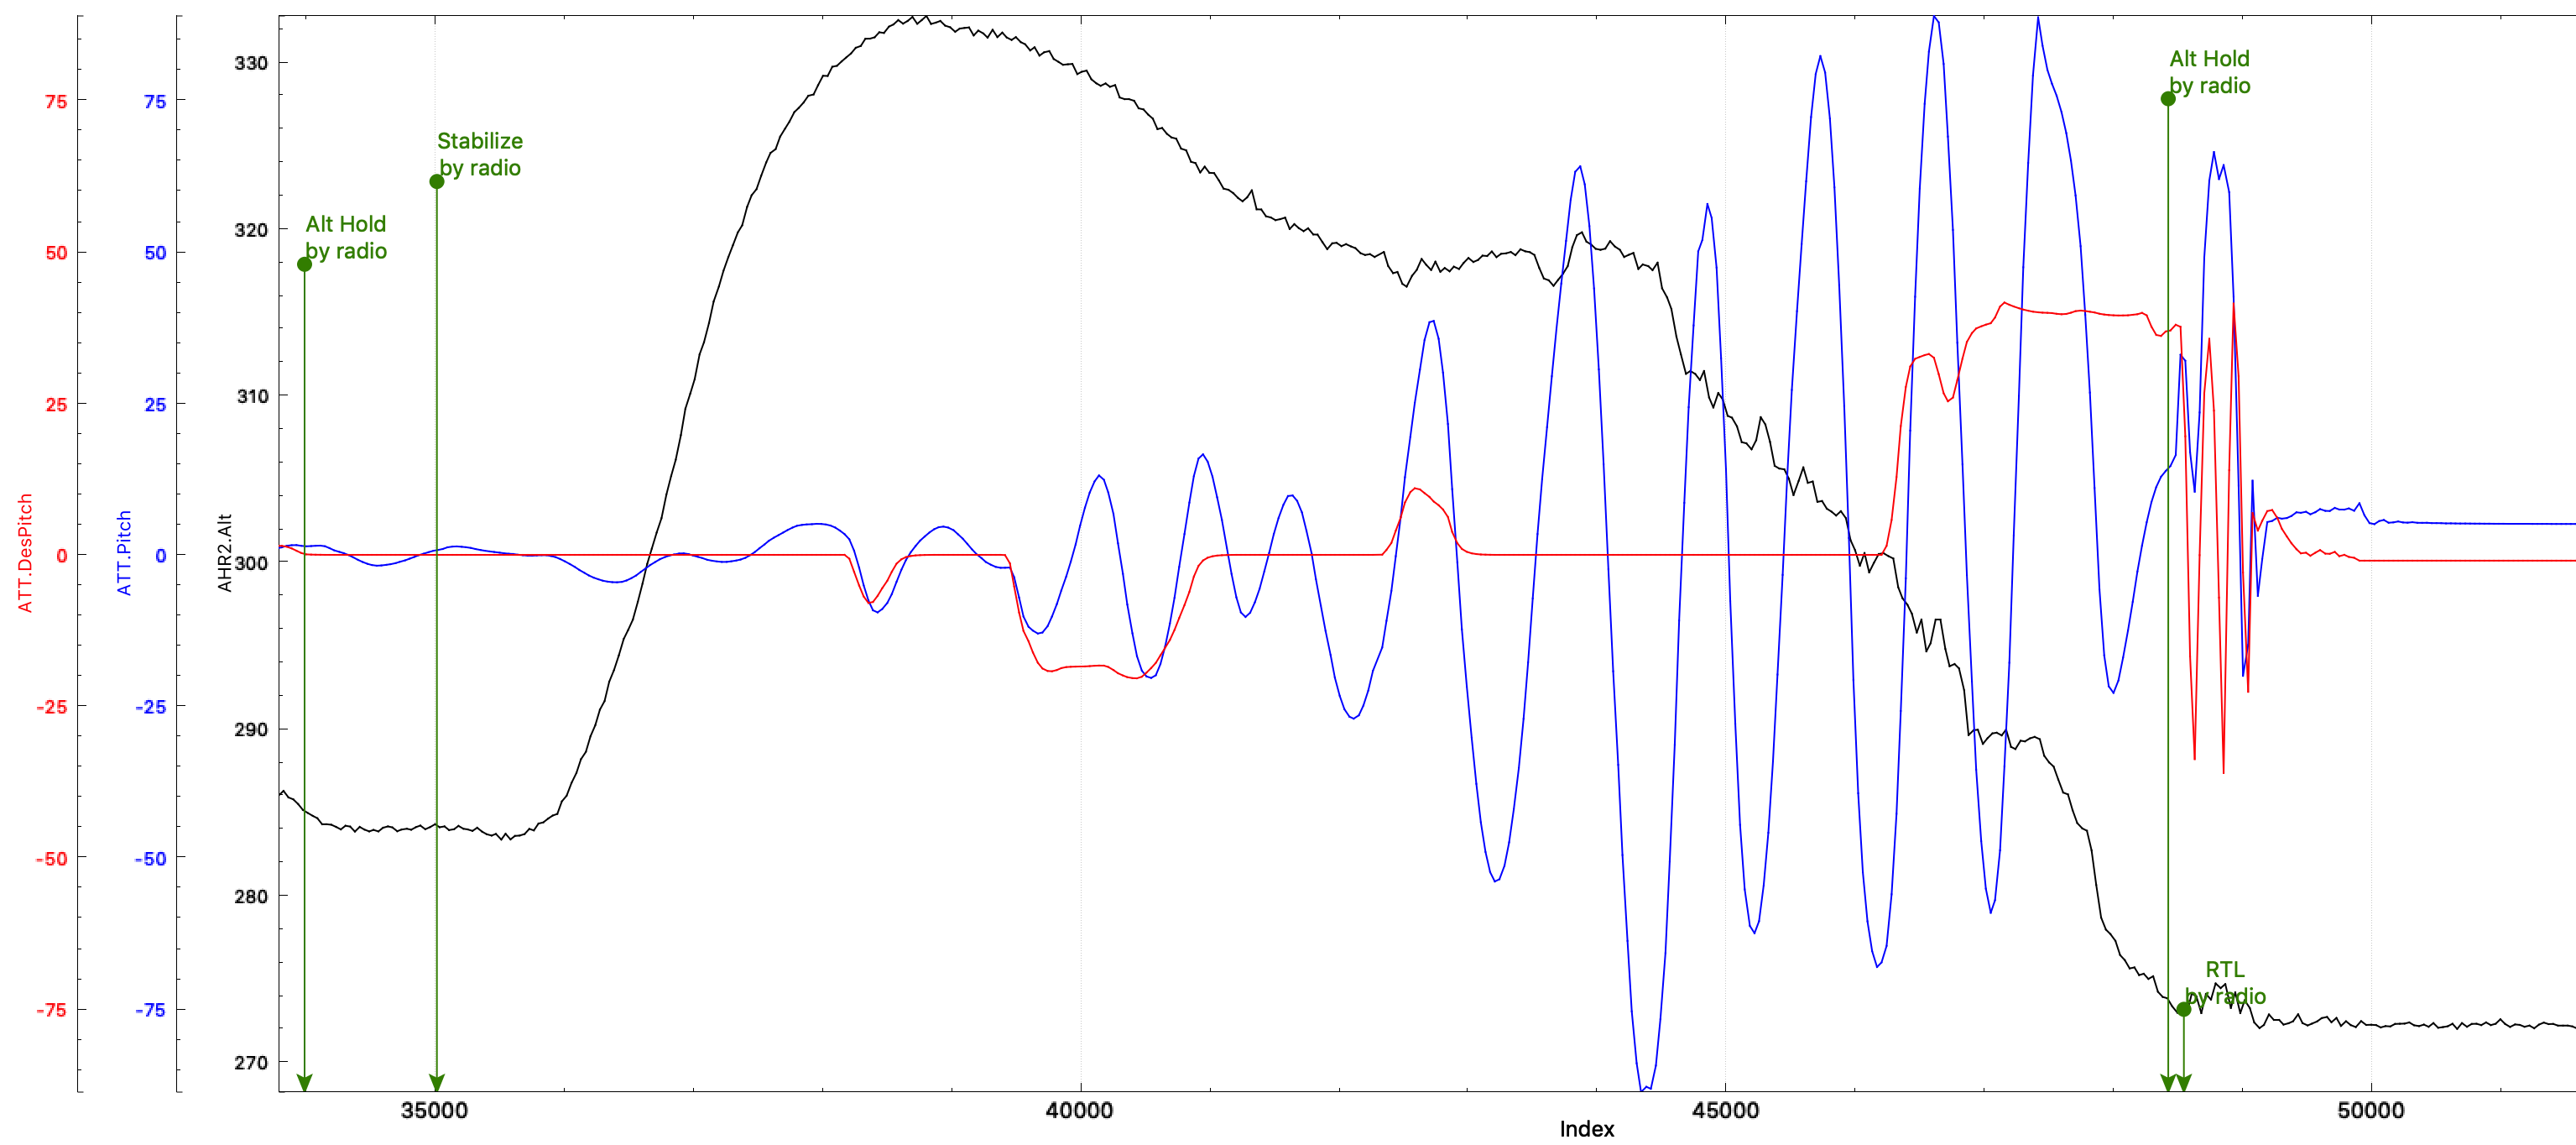
Hi Guys, I am looking for some help reviewing 2 logs from 2 separate crashes that recently happened with a larger hexacopter. My first crash was last week and at that time it seemed like the crash may have occurred from a flight controller mount coming slightly loose and introducing vibration. I rebuilt the hexa and again had a crash. Both crashes happened after the copter flew well for a perriod of time. I was able to perform a succesfull autotune both times and safetly land (the yaw was quite sloppy after the autotune) The next flight is when the crashes occure. Both times the hexa has a hard time keeping stable and starts pitching back and forth very aggresively until I can’t control it at all and it hits the ground.

This hexa only has about 40min of flight time on it so far.
It has a Black cube mounted in a KORE carrier board.
Has 15" props using T motor motors and Hoibbywing 40A ESC’s
I have another hexa that it setup almost identical except it is running an older pixhawk. I have been flying this one for over 2 years without an issue.

At this point I am at a loss as to what is happening.
I uploaded both crash logs to the link and also the log from my most recent autotune that did not have a crash. The next flight after it did. The most recent log is “Crash_2020-04-30 20-20-44”.

https://drive.google.com/drive/folders/1PmL7j8KsDodmy-BNF_3WwkxBLj6ywwwS?usp=sharing

Thank you for reviewing and I greatly appreciate your help.

You need to upload the .bin files. The .log files don’t help at all

@smartdave I appreciate you letting me know. I just uploaded the .bin files for review.

Thank you for your help.

In the log for 2020-04-20 I see Roll and Desired Roll are almost always departed and eventually the flight controller cant maintain any stability. Pitch is not so bad, yaw is not ideal but not the cause of the problems.
There’s also some Z vibrations causing some clipping, but that’s mostly once the craft is already in trouble and almost beyond saving. Vibes are probably something to keep in mind for later.

Based on that log, I’d probably change these parameters at least:
ATC_RAT_RLL_P,0.06
ATC_RAT_RLL_I,0.06
ATC_RAT_RLL_D,0.01
This is reducing them by 10%

Also it looks like most other parameters are defaults. Best to set these too:
PSC_ACCZ_I,0.496
PSC_ACCZ_P,0.248
ACRO_YAW_P,2.5
ATC_ACCEL_P_MAX,75600
ATC_ACCEL_R_MAX,75600
ATC_ACCEL_Y_MAX,22500
ATC_RAT_PIT_FLTD,15
ATC_RAT_PIT_FLTE,0
ATC_RAT_PIT_FLTT,15
ATC_RAT_RLL_FLTD,15
ATC_RAT_RLL_FLTE,0
ATC_RAT_RLL_FLTT,15
ATC_RAT_YAW_FLTD,0
ATC_RAT_YAW_FLTE,2
ATC_RAT_YAW_FLTT,15
ATC_THR_MIX_MAN,0.1
INS_ACCEL_FILTER,20
INS_GYRO_FILTER,30
MOT_THST_EXPO,0.71
BATT_ARM_VOLT,22.1
BATT_CRT_VOLT,21
BATT_LOW_VOLT,21.6
MOT_BAT_VOLT_MAX,25.2
MOT_BAT_VOLT_MIN,19.8
BATT_FS_CRT_ACT,1
BATT_FS_LOW_ACT,2

And this will give you a bit smoother RC Feel
ATC_INPUT_TC,0.22

After repairs :cry: you’ll want to go over this tuning guide and use this spreadsheet to run more Autotunes.
I highly recommend doing the Compass/Motor calibration too.

https://ardupilot.org/copter/docs/tuning-process-instructions.html

…and I’ll take a look at the next log.

1 Like

In the next log, 2020-04-30, there’s other things I noticed that may or may not exist in the first log

There’s a slight weight imbalance to the left side - not a big problem but something to watch out for.
EDIT: for Kore carrier motor numbering, I think this will mean the FC is fighting a physical yaw problem not weight imbalance - a misalignment of motor mounts for example. It’s not drastic, although every little thing adds up…

Once again, Pitch and Roll depart from desired quite a lot.
Yaw and Desired Yaw are actually quite good in this log.

I see some PIDs are different to the first log, but some other parameters still look standard or strange.
I think all the previous recommendations stand, use that tuning guide and spreadsheet as starting points.

Z Vibes are definitely coming into play I think. All the usual apply, prop balance, loose items, wires knocking or pulling the flight controller or carrier board.

@xfacta thank you for the time you put in to review these logs and point out things. I appreciate you sending over those recommendations from the parameters to set and a guideline. From what you see there is nothing physically wrong with any components such as motors or ESC"s though?
The vibration thing is really concerning me because both times I was able to run an auto tune which doesn’t really get the rpm’s up on the motors so maybe bad vibrations are not showing their ugly face. It seems like the problems show when I am giving it a little more throttle to test out the build. On that note I have the Kore carrier board connected straight to the frame with nylon standoffs. They mentioned that you don’t need to mount the carrier board on vibration dampeners but I may still do it.
As far as the motors mounts possibly not being aligned, I leveled the cube both ways on a table and then leveled the motors to that. Does that sound like a good approach? I don’t have any wires hanging off the drone and nothing is flopping around at all. Everything is secure. The wires on the drone are not tight and have enough to move slightly if needed.

Thank you.

I couldn’t see signs of anything electrically wrong.
Personally, if I had a Kore carrier I’d probably mount it with those anti vibration rubber mounts with the thread poking out each side. I’m not a fan of hard-mounting a critical circuit board so the it becomes a structural part of the frame - given that there WILL be some amount of flex in the frame no matter how strong we think it is. It may take a few different sets of rubber mounts to get the right strength or flex.

For leveling it’s important to get the “prop disc” level, not necessarily the FC.
We have a very light weight level, made with a suitable length aluminium angle and glued on a “brickies line” level.
First, line up all your motors straight/level/vertical/90 degrees (whatever you want to call it :slight_smile: ) You should be able to see all the prop tips “point” to each other exactly. Look past one prop to it’s opposite to see they are both exactly aligned, no offset angle between them. There’s numerous ways to do all this depending on construction and components used.
Next, set the craft on a stable, solid surface like concrete, not a wobbly old table. Rest the level across the tops of motors or props - however you can do this in a stable repeatable method so the level can be moved around over opposite pairs of motors/props multiple times to check and recheck level.
Choc the landing gear to obtain level in every direction, then hit the Level Horizon button in MP or QGC. The closer you can get the prop disc to being perfectly level, the better it will fly and handle wind.

@xfacta Thank you for your time once again. I completely agree with you about hard mounting the carrier board to the frame that is more than likely flexing and then playing games with the flight controller. I am confused by what you mean when you say “with the thread pointing out both sides.” Are you referring to the end of the rubber dampers coming through? I think what I am planning to do is cut 2 pieces of carbon fiber, put 4 rubber dampeners or dense foam between the two and hard mount the bottom to the frame and mount the carrier board to the top plate.
Thank you for the detailed explanation of leveling the prop disks and it all makes since and helped a lot.
One last question, the parameters you sent in you first response do you reccomend those as a starting point to then do a auto tune from (maybe it explains this in the link you sent. I haven’t been able to look at it yet)? Also would you recommend those settings for any large copter?

Thank you.

Either of these sorts of things are what I was thinking of, whichever suits - but you idea is good too.
image

In the links I sent, you’d follow that tuning guide to get to the Autotune stage, in conjuntion with that use the spreadsheet to easily get the values you need instead of trying to interpret the tuning guide graphs onscreen. In the spreadsheet, plug in you prop size and LiPo battery cells.

Thank you that clears up the questions I had about using the spreadsheet. I have a parameter file from before any autotunes were ran so it should be the defaults after loading new firmware. I will load that and then change the values to match what you have above and look at the spreadsheet values too. After all that and the copter is flying decent i will run an auto tune.
I was planning on using those mounts initially and I have them on my desk but when I was installing them I had one of the screw mounts with the metal disk on the end pull out of the rubber dampener so I lost faith in them and put them aside. I will re-look at them.
Looking back at your comments about “leveling the horizon” do you level the prop disks in all directions hit “calibrate level” and then also calibrate the accelerometers in all six directions or do you just calibrate level?

Just do level horizon, if you did the initial accel calibration reasonably.

I am changing the parameters to those that you recommended above before i do another test flight and then an autotune. When setting PSC_ACCZ_P to 0.248, Mission Planner is saying that it is out of the range of 0.500 - 1.500, should i keep it this way?

That’s just a warning, forge ahead readless and set it to whatever was calculated.

it seems you do have a tuning issue. The pitch gradually departs from the desired value until it got out of control during descending and crashed.

No signs of electrical issues.

it seems your troubles started with that loose mount, maybe the first autotune done while the mount was still onboard captured bad parameters and it keeps affecting your following flights?

as suggested by @xfacta I think a fresh start is the best course of action.

reinstall everything to default and use backup parameters from before the loose mount incident.

yah, crashing a large Hexa is a real pain…I wish you all the best next time!

by the way, in your next flight take baby steps and don’t attempt autotune till you have a good analysis of the first few flight logs. make sure this propagating error is no longer there.

Thank you @Mark57 for the second look and review of the logs. I loaded a parameter file to the hexa from before my first auto tune so it should be default values. I then changed the values as @xfacta suggested. I will be re-leveling the motor mounts, doing a new accelerometer calibration and then a level horizon. I will also be doing a new ESC sync and compass calibration and I also re calibrated the radio. In your guys opinion is that enough to “reset” this system? I am trying to avoid bad settings to continue to raise problems. I will try to fly the hexa tomorrow and then load the logs for analysis before i do another tune.

Thank you.

Regarding default values!
I changed the FC in my Hexacopter from old version Pixhawk to CUAV V5 nano. Loading an older parameter file caused a lot of problems even an old one before auto tune.
I than loaded a Rover Firmware onto the new FC and than back to Hexa V 4.0.3. Only now everything is fine and no further problems. Good luck

Thank you @FRED_GOEDDERT I might as well start from scratch again by loading a rover firmware and then back to v 4.0.3 like you mentioned. I appreciate the suggestion. I will then change the values to what was recommended above before flight.

1 Like

Giving an update and looking for additional help to review the most recent log. Before this flight loaded a rover firmware, restarted the cube and then loaded hexa V4.0.3 back onto it to start fresh and avoid any bad old parameters left over. I then ran through all the initial setups including accelerometer cal, compass cal and esc cal. I put all the prop circle on the same plane (all tips point right at the one next to it) and then did a calibrate level. I also checked balance on all 6-15" props and did slight sanding. I added some vibration dampeners to the mounts that the carrier board is on, they are similar to what Shawn recommended above. I then changed the parameters as @xfacta suggested.

I took the hexa out for a flight and it did not fly well at all. It was a bit windy (up to 15mph gusts) but this setup should handle that well once it is tuned. I did the best i could to get as long as a flight as possible but it was difficult to keep it flying well and I am trying to avoid another crash so i hope the bin below is long enough to get some info and suggestions out of. The new bin is “2020-05-07 15-22-16”

One thing i did want to mention is how close the prop tips are to each other. The left and right side have about a half inch gap between tips. The gap between the props directly in front of the hexa and behind the hexa have about 2 inches. I modified how these arm connect to the drone to make the mount stronger and this changed the angle of how they come out of the drone very slightly which is what is making up the difference. I also uploaded a few pictures of the setup so you can see what i mean.
https://drive.google.com/drive/folders/1PmL7j8KsDodmy-BNF_3WwkxBLj6ywwwS?usp=sharing
Thank you for your help.

Is that a tarot 680 pro?

The props being so close shouldn’t matter. My 680 props are almost 1/4 inch apart

@smartdave yes it is but it has been heavily modified. I have the top and bottom of the frame doubled and have replaced the arms with longer ones that are also 2mm thick (12mm ID). I have also eliminated the cheap clips that the arms lock into and 3d printed a substantial mount. I also scraped the motor mounts and I am just using 16mm clamp style for strength.

I have another one that is speced out almost identical except it is using a pixhawk 1 and it has been flying awesome for 2.5 years.

Your build looks great, and thank you for the picture of how close your props are.