Hi Everyone - I’m very new at the ArduPilot forums and blogs, so if I’m doing it wrong… go easy on me.
A couple of years ago I had the interest of building a flying TARDIS much like Otto Dieffenbach. In my research I found that he used a KK2 board and there have been loads of advancements in flight controllers since then. Originally I was looking for a quadcopter setup that could, in addition to the motor, control thrust vectoring control surfaces. I was unable to understand how to do that… but I found the next best thing, SingleCopter.
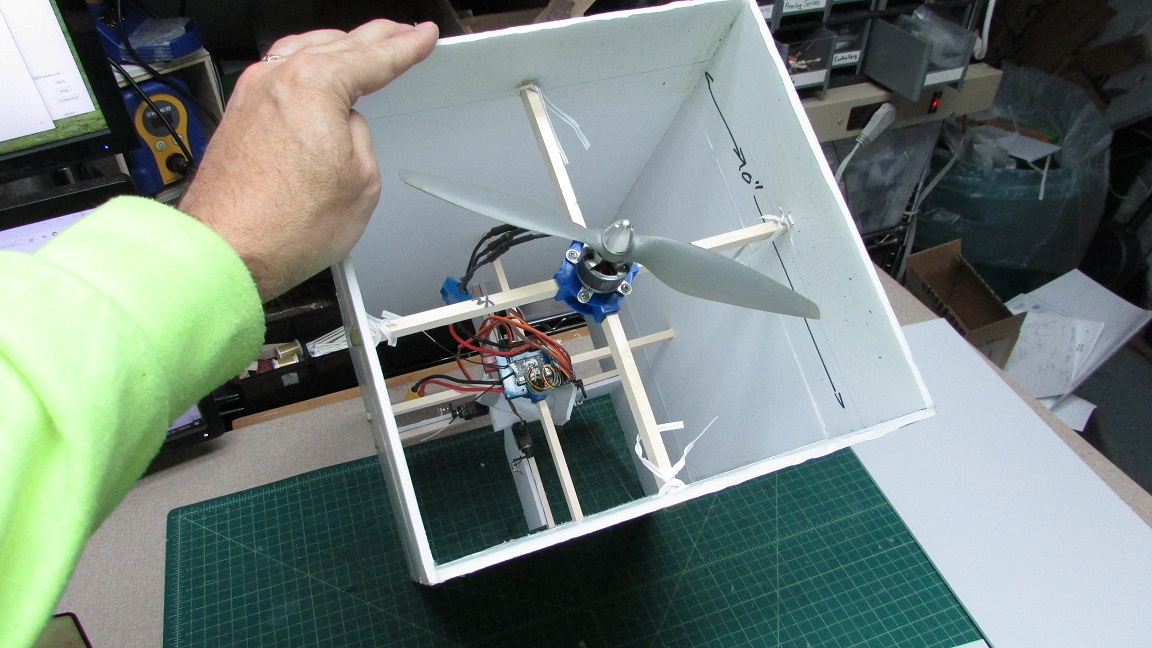
With the new found firmware I went back to work. I built two test rigs, one using a PixRacer and another with a Matek F405 Wing flight controller (pictured below)
Parts List
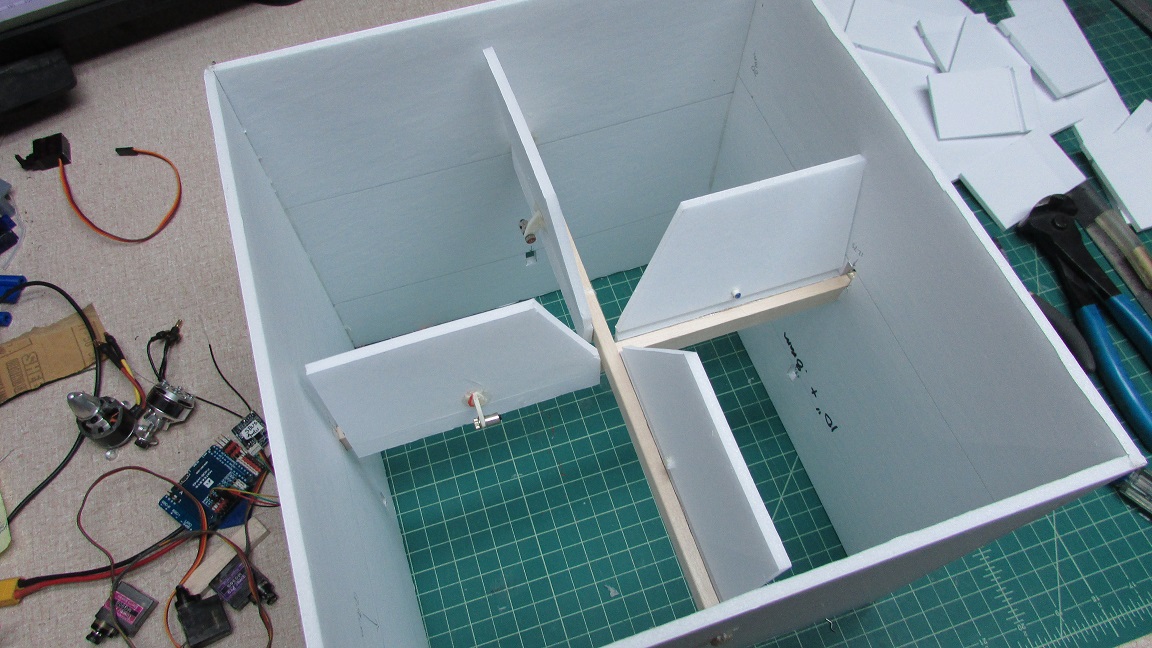
2 sheets of Ross foam board
4 13g metal gear digital servos
Motor: NTM 28-26 1200 kv motor
Propeller: APC 9x4.5
Battery: 1300 mAh 3S
ESC: HobbyKing 20A
Flight Controller: Matek F405 Wing
Firmware: ArduCopter, SingleCopter
Great job David! I think you’ll get a little more control authority by enlarging the control fins or cutting away the outer body where it covers the lower part of the fins so that they stick out the bottom some more.
Paul, It was fun to get up.
Thanks for your thoughts… that occurred to me also - great minds… First, I’m going to try getting it working with larger control surfaces first so I don’t cut much out of the facade. Otto got it to work without cutting the walls, so I think I should be able to make it work. Otto had much bigger thrust vectoring control surfaces (including quad copter control). My thought was that larger paddles would restrict the airflow if fully displaced to one side or the other. Another thought that I have yet to explore is to create a tube about the size of the propeller that extends the height of the structure. The tube would be essentially a thrust tube and the bottom of it could be a bit shorter than the outside box and the thrust vectoring control surfaces could be outside the tube but inside the facade. The box is sketched out to be about 20” x 20” and the propeller so far will be about 11” diameter. That is a lot of dead space (drag). Based on box fan designs are terribly inefficient with a lot of eddy effects all the way down. A tube may more than make up for the additional weight.
The air tube is an interesting and promising idea.
At one point I added a rounded lip to the inlet of my machine and it increased the power output by a lot. I remember reading articles in Quiet and Electric Flight International about the performance increases possible with good airflow setups in ducted fans. Those were the days of Speed 400 motors, nicad cells and home made fans. Another thing was to make the shroud just a tiny bit wider than the diameter of the prop - apparently efficiency is lost with a wider gap.
I have a comment about you indoor flight in the video. From my experience it is extremely hard to start if you are afraid of giving it some throttle. The bottom needs to be free to move in all directions, otherwise the flaps will not do their job and will just make it fall sideways. The copter should touch the floor only when landing. This also needs to be crisp. The moment you touch the ground you kill the motor.
Best is to start flying outdoor (should be no wind). Give it at least 75% throttle to make it jump up without fear of hitting the ceiling. Once at decent height you can reduce the throttle. After you get a feel for the copter and learn how to make it jump up at take off you can start flying indoor. I myself fly it in AltHold and Super Simple mode. Makes it so much easier! I could not fly in any other mode indoor - I’m not a pro.
I also have a question for you. I assume your firmware version is 3.6.10 or higher. Before you arm the motor do flaps respond to your yaw stick? For me only pitch and roll work but not yaw.
In my older single copter which has 3.5.4 firmware, all three work: pitch, roll and yaw, even before arming the motor. I need to make sure whether they made this change to 3.6.11.
Ah, The power train is a bit under powered… I was at full throttle. For the prototype I used an old motor that I fitted to my original quad copter from yesteryear, circa KK2. The NTM 2826 1200 kv on 3S pulls 17 amps (motor speced at 17) and produces 28 oz of thrust as determined by my DIY thrust rig. The prototype weighed in at 18.3 oz so obviously I”m going to need more thrust. So, that is why it was skipping across the ground because it would only lift with the help of ground effect. The next one will have more muscle…
My plan is to install a GPS antenna and use Super Simple flight mode, but that will come after playing around with more configurations. I figured I get the basics and add on more and more stuff. I’m not a pro either, just loving trying new “for me” things. Certainly people like you and Paul are blazing the trail and I”m just following in the clean wake.
The board is loaded with ArduCopter latest version v3.6.11. I was going to respond to your question in your thread. I think you are onto something with the control surfaces not moving. I would like them to be fully active upon arming… but mine do not activate after arming the board. Not only that, they don’t start actuating until throttle is raised 10% or so. I find it a little bit unnerving to not hear the flaps leaping into action upon arming. This is like a flight control check that is totally missing. On my testing rig, I always ran it at ½ throttle so I didn’t notice the delayed actuation. I can load earlier versions onto my test rig if you say the flaps activated with arming. I’ve only used v3.6.11 so I wouldn’t know any better.
Best,
David
Thank you David - this is very helpful information for me.
Yes - v3.5.4 would make it much easier for you. Evidently they removed this feature, as you can see from Peter’s reply to me on the forum. I’m not sure if you can get version 3.5.4 - I cannot find it in the repository. Either much earlier versions or v3.5.7. I have not tried the 3.5.7
I understand that you are not using Pixhawk. In my Pixhawk Mini I have a Safety button that I have to press first before going to arming the motor. It’s a red lit button that turns from blinking into solid red after pressing it. After I press this button all the surfaces move proportionally to the stick movement. Nice and steady. So if there is anything in the way of your surfaces you can limit their travel either in the program or in your radio. Extremely helpful. You should be able to do this same.
After the motor is armed surfaces no longer move in proportion to the sticks. At this point the autopilot tries to stabilize the copter (after as you said you give it some throttle). This makes the surfaces move erratic, with delay, and not quite the way you would like them to move. I don’t think you should be setting up your copter after arming the motor.
So, even in v3.6.11 you should be able to check the direction of movement of the flaps without having to arm the motor. Just find this “safety switch”. The flaps will still move in pitch and roll direction. Just not in yaw.
Hi Andrew, True, I am using two platforms, PixRacer and Matek F405 Wing. Both seem to operate the same, however, there is no arming button for the Matek F405 Wing, which I used for the prototype above. Arming is, of course, performed with the stick and I have turned off the arming safety features, including the button (since I don’t have one for the PixRacer) so they do not prohibit arming.
After thinking about it for a bit, it seems logical that the control surfaces would not move until motor arming because they are connected as “MOTOR” outputs. When I first started playing around with this (and before I really read the setup instructions) I tried to get servo outputs like Elevon, Aileron, Rudder, Elevator, you know, the ones you would expect to operate a control surfaces, but in ArduCopter, these outputs seem to have no functional output that I could tell. If I were designing the firmware for a SingleCopter, I would have used the control surface servo as outputs rather than redirecting the motor signals (which I assume was done). In my mind it seems that Elevon and Rudder control is all that would be needed. I do not have a background in software development so I am unable to read through the code to determine how it was set up. It would be interesting to know, though.
I’ll have to an earlier firmware version and test the arming. I’m also going to be looking for a passthrough flight mode which should produce a 1:1 relationship with stick to control surface movement. But… since they’re connected to motor, pass through may not work.
Also, before I discovered SingleCopter, I was trying to utilize QuadPlane. I jumped from it when I found SingleCopter, but the idea of having 4 motors with control surfaces all acting together is intriguing.