Building a Better Quad Frame

I’m really not fond of logical fallacies and I try to avoid them whenever possible. I really don’t want to argue back and forth on this blog but I’m going to defend my position. First, I’m going to present an important definition for the benefit of young people who may read this blog at a later time:

hy·poth·e·sis

noun
a supposition or proposed explanation made on the basis of limited evidence as a starting point for further investigation.

My hypothesis is that one or more of the arms or motor mounts on that specific frame would have broken in that crash if I had not used nylon bolts. This is based on the following facts:

  1. The arms were made of very lightweight, unidirectional carbon fiber tubing which is 7mm in outside diameter. See my above photo of the frame that weighs 94g. This tubing fits inside sections of 10mm braided tubing that I used on the previous frame.
  2. The motor mounts were made from very lightweight, balsa/carbon fiber composite that I have managed to break in previous experiments.
  3. There was enough force present in my crash to shear 12 nylon bolts, so it didn’t all disappear into the ground.

I hope this makes it clear that my previous statements were not logical fallacy at all, but were suppositions clearly based on factual evidence. I am very happy to be corrected when I’m wrong. I ask everyone to check my math because I make mistakes, but please be constructive when commenting on this blog. I am here trying to help people.

Thank you.

Indeed but you can also hit an obstacle which blocks or slows down your prop, without a crash detection happening, which happens the most in my experience.

1 Like

Hope my blabbering helps. I don’t get out of the shop much, which can lead to long comments at times.

I think your big warning about nylon bolts is spot on. They can be used, and as hugues points out are strong enough, but they do add different risks compared to steel or aluminum. I think the biggest risk you will find for people new to righty tighty lefty loosey is that they are very easy to either cross thread or over torque. If they do not break in this process they can be left in a less than great state, which is very hard to visually inspect. Your big bold warning covers that I think, so as long as people are educated on the risk/benefit I say have at it.

1 Like

I had experimented with lighter than steel screws/nuts at one point in time in an attempt to save weight by all means…

…I did not go for Nylon but instead for aluminium screws/bolts.

i tested 7075 (aircraft aluminium) and got decent results but the screws were prohibitively expensive. i then tried custom made screws from 6061 aluminium made in china - with discouraging results :frowning:

The result was that a) I could only tighten screws to <0.4Nm max ( or the screws threads would give in) and with that mini tension I got very significant vibration issues. the ship at that time was 4kg TOW with 18" props, all CF frame.

i switched back to steel screws,and all vibration issues were immediately resolved…

I can’t speak about small/light birds - and my setup was 100% CF parts - so a different setup - but for the bigger birds 5-15kg my personal experience is you get best stiffness (=least vibrations) with steel screws/nuts (at,least,at M3 or M4).

Hi @rob215x , sorry if you feel my comments are unfair on you (and @Hugues). My intent is not to belittle or be negative to try and make myself sound clever - in fact one of my pet hates is when people troll forums beating on others who are trying to be constructive and contributing knowledge. I’m a very literal person, so I’m simply discussing the interesting points brought up here but I can be a bit Sheldon-like sometimes. Apologies for any offence caused (unintentionally).

I do stand by what I said though, from my point of view, and I don’t think there’s anything wrong with constructively discussing and disagreeing with what others post in public - it’s important if there are potential problems or errors for others to see that. I also know next to nothing about hardware, so happy to accept I could be completely wrong. I do know however that designing heavy dangerous objects to deliberately ‘rapidly disassemble’ in a crash is a terrible idea from a safety point of view. There are many documented incidences of injury and death from this kind of issue - if you look at almost all vehicle engineering they are designed to deliberately contain and self-damage in the pursuit of safety.

I am interested in what you are doing because I think there is a huge disconnect between the great software we have at our disposal and the lack of similarly great hardware for the end-user to get flying with. I have also followed @fffrantz and @Hugues projects with great interest over the years. They have done some quite brilliant work and produced really great results, but with limited practicality/reproducibility. I am still searching for practical, easily reproducible recipes for great hardware, which is what brought me here. My points/questions here is in pursuit of that, trying to point out or find out more about the areas where I see others have gone wrong in the past.

Good luck for your build/project, it has some great ideas.

1 Like

10 - Packing Material and Drone Design

As I’ve mentioned, this blog is for people who want to build their own quadcopter frame with inexpensive, easily sourced materials and minimal tools. I also want that frame to perform really well because its the same frame I’ll be using for my photography business. I’m trying to bring new people to the Ardupilot community and hopefully this blog will become a good resource.

For any of you building your own frame for the first time, I’ve been experimenting with many different materials in order to save you some time and money. Physics theory is great but my posts are based on results from trying things in real life. I like using math to explain why something works but there are times when you just need to build it and see what it does.

The other day, I bought some outdoor patio furniture from Home Depot. The box had some packing material made completely out of brown paper, like they use for grocery bags. I was amazed by how strong and light it was. One piece seemed like a good size for a 680mm quad frame (like the one I’m currently building in this blog). So, I weighed it…

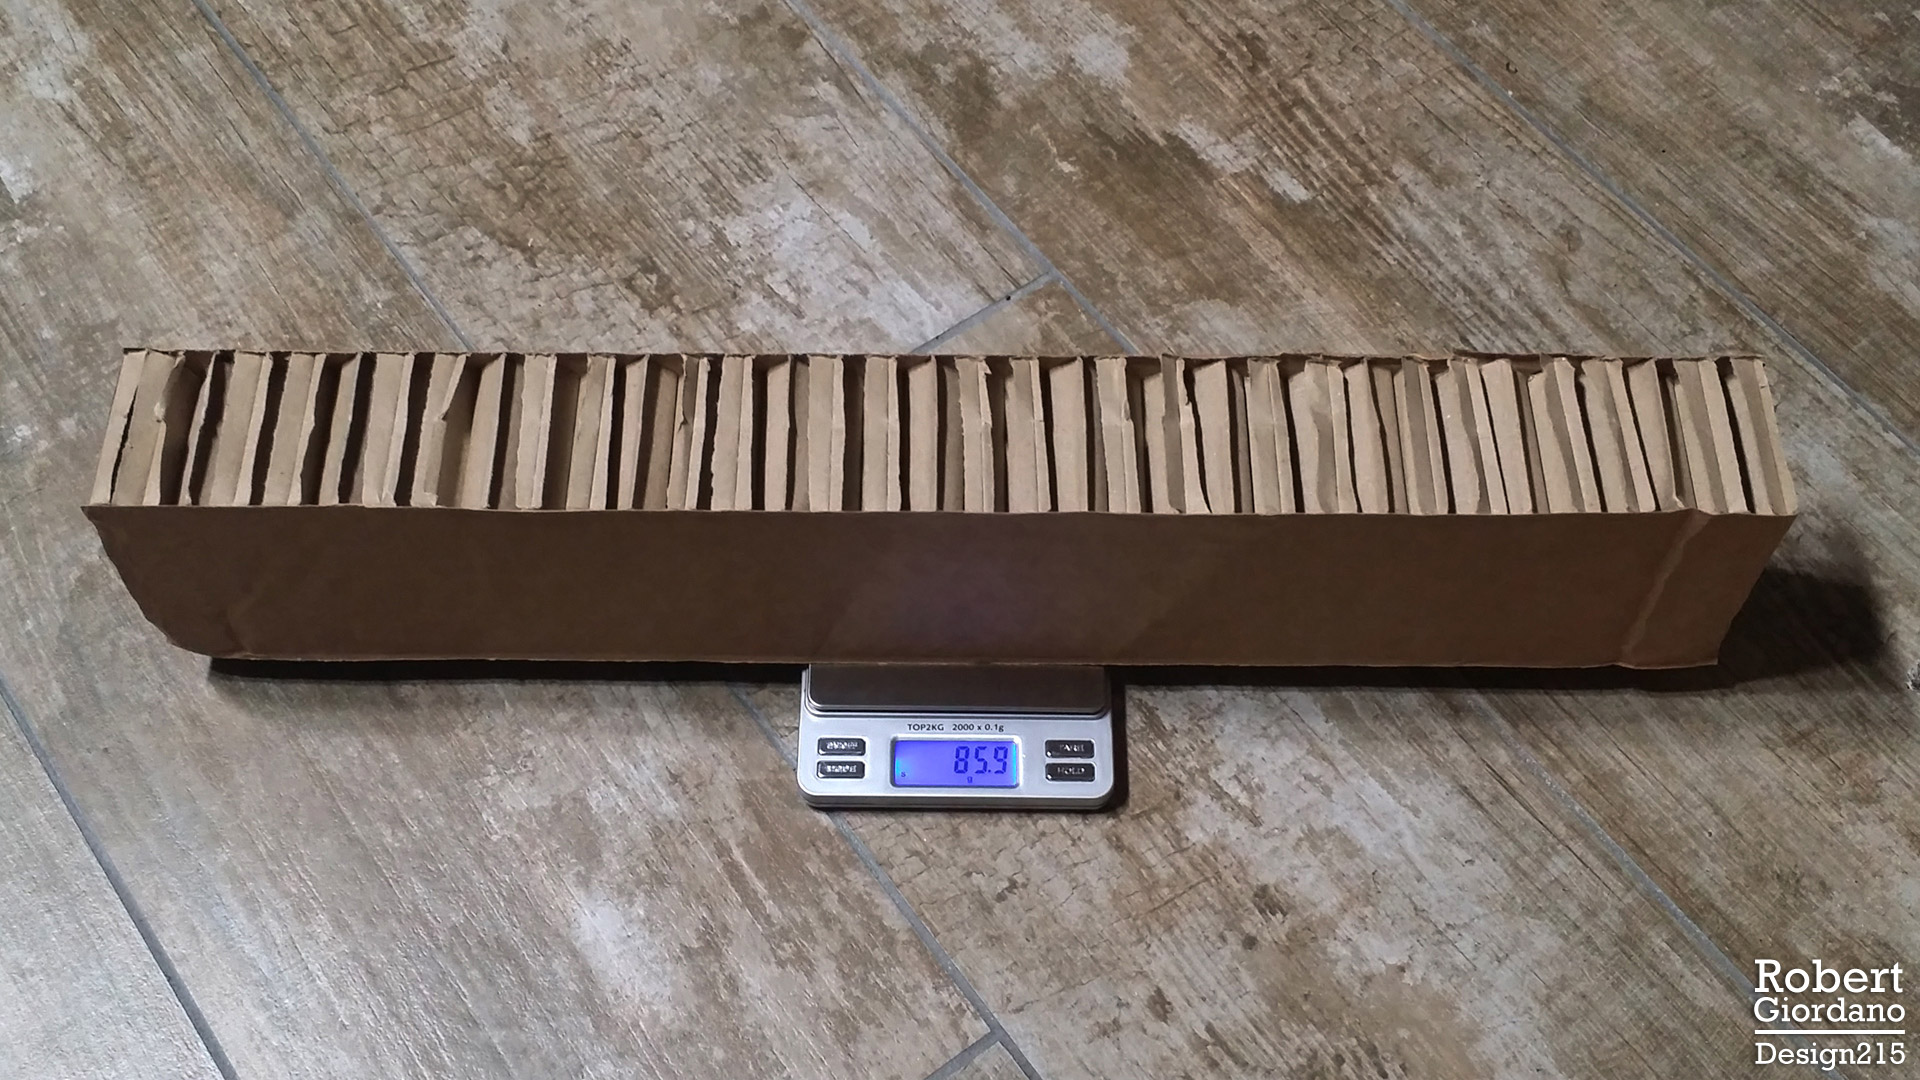
The overall dimensions of this piece are 94mm wide x 60mm tall x 52cm long. There’s a single layer of brown paper on the top and bottom, with strips of paper arranged in a honeycomb pattern in the middle. Next, I clamped it into my torsion test stand… (the video says 38cm but that’s the distance from clamp to clamp- it was too long for my test stand)

Amazing results!! Its almost as stiff as my “X” frame and certainly better in torsion than any other frame I’ve tested so far, either commercial or DIY. But how can I use it? I can’t just stick tubes in it. Its made out of paper.

I think the design principle is what’s important here. How can we use this design to make a stronger, lighter frame with other materials?

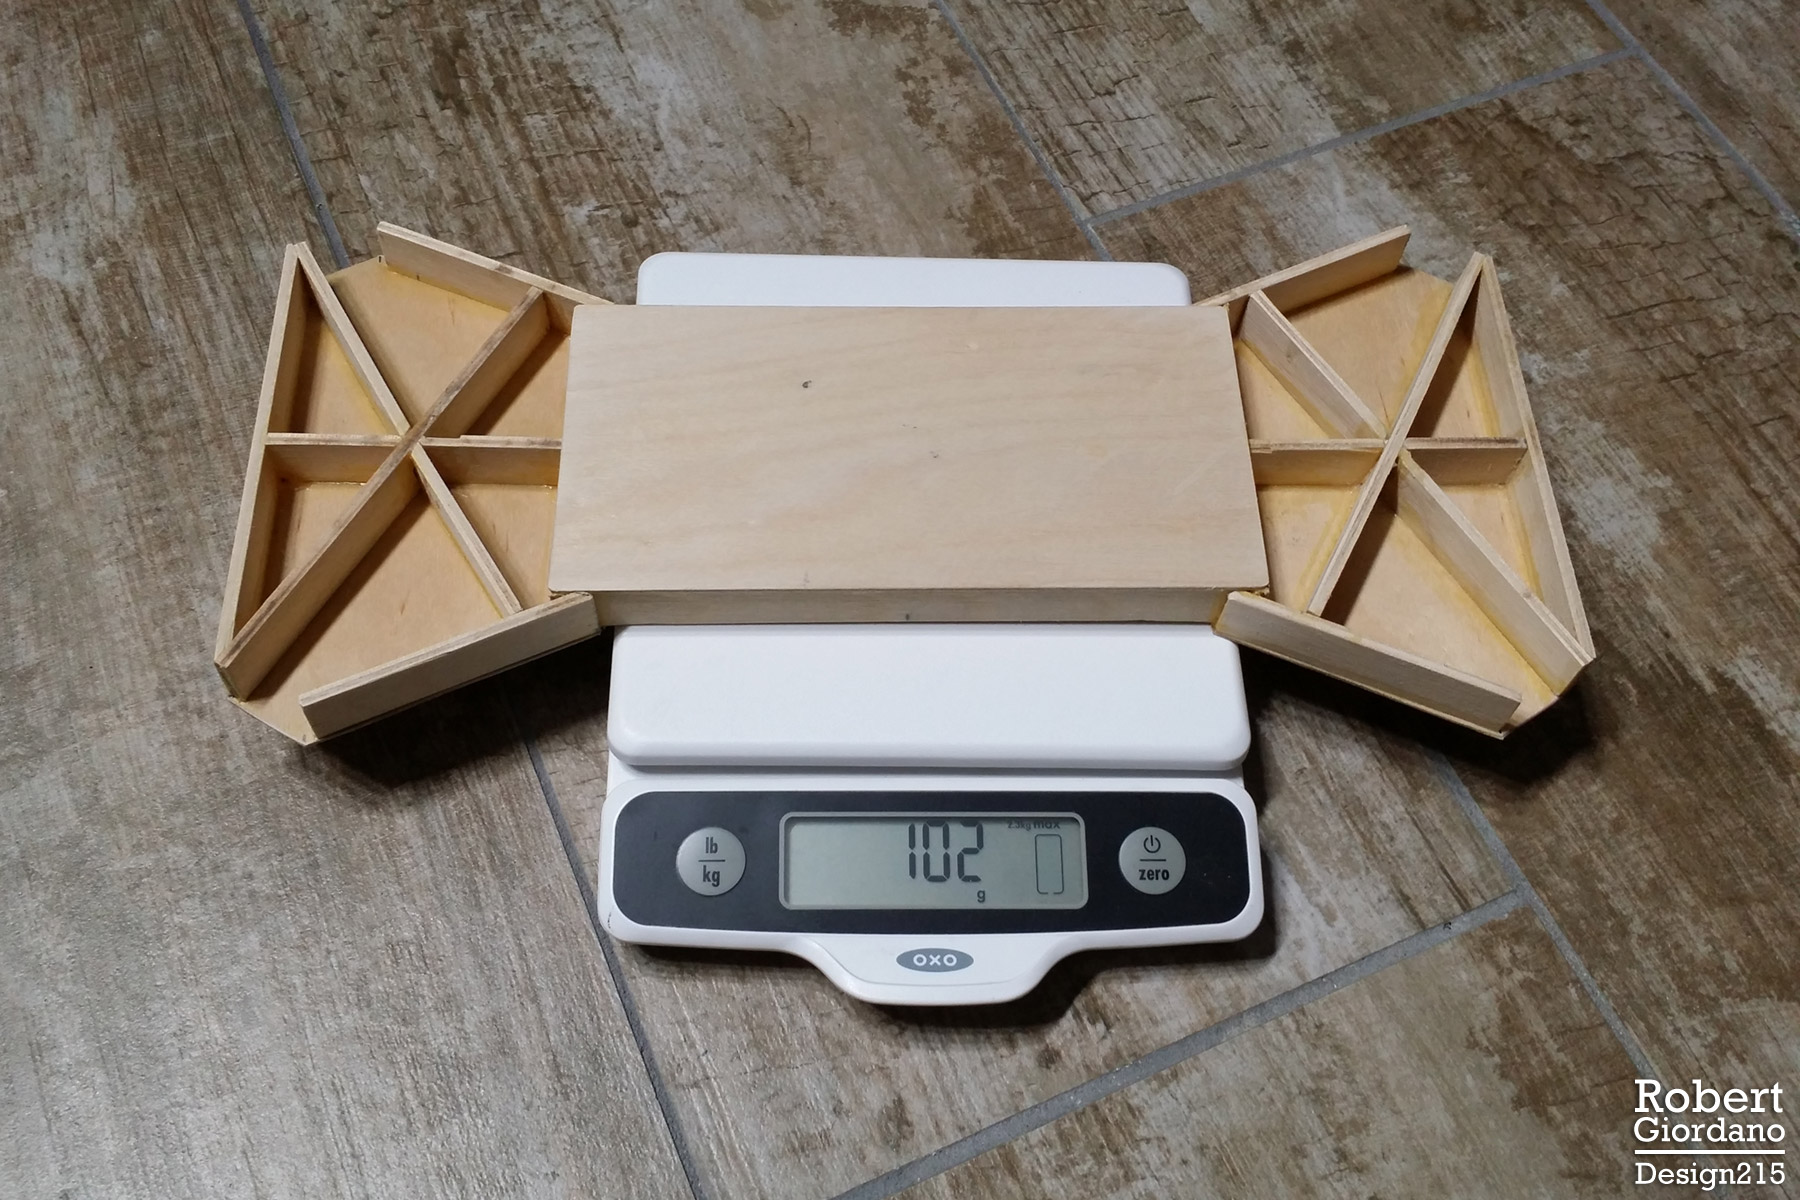
Today, I went to my local arts and crafts store. I wanted to see if I could find some lightweight material I could put between two pieces of birch plywood to make something like the amazing packing material. I returned home with some blocks of craft foam. Its the stiff, hard foam that’s usually green or white and is used for flower arrangements. It comes in solid round balls, cones, and blocks.

I cut 2 pieces of birch plywood 100mm x 300mm x 1.5mm (1/16"). I had 2 different sizes of foam blocks, 30mm thick and 48mm thick. The 30mm didn’t feel stiff enough so I used the 48mm block. I weighed the pieces…

Its slightly heavier than my Drogon v2.4.6 frame body…

Note: I use two different scales. I compare the readings from both to ensure my measurements are accurate. The silver scale is more accurate for very small things because it measures to 0.1g. At anything over 20g, both scales show the same integer value.

Next, I glued the pieces together with 3M 6070, an adhesive made for foam. Once the glue was dry, I weighed it again and it was 120g. Finally, I mounted it in my torsion test stand…

Well that was interesting! Although it isn’t nearly as stiff as the paper packing material, it is slightly stiffer than my Drogon 2.4.6 design. I’m going to stick with my current design for now, but I think this experiment was definitely worth the effort. Here’s what I learned:

  • A honeycomb center structure glued between two sheets of material, make a very stiff structure. The material on the top and bottom doesn’t even need to be stiff by itself. It could be a thin layer of veneer or carbon fiber. This is essentially how Nomex is constructed.
  • Craft foam isn’t as good as the paper honeycomb for a center structure. Maybe there are better types of foam out there for this purpose. But for now, I’m trying to stay away from exotic materials that are expensive and hard to find. Nomex is expensive!
  • Looking at the math/physics of this experiment, increasing the height (or more accurately, the area) of a frame’s cross section, greatly increases its stiffness. Switching from the 48mm thick foam down to the 30mm thick foam, I can feel the lack of stiffness just twisting it by hand.
  • Is anyone wondering how much it would weigh if I used carbon fiber instead of birch plywood? For the following weights, I’m adding 6g for glue since I know that’s what I used to make the one I tested. If I used 1.0mm carbon fiber, it would actually be heavier at 144g. If I used 1/32" (0.79mm) carbon fiber from Dragonplate, it would be 102g. I also checked a piece of 0.5mm carbon fiber plate I got from eBay and the total came to 103g. If I used 1/32" birch plywood, it would be 92g. Given the cost of carbon fiber, I’ll keep using birch plywood for my prototypes.

Stay tuned for more experiments! I have many things planned. I will add motors and props to something soon! :grinning:

My inner engineer is having a little happy dance. I read your first post in this blog AGES ago, and hadn’t come back. I’ve been missing out. Love this thread!

2 Likes

@Hugues I think your calculation is off by a factor of 10. 1 MPa to kgf/cm2 is 10.2

11 - Drone Frame Calculator

Its been a while since my last post but I have a LOT of stuff planned so I wanted to give everyone an update. Building frames from scratch, using a variety of materials, can be time consuming. You’ll buy some materials that seem like they could be lighter but when you cut the pieces and glue them all together, you may have only saved a few grams overall. Worse, your frame might even be heavier. Some people fill notebooks with measurements and weights of all the different parts, while others put everything into an Excel spreadsheet.

I don’t really like either approach, plus I wanted something to do the math for me…

I wanted to make a tool to help me calculate and keep track of all the weights of my frame parts.

What I thought would be a simple project, has turned into something much more complicated. Sound familiar, LOL? Anyway, I’m pretty far along with this new tool, and I’d like to share a preview of it…

Introducing the Drone Frame Calculator

I’m sure many of you have used eCalc and if you haven’t, its a great tool for calculating which motors and propellers to use for your drone. My tool serves a completely different purpose. The Drone Frame Calculator or “dCal” helps you compare different materials for building drone frames. It lets you store multiple lists of parts and weights online, so you can compare them against each other, or against your friends’ designs. And, it lets you calculate the weight of any size piece of material, if that material is listed in my database. I’m currently filling the database with hundreds of materials, from carbon fiber plate and tubing, to steel, aluminum, and nylon bolts, to plywood, balsa, foam, and carbon fiber composite sandwich materials.

An Example of dCal’s “Irregular Shape” Mode

Here’s one example of how you can use the Drone Frame Calculator:

Here’s the top plate from my H4 Alien 680mm quadcopter frame. It’s a fairly complicated shape. It would be difficult to estimate what that exact piece would weigh if it was cut from a different material. This is where dCal comes in handy.

As you can see, the original piece weighs 65 grams. Its made from 1.5mm carbon fiber plate with a matte finish on both sides. The material looks exactly like the 1.5mm carbon fiber plate I bought from GetFPV. The thickness measures exactly the same.

In dCal, I clicked the “NEW PART” button and selected “Irregular Shape” mode. I selected 1.5mm Carbon Fiber plate from the Materials drop-down menu. I entered 65g in the weight field, gave my part a name, and clicked “Save”.

Next, I made 2 copies of the part. On the first copy, I selected “1.0mm carbon fiber plate” from the materials drop-down menu and dCal showed me what the new weight would be, if I cut out the same shape from the new material.

The third example shows the weight if I cut the same piece out of 1/16" birch plywood. It would weigh less than half of the original!

More to Come…

I’m still building and testing this thing. It’s not quite ready for the public but its getting close and I wanted to share what I’ve done so far. This will be a FREE utility. I might run some Google ads to help with hosting costs but its running on my company’s server for now. I have many features planned, and I hope some will be influenced by this community, so feel free to pm me.

You can also follow my dCal blog :grinning:

3 Likes

Another Example

Here’s another example from my dCal app (Drone Frame Calculator). Earlier in this blog, we discussed steel bolts vs nylon and aluminum bolts. A common size bolt in many small to mid-size drone kits is M3 x 6mm. An H4 Alien quadcopter kit uses up to 96 of them, depending on the version and if you install all of the parts.

In dCal, I can just select different M3 fasteners from a drop-down list and enter the quantity. dCal instantly gives me the weight of my bolts:

There is one more option milling 3D frames subtractively. if you can cut 2d on a cnc you can cut 3D body’s breaking a arm requires you to mill another part for a few bucks and mill time once the patterns are developed. I don’t think its not in the realm of the DIY hobbyist. Some of the advantages are also low GPS interference low vibration good protection of FC and esc’s. just my 2 cents.

1 Like

I agree. You can also get 3D parts printed locally now in many locations. I’ll be exploring both of these options in future posts.

1 Like

More dCal Stuff to Help Build a Lighter Quad

As you might have noticed, I haven’t had a lot of time to work on this blog but I’ve been busy in the background, making tools to help accomplish the original goal - to design a better quadcopter frame, suited for DIY builders who have a limited budget and basic tools.

I’ve been adding materials and components to the database in dCal, my Drone Frame Calculator project. For example, I’ve added a fairly good selection of FPV cameras, by weight:

Visit this page here: https://design215.com/dcal/u/examples/camera-weights

I’ve also added a very simple flight time calculator when you know how many amps your drone uses to hover. The page has additional information for novice builders:

Visit this page here: https://design215.com/dcal/toolbox/flight-time-amps

I still have a lot of work to do on this project and I welcome any suggestions or requests. I’ve drawn up my next frame design and I’ll be using dCal to estimate its weight before I start building it. I’m going to be making a series of short videos demonstrating the build of this frame and hopefully it will accomplish the goal of this blog.

2 Likes

I used 15x15x800mm carbon fiber square tube to build my frame.
It’s very durable,strong,and light. I build two quad 525mm and 650mm size as those pictures.


525mm quad’s weight is 1945g include 6S3P Li-ion battery, and over 60min flight time.

650mm quad’s weight is 2270g include 6S4P Li-ion battery, and over 50min flight time.
I think maybe it’s not the best frame,but it’s good for me.
For your reference.

4 Likes

Great blog, Robert! I really like the way youve based your findings on real-world tests and not relied on marketing hype or “the received wisdom”.

1 Like

12 - Tubing Calculator

As part of my collection of tools designed to help everyone build better drone frames, I just launched another simple, but hopefully useful tool: https://design215.com/dcal/toolbox/tubing-calculator


UPDATE: These images reflect the new formula used for comparing torsional strength.

I’ve included some of the same information I first posted in this blog, back in April. After searching the internet and playing with many online calculators, I couldn’t find one that let me compare two types of tubing side by side, gave me the torsional constant for a thin-walled closed section AND estimated deflection, and worked well on my tablet. Also, I didn’t see any other calculator generating graphics that are perfectly to scale. I hope you like it.

I just finished this tool last night so if you find any bugs or see improvements I could make, please send me a PM. Thanks! I have a LOT more coming!!

2 Likes

It is actually easy to make a mold and lay down the carbon clothing resin, All using only simple hand tools.

If you are doing this at home you are not going to use an autoclave. C-clamps work and provide enough pressure for a small part like a drone body.

carbon/epoxy can be rather low-tech if you want it to be.

3D printing works too. You can print a stiff and light frame of you make the shell thick enough. Make it light be printing the in-fill at very low density, say 10% to 30%

1 Like

Now I do :smiley: Also - how did you film the qav400 crash in episode 2? It looks as if the main camera is following the quadcopter. We’re three cameras on board?

Yes, 3 cameras. There’s a 7mm x 300mm carbon fiber tube extending backwards with a 808 Keychain camera attached to the end, hanging under it. Until I watched that camera I had no idea what was going on with my frame. I learned a lot from that experiment.

Hi Rob,
I just found this thread and thought I would throw in a couple comments. I’m an aeronautical engineer and have been designing airplane structure for about 40 years now for a small airplane company in Seattle (Boeing). I have been messing with drones for a while and want to embark on a custom build for efficiency so I have found your posts to be excellent. The comments I would throw in are these:

  1. There has been discussion of torsional stiffness and ways to increase it using truss structures. In fact the most efficient way to increase torsional stiffness is by using a closed section. All current airplanes use a closed box section in the wing as the primary torsional stiffness. Truss work went out when stressed skin designs took over. If I understand your current build in plywood it looks like you have an open section in the center on one side and open on the other side on each end. If you cover the center section you can leave out all of the diagonal bracing and have a more torsionally stiff section. There is no need for any sort of core unless you want to make the skins so thin they lack stability.

  2. One topic I have not seen addressed (maybe it has been in other forums) is the loss of efficiency when the prop goes over the arm. The arm in essence is blocking a percentage of the prop’s thrust. The amount of blockage will be proportional to the arm’s cross sectional area and to the drag coefficient of the section. A square section has about twice the drag of a cylindrical section so this effect would be double for the same size square tube. If one was to fare in the cylinder to a symmetric airfoil shape it would drop the drag to one tenth of that of the round tube! So keeping the arms as skinny and as aerodynamic as possible should have a large impact on efficiency. Another spin off on this topic is that the prop- arm interaction will also cause vibration. There will be a pulse to the airframe as each prop blade goes over the arm. I want to build a test rig to test some of this with different arm shapes.

5 Likes