TF03 can directly be connected with the serial port of PixHawk. TF03 can be interfaced with flight controller for the purpose of altitude holding or obstacle avoidance. This document is suitable for PixHawk adopting ArduCopter V3.6.2 or higher firmware (or any other board flashed with ArduCopter).
Note : The default mode of LiDAR is Standard output mode and it needs to be used instead of PIX mode for firmware V3.6.2 or above, if PIX mode is chosen by mistake please switch it back to standard mode by sending command (refer to manual for command).
TF03 Settings :
The default communication of TF03 is UART. So you don’t need to make any changes in the interface settings.
PixHawk Connection:
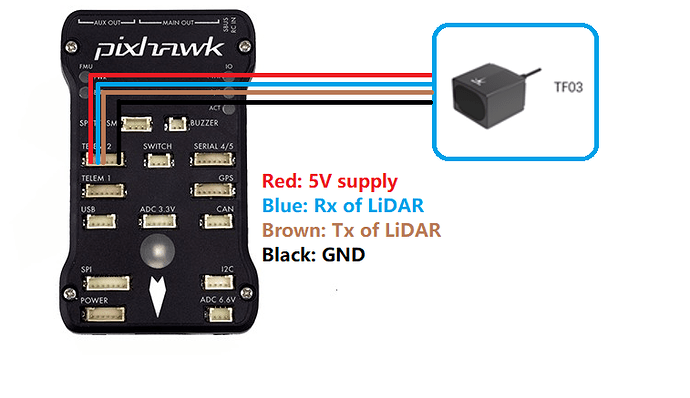
See the wiring details in PixHawk manual and TF03 manual; we take the example of PixHawk1 for connecting LiDAR.
Obstacle Avoidance:
Figure 1 : Schematic Diagram of Connecting TF 03 to TELEM2 Interface (Serial Port2) of PixHawk
Some key hints about TF03 connector and supply voltage :
The default connector of TF03 is Molex (JST) with 1.25mm pitch. If your flight controller needs some other connector like GH 1.25 then you will need to replace Molex connector with GH 1.25 connector in order to match it with your flight controller’s connector.
If TF03 faces down, please take care the distance between lens and ground, it should be larger than TF03’s blind zone (10cm)
Power source should meet the product manual requirements: 5V±0.5V and peak current of 180mA (for LiDAR V1 ), while 5V~24V and peak current of 150mA (for LiDAR V2 ). It is advised to power the LiDAR separately rather than powering through flight controller.
Parameters Settings for Obstacle Avoidance :
Connect the flight controller to MP. Select [Full Parameter List ] in the left from the below bar- [CONFIG/TUNING ].
Find and modify the following parameters:
Common settings for obstacle avoidance:
AVOID_ENABLE= 3 [if 3 = UseFence and UseProximitySensor doesn’t work then try with 2 = UseProximitySensor ]
AVOID_MARGIN = 4 [can be increased according to user’s requirement]
PRX_TYPE = 4
Settings for TF03 :
SERIAL2_PROTOCOL = 9 [Rangefinder option]
SERIAL2_BAUD = 115 [Choose the current LiDAR baud rate, if haven’t been changed, the default
baud rate 115200 should be selected, that is 115]
RNGFND1_TYPE = 19 [Same option with TF02] (ArduCopter V4.0.0, choose the 27 [Benewake TF03])
RNGFND1_MIN_CM = 20 [It can be changed according to real demands and should be bigger
LiDAR than non-detection zone, unit is cm]
RNGFND1_MAX_CM = 5000 [It can be changed according to real demands but should be smaller
than effective measure range of LiDAR, unit is cm]
RNGFND1_GNDCLEAR = 20 [expressed in cm, depending upon mounting height of the module and
should be bigger LiDAR than non-detection zone]
RNGFND1_ORIENT=25 [TF03 real orientation]
Upon setting of these parameters, click [Write Params] on the right of MP to write parameters.
If the error message “Bad LiDAR Health” appears, please check if the connection is correct and the power supply is normal. Please turn-off completely the flight controller after configuring the parameters, otherwise changes will not take place. If your battery is connected to your flight controller, please disconnect it as well.
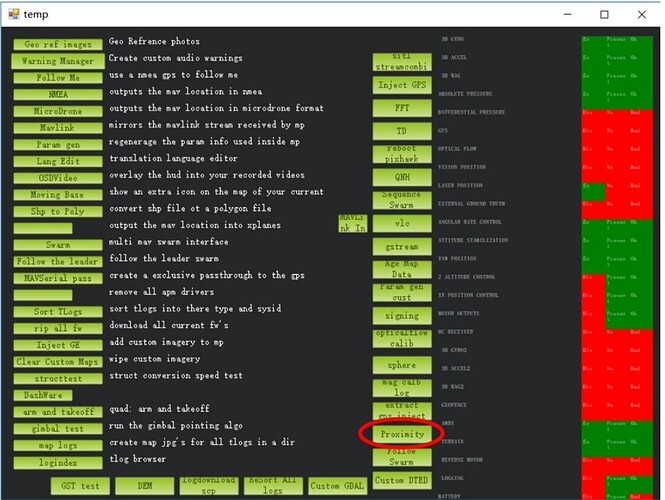
How to see the target distance from the LiDAR: press Ctrl+F button in keyboard, the following window will pop out:
See next page.
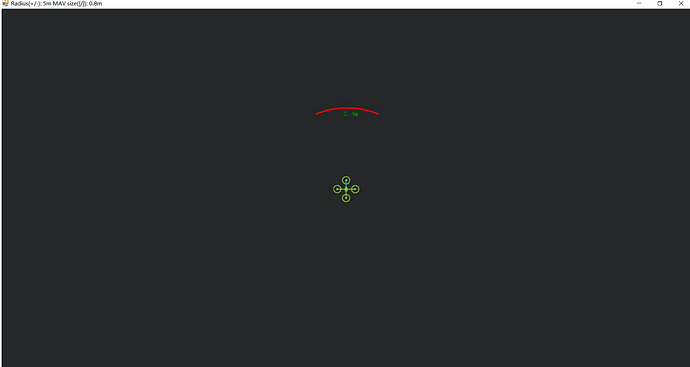
Click button Proximity , the following window will appear:
The number in green color means the distance from LiDAR in obstacle avoidance mode, the number refreshes when the distance changes or window opens, closes, zooms in or zooms out, and this distance will not be influenced in Mission Planner, the version available at the time writing this tutorial is v1.3.72.
Attach: If TELEM 2 port has been used, SERIAL4/5 interface can be used, the other setting are same.
Configuration Descriptions of Mission Planner:
Connect flight controller to MP, Select [Full Parameter List] in the left from the below bar [CONFIG/TUNING]. Find and modify following parameters:
SERIAL4_PROTOCOL = 9
SERIAL4_BAUD = 115
Upon setting of these parameters, the other parameters are same as Mission Planner configuration description of TF03 for the purpose of Obstacle Avoidance or Altitude Holding, then click [Write Params] on the right hand side of the software.
Figure 2 : Schematic Diagram of Connecting TF03 with SERIAL4/5 Interface (Serial Port 4/5) of Pixhawk
Mission Planner Configuration Description of TF03 for the Purpose of Altitude Hold:
Connect the flight controller to MP. Note : the installation height should be greater than non-detection zone. Select [Full Parameter List] in the left from the below bar- [CONFIG/TUNING]. Find and modify the following parameters:
SERIAL2_PROTOCOL = 9 [Rangefinder option]
SERIAL2_BAUD = 115 [Choose the current LiDAR baud rate, if haven’t been changed, the default
baud rate 115200 should be selected, that is 115]
RNGFND1_TYPE = 19 [Same option with TF02] (ArduCopter V4.0.0, choose the 27 [Benewake TF03])
PRX_TYPE = 0 [on equal to 4 also gives the value if RNGFND1_ORIENT = 25]
RNGFND1_MIN_CM = 20 [It can be changed according to real demands and should be bigger
LiDAR than non-detection zone, unit is cm]
RNGFND1_MAX_CM = 7000 [It can be changed according to real demands but should be smaller
than effective measure range of LiDAR, unit is cm]
RNGFND1_GNDCLEAR = 20 [expressed in cm, depending upon mounting height of the module and
should be bigger LiDAR than non-detection zone]
RNGFND1_ORIENT = 25 [Facing downward]
Upon setting of these parameters, click [Write Params] on the right of the software.
If the error message “Bad LiDAR Health ” appears, please check if the connection is correct and the power supply is normal.
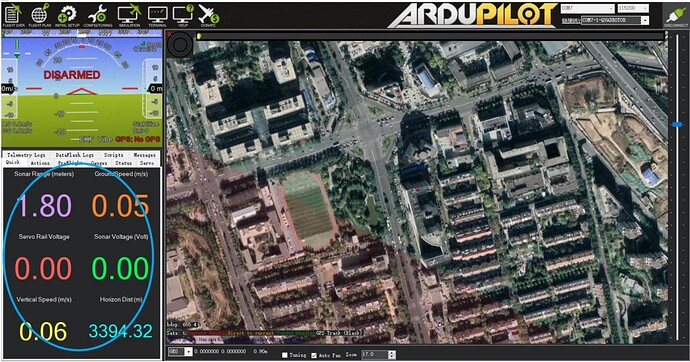
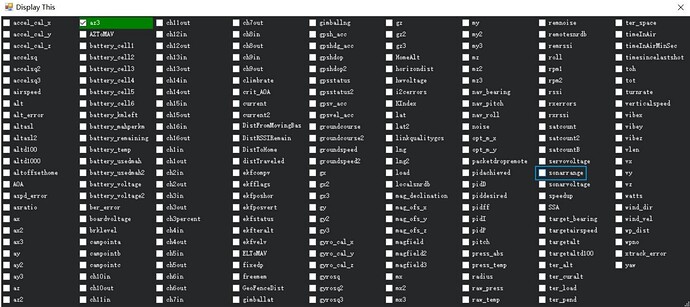
How to see the altitude value from LiDAR sensor: double click the area of the Mission Planner, see the following picture:
Select option sonarrange , see following picture:![|624x278]
