When is a hexabot not like a tank?

I exchanged a couple of messages on this in the discord, and have decided to start a new thread here.

I had the idea of seeing if I could get a legged robot teaming with a multirotor drone. The legged robot could be dropped by the drone in an area that is difficult or dangerous to access for people. The drone can act as a forwarder back to the operator, as well as working in concert with the scout to path plan using a photo map taken at the time. There are tons of activities this system could be useful for.

As pointed out to me on discord, ardupilot can not natively control a 6 legged robot due to the limit in servo outputs of 16 (3dof leg - there are 4dof legs too). There is some work done on a quadruped 3DOF leg as part of google summer of code.

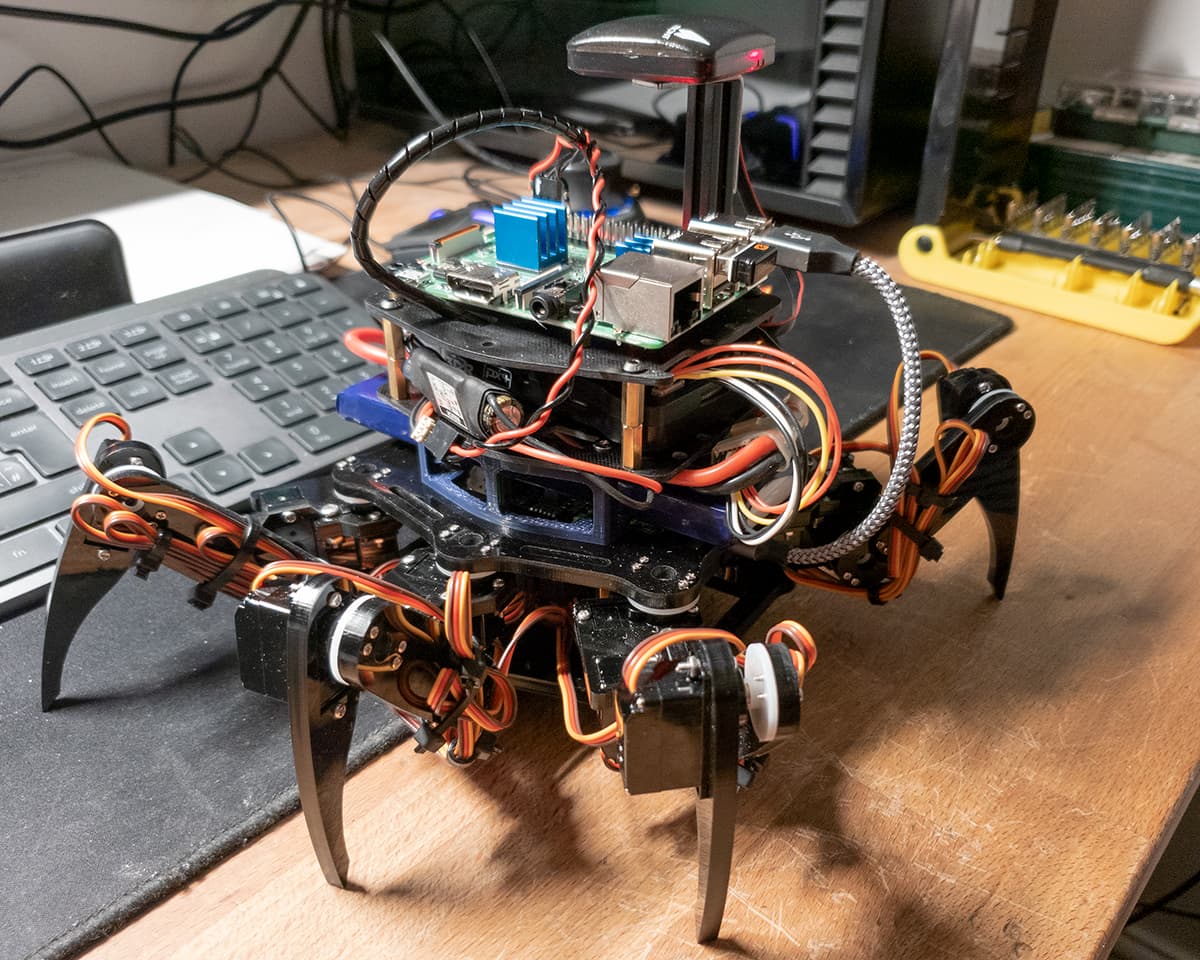
I did some research and found the Freenove 6 legged robot for a reasonable price. Freenove have done a good job of documenting their robot and the associated code - even down to including the .dwg files for the laser cut parts.

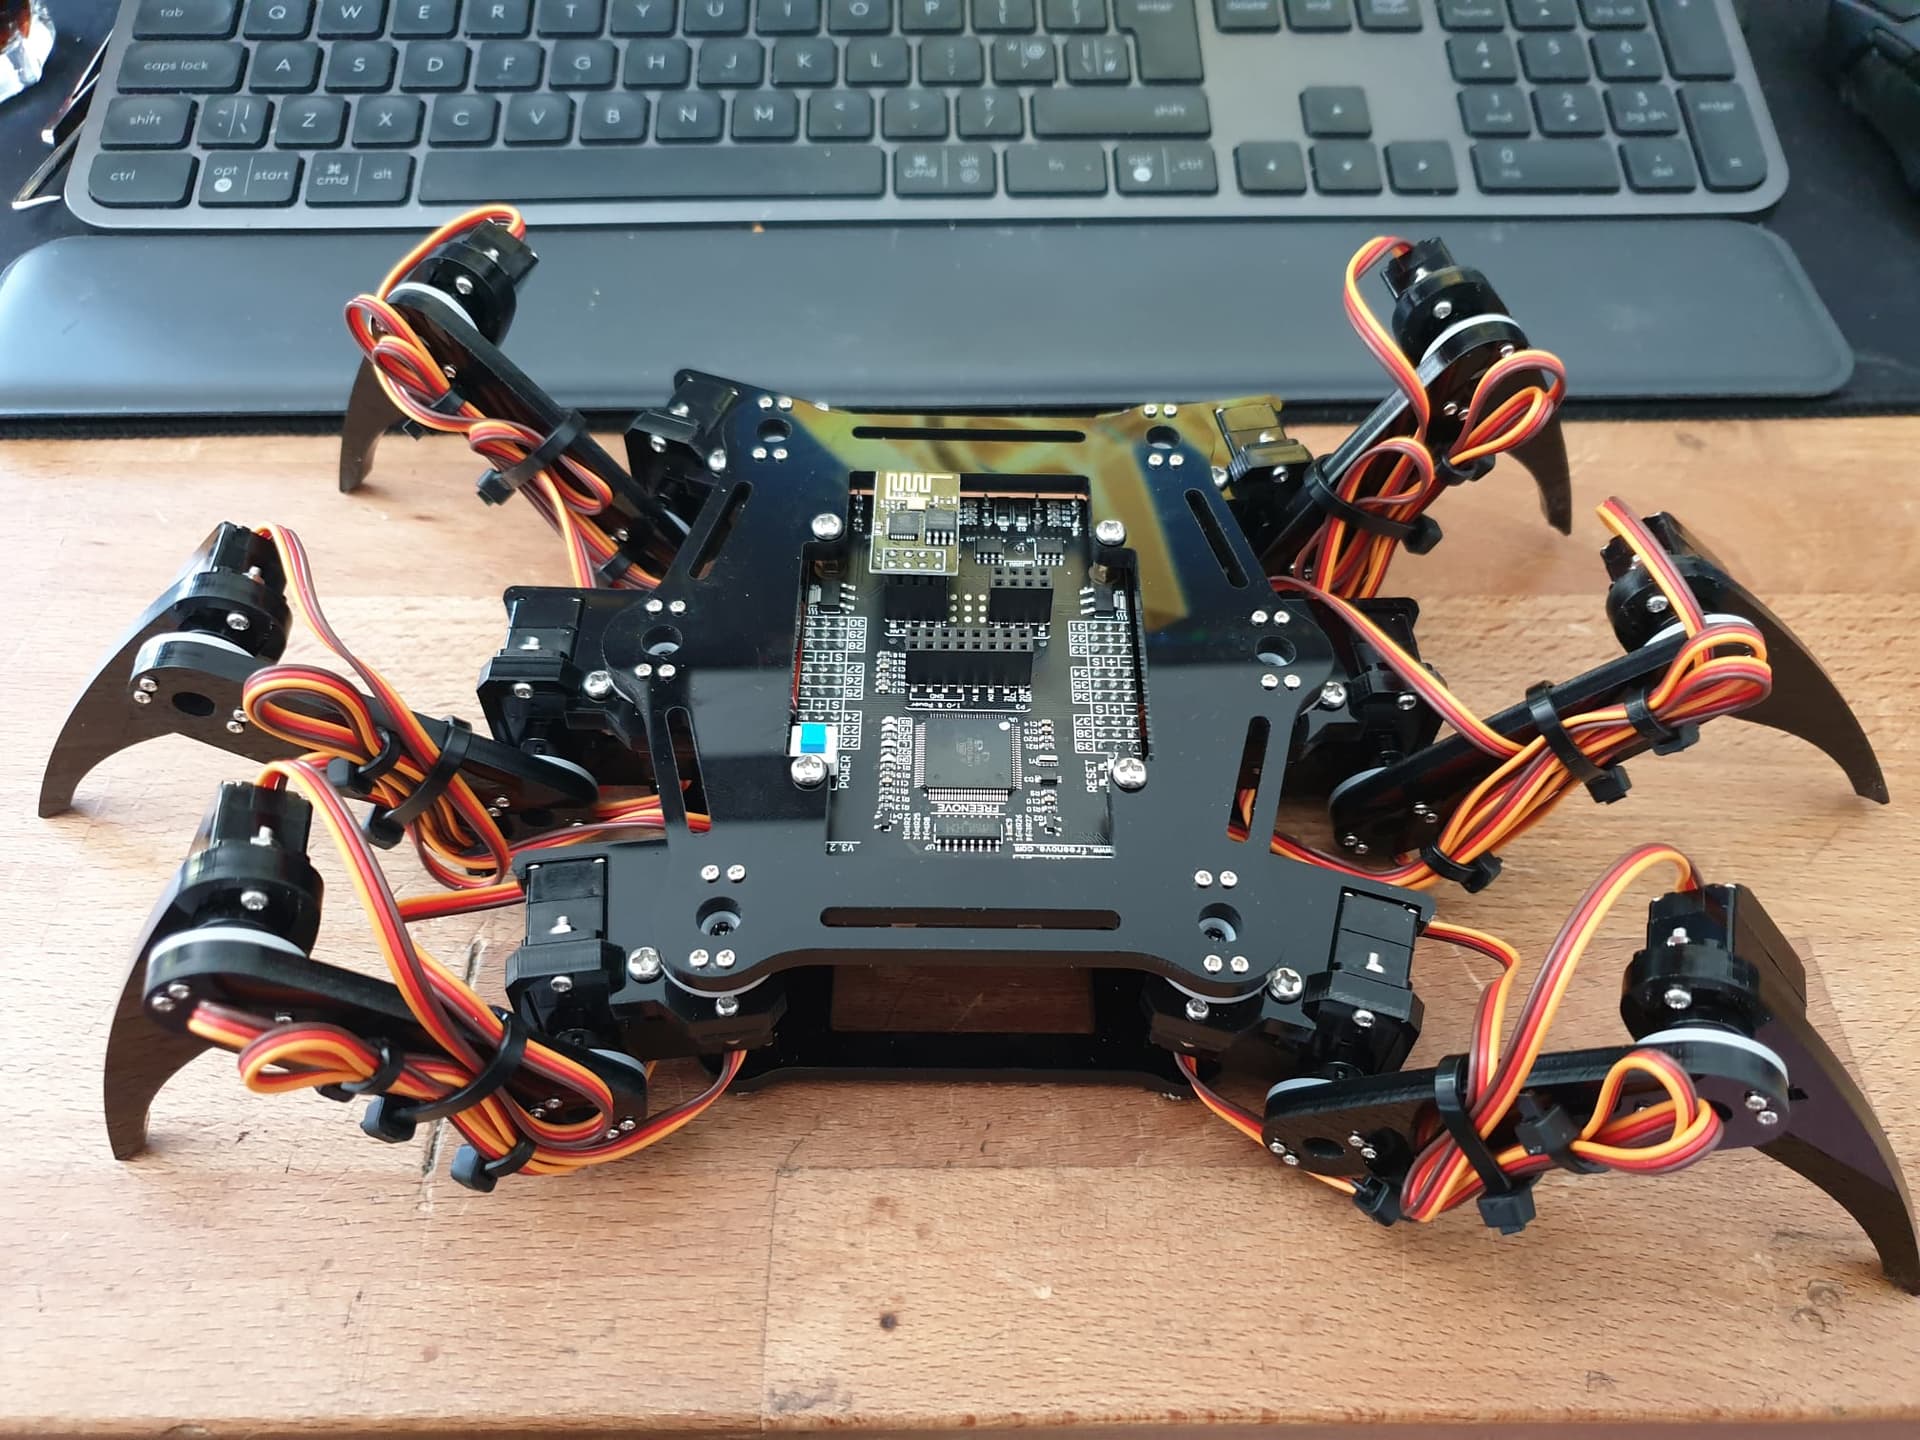
This robot is controlled by a board that incorporates an arduino mega, drivers that cover the 18 leg servos required and an ESP-01 wifi and another wireless comms module. There are also some extra exposed pins for expansion, and a USB-C port. It’s powered by two 18650s. I can control it from an android app or a processing developed app running on another pc either on windows, mac or linux/pi as provided by Freenove.

So far, that has mostly worked fine (problems controlling over wifi on a pi).

Obviously, the next step is to give it some intelligence. I have a 3DR pixhawk 1 and GPS autopilot that I had been using in a rover project.

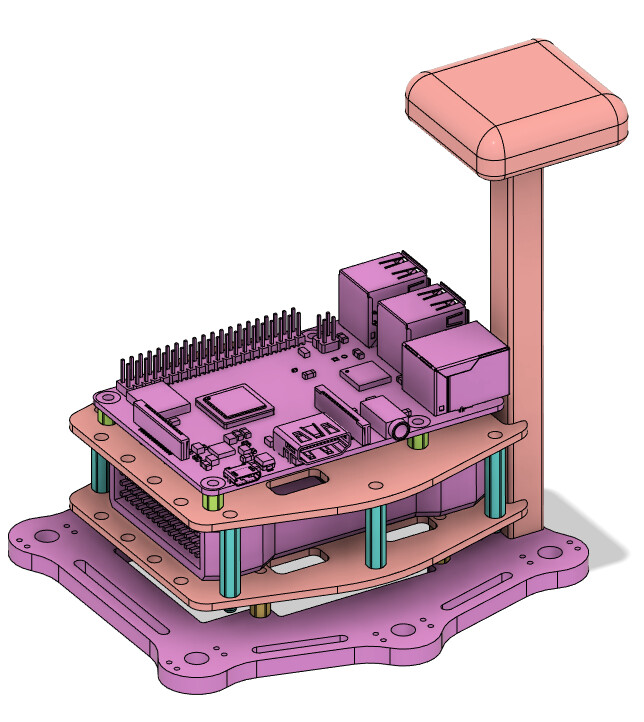
My plan is to combine the RPi 3 (or the PicoW thats in the post) with the pixhwk 1 onboard the scout robot.

Autopilot connected to remote pc using radio over telem 1
Connect the rpi to the autopilot over serial on telem 2
Connect the scout to the rpi over usb

Problem is, how to use ardupilot to command the robot…

I was thinking that the 6 legged robot isn’t that much different to a skid steer tank. It can translate forwards and backwards, rotate on the spot as well as mixed in with forward and aft motion.

The legged robot can also translate left and right, as well as twist left and right, tilt fwd/back left/right and change its body height. Which the tank can’t do. As a proof of concept, it would be OK if these other manoeuvres weren’t a part of the available controls.

My thought was to use a lua script to translate skid steer servo commands in to commands that could be understood by the legged robot controller and send them from the autopilot, to the pi and then from the pi to the robot controller. The controller has the freenove arduino program to control the robot leg servos. The pi can then also interject with obstacle avoidance from a camera sensor.

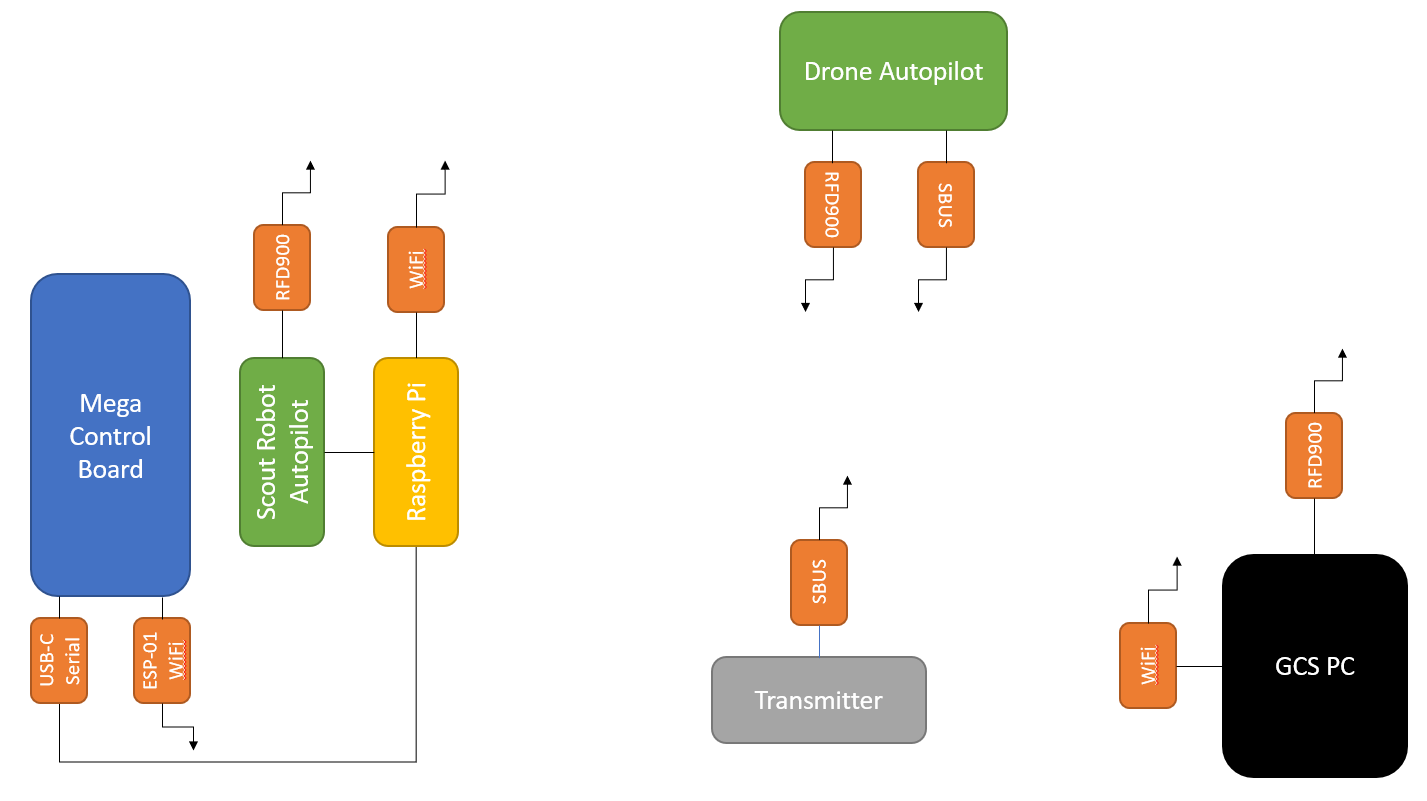
My skill weakness is software so, at this point I have no idea quite how to make these leaps, at the minute I’m trying to find a good way to link everything together. I’m thinking that mavlink is going to tie all of this together in an as yet to be discovered way. My comms layout looks like this at the moment…

Any help, advice, comments etc are gratefully received.

This afternoon I’ve been able to connect the Pixhawk to the rpi using the serial port/Telem2 and have the rpi running mavproxy, forwarding telemetry to my desktop, where I was able to read it in missionplanner and change parameters, create a mission and upload the mission to the pixhawk.

The next step is to get the rpi and the pixhawk on to the robot and then at least be able to track position using a remote GCS.

Now, off to run the robot in manual mode at the flying field to see how it handles that simple terrain, and put a few batteries through the drone.

1 Like

And here’s the design for the electronics stack. No radio yet, but can be added without too much trouble. Would like it to be not too tall, but this is only for testing - likelihood is I’ll make a new robot chassis if I can prove it out.

1 Like

Here are some clips of the robot in use on hardened ground and a small incline.

The robot currently has an issue with moving over grass that has recently been cut - the legs don’t lift high enough to clear the grass when rotating forward, and so they get caught by the grass and held back. The robot can be raised above the height of the mown grass, so the body isn’t bottomed out. This is controlled by the android 'phone app created by Freenove - I’m filming with a phone in one hand and controlling the robot with another phone in the other hand.

I’m going to look into the arduino code to see if I can get the legs to raise higher (or the lower limb to rotate outwards). This will likely mean a slower forward speed, but at least this is movement. A larger robot would not have this problem, and there may also be other gaits that help with this.

1 Like

Latest update…

I NC’d the two plates to mount the autopilot and the rpi to - 2mm FR4. These are frustratingly sized to clash with the set sizes of the spacers on the robot frame. I will spend some more time trying to mount both to one plate in the future.

I also designed 3D printed supports for the lower plate because the supplied robot plates are 6mm thick, and for standard stand-offs the thread length is 6.5mm or thereabouts - so no thread to pick up on the lower stand-offs. The 3D printed parts allow me to use longer threaded screws in this joint.

The whole stack is relatively tall now - something to try to sort next time around.

So, now there is a 2S3k mAh lipo on the robot top plate, then a Pixhawk 1, and then the RPi 3B. Power is supplied to the autopilot with the 3DR power brick. A Mauch 5v/3A BEC is soldered to an XT60 connector to connect it to the output of the power brick. For now, I’m using one VCC/GND line from the BEC output on a modified servo lead to the RPi J8 pins. The 3DR GPS is mounted on an alu. extrusion to get it above the electronics, but it’s not great compared to the HERE GPS unit I have on my multi rotor.

Wiring is quite messy right now, but I want to see if I can get an operating system before I start on making it neat.

Future plans - I would like to redesign the central chassis to give better ground clearance and remove the soldered on 2S 18650 carrier. I like the idea of independent power supplies for the servos and the electronics, but it’s now getting heavy. It will still walk on carpet easily, but obviously is drawing more current. There’s plenty of weight to save - the original robot is made from 6mm acrylic for example. I could also assess whether it’s worth upgrading the servos from the bog standard metal micro servos that are supplied.

Now it’s down to joining it all up with code.

2 weeks later and I’m ready to test the extras I put on top of the legged robot.

This is what I have on the software side:

I have an Rpanion 0.9.0 image modded as I need on the rpi 3b - that runs at startup and sends to a specific IP rather than as a wifi access point. This provides passthrough of the ardurover data as well as video out from the rpi camera, in to missionplanner and command of autopilot via missionplanner.

The pixhawk is running and configured as a skid steer vehicle at the moment. This also provides Tx passthrough capability via sbus. Trims set for mid sticks control.

Ardupilot can’t conventionally address the number of servos required for a 6 x 3dof legged robot. There is some work for a 4 legged robot that has 3dof per leg as mentioned before.

The robot is an educational kit provided with control via an android app (closed) and a processing app which is provided with the source code. The robot is controlled by an arduino mega based board with usb, wifi and remote control connection options.

I have a very short USB-USBC cable from the rpi to the robot board. This is the only connection in use.

I have written some python to take servo raw data from the telem messages and pass the pwm values for each channel through an elseif set of loops to select the appropriate output. For now the robot is controlled in fwd-aft and rotate left right. There is no speed control as such so its quite simple, but does the job.as a proof of concept.

I have modified the processing sketches to cut out some bits I don’t want, keep what I do and add a new tab in the main program to control the robot through the python link. I use a socket to send data from python to processing, and the processing scripts plug the command into the existing controller code.

With a lot of googling and a bit of head scratching never having used processing and very rarely coding anything I think I have a working system to test tomorrow.

1 Like

have a look here you can 100% control that rover using ardurover. would be really awesome to see, I have a hexapod all cut and printed but haven’t gotten around to finishing it
https://ardupilot.org/rover/docs/walking-robots.html

You can control a 4 legged 3dof bot, but not a 6 legged 3dof bot, with the standard autopilot servo output, as mentioned.

yes with what most autopilots support on their output rails you would not have enough outputs but you can also use can node adapters linked below to get up to 32 total servos which i think is the hard limit as of now.
http://www.mateksys.com/?portfolio=can-l4-pwm

this is the one I printed Home · antdroid-hexapod/antdroid Wiki · GitHub

1 Like

I figured that would be your suggestion - I’d like to see it done too, but no need to re-write control for this proof of concept. Good to keep in mind for the future though. This was challenging enough for me, and not too expensive as I already had a lot of the parts.

Next step for me is to map commands from a mecanum setup so I can work with translations a bit easier.

i wonder if there would be an easier way to ingest what you already have into ardurover? any way thats a very cool project would be so cool and creepy to have 6 legged ardurover and all the benefits it would have.

There may well be. Fundamentally I see no reason why not - its a matter of coding it. I’m a builder rather than a coder so that’s always the tough part for me.

Freenove provide the data download for this robot here:

https://www.freenove.com/tutorial.html

You want FNK0031 if you want to check it out.

They have a larger hexbot too but that has a totally different control setup that might well be more applicable to larger walking frames.

I was inspired by Erik Lely’ channel:

He’s got a 4 leg 4dof design as well, and I’d be interested in seeing if there’s anything worthwhile in a 6 leg 4dof design. I always keep in mind the current requirements for these things though.

I want to create a disposable/attritable scout/search robot for use in de-mining so keeping costs reasonable, and keeping the bot easy to make is important.

Your bot looks interesting and is likely about the same size as mine.

1 Like