Part 1 - Apsync installation on Raspberry PI3
First you need to install Apysnc image on Raspberry PI3
Follow the instructions:
APSync — Dev documentation
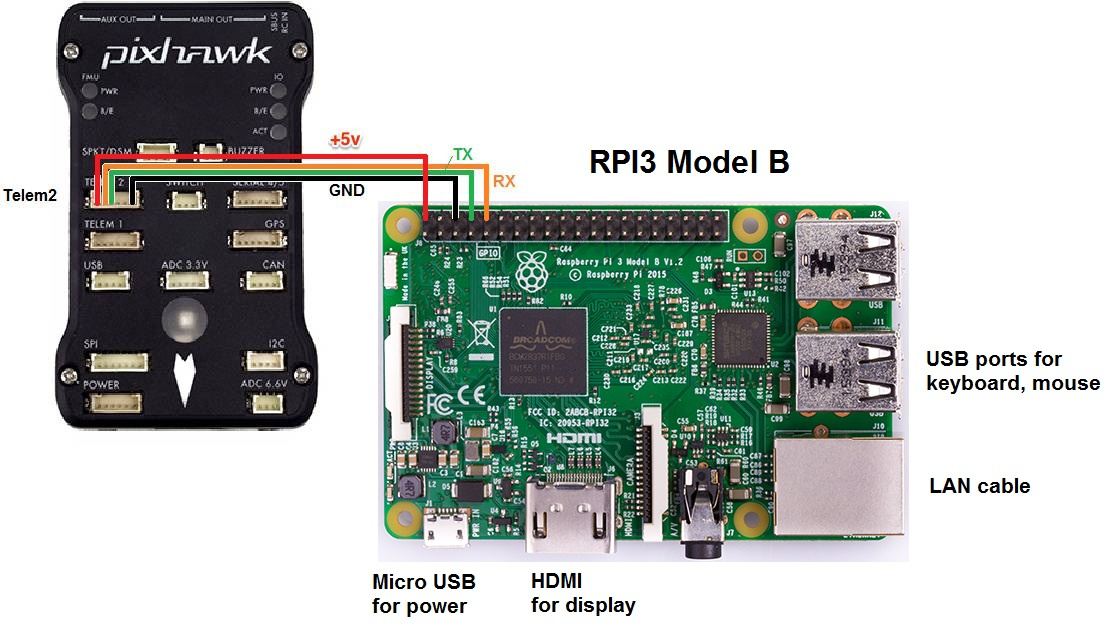
Wiring the telemety port ( Telem1,2, …) to RPI3 depend about your flight controller
When installed you can connect to the PI3 with a terminal emulator such as BitVise (Bitvise SSH Client | Bitvise) by connecting to the board’s wifi access point and then ssh to 10.0.1.128
username: apsync, password: apsync
BitVise : You can edit the scripts without use the terminal
Once connected to the WiFi network browse to http://10.0.1.128 (Configurations page)
If everything Is ok check the communication to the ground station
You can use Mission Planner or Qground control
By default the telemetry is sent from RPI3 by UDP port 14550 and baudrate is 921 (921600)
You must modify the baud rate of you telemetry port connected
The script used to configure the communication is under …\start_cmavnode \cmavnode.conf
The section used to configure UDP is
[to_14550]
type=udpbcast
sim_enable=false
bcastport=14550
bcastip=10.0.1.255
bcastlock=1
Note:
Next we will modify the section to change from broadcast to a static IP address (ZeroTier Network)
Part 2 -Check Video Streaming
When the first part is done , and everything work we need to check the gstreamer section
You can do test also without a CAM . Gstreamer is installed by default with Apsync
Check on console :
gst-launch-1.0 --version
The video streaming can be started from http://10.0.1.128:8000
We need to stop and disable the autostreaming
Note:
When you start the streaming from web page , the IP address of your client will be associated
So , if you change the client , you need to stop and start to join a new IP address
The script is under …\start_cherrypy\start_udp_stream
By default this script is used to start with a raspicam , we need to add new pipeline
Open the file ( If you have installed Bitvise you can edit without use the console )
Comment or remove the section raspvid
raspivid -t 0 -h 720 -w 1024 -fps 25 -hf -b 2000000 -o - |
gst-launch-1.0 -v fdsrc !
h264parse !
rtph264pay config-interval=1 pt=96 !
udpsink host=$STREAM_TO_IP port=$STREAM_TO_PORT
Add a new pipeline
gst-launch-1.0 videotestsrc is-live=true ! \
video/x-raw,framerate=30/1 ! \
videoconvert ! x264enc ! \
h264parse ! rtph264pay pt=96 ! \
udpsink host=$STREAM_TO_IP port=$STREAM_TO_PORT
Now you can start the streaming from web page
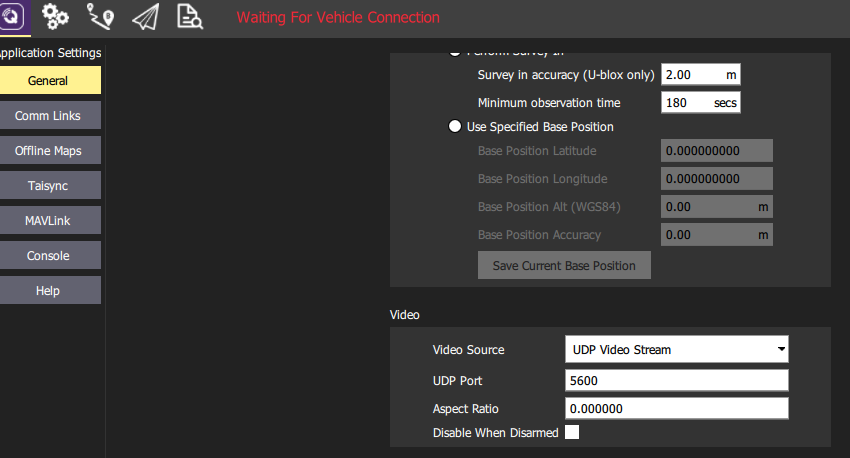
To test with ground control , I prefer QQC , there is a section to configure the video
By default the port is 5600 (Apsync)
If everything work go to the main page of QGC and you will se the test signal video
If you want to test a streming video It’s neccesary to have a USB Cam or raspicam
You can read UAVCast documentation to check the hardware requirment
https://docs.uavmatrix.com/hardware/
At the begin I used GIT2 Cam as PC cam
The compression is an hard job to do , better have a compressed H264 signal (not raspicam)
Next step i will explain:
Connect a LTE Usb modem ( Huawei E3372-153 )
Check internet connection
Install ZeroTier on RPI
Install ZeroTier on PC or another device
Modify the script cmavnode to send telemetry on VLAN
Modify the script start_udp_stream to join a cam or encoder H264
I suggest to buy an encoder when you will be able to have a good result with a CAM and LTE