and the next story to tell
my uc4h powerbrick node is a great success so far 
I think this brick, if it will turn out to be reliable, has some top-notch features:
(A) Uavcan:
well, obviously, …
(B) 5.3V by low-noise 42V, 3.5 A switch regulator:
I use the LT8610A, that’s a member of the SRs used by the ACSP- series of AUAV/mRo. So, you’ll agree, top-notch.
© 100A current Hall sensor:
no lousy resistor shunt, hall sensor should be state-of-the art. I’ve used the ACS770, which is the predessor of the widely used ACS758, with slightly better specs. I was considering also to use a ACS780/1 because of it’s significantly smaller size. It has also the advantage of a 3.3V version. But it’s small size has also its cost (e.g. I think the ACSP7 is not perfectly designed).
(D) LDO stabilized power for the current Hall sensor:
that’s actually a point which I think the ACS modules so far have all overlooked (I just know about Mauch and ACSP7), the ACS is ratiometric. That means that if its power supply varies also the current sensor signal varies proportionally. If the ACS is now directly powered from the 5.3V source that means that if one draws significant power on the 5.3V line (such as 2A), the voltage drops by e.g. 0.3V or 6% in my tests, also the current on the main line will be measured incorrectly by 6% - which is IMHO quite a lot. So I’ve added a LDO for the ACS.
(E) Precise Charge Estimation:
This is another unique feature. Since the UC4H power brick has it’s own microcontroller, it can determined the consumed charge (mAh) much more precisely than would be possible otherwise. This is so because it can measure the current at a much higher rate and thus track current fluctuations much more precisely. Specifically, the node’s firmware measures the current at 1 kHz, which is several 100 times faster than with the currently available power bricks.
the only disadvantage: it is not really tiny (but obviously it’s the first test version)
I couldn’t do a test flight, since power.CircuitStatus is not yet supported by AP (if I’m not mistaken, there is “only” a PR). I actually struggled a bit with finding a procedure to test the brick, but luckily I found in my garbage bin an old heater element, with a resistance of ca. 2 Ohms, so perfect for some bench tests. So, I could do a good set of tests.
(i) heater element connected to the 5.3V power source => ca 2.3A Amp draw, no issues with that, the voltage ripple stays at 5-10 mV (the switching regulator chip gets hot, but that’s how it is). The voltage drops by about 0.3V to ca 5.0V, but that’s OK.
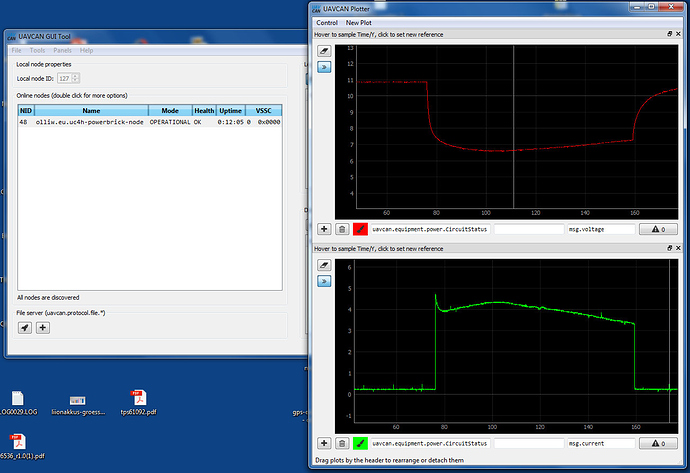
(ii) 3S lipo connected to the heater heater element, with the powerbrick in between => current draw of ca. 3-4 A. Voltage&Current recorded with UavcanGUITool => everything looks perfectly fine
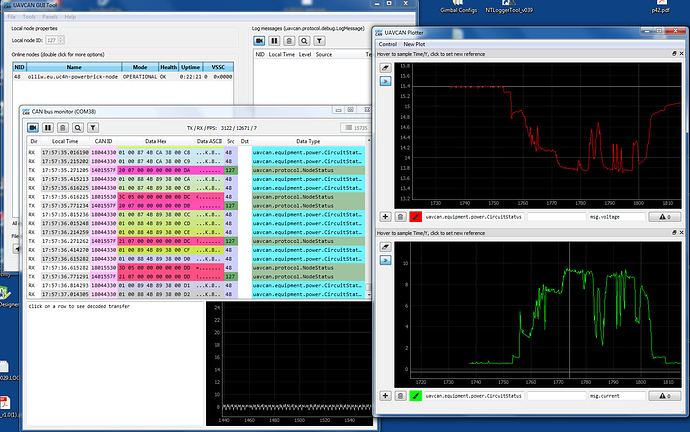
(iii) 3S lipo connected to the copter with the powerbrick in between, one motor equipped with prop => current draw of up to ca. 9 A. Voltage&Current recorded with UavcanGUITool => everything looks perfectly fine
I’m really happy with that.
Hopefully the “AP_BattMonitor: UAVCAN support” PR gets merged into master soon 
This brings up however again the question of a concept for how the CAN bus should be powered …
Olli
here the module and some “proof” by pictures
test (i) (1DIV = 5mV):
test (ii):
test (iii):

