Spraying Weeds with a Drone


Hello everyone, recently I received some interest about the UAVs that my company builds, and I asked if people would be interested to hear about some of our experiences using the equipment in an agricultural setting. Based on the responses I received, I decided to make a post here and share it with the community.

My company was approached by a commercial lettuce farm that was having difficulty controlling weeds around the irrigation valves in the field during the growing season. During the off season, the weeds are controlled by hand spraying around the valve; the location of the valves in the field prevents tractors from ‘disking in’ the weeds into the ground. However, once the lettuce has sprouted in the field, foot crews are unable to walk in the field, otherwise they will damage the crop. During the growing season, the weeds are able to grow in the area around the valve, and these uncontrolled weeds can spread to other areas of the farm. The valve area is very small relative to the total area of the farm, so hiring a manned helicopter for spraying the valves is cost prohibitive. This application (small amounts of herbicide precisely sprayed at low altitude) is a very good fit for a UAV sprayer.

lettuce%20farm%20overview%20locations

In the picture above, you can see the outline of the farm with the features in question. The red arrows point to the locations of the irrigation valves, which are permanently installed in the field (and cannot be moved). The blue arrow shows an irrigation pond that had a problem with invasive water reeds. This area was particularly important to spray with the UAV because, according to the farmer, this area had been impossible to spray previously due to the danger of driving tractors near the steep edge of the banks, and the water was too deep and muddy to wade into on foot with a backpack sprayer. The green arrows at the top of the photo show two irrigation ditches that were also sprayed.

The farm itself had many challenging obstacles, ranging from power lines to various irrigation valves, tractors and other small variations in the terrain. My plan for this blog is to outline the challenges that we faced in spraying of each area, and share how we overcame these challenges with our equipment at hand.

A little bit about my company: We provide engineering consulting services primarily in aerospace and industrial robotics applications, and we build a line of large multirotor UAVs for various commercial uses. To complement our UAVs, we also design and sell different types of sprayer systems, as well as provide custom engineering based on customer needs for everything from payloads to complete vehicles.

Please feel free to ask any questions and I will try my best to answer them in subsequent posts

4 Likes

The Drone

R30%202%20resize

The drone we used was one of our in house heavy lift multirotor platforms. The basic drone specs are as follows:

  • Custom frame (in house design) ~1200mm
  • 10kg empty weight (22lbs)
  • 25kg AUW (all up weight)
  • 1 gallon sprayer system
  • 48Ah batteries @8S
  • 8x KDE 7215-135 motors
  • 8x KDE 95A ESCs
  • 8x Tmotor 30x10 carbon props
  • Mauch power modules and current sensor
  • Custom Power Distribution Board
  • RFD 900 telemetry radio
  • FrSky L9R reciever

The drone itself has some special features that proved valuable during the spraying. The first is that the body of the vehicle is actually machined from a single piece of aluminum. This monocoque structure acts as the base for all of the components to be mounted onto, and it also serves as a heatsink for the ESCs. This allows all the electronics of the UAV to be sealed from the elements, which is very important in spray applications.

Another benefit of the machined body design is that the arms mount to the body via precision pins that are pressed into the body. This allows the arms to be removed for storage, transport, and repair and let the arms be re-mounted to the drone with perfect alignment (no messing with clamps on tubes!). A color coded pair of MT60 connectors are used for the motor connector, while a 2 pin JST connector is used for the navigation light in each arm.

R30%20arm%20mount%20resize

The arms themselves are an airfoil shaped unidirectional carbon fiber tube with machined aluminum hardpoints bonded in place (similar methods are used in high performance aircraft applications). The airfoil shape tube is incredibly stiff in the vertical direction, and its shape helps reduce vibration by reducing the vortex shedding from air impinging on the boom. Compared to the 30mm round tube that we originally used, we saw a slight reduction in current draw as well (probably due to the more efficient streamlined shape).

R30%20arm%20closeup%20resize

With the arms removed, the drone is quite compact and easy to store and transport.

The X8 arrangement has an advantage when it comes to spraying in that the rotor wash of the props is evenly distributed around the perimeter of the vehicle, leaving a ‘dead spot’ directly under the center of the vehicle. This allows the drone to perform targeted sprays with very little drift. In the picture below you can see the spray pattern that the UAV left on the dirt at a baseball diamond we were testing at. The UAV is able to dispense (relatively) large amounts of liquid in a tight area with very minimal drift.

4 Likes

Very nice machine, but spraying into an open water body has the potential to be very harmful to the environment. This might not matter since there is nothing left in the area to harm, but I think anyone thinking about such an application should consider that. Are you using a special weed killer?

1 Like

That is some beautiful engineering work. Kudos.

1 Like

Consistent work, can’t wait to see productivity, m2 per flight or so…

1 Like

Nice piece of engineering.But, somehow I have a feeling that this is over engineered. Will it bring back the cost of designing and manufacturing ? Does this level of spraying precision is needed by any customer ?

Tobias- The weed killer is a product that breaks down when exposed to water, and was provided by the farmer. All of the irrigation ditches on the property are filled with water and connected to the pond, and are sprayed with literally thousands of gallons of the same herbicide every month. Basically, the current method of maintaining the ditches involves a large truck with a tank, and a man walking beside the ditch spraying the whole thing down with herbicide. Very interesting to watch

Andreas- We provide these UAVs for sale, as well as use them to provide services for customers. Our customers that have purchased the vehicles appreciate these features and the quality of construction, as they are not ‘drone people’. Rather, they are in the business of providing agricultural services, and in that case a high level of reliability is needed. Focus on the job not the equipment so to speak

2 Likes

The Flights

All flights were conducted early in the morning, before the wind had a chance to come up. All flights were flown in daylight, between 7am and 11am local time. The flights took place over 2 separate days, due to the limited flight time available before the wind began to pick up, and the number of valves that needed to be sprayed.
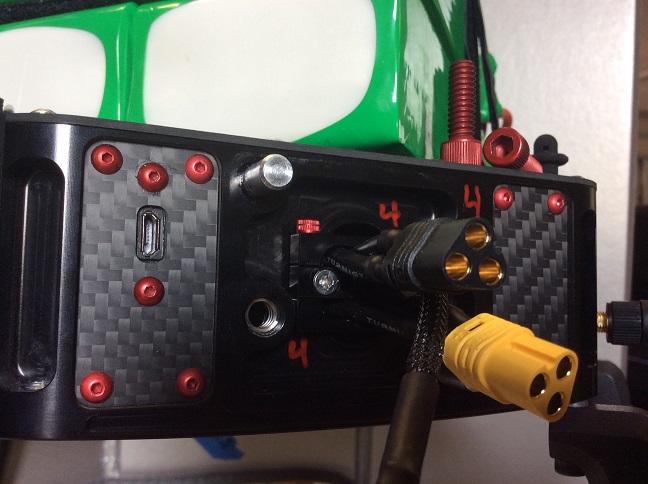
Two different approaches were tried during spraying. The first was to manually pilot the vehicle in ‘loiter’, while the second method used Mission Planner to generate a low altitude grid pattern over the areas in question. All of these flights used the barometer on the Pixhawk for altitude measurement, as our in house copter does not have a LIDAR altimeter or any other sensors.
The manual flights were chosen when the area to be sprayed had lots of obstacles in close proximity to the target area. For example, it was decided to fly the pond area manually, for several reasons. The main reason is that the pond actually sat below the ground level, and thus required the drone to fly below its ‘home’ level, in close proximity to an earthen wall, in order to sufficiently spray the shore of the pond. Several power lines ran around the pond perimeter, as well as a tractor parked near the shore of the pond.
During this flight a combination of FPV (first person view) cameras were used to position the drone and spray swath, as well as a visual observer. There are two cameras located on the drone; one facing forward out of the vehicle nose, and another facing down at the sprayer nozzle. A spotter was also utilized and was in visual and verbal contact with the pilot during the flight. During this flight, the drone was flown within approx. 2 feet of the earthen wall.

lettuce%20farm%20pond%20manual%20flight

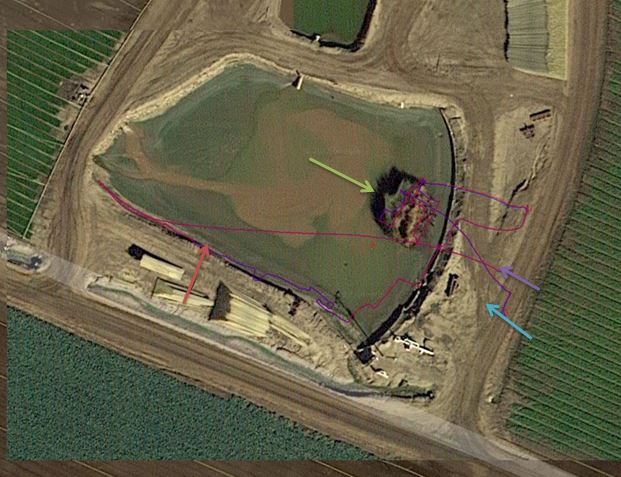
In the picture above, The vehicle takeoff point is market by the blue arrow. The vehicle was piloted to spray the water reeds first (green arrow). After the reeds had been sprayed, the farmer asked if we could spray the bank, which we then did on the same flight. The UAV was flown extremely low along the bank of the pond (red arrow). After the bank was sprayed, the vehicle was manually landed near the takeoff point (purple arrow).

The manual flight was able to obtain good coverage of the water reeds in the center of the pond as well as the weeds growing on the banks of the pond. According to the farmer, this area had been impossible to spray with any other method, as it was too dangerous to drive tractors near the soft earth edge, and the pond was too deep to wade into using a backpack sprayer. Coverage was confirmed visually via the downward facing camera, as well as on the flight logs generated by the Pixhawk.


The second area that was manually flown was a pair of irrigation valves near the road. Both of these valves were challenging due to the amount of debris surrounding them. Each of the valves had piles of old tires and large metal posts in the ground to protect them from being hit by trucks and tractors driving off of the road (apparently this had been an issue in the past!). To complicate things further, one of the valves sat directly under power lines!

Once again this flight was conducted using the two FPV cameras and a spotter, with the altitude held approx. 8 feet off the ground. Post flight inspection was much easier than at the pond, as the operator could simply walk right up to the valves and verify visually the spray pattern (red dye was added to the product before filling the tank). The flat area of the field, coupled with a lack of land marks for visual navigation, made it surprisingly difficult to find the second valve for spraying. The pilot flew the drone off track a bit before correcting and finding the second valve. Surprisingly, there were no observed issues with the drone operating under and in close proximity to the power lines.

lettuce%20farm%20valves%20by%20road

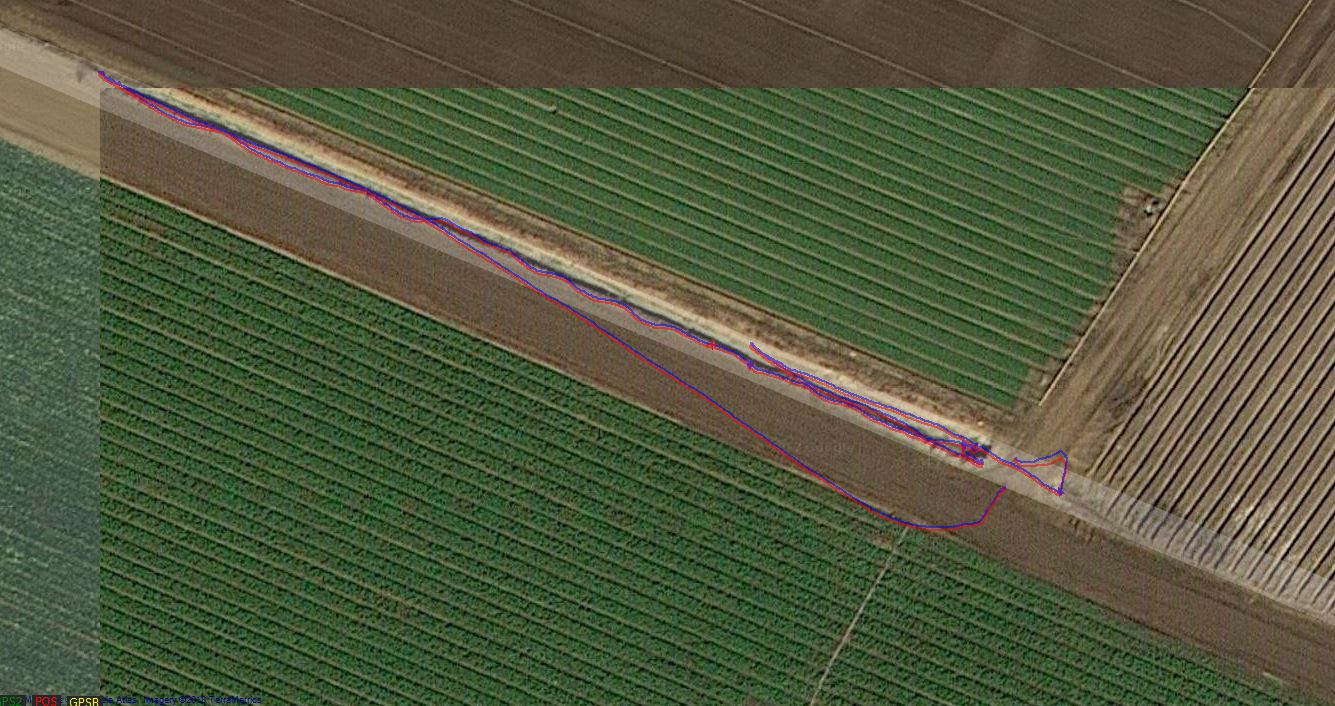
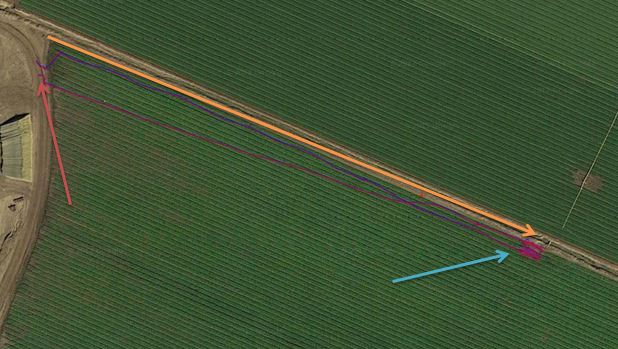
The debris around the valves can be seen in this satellite image above (blue arrow). The power lines (although not shown in the image) run parallel to the road (orange arrow). The pilot was temporarily disoriented by a lack of landmarks, and overflew the first valve while trying to find the second valve (green arrow). The second valve is marked by the red arrow. This flight took approximately 8 minutes.

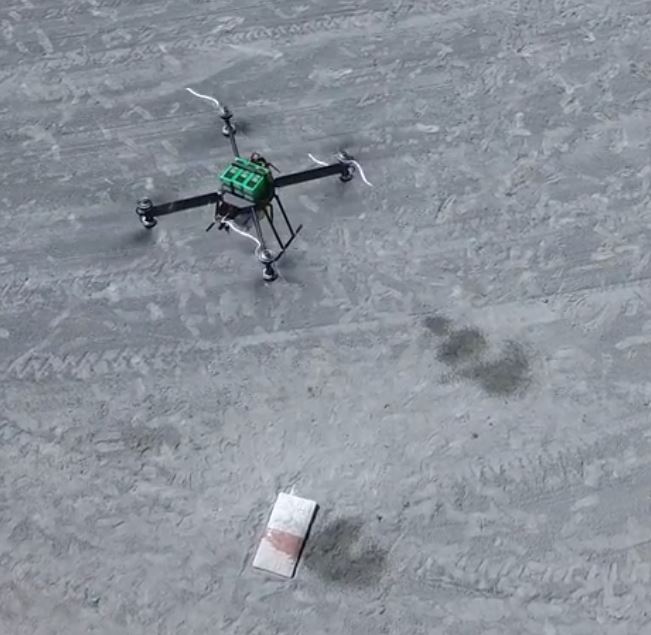
Automated waypoint flights were used to spray several valves in a part of the field that had minimal obstructions and a clear line of sight from the operator to the vehicle. A grid pattern was planned using Mission Planner. We used the ‘Grid Options’ tab under the ‘survey grid’ to set the overlap, altitude, and speed of the drone during the flights. The flight plan had the vehicle flying at an altitude of 10 feet AGL (above ground level) at 2.5 mph, with a distance of approximately 6 feet between passes. The distance between passes was determined prior to arriving on site based on testing performed earlier at a different location. The barometer was used to sense the altitude on all the flights, and the automated flights had to be flown at 2.5 mph (~1m/s) in order to prevent the vehicle from losing altitude due to the aerodynamic effects in forward flight. I believe that a LIDAR altimeter would have been invaluable in this instance for increasing the spraying speed while maintaining the low altitude required to minimize drift.

From previous testing, the customer supplied ‘shower’ nozzle had a swath of approximately 8 feet. The entire area around the valve measured approximately 800 square feet (20 feet by 40 feet). The entire flight (including take-off and landing) took approximately 6 minutes, and the actual spraying of the valve area took approximately 3.5 minutes. Spraying the single valve used approximately 1/3 of a gallon, which is consistent with the flow rate measured through the nozzle earlier as well as the actual spraying time during the flight.

lettuce%20farm%20single%20valve%20flight

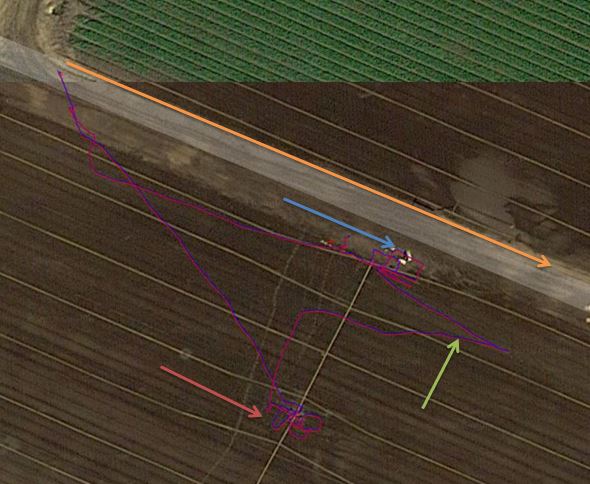
In the picture above, the valve is market with the blue arrow, the takeoff and landing point is market with a red arrow. The distance between the takeoff point and the valve is 250 yards (~228m, length of the orange arrow).

Once it had been proven that the equipment was capable of performing a spray pattern on a single valve at a very low altitude, the team decided, based on the battery usage and payload capacity, to begin spraying multiple valves in a single flight. To spray multiple valves, the team would first plan a normal mission of a single valve and execute the flight plan as stated in the example above. While the pilot watched the vehicle during spraying, the other team member would plan a different mission on an adjacent valve. When the drone was finished spraying the first valve, the pilot would manually take control of the vehicle while the other team member loaded the new flight plan to the drone while it was still in the air. Once the new flight plan was uploaded, the drone was set to auto mode to spray the next valve in the series.

lettuce%20farm%20double%20valve%20flight

The first valve spray pattern (blue arrow) was uploaded to the drone before takeoff, while the second valve spray pattern (red arrow) was uploaded to the drone while it was in the air. The takeoff and landing point was the same as the previous flight (green arrow). If you look closely, you can see the first valve that was sprayed (near the blue arrow) near the irrigation ditch. The entire flight to spray two valves (including take-off and landing, as well as upload of an additional mission mid-flight), took 10 minutes, dispensed 2/3 of a gallon of liquid and used approximately 40% of the battery capacity.

The last example involved spraying a drainage ditch on the north end of the property. In this instance, the drone was programmed to fly several overlapping passes at roughly 2 ft AGL (basically the same level as the ground, but centered above the ditch). The speed and sprayer parameters were the same as the previous flights. The ditch was actually one of the more challenging flights because the ditch did not have a constant width. The ditch actually tapered by several feet over its length, which necessitated the use of multiple passes at the beginning of the ditch, while towards the end of the ditch a single pass was sufficient to cover the entire width. At the end of this flight the drone was manually flown to the launch point due to an oncoming tractor which had no intention of stopping for the drone (indeed, that was one of the criteria that the farmer laid out; in no way would our spraying and flying interfere with the daily operations of the farm).

2 Likes

I am on our County Weed & Mosquito Board and am very interested in using drones for agricultural applications. What is the weight of your total payload? What restrictions do you have with the government as a commercial drone pilot?

Cheers,

Joe

Joe-

For these flights we are restricted to 54lb (25kg) max weight. The vehicle itself weighs 21lbs (~10kg), which leaves 33lbs (15kg) for battery and payload. On these flights we flew with 48Ah of batteries, which weigh approx. 18lb (~8kg). This leaves us with 15lbs (~6.8kg) of usable payload. If we were to fly with 32Ah of battery, we could increase the payload to 21lbs (~9.5kg), but the flight time would be less due to the heavier payload and smaller battery bank.

General guidelines for commercial UAV operation are no flights over people, no flights over 400 feet AGL, daylight only operation, less than 55lb aircraft weight, and line of sight operation (ie you must be able to see the drone with an unaided eye). There are more rules depending on exactly what you are doing, but those are the major points.

I was wondering which flight controller you are using. I didn’t see it in your original specs list but then I saw you mention “Pixhawk”. Would you mind telling us which Pixhawk you’re using?

By the way, that is some beautiful engineering, especially that machined aluminum body. Reminds me of my Macbook Pro, lol. How much does that single piece of aluminum weigh?

thanks,

Robert

Robert- Sorry I wasn’t more clear in the description. On our in house unit (that we used for this job) we are flying an original 3DR Pixhawk from the last batches back in 2016(?). We have also used the Pixhawk 2.1 Cube as well with good results.

With the original Pixhawk, we needed to build a tuned mass damper to quell the vibrations, as all of the off the shelf designs were not giving good results. The main challenge is that the props rotate around 1800 RPM (30Hz), so we needed to use a relatively soft damping arrangement, coupled with added mass to get good vibration performance.

The aluminum body in its finished state weighs around 630g (~1.3lbs) if memory serves me. We looked at using a bladder molded carbon monocoque as well. Even though the carbon would probably be a little lighter, we would still have to deal with the thermal issues from the ESCs. The aluminum solves that issue nicely, and the body has a ton of hardpoints that make it easy to add things like cameras, booms, and other accessories.

1 Like

From my maths your copter with 25 kg AUW and 48Ah 8S batteries should fly for 36 minutes with 78A while hovering so 9,8A for each motor.

I think that a traditional heli would be much more efficient especially in the gas version since the fuel during flight get consumed and the heli become lighter.
Rob Lefebvre wrote a lot about heli advantages over multirotors .

Thank you for the update!

I am assuming you still need to have a UAV Pilot licence to spray commercially?

Cheers!

You will generally need more than that.

Depending on what country you are in of course.

Here in Australia there are at least 3 Department of Ag licenses you have to have, as well as your RPAS Operators Certificate.
There will also be OH&S requirements and EPA requirements that have to be incorporated into your ReOC operational Manuals and approved by CASA.