Success! RC controlled servos! Now, to clean up wiring including hard wired e-stops…then some tuning!
2 Likes
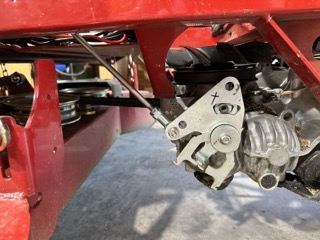
Servo linkage in. SendCutSend fabricated the push arm for the servos. Have 2 extras if someone has purchased the HappyModel400’s.

2 Likes
Any tips/tricks for tuning the RC vis a vis the servo actuation greatly appreciated!
In general the approach is to have the servo mid-range and arrange the hydro valve in the mid (neutral position). when actuated the servo should be able to move the valve to either full forward or full reverse from the neutral position. It is generally also advised to only adjust servo trim only in ardupilot software with all the RC trim options left at factory settings on the actual transmitter. It gets complicated if trim is adjusted in both places and it makes changing out the RC transmitter more difficult. Also only do any servo reversing on the ardupilot software (usually one servo is reversed).
I am sure others have their own approaches and all suggestions are welcome. Your push/pull angle of the linkage with the servo and the valve look good to me. The trim will eventually have to be set with the mower up on blocks and the engine running to get no movement when in sticks are centered and to get the same speed on each rear tire (particularly at full engine throttle and full forward speed) to get straight tracking prior to tuning.
Here is a short video @ktrussell put together: https://www.youtube.com/watch?v=IepGuPBgusU&t=71s
It is also important to note that all final tuning has to be done at full hydraulic pressure (engine at mowing speed). The overall system is sensitive to hydraulic pressure and the tunning has to be done at pressure and mowing speed.
3 Likes
That helped! Confirmed a few things I did this morning - thx @ktrussell and @SJohnson .
I’m a little confused on getting my switches on the Radiomaster set up. Have been reading tons, but as I was warned at mowstock, there’s much inside the open source builds. Right now, connecting the dots from switches to arming, and the handoff between flight modes.
Should be able to do a decent test tomorrow with engine running!
1 Like
Would love to hear some ideas on where to insert the kill switch electrically. There’s a “mag kill” wire in my schematic. Once the fuel is reconnected and engine is running I’ll test that.
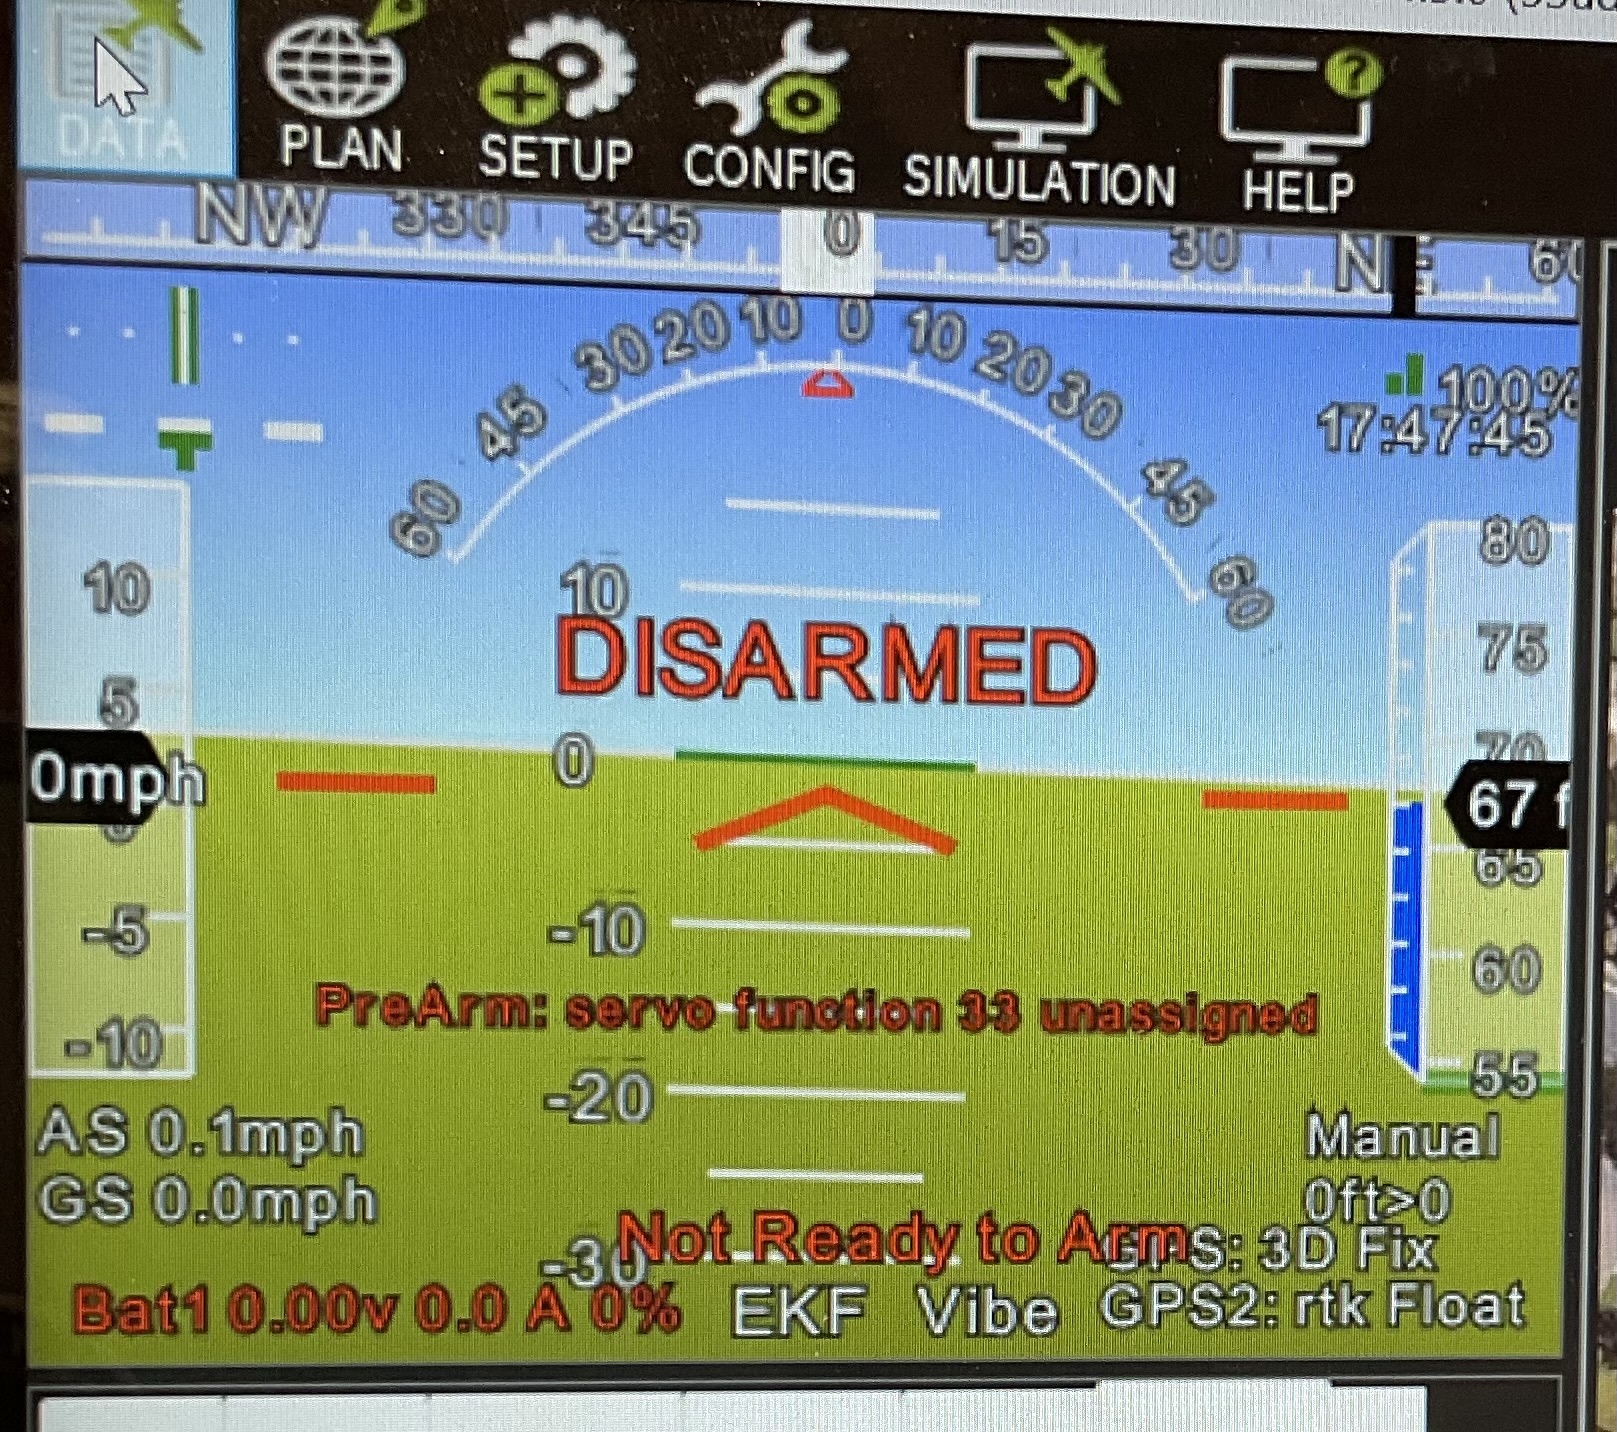
Oh and I have this going on - Pre-arm: servo function 33 unassigned. Thoughts on how to t shoot? Couldn’t find a “33” in any of my servo settings. Funny the mower was inside the barn, doors closed and had these GPS indicators. Maybe need to reboot MP…
Share your current parameter file and exact firmware version in use.
Hi Yuri - thanks for taking a look. @SJohnson is dropping by next weekend for some tuning fun. If ever in Austin, let me know…
marblecreek-params.param (15.9 KB)
Mission Planner 1.3.81 Build 1.3.8741.25556 ArduRover V4.5.0 53ad2c2a
Let me know if this is the information you requested (was unsure where to find the firmware version, copied from the top bar in MP)
Also have “Throttle radio min too high”…gremlins…
RC control tested today - on jacks, set mid (R2D2 neutral) position. Controls worked great - some tuning for symetry left.
Punchlist:
Small fuel tank install
Covers for electronics (fan is a bit noisy on top of Pixhawk RPi CM4 - no RPi)
E-Stop (manual and radio)
Adult supervision on GPS yaw config (seems to be slightly off - offsets?)
Tune throttles on jacks
Set up radio and MP for handoff between the two
Create Test plot
Test navigate of plot (no blades yet, not full throttle)
1 Like
To be successful in getting the mower operational you do have to sort of use the setup and first drive sections of the Ardupilot Wiki as a guide. One of the setup steps that will help you is to adjust the servo output and trim. On Mission Planner look under Mandatory Hardware and use the Servo output page to adjust the servo trim to match them up and trim so the wheels don’t turn when in the neutral position. You can adjust the servo outputs while the wheels are turning.
2 Likes
Your kill system just has to ground the mags to kill the spark. Just don’t put it in series with the RC kill. It should be in parallel so either will go to ground. The other option is to break the power going to the “anti-run on” solenoid located on the bowl of the carb. When power is killed, this shuts off fuel to the main jet circuit which kills the engine.
Looking great and getting close! Onward!
3 Likes
Kill system working from e-stop! Will work with you this weekend on a plan for a radio kill. . .
Where is that screen that showed the gps yaw numbers in realtime - basically, if the number was 63335 or something that large you had work to do. Just can’t remember when you showed me at Mostock…cd
2 Likes
The screen is located under the Mission Planner Setup menu.
Select Advanced and then Mavlink Inspector, then find GPS2 raw

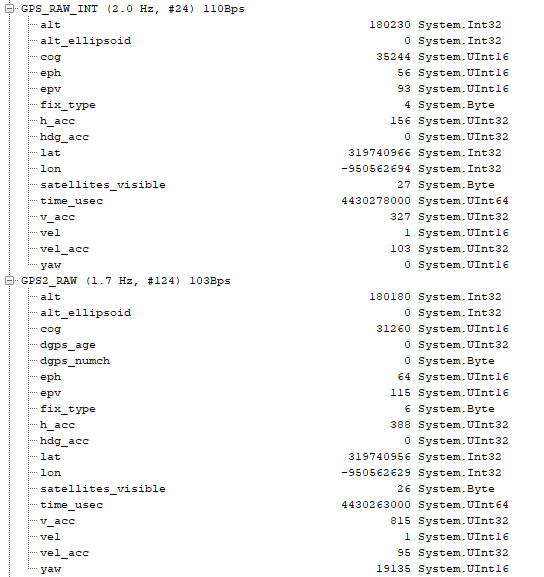
Look for yaw!
In this example 19135 translates to 191.35°
2 Likes
Maybe even easier…
On the Quick tab, double click one of the values and change it to gpsyaw2.
3 Likes
Did you ever get rid of the PreArm: servo function 33 unassigned error? I don’t quiet understand this but I did look over your configuration parameters and the servos appear to be assigned with the correct values for skid steering where each servo is driven by an independent RC channel. I am starting to think it is an arming configuration issue. I noticed you had ARMING_CHECK set to 1, which tells it to check a list of items to see if they are OK prior to allowing arming. On mine I have this set to 256 so it will Arm without checking. I visually inspect my servos before arming and I have the parking brakes on and usually the engine just idling.
I also noticed the inertial navigation systems INS_POS1,2,3_XYZ were all still set to zero. We will need to fix that before we start drive/navigational tuning. We will need all the gyroscopes and accelerometers giving us the correct information.
2 Likes
I have always wondered how everyone else configured Ardurover to do the manual steering with their RC transmitters. I have just never ask anyone. I elected to go the separate steering and throttle route. To me it seemed like it was a better choice if you ever wanted to be able to drive the mower using both axis on a single joystick.
Thanks so much y’all - was killing me. I’ll implement your suggestions tomorrow eve (Steak nite at mi casa tonight).
Prearm 33 error was there last evening still.
Somewhere along the way MP had a GPS1 No Fix error. The blinking green light wasn’t present on the GPS1 radio either. I swapped it with my base radio with no change. The unit did show up in messages tho. Was raining, so didn’t have clear view of the sky like GPS2. Will work on that tomorrow too.
Cd…
Set the following:

What you have in your parameters right now makes no sense at all and is likely the cause of your prearm issue.
Firmware version is displayed in the Mission Planner title bar when the vehicle is connected. It should be something like Rover-4.5.1.
I put steering and throttle on the same RC stick and always have.
3 Likes