MAVLink routing with a Router software

MAVLink routing on Companion Computers.

One of the strengths of ArduPilot is that we rely on the standardized MAVLink protocol for our telemetry. As our drones gain more capabilities, companion computers are often used with many separate pieces of software that need to have access to the flight controller data.

A common approach to do this is to use MAVProxy, the ArduPilot developer’s main Ground Control Station. MAVProxy relies on a module based approach that allows it to have numerous capabilities, can serve as a MAVLink message router between multiple components and implement the routing of MAVLink messages according to Mavlink routing protocol.

Routing components with MAVProxy is simple: we need a --master endpoint to connect to the autopilot and then we can setup as many output endpoints (--out) as we want.

This approach is simple to set up but has some costs. MAVProxy, is a fully featured ground control station and not a sole message router.

Using the default startup options consumes a lot of resources, and defaults to loading numerous modules. You can see those default modules at the MAVProxy prompt, (a prompt that shouldn’t exist for a simple routing feature…), by typing module list :


STABILIZE> adsb: ADS-B data support
arm: arm/disarm handling
auxopt: auxopt command handling
battery: battery commands
calibration: calibration handling
cmdlong: cmdlong handling
console: GUI console
fence: geo-fence management
ftp: ftp handling
layout: window layout handling
link: link control
log: log transfer
map: map display
misc: misc commands
mode: mode handling
output: output control
param: parameter handling
rally: rally point control
rc: rc command handling
relay: relay handling
signing: signing control
terrain: terrain handling
tuneopt: tuneopt command handling
wp: waypoint handling

How can we make this better?

Solution 1 :

Clean up MAVProxy!

First, launch MAVProxy as a deamon with --deamon that removes the interactive shell. Next, you want just routing, so the only module you need is link. This module will allow you to set as many outputs you want on launch.

Secondly, MAVProxy should be configured to stop adjusting telemetry rates… You may have noticed that MAVProxy and all Mavlink GCS, automatically request data from the Autopilot. This comes from a special routine that will regularly set the telemetry stream rates: the frequency the autopilot should send a defined group of messages. This feature is convenient for a GCS but not for your MAVLink router as it will fight against other software on the same link. For example, if you have MAVProxy connected to the Autopilot and a companion computer connected to MAVProxy, if you ask with the companion computer to have the IMU message at 50Hz, after a few seconds the IMU message will stop coming at 50Hz and revert to 4Hz as MAVProxy will have reset it.

Thankfully, MAVProxy has an option to disable this behavior, like most GCS. For MissionPlanner, it is in Planner configuration options.

Your new MAVProxy command line will be something like:


mavproxy.py --master=tcp:localhost:5762 --daemon --default-modules "link" --streamrate -1 --out 0.0.0.0:14552 --out 0.0.0.0:14553

--master for the autopilot link

--daemon for not have interactive shell

--default-modules "link" to keep only the ability to set outputs.

--streamrate -1 to disable messages control from MAVProxy

--out 0.0.0.0:14552 to set new output

Now you have a clean router for your Mavlink messages.

Solution 2:

Use another software that just do MAVLink routing : mavlink-router

This is small C-based software that mostly only does MAVLink routing. It can do the routing of Mavlink messages according to MAVLink routing protocol, do messages filtering and sniffing, and lastly it has a logger system.

Compared to MAVProxy it is very lightweight both in size and CPU usage. However, it is optimized for routing and has limited other capabilities.

If you have multiple pieces of software that need access to the autopilot data stream, mavlink-router is one of the most used options.

Solution 3:

Use some Linux tools. These aren’t dealing with MAVLink specifically, but can still be used to push MAVLink messages through IP networks. Two are well known:

Both allow you to create a serial connection to the autopilot and link it to an IP network.

Solution 4:

Use [mavlink-hub.py] (https://github.com/peterbarker/mavlink_hub). This is another packet-distributor based on pymavlink; it has no routing capabilities and simply sends any packets received on any of its links to each of the other links. Lighter-weight than MAVProxy and written in portable Python, and thus heavier on resources than mavlink-router.

Solution to avoid : MAVROS

MAVROS is a great piece of software but it serves its purpose at linking ONE and only ONE MAVLink system (one autopilot for example) to ROS. It has some routing capabilities to relay messages but considering the heaviness of a ROS deployment, you shouldn’t use it for routing and especially if you don’t need to use other ROS tools. Prefer mavlink-router or even MAVProxy that are much simpler to maintain and efficient for routing.

MAVLink routing protocol

The Mavlink routing protocol defines how a MAVLink message should be delivered when a target is settled. It can be resumed by the two following pictures.

With MAVLink routing prototocl

Without MAVlink routing protocol

Do you know some other solutions ? Let’s us know !

15 Likes

I also like Mavp2p : https://github.com/aler9/mavp2p

1 Like

Nice one. Comparison with other software is a bit outdated, specially for mavlink-router.

1 Like

That’s the best explanation of mavlink I’ve read. Nice one!

Out of interest, we currently use a serial connection between ArduPilot and Jetson Xavier and use MavRos along with many other ROS packages. We also link via RFD900X to a GCS.

Could we run MavLink on the Xavier to route messages out via Ethernet and also to a MavRos instance? Cheers

1 Like

it really depends on your use case.
If you just have a GCS on the RFD link, you could just keep MAVROS and use it gcs_out module to stream back the data.

Otherwise, you could use mavlink-router as the connection to ArduPilot on serial and create two endpoints : one for MAVROS and another to the RFD link

Thanks for the thoughts. Couple of things to try/consider.

One benefit would be freeing up a Cube serial port. Running short while still using serial gps’s. Tried using usb for the MavRos link. Works, but unfortunately that also powers the cube. In that case, any time the companion computer is running we need to have the power supply connected to the carrier board, radio etc so the Cube doesn’t try to do it all. Maybe could cut the power wire on the usb cable…there’s a though.

haa I didn’t read it that way… Getting the RFD directly plugged on the Autopilot is generally the best thing as you got direct control on the autopilot without relying on the companion computer. In term of safety that is better.

If you can, you could try to use CAN sensors ! That will free the serials
Becarefull with USB, it isn’t really suited for flying due to vibrations

Thanks, that’s the reason we do have the radio directly connected. I also dislike relying only on Ros/Companion computer for obstacle avoidance sensors. Have radars on order for front and rear. Got 2 CAN adapters for them. Might try the new HerePro when available to get gps onto CAN as well.

Oh wow. I had not considered that. Even a small extension thats glued to the frame and inserted in the cube?

This one seams promising as well: https://github.com/gitdillo/mavlinkhandler

quite not the same. Here we are speaking about just routing mavlink msg, MavlinkHandler is an abstraction to have Mavlink controler object. That is interesting for control/automation but is overloaded for routing stuff.

if arduino, teensy, etc count as companion: GitHub - olliw42/fastmavlink: The fastMavlink library.
:slight_smile:

1 Like

it could and are usefull. But they will be a bit limited for TCP/IP communications
Thanks for sharing I will add it

mavlink-router author here. Nice summary and I even got to know other projects I didn’t know before.

2 Likes

Thank you for this detailed and thorough explanation! This has helped me understand so much about the routing process! I do have a few questions when applying this solution specifically to my project.

For my project, I am trying to use Solution 1 for communication. My connection is like this: sensor[ttyUSB0] → Rpi companion[Serial0] → flight controller[Sik Radio] → GCS[COM#]. The sensor sends ASCII data at 40Hz which I would like to receive via UDP and utilize on another program while simultaneously using Mission Planner

I have set up my message in a similar way with the guidance of another user on this forum. I do see some key differences compared to the one you described in solution 1.

VS.

mavproxy.py --master=/dev/serial0 --baudrate 912600 --out=/dev/ttyUSB0:115200 --nowait --master=/dev/ttyUSB0 --baudrate 115200 --out=udpbcast<MY_IP>:14550 --nowait

The user insisted that the flight controller must always be master so rather than having two “–out” as the author described on this blog, I set the flight controller[Serial0] as a master out to the sensor[ttyUSB0] and the sensor as another master out to GCS via udp broadcast. This yielded the results below

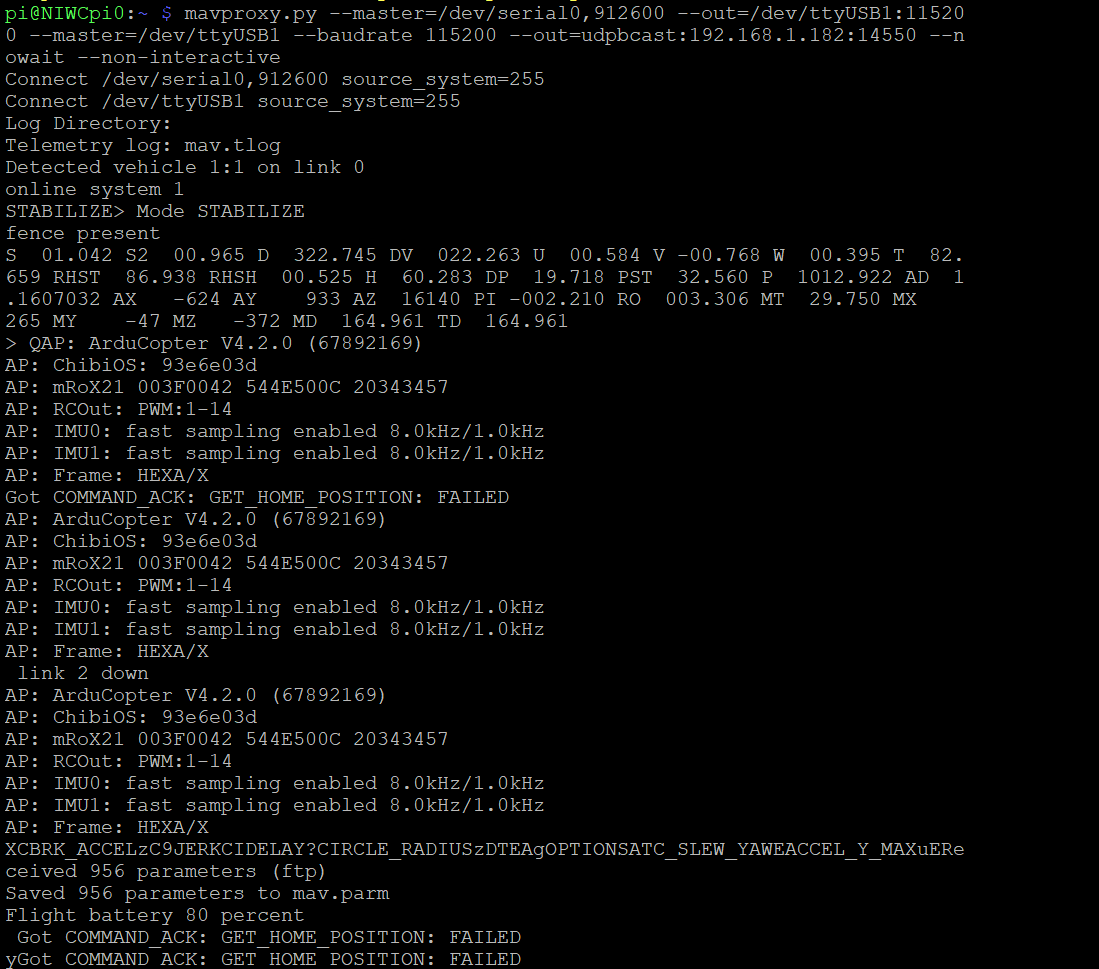
In this case, should I continue utilizing multiple "–master"s, one for the flight controller to mission planner and another from the sensor to UDP broadcast for my data science objectives? Or do I just need to set one up with multiple "–out"s and the sensor data will still be transferred through?

Thank you!

I have found that even following the guidance above, mavproxy.py will max out the CPU on a Raspberry PI Zero W, and this impacts the performance and reliability of the connection to downstream devices (like the groundstation). I’m connecting to the PI via wifi (on the bench) and LTE (in the air).
I haven’t tried other options, but I did find that mavlink-routerd provides a reliable and high performance telemetry link to a ground station and uses only 10-15% of the CPU on the PI Zero.

Mavlink-router is your next step. It’s much faster and light weight.