L1 navigation for tradheli

I’m pleased to announce that hopefully in the next week @ChrisOlson and I will be releasing a version of ArduHeli 3.6 with L1 navigation including its own speed controller. The way it will work is that you will have a parameter called WPNAV_USE_L1_NAV. if it is set to zero then the standard copter navigation will be used however if set to 1 then the Plane L1 navigation controller is used for only Waypoint, Loiter Unlimited, Loiter Turns, Loiter Time and Land. For all other commands in your mission plan, it will smoothly transition to/from copter navigation controller. In the vertical axis, it still uses the copter position controller and performs linear altitude changes between waypoints just like copter nav however if the heli doesn’t have the climb performance or the climb rate is limited, then it doesn’t slow down to make the altitude and will fly through the waypoint at speed and continue climbing as it navigates to the next waypoint.

Here are the parameters it uses
WPNAV_USE_L1_NAV - enables/disables L1 navigation
WPNAV_L1_LTR_RAD - radius used in loiter mode. aircraft always flys clockwise around loiter point
WPNAV_ACCEL - set max acceleration in x axis. Initially use 100. it will provide smooth accel/decel.
WPNAV_SPEED - sets default speed for wp navigation
WPNAV_ACCEL_Z - set max vertical acceleration
WPNAV_SPEED_UP - max climb speed
WPNAV_SPEED_DN - max descent speed

L1 parameters
NAVL1_DAMPING - same as Plane L1 parameter
NAVL1_PERIOD - same as Plane L1 parameter
NAVL1_XTRACK_I - same as Plane L1 parameter
NAVL1_TURN_SF - scale factor for coordinating turns. The L1 nav includes an input to the pedal to coordinate the turn. If you think it is not enough or too little, this scale factor allows you to adjust it. Start with the default value of 1.0 and recommend only changing by 0.05 increments if you think you need more or less.

Speed control parameters which are standard PID parameters. Use the default values initially. The FF value is important for reducing transients when starting L1 nav with some speed on the heli.
SPDHGT_VEL_P
SPDHGT_VEL_I
SPDHGT_VEL_D
SPDHGT_VEL_IMAX
SPDHGT_VEL_FILT
SPDHGT_VEL_FF

We will let you know when it is available for download. I’m sure Chris will also add some posts giving his experience with it and tips for using it.

8 Likes

Awesome! Can’t wait for this!

I have to compile and test the latest changes and test fly them before I will put it out for public test release on a ArduHeli build. The L1 Nav is totally Bill’s masterpiece and hard work, I’ve had all the fun test-flying it.

Anybody that has flown Plane already realizes it is a game-changer for heli. It makes your helicopter much more efficient flying waypoints, much smoother, and autonomous missions flying at the maximum top speed of your helicopter are now possible without having to deal with Copter Nav limiting the performance of your machine. Also makes flight planning for smooth waypoint flights much easier than spline.

People flying survey’s, S&R runs, or handling long-line loads on autopilot are gonna love L1.

I would expect in the next day or so I’ll post a summary of it, get the builds into a release, and pass on my experience with it.

2 Likes

Hi Bill, this is great news and like my children says when they are exited about something. “I can’t wait to get my hands on it!” My heli is already flying great but having the same fluid movement as the plane is something to look forward. Thank you for making this an awesome experience!

2 Likes

Didn’t mean to rush you on this. I think we are both excited to see this go public. Thanks for all of the flight testing!

The ArduHeli 3.6 build with L1 Navigation is available here - >

Bill provided good information for folks who want to fly this, I’ll add some as well.

The advantages of L1 Nav are

  • it maintains constant speed in turns, climb, descent and does not slow down the heli like Copter Nav does to hit a waypoint or altitude
  • In crosswinds it will crab the heli into the wind as all normal aircraft do, instead of banking it into the wind and flying the aircraft in a slip like Copter Nav. So folks that have tail empennage on their helicopter, especially vertical stabilizer, will find it more fuel efficient and less power requirement for the tail rotor
  • speed changing in flight is infinitely smoother than Copter Nav
  • more efficient turning on survey flights or S&R passes, reduces overrun on the turns

Some things to be aware of:

  • you must become familiar with the maximum turning, climb and descent performance of your helicopter, as L1 is capable of pushing your machine to its limit with no holds barred
  • in turning, a 60 deg bank angle coordinated turn in any aircraft is a 2G turn. Doesn’t matter if it’s a RC helicopter or a fighter jet. So if your helicopter weighs 25lbs, in a 60deg banked turn it now experiences the equivalent of 50lbs of weight. It must have the power to do this and maintain airspeed at the same time
  • become familiar with the maximum climb/descent gradient you have set for your heli with the WPNAV UP/DOWN settings. You’ll have to figure this out and calculate your maximum gradients when you lay out waypoints. Otherwise you’ll end up with the same problems that full-size pilots have cruising at FL450 @ 580kts, want to make a standard “rule of 3” descent so as to not overwhelm the cabin pressurization, don’t start the descent at 500 miles out you won’t make the airport unless you pull the throttles back and slow down. L1 is the same way. Learn about climb/descent gradients and how to apply them in flight planning, as L1 will not automatically slow the aircraft to hit an altitude target.

I’ve flown this several hours now. Have switched to using it for survey flights. In setting it up I’ve never made any adjustments to the speed-height controller settings. WPNAV_ACCEL set to 100 is sufficient and allows for very smooth speed changes. WPNAV_ACCEL no longer has anything to do with ability to hit waypoints. Set your WPNAV_RADIUS to the distance your heli flies at cruise speed in two seconds.

The NAVL1 settings, I don’t know what Bill has flown, but damping set to 0.8 and turning period of 18-20 works for my heavy helicopters. I’ve never adjusted the cross-track error I-gain from the default, or found it necessary.

The SF setting, however, I have played with quite a bit. I call this the Stomp Factor on the torque pedals. If I want to make really cool “ag turns” and pedal turn it I’ve set this up to as high as 2.0. What it does is lead the turn on torque, convert some of what would be bank angle to nose down instead on a tight turn, and reduce or eliminate the cross-track error lining up on the next pass. Set it high enough it will virtually point the heli’s nose at a point on the ground and pivot around it making the turn.

Depending on how fast you’re going, this can max the heli right out on pitch and pull maximum power in the turn. But it sure is fun! Stomp Factor is also interactive and you can leave it set at 1.0 and add manual Stomp Factor in the turn with the rudder stick while the autopilot flies the heli otherwise. Really fun on FPV.

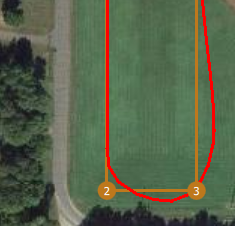
This is a survey flight I flew with it showing the turns. On entry to waypoint 1 I was cruising across the field at 60 kts and it was a ~1/2 mile run to that waypoint. I turned the speed down to survey speed at 20 kts before it got to waypoint 1 and you can see how it made the entry on the pass. No stop-turn-go robot stuff like Copter Nav. Nor any really scary hairy unknown flight path that a spline might take on a waypoint that far away.

Tiny bit of cross-track error on the entry to the passes, a little more Stomp Factor would fix that. But it was minor so I didn’t worry about it. At steady 20 kts she was pulling ~30 deg of bank in the turns. You can see there is no over-run on the pass, despite the fact that it holds speed in the turn. Way more efficient for your helicopter as it is not accelerating and decelerating all the time.

The same speed and pass width with Stomp Factor set to 1.0

Stomp%20Factor%201

One final note; Bill added a feedforward path to the speed-height controller. When I flew it today I set that to 0.1 and it seemed to provide smooth transition in speed from a manual mode to Auto. I think Bill has a recommended way to adjust that, but I did not thoroughly test that today.

Edit: I had to edit this post as I had pre-prepared it but I had information for the post on two different computers, plus my tablet.

The method of tuning the L1 is best done for a chosen speed on 180 deg S&R turns. You can refer to the Plane documentation on how to tune it for the turning period and damping.

Hi Chris, I don’t see the link. Not sure if I am missing it or if it is not available yet? Thanks.

It should be there now. The builds are done by an automated script I wrote. There is binaries for the common boards that I know people are flying in helicopters. If somebody has one that a binary does not exist for, let me know what the board is so I can add it to the build script.

Thanks Chris, I have just downloaded for my CUAVv5 and V3. The sun is just about to come up on our side of the world (it is now winter for us) and today is going to be a great day.

Hi Chris, may you add Pihawk1 board, thanks

Pixhawk1 is added. The fmuv2 build should work for Pixhawk boards that do not have the flash bug.

@BillGeyer
For all other commands in your mission plan, it will smoothly transition to/from copter navigation controller. In the vertical axis, it still uses the copter position controller and performs linear altitude changes between way-points

Starting a video mission with L1 navigation than change to Region Of Interest.
I wonder if I can incorporate a portion of ROI in a mission for my video projects, flying side-wards and backwards and will it transition to forward and back to L1 navigation to finish the mission.
I think I will try it when I feel comfortable.
In the past I have used for videoing the flight mode Drift which does very nice automatic coordinated turns. But it is a bit odd to fly with the TX.

I think this point should be bolded and underlined because it’s very important. Unlike copter NAV where you typically would set your waypoint radius really small to ensure the aircraft went through the waypoint, you want to make your waypoint radius larger in L1 navigation in order for it provide a smooth turn to the next course. Otherwise you’ll end up with the aircraft flying through the way point and tear dropping into the next course.

I don’t think this will work. While conducting L1 nav the L1 controller has complete control over yaw and thus the copter region of interest inputs for yaw will be ignored. You could switch to spline way points which would invoke the copter navigation and that would allow the region of interest feature to work normally.

Please DO NOT change the WPNAV_USE_L1 parameter in flight. That will have unexpected results.

Yes, I tested this in flight and it works. If you plan a mission with regular waypoints running L1, but insert spline, it will switch seamlessly from L1 to Copter Nav when it hits the spline waypoints. At the point where you have the splines you could insert a ROI and it should work. I didn’t test that. But since I know it switches to Copter Nav I’m reasonably sure it will work.

In my test, as soon as it got past the splines it went back to L1 and it was smooth. It just sped up and went back to what it was doing before. I thought it might actually fly a spline on L1, as the first versions of this did. But the final version simply slows smoothly to the Copter Nav and does what any multicopter would do on a spline.

1 Like

This is a good point too. L1 will not work with WP radius set to 2 meters or 5 meters, or whatever people use for Copter. Depending on the speed, it may or may not use the full radius to make a smooth turn. I’ve been flying it with the WPNAV_RADIUS set to 2200 (22 meters), tuned for flying tight 180 deg turns on surveys at 20kts. At 10kts it will turn an almost square corner much closer to the waypoint with smaller radius. At 30kts it will fly a wider “teardrop” with more crosstrack error.

So this can be tuned for your normal cruise speed. But it will handle a wide range of speeds and still keep the bank angle in check with the turn rate (or turning period), and still maintain constant speed in the turn.

I found that the damping setting, lower values will cause more “teardrop” and crosstrack error on the next leg. Higher damping causes less “teardrop” and cross-track error. I had the damping at 1.3 at one point to get zero crosstrack error. But turned that down to 0.8 and found Stomp Factor and the associated pedal turn works actually better for 180 deg S&R turns.

Stomp Factor is one thing Plane L1 does not have. But pedal turning is a perfectly valid method of making tight turns with helicopters, within the airspeed limitations in the flight manual for pedal turns. And it works just as well in RC as it does in full-size manned.

This is a good video that depicts the dynamics of the S&R reversal using a pedal turn. A helicopter can literally turn on a dime using this method. ArduPilot is now capable of doing this with L1 on autopilot if you get it tuned right with Stomp Factor.

1 Like

@ChrisOlson. I can confirm that the behaviour is different between normal waypoints and spline. In my 1st test, I used spline and did not see a change. I first thought that I had not set it up correctly but as soon as I used normal waypoints the changes were dramatic and L1 was active. I still have to do a number of tests as my radius is much wider than anticipated. I originally soften the WP behaviour a lot to get smoother results but the pedal turn is a way smoother option and I would like to see if I can get the same results from your suggestions above.

If this may help some else, setting WPNAV_USE_L1_NAV = 1 activates the L1 controller.

That’s correct. It won’t work with spline. Even if L1 is enabled it still will revert to Copter Nav if it encounters spline. It will, however, switch smoothly back and forth in flight if you insert spline in middle of a regular waypoint flight flying L1.

The turning period, damping and Stomp Factor will affect this. What I would do is set the WP radius for the typical speed you fly. I don’t know if you’re flying gas or electric, I think you have gas. So set up a flight plan in the shape of a big figure 8 and put a DO_JUMP command in it continuously repeat. It might take an hour to get it tuned to perfection the way you like.

Set up your Channel 6 knob to adjust the WPNAV_SPEED and set the tune low and tune high to the minimum and maximum speeds you’d like to see. Take off and start flying the flight and turn your knob up until it is cruising at your desired cruise speed.

For now, leave the damping at 0.8 to 0.85. I don’t think you’ll find it necessary to adjust this.

Start with the period at 20. Reduce the period one at a time and you should start to see the helicopter turning BEFORE it gets to the waypoint initiating the turn, it should fly in a teardrop fashion with crosstrack error to the outside of the leg of the flight to the next waypoint. If the waypoints are sufficient distance the crosstrack error should reduce and the helicopter’s flight path will intercept the radial to the next waypoint.

If you get the period too low it will bank quickly - it banks more aggressive with lower period.

Now, when you get it banking the way you want try some manual pedal turn and see how much it takes to get zero crosstrack error as it makes the turn. Important to do this in both left and right turns because of torque based on your rotor turning direction makes bank angle steeper turning one way than the other.

Now, when you get the “touch” on the pedal turn and see it works good set the Stomp Factor to try to simulate it with the autopilot. Bill said to only adjust the Stomp Factor by .05 at a time. But I found here that adjusting it by 0.1 at a time provides a more reasonable adjustment.

Stomp Factor (pedal turning) is best used on 180 deg S&R reversals. That’s where it has the most desirable effect. It has a negative effect on a 90 deg turn at speed.

If you do not fly flights with 180 degree turns then adjust the damping instead to eliminate the crosstrack error and maybe put in a small amount of Stomp Factor like 1.1.

That’s basically how I tuned it here. The first versions of the code I tested did not have Stomp Factor. Bill put that in later so I could pedal turn it. But it is kind of a nice feature.

3 Likes

Just a note here that you can use do_change_speed commands in your mission plan to change speeds as well. The aircraft will smoothly accelerate/decelerate to the new speed based on your wpnav_accel param.

A little explanation on the directional control logic that is used with the L1 controller. Unlike Planes where more of the natural directional stability (tail follows the nose) is used to aid in coordinating the turn, copter always has control over the tail and unless some (pilot/autopilot) is telling it to yaw the aircraft, it always holds the heading. So with L1, I had to determine the yaw rate at which to swing the nose to provide a coordinated turn. The calculated yaw rate is just based on the bank angle and assumes a level turn. The turn scale factor, or Stomp Factor as Chris likes to call it, allows the user to put more or less pedal in turns in case the calculated value is not enough to keep the turn coordinated.

Hope that helps.

I have updated the L1Nav build to the latest Copter 3.6.9 and added NuttX builds for all the various Pixhawks and Pixracer

The firmware is here ->

2 Likes