Hello,
Please forgive if the question is dumb, I am new to the Ardupilot Community and the techniques and couldn’t find an answer.
I am trying to connect a Camera via CHDK to my Pixhawk.
I am following the instructions in this video.
In Mission Planner in Initial Setup - Camera Gimbal I can not choose RC5 - RC11, but instead SERVO5 - SERVO14 are listed.
I tried to count the pins and put the cable at the correct place, but whatever I try I can not get the camera to shoot a photo.
I think I understand your issue. Indeed, when I first experimented with the servo trigger I was confused by the pin names (I think some major rework on labeling is needed).
Nonetheless, I found this image to be the most helpful.
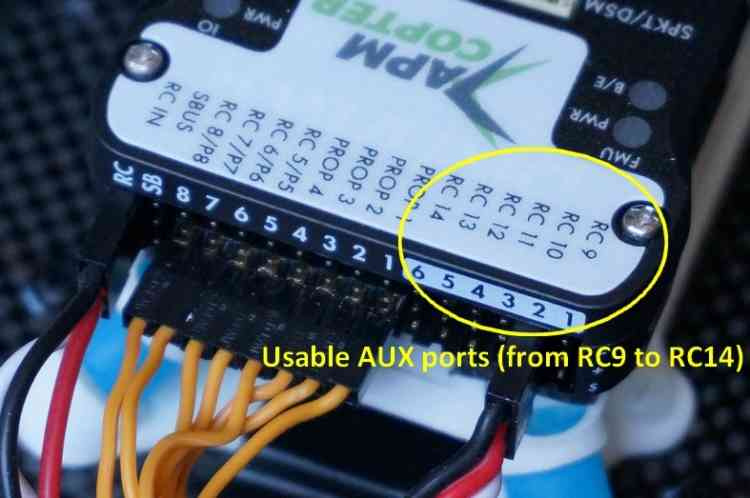
I prefer to use the AUX ports (SERVO 9-14, for AUX pins 1-6 respectively). I reserve AUX pin 4 for my camera feedback, as AUX 4 can be used for fast feedback capture.
Also check your BRD_PWM_CNT parameter, as setting that disables some of the AUX pins. (eg set to 0 if you don’t need extra ESC/Servo outputs for flight controls).
The confusing part is that you also have to set a parameter for relay trigger pin, even though you’re using PWM.

Also ensure that CAM_TRIG_TYPE is set to servo.
And experiment with CAM Trigger duration (in tenths of a second) and PWM values.
1 Like
First of all, thank you for your answer, that helped me understand the numeration.
The Camera is now connected to AUX4/ SERVO12, CAM_TRIG_TYPE, RELAY_PIN and BRD PWM_COUNT are set as in your screenshots.
When I tried connecting to AUX1 I had SERVO9 and RELAY_PIN 50 chosen (At least that is how I understand it.
With CAM Trigger duration you mean the bottom right button in Initial Setup - Camera Gimbal - Shutter and
with PWM values, do you mean BRD_PWM_COUNT?
Edit: Is it possible that my connected GPS receiver (not fixed) might cause a problem? Like that it is searching for a signal and ignoring everything else in the meantime?
Edit2: I think I got it wrong, RELAY_PIN 54 is for AUX pin 5?
Yes, to use AUX4:
SERVO12 (Gimbal Setup)
CAM_TRIG_TYPE = 0 (PWM)
RELAY_PIN = 53 (for AUX 4)
BRD_PWM_COUNT = 0 (Permits all AUX for GPIO)
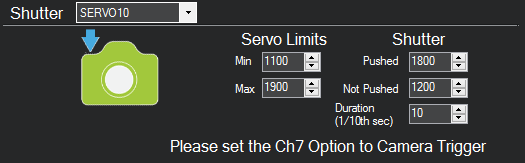
CAM Trigger duration and pushed/not pushed PWM values are configured at the bottom right of the camera gimbal configuration (Shutter settings).
I presume you are using the hardware shown in the video? There are prebuilt cables to simplify the process. But the setup is different.
Also . . . Is your pixhawk armed during testing? Not the arming through Mission Planner, but the arming switch. Arming switch must be pressed to unmute PWM outputs (including camera trigger signals).
I use a Sony camera with Seagull #REC, so its a bit different on mine, so I apologize for any difficulty.
Yes, I am using the build he showed in his video. I try to connect a Pixhawk 1 with a Canon Powershot A2300.
I actually forgot to arm the Pixhawk, sorry.
In the full parameter list I am running into another problem. The RELAY_PIN resets itself to 54 all the time. I just have to go into another tab, when I look again the value (had it set to 53) is at 54 again.
So I tried to connecting it to SERVO13, which should be no. 54, together with the the other values at 0 and the Pixhawk armed. It doesn’t react.
Can I just fiddle around with the PWM values and the duration in Shutter or is there a list somewhere?
When you modify parameters in the full parameter list, ensure you “write” the parameters to the flight controller. Type in your new parameter value, hit the enter key, then click the “Write Params” button.
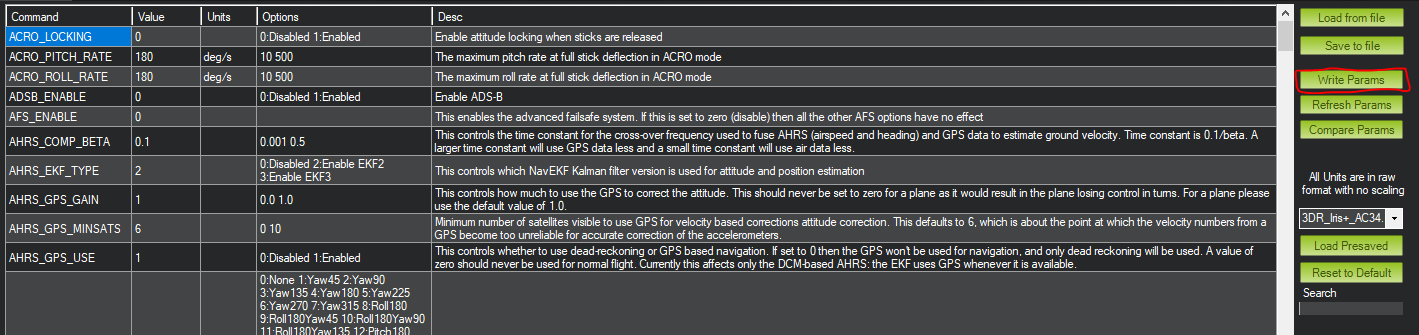
The PWM values are important (and can be modified through the gimbal config) but the other parameters mentioned have to be modified in the Full Parameter List.
Thank you, saving the values in the parameter list worked now.
I still can not get a the camera to shoot a foto.
My build so far looks like this:
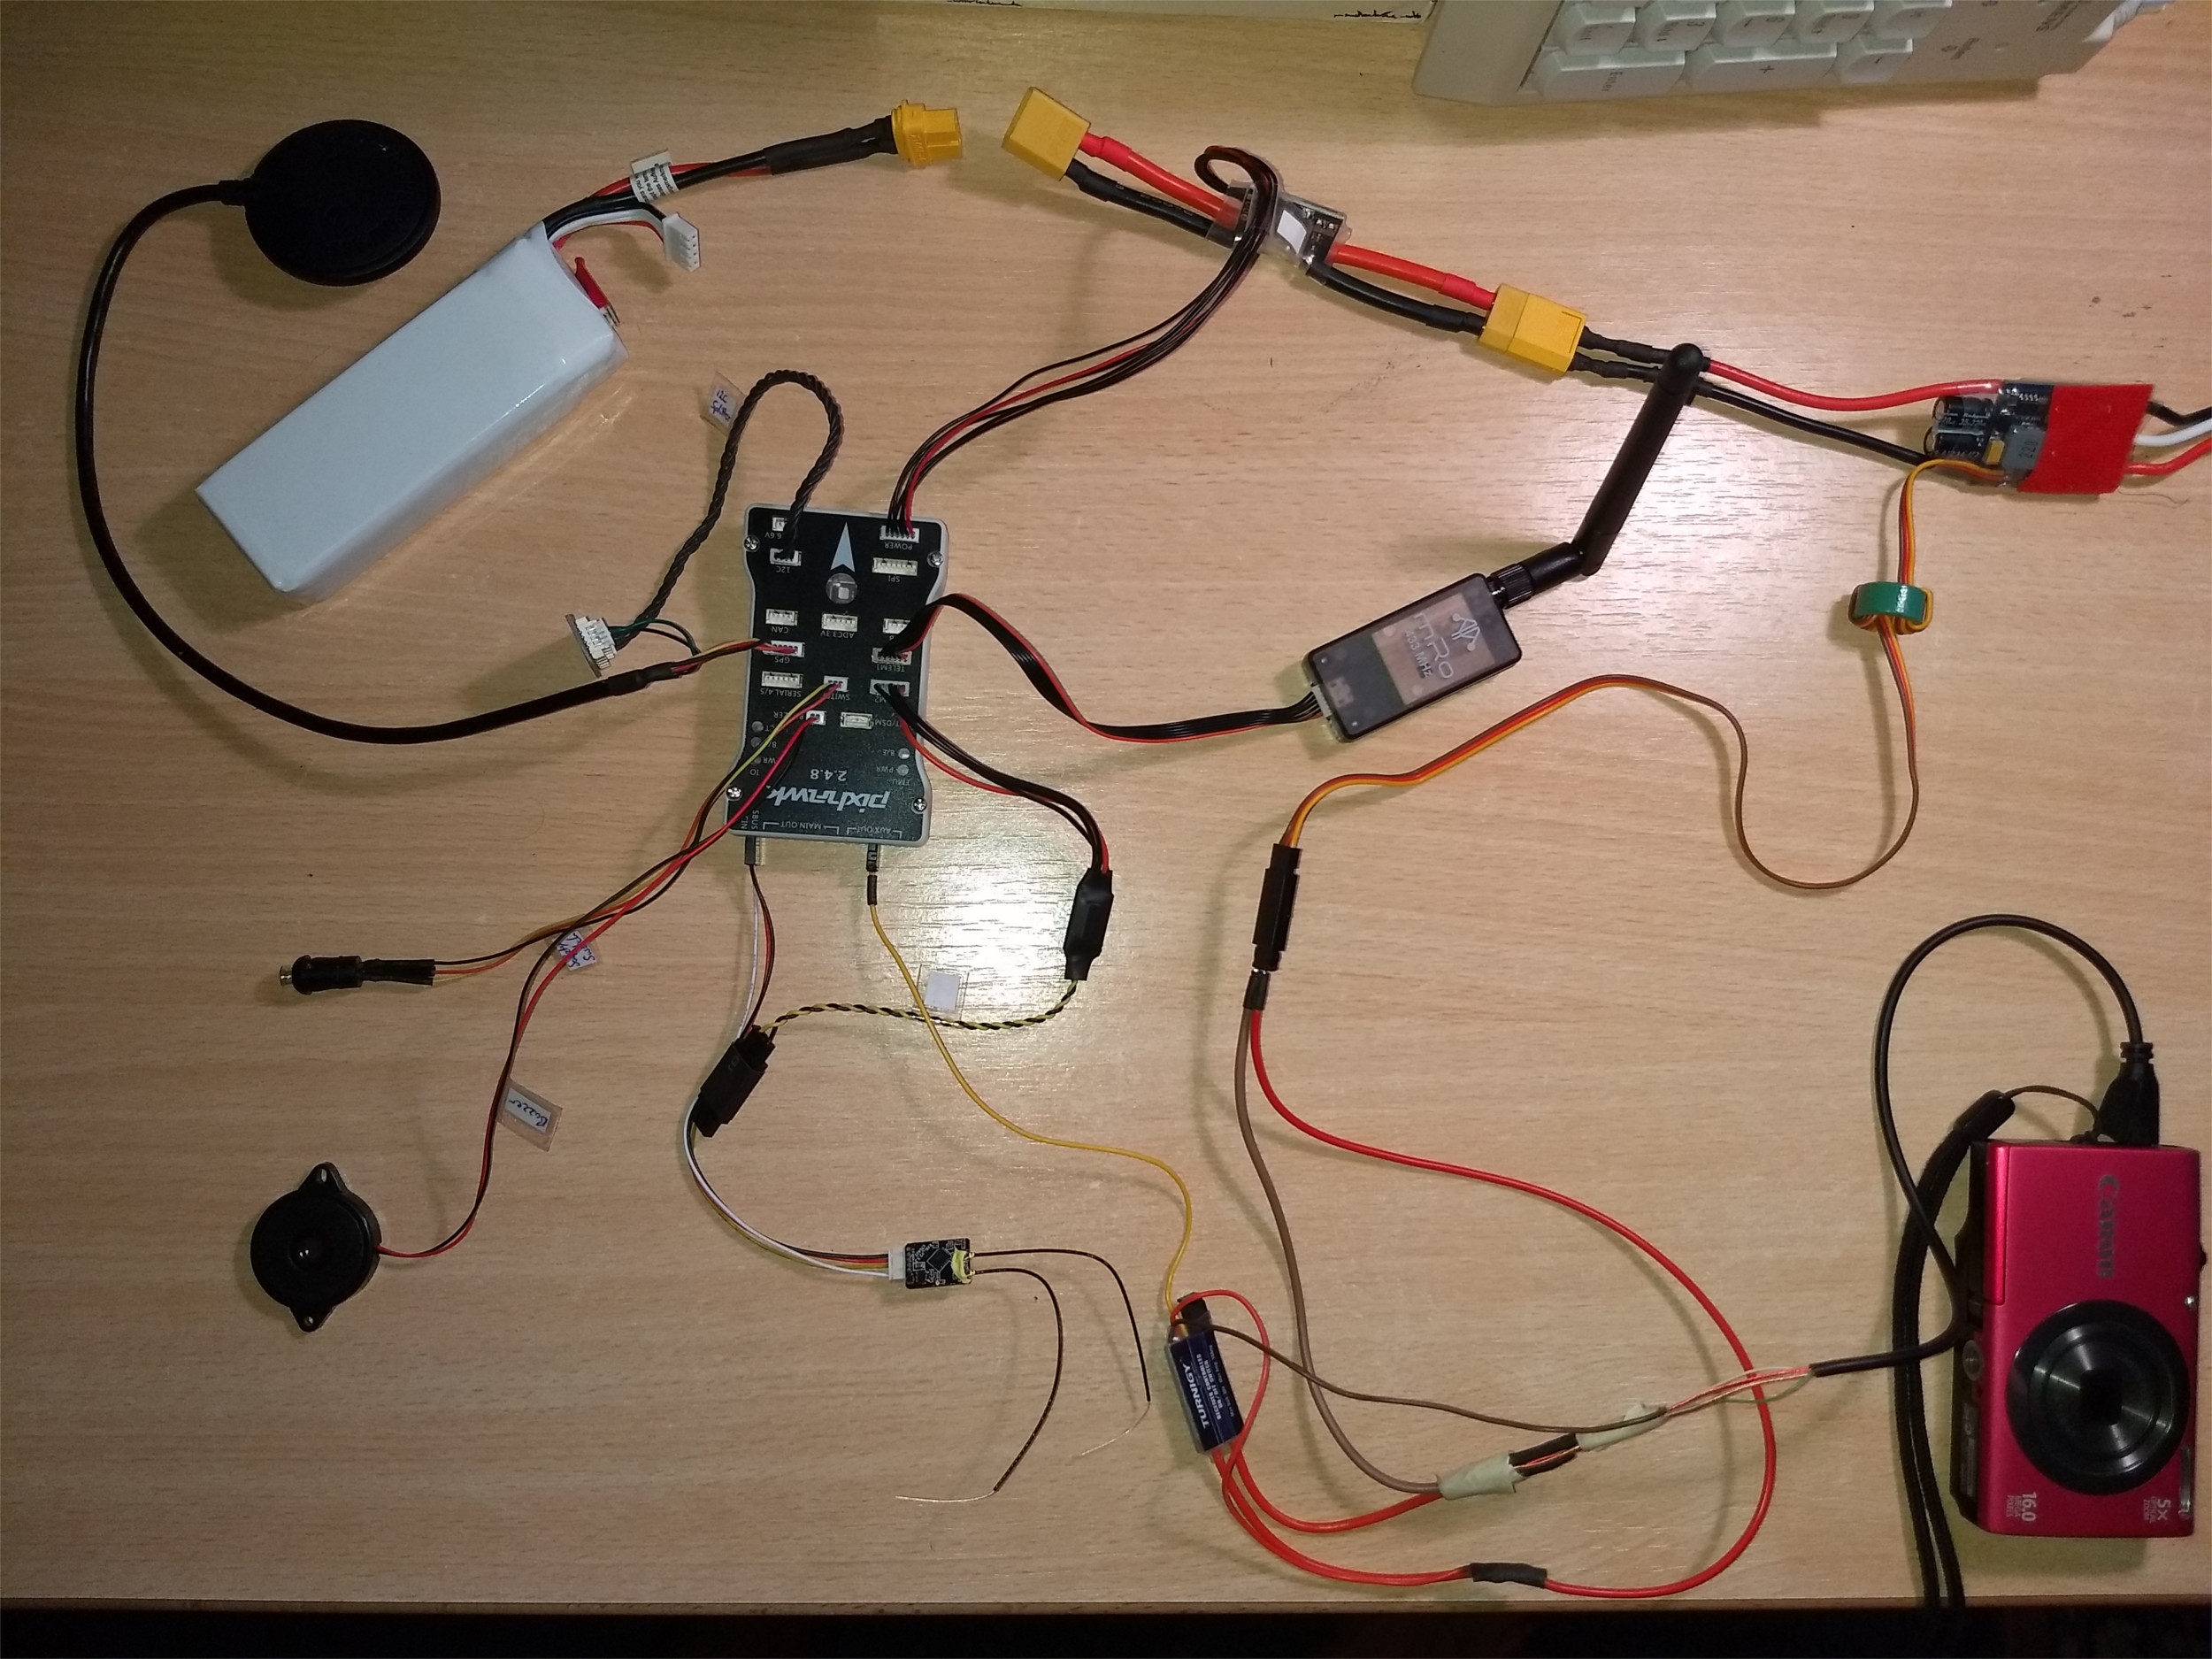
The camera is connected through the cable construction from the video with the BEC (which is connected to the battery through the power module) and the Pixhawk (AUX4 here).
The Pixhawk is running, the GPS signal works and the connection between the Laptop and the Pixhawk works with the telemetry radio.
Currently I am trying it this way:
1.) Turn on the Pixhawk (aka connect the battery)
2.) Connect it with Mission Planner
3.) Turn on the camera (running CHDK with the “update firmware” method)
4.) Arm the Pixhawk
5.) Check the correct Servo (12)
6.) BRD_PWM_COUNT 0; CAM_TRIG_TYPE 0; RELAY_PIN 53
7.) Try to take photo NOW in Mission Planner
I can not find CH7_OPT though if that is needed.
Hmm, I can’t find any information on recommended PWM values for the Turnigy electronic switch. I believe it has lights on the back? Any reaction from said LEDs when you attempt to trigger the camera? From the software side I would now adjust the trigger duration (eg 1 tenth of a second) and PWM values for trigger pushed / not pushed via the gimbal configuration screen. Said values automatically save when changed.
If you have experience with a multimeter, that would be my next step (see if electronic switch output changes when triggering, and if average voltage from PWM pin changes with trigger).
I think I found my big error.
I thought the Pixhawk is armed when the Safety Switch is pushed.
This does not seem to be the case.
On startup I get the sounds “Startup OK” and “Failed to arm” according to this site.
The LED shows me “initializing please wait” and then “RC failsafe activated” according to this site.
But I do not have a static green LED.
I am sorry for this…
That’s interesting.
You may need to look at your pre-flight check setup . . . it is possible to disable preflight arming checks, but is strongly discouraged. It would be helpful for testing, however.
Check that your power module is configured correctly (eg voltage and current on flight data screen make sense).
Also check that your RC transmitter is paired with the receiver, and that the RC inputs are acknowledged by the Pixhawk (under Initial Setup > Mandatory Hardware > Radio Calibration).
So I got the PixHawk armed now and got a Tuffwing cable.
As far as I see it, there is no reason why it shouldn’t work the same way.
From my understanding the Script just makes it possible to set certain camera parameters.
The cable is put into AUX2.
BRD_PWM_COUNT = 0 (No PWMs)
CAM_TRIG_TYPE = 0 (Servo)
RELAY_PIN = 51 (AUXOUT2)
SERVO10_FUNCTION = 10 (camera_trigger)
Mission Planner now shows that a photo has been made,
but the camera is not making a picture.
There is a BEC connected to Servo7 and a Zener Diode to Servo 8 (as shown here).
Hmm.
So one difference with the Tuffwing cable is that it uses a PWM input (as opposed to a relay-type as with your previous switch device). What are your camera trigger configuration page’s values?
I would follow the instructions here to the extent that they are applicable to your setup. For one, I do not know if you are using (or wish to use) the LUA script they suggest - said script does, however, have a setting for accepting Pixhawk input.
They also have a note saying that RELAY_PIN ought not be the same as the pin triggering the camera (different from my setups). so try setting that parameter to null.
Does that mean I have to set the BRD_PWM_COUNT to 2 or higher when I use the Servo10?
My configuration on the site Initial Setup -> Camera Gimbal is this:
I would love to use the LUA script, but the download link to it on the CHDK Wiki page does not work for me. Do you have it by any chance?
Setting the RELAY_PIN to -1 (so disabling it) doesn’t seem to work either.
I got the script.
Now it works.
Settings in the parameter list are as before. (BRD_PWM_COUNT 2, …)
Also I put the settings as shown on the Tuffwing site.
Thanks for the help and patience with me, Mr. Williams 
I’m glad to hear you got it working!
I wish I could have been more direct in the solution, but given our differences in equipment, the back-and-forth was inevitable.
From here the primary challenges will be related to capture speed (depending on what overlap you need at groundspeed vs minimum airspeed) and tagging.