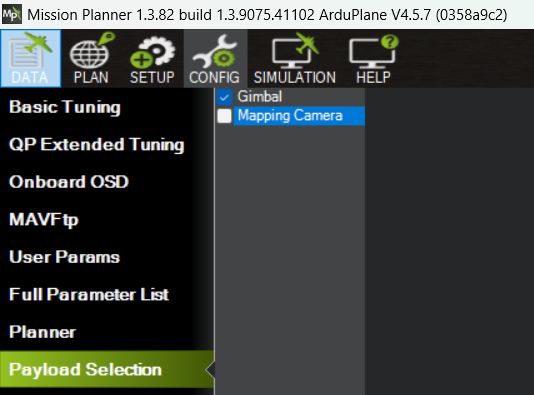
@Eosbandi recently added some hooks to allow for plugins to add pages on the Setup and Config tabs, and I decided to use this to create an example plugin to do something I’ve been wanting for a little while now.
The new Payload Selection example plugin adds a convenient way to configure payloads on your vehicle. This feature simplifies the process of editing parameters for which payload you have installed, such as gimbals and cameras, by allowing you to select what you have installed in your aircraft from a list of checkboxes.

This is something that is very user/platform specific, so it’d be messy to include by default in Mission Planner, which makes it a great candidate for a plugin.
This doesn’t have to be specific to payloads; that’s just the use-case I needed. This is applicable for any group of parameter settings you want to change on/off frequently.
How to Use the Payload Selection Plugin
- First, you will need to update to the latest beta of Mission Planner (or, in the future, if 1.3.83 is out, you can skip this step)
- Go to
C:\Program Files (x86)\Mission Planner\pluginsand openexample22-payloadconfig.csin any text editor (but preferably something with syntax highlighting, like VSCode). - Create your list of payloads and their respective parameters. By default, the list is commented out
        // DEFINE YOUR PAYLOADS, AND THEIR PARAMETERS, HERE
        public static readonly Dictionary<string, Dictionary<string, double>> payloadParameters = new Dictionary<string, Dictionary<string, double>>
        {
            {
                "Gimbal", new Dictionary<string, double>
                {
                    { "MNT1_TYPE", 9},          // Set Mount1 Type to Scripting
                }
            }, // This comma is needed between each payload (but this comment isn't)
            {
                "Mapping Camera", new Dictionary<string, double>
                {
                    { "CAM_TRIGG_TYPE", 1 },     // Set trigger type to PWM
                    { "SERVO9_FUNCTION", 10 },   // Set servo 9 to camera trigger
                }
            }, // Don't forget this comma
            {
                "Another Payload", new Dictionary<string, double> // Add as many as you want
                {
                    { "SOME_PARAM", 1 },     // Set trigger type to PWM
                    { "SOME_PARAM2", 15 },   // Set servo 9 to camera trigger
                }
            },
        };
- Save the file and start Mission Planner
- Connect to a vehicle (the page will not show up if you are not)
- Go to the Config tab, you should see your new Payload Config tab there.
- If it’s not there, you likely made a small syntax error. Look closely at the example and make sure you did not miss a bracket or a comma or a quote mark.
- If you still aren’t sure what went wrong, hit Ctrl-P to pull up the plugins window and click the “Show Errors” button for more information (i.e., the line number where you likely messed up). In the below screenshot, I forgot a comma on line 48:
When you select one of the checkboxes, the params listed below it will be set. When you uncheck the box, all those params will be reverted back to default.
Enjoy
