Cube Black EDU-450 Frame: sharing some build problem resolutions (for dummies, like me)

I’m coming at Ardupilot as a tool for a control systems educational platform. The effort gets hot-and-cold due to time constraints. I started a thread for the attitude controller details I’m ultimately interested in here.

A guy can only mess around on paper and sim for so long though. This thread shares some of my, “for dummies” moments as I’ve wrestled a Hexsoon EDU-450 (Gen 1 I think) and a CubeBlack setup into shape. My setup is vintage 2018, and I’ve never flown it! Like I said…time, work, family, etc. I’ve been more interested in building the “study” platform than flying, although step 1 I’ll have some fun with it here soon.

I’m not a RC guy in the least, so some very basic confusions challenged my build. That said I’m an old embedded systems guy so the fundamentals aren’t a problem. It’s the jargon and the generations of various (sub)systems, compatibility, RC radios and receiver combos, Telemetry radios, flight modes, and on, and on that at certain points made me wonder if I have things going in the right direction for my build.

Here and elsewhere there have been very helpful folks from time-to-time…I’ll start with my most recent hang-up: what the heck RC radio-receiver combo will give me some plug-and-play action!

Ardupilot docs and community are great. All I’m intending to do here is hopefully give somebody, anybody, one more link to click when they’re stuck on a build and maybe it will help.

RC Radio set-up that will, “plug-and-play” with ArduCopter V4.3.6…

SUMMARY of this post:

  1. intending to share a plug-and-play RC setup. If you want to buy a receiver-transmitter that will, “just work” with CubeBlack here’s an option.

  2. Describe the challenges I faced (with first Spektrum DXS attempt)…if you got that to work reply with a solution!

Details…

I appreciate the many, many options Ardupilot supports for RC radios and receivers. It makes sense that folks with good experience with this-or-that brand or feature set would want it supported by ArduPilot and the various hardware platforms. However, if you’re not experienced with RC and you want some confidence something will, “just work” out of the box, here’s an option.

I first bought a “Spektrum DXS” 7-channel transmitter that came with an AR410 receiver. I thought this would be great given the CubeBlack PX4 carrier board has a committed “spkt” connector! Plug-n-play I figured. As is typical for me it was more like plug-n-pray. I did NOT get this to work! If you did get the DXS-AR410 or equivalent to work into a Cube setup, reply below for the benefit of others!

Back to my happy path…

I started over with an FR-Sky X8R receiver and to make that work needed a new transmitter so I went with the Taranis Q X7.

Couple (funny) details:

  1. The Taranis Q X7 comes with no battery (at least the one I bought).
  2. Once I bought the battery now I need to figure out how to charge it…I think I’ll get it worked-out with the universal charger I have here for my LiPO’s.

Those are two more “funnies” I call them. I did cheat a bench power supply voltage into the battery cable in the meantime.

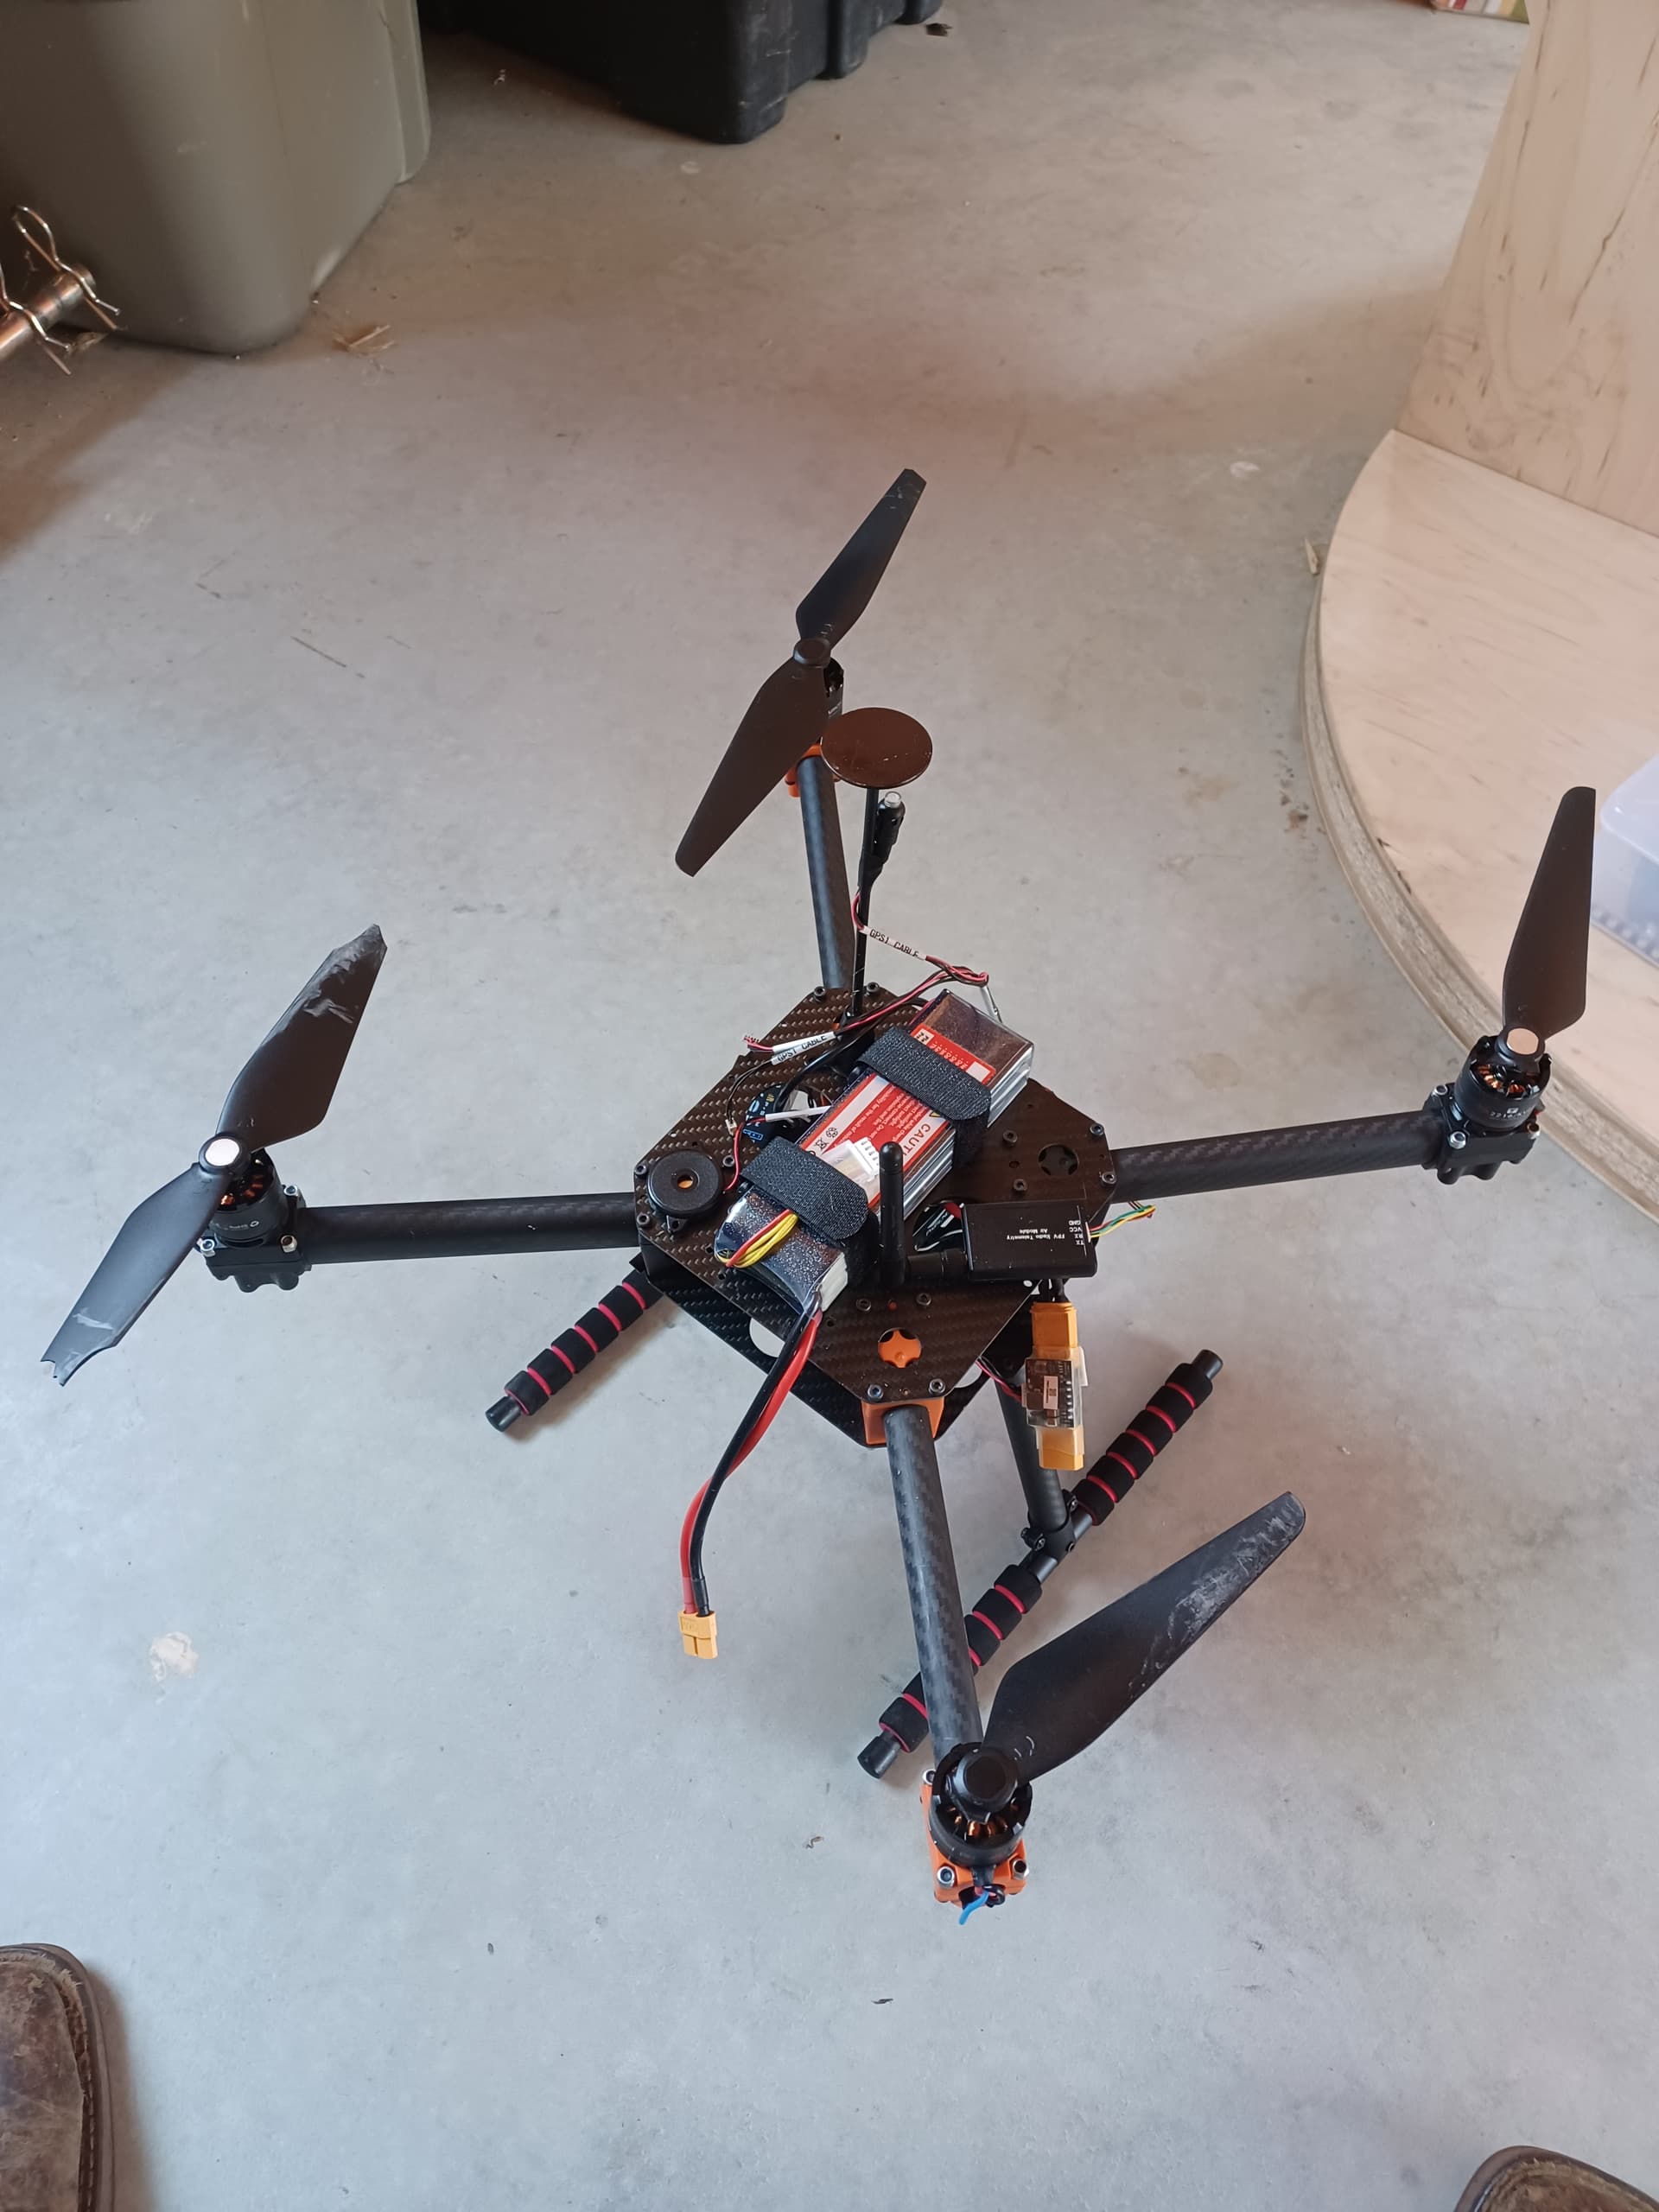
The receiver is wired as-shown in the first picture: just as simple as you’d expect: X8R “SBUS” to “RCIN” on the PX4.

-Don’t be confused by the jumpers that you get with the X8R.
-Don’t be confused by some online references to “special cables”.

I think the “special cables” are for “telemetry” links to the same Taranis RC transmitter you’re just wanting to use for RC (that’s another newbie confusion: the difference between “telemetry” link and RC link).

I’ll cover my “binding” next when I follow-up with a video editing my “model” in the Transmitter. The Taranis display is nice but if you’re totally new to it it’s a bit confusing. I’ll share my trip-ups and resolutions in a later video on this thread.

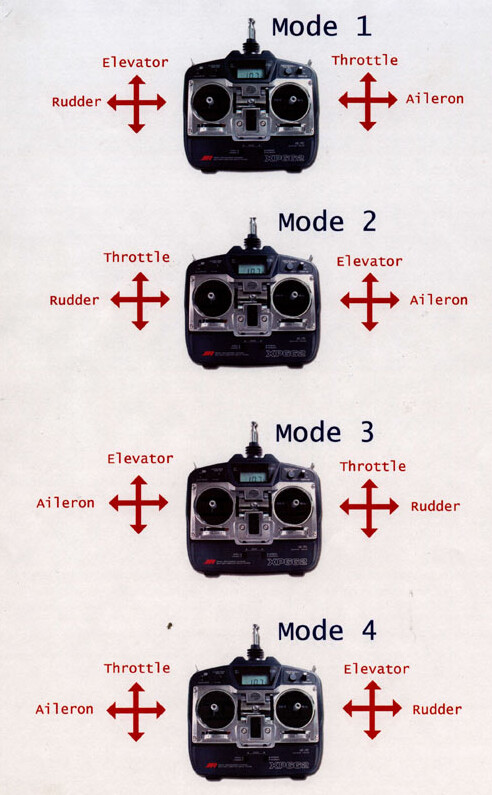
I did get the Taranis Q X7 Bound “bound” and a “model” setup within it for my “quad” (more to do there, as I don’t think I like my stick assignments, and I have no idea what these other knobs and levers might be useful for. Again, more follow-up later).

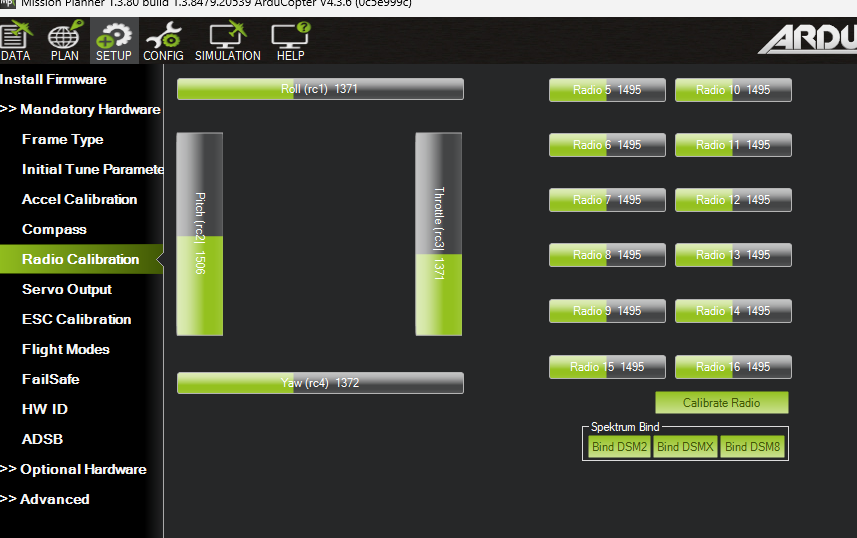
Of course my Spektrum messing-around delayed my happiness a little bit…after I figured the new SBUS should, “just work” I’d visit the “Radio Calibration” screen but just as with my Spektrum foray…but no joy.

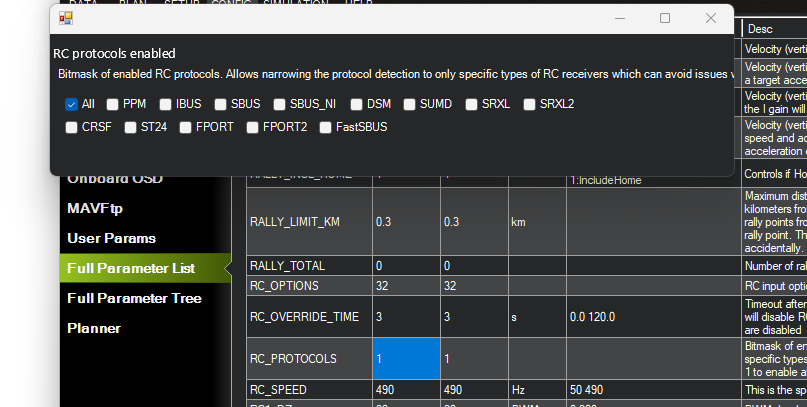
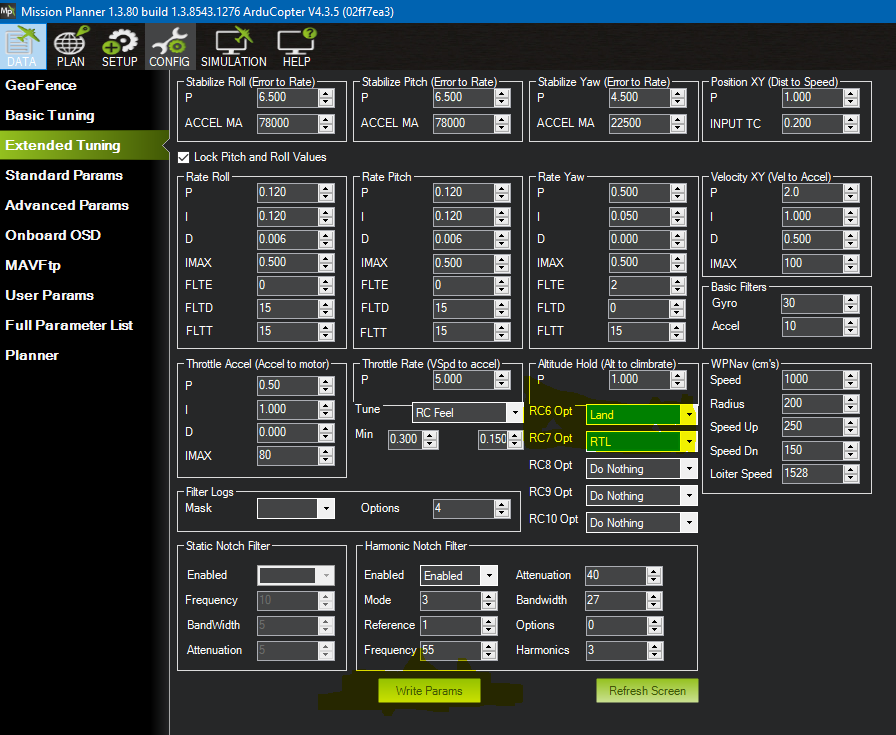
Then I remembered I messed with ONE parameter trying to get Spektrum to work! I had changed the default “all”=1 to DSM=32 (because I thought Spektrum wanted DSM…but there again very confusing with DSM2, DSMX, etc etc).

I changed back to ALL and got happy! Green Bars on the “radio calibration screen”

To Recap:

  1. out-of-box Cube Clack ArduCopter V4.3.6…NO parameter changes needed!
  2. Taranis QX7 to X8R receiver SBUS connector to PX4 “RCIN”.

This will, “plug-n-play” for you once you have the QX7 “bound” and an “model” configured. I’ll cover this next but for now you can shop with confidence.

PX4 is an alternate firmware, completely separate from the ArduPilot project, though suitable for use with the Cube series of autopilots.

I’ve removed the reference to it from the post title and updated the category to Copter 4.3.

“Pixhawk” is an open hardware reference, to which the Cube and its carrier board conform.

It’s all a bit confusing, but hopefully that helps sort at least a little confusion in the nomenclature.

1 Like

The X8R is a good receiver.
In your transmitter reverse the pitch channel
Also set the failsafe (in the transmitter) to “No Output” so if you go out of range the copter acts like there’s no receiver connected (no pulses received) and goes into failsafe mode, usually Return To Launch.

1 Like

Thank You! That is something that has confused me too! Pixhawk, “Pixhawk2” stamped on the cube, “Px4” on the carrier module…lots of p’s, x’s, etc. Your comment is very much appreciated and I hope it helps anybody else (like me) who might trip past this thread!

1 Like

@xfacta above was quick with some advice on the transmitter config for my stick assignments above, and also the failsafe setup which I have not yet done but blow-past in this Taranis Q X7 video (I was making the video when he commented!).

I’ll follow his advice above: "set the failsafe (in the transmitter) to “No Output” " soon. For now, here’s a video of me fumbling-through the Taranis menu to do the couple things required to get this setup “hot” into Ardupilot.

If you know anything about the Taranis menus and such this video will be of little interest to you, but if out-of-the-box it seems confusing you can see here how I figured-out the menus and navigation at least sufficient to get started.

Thanks again to the commenters above who are already adding a lot to make this thread more useful I hope.

Taranis Q X7 basic setup for X8R receiver

I got it, “flying”…on a gimbal I built awhile back as a tool I’ll use for evaluating some attitude controller schemes as mentioned above (specifically here)

I’m glad I put it in the gimbal mount. It was a convenient way to calibrate the compass in particular. Also, given I have never flown anything it is good for me to mess with the stick with the thing pinned but able to thrust, roll, pitch, and yaw as you can see in the video.

My throttle failsafe is bugging me so I have that disabled and need to revisit. I’m also a bit sketchy on the “mode” options and using switches on my RC transmitter to change that. I’ll figure that out and post it later…it seems a bit confusing, but I DID follow-up on the Taranis Q X7 setup as mentioned above:

-I remapped the sticks for thrust and yaw on the right stick.
-I assigned the switches I’ll use for “mode” changing.

I’ll do another video of the RC transmitter setup when I also get into, “mode” changing later. For now I need some manual stick time and I don’t need to mode change.

For now, this looks like it will fly once I let it live free of the gimbal! I could tune it right here, or maybe I’ll get some time on it and toss it back on the gimbal later.

This was a load test for my gimbal too. You can see some flex in the arms as I expected but I’m OK with that. I want it somewhat light to not be a huge factor in the eventual analysis of the controllers I’m messing with.

https://youtu.be/IpWREzNKxRY

Do you have a mode 1 transmitter, or is it mode3 ? Usually we use Mode 2 for multirotors, but mode 3 is the same with the left/right stick functions swapped.
It’s OK to use whatever you are most comfortable with though.

The reason for the odd layouts is the Plane people want to hand launch the plane and have only one hand on the transmitter, so they set the throttle for takeoff, then only need rudder and elevator until after a successful launch. So mode 1 would have been the first mode where all our transmitters have evolved from.

On the transmitter set a 3 position switch on Channel 5
Then in Ardupilot settings / MissionPlanner go to the Setup / Mandatory / Flightmodes
and set them like this


and ensure that when you move the 3 position switch the Stabilise, AltHold and Loiter modes/positions are highlighted as appropriate.
You will be starting in Stabilise mode for initial take off and test flights, and switching to AltHold once relatively stable in the air.
Stabilise is hard to handle, because control is very “manual” and direct, but it is something you need to get used to. It’s the mode you need in a hurry if anything ever goes wrong.
Loiter can come later when you’ve good stable flight in AltHold.

You can set two 2 position switches for Land and RTL on channel 6 and 7 in your transmitter, then select them in MissionPlanner / Config / Extended tuning as per this pic.
You must remember to hit “Write” at the bottom.

1 Like

Thanks! I modified my Taranis Q model to be mode 2 so that’s making sense now. I’ll follow your advice on the switch assignments. Excellent detail there. very much appreciated!

Yes, you’re right! I was also in doubt about which firmware to use and where to build it, whether through the Ardupilot repository or following the PX4 autopilot documentation. I always choose Ardupilot, because of developer community.

1 Like

Success! Got her flying in the pasture and had some success with repeated take-off’s and landings and moving around manually for some time. Alas, my RC skills got me a bit messed-up and I had to dump her on the roof of my porch and broke my props.

Good deal actually, as I can now get some on order and get some other work done in the meantime!

When I get back to it I’ll go back over my Taranis Q X7 setup for the switches and get the modes setup per Shawn’s advice above.

I also now have a much greater appreciation for flying guided missions and not so much of this manual flight stuff! It’s difficult! I’m surprised I didn’t burn the thing in completely!

When the Modes are setup and I have my GPS wired-up we’ll fly some guided missions. So, mode control via our RC controller and/or mission planner plus GPS setup look like some good material to cover here soon.

Good work.
You’ll need to secure all the wiring and parts in a more permanent fashion - anything that can move and vibrate in all the prop wash and frame vibrations will cause problems.
I would remove the “Safety” switch and set:
BRD_SAFETYENABLE,0
so you paradoxically dont have to reach in amongst spinning props to get to the safety switch.
Make sure you have:
ARMING_CHECK,1

Also definitely set up the GPS right away - there’s plenty of things you cant do without it, and it’s required for some safety features like RTL and Fence.

If you can download the .bin log file via MissionPlanner “Dataflash Logs” and upload it to a filesharing service (dropbox etc) and share the link here - we can check over it and see what needs work.

1 Like

Also I usually set a two position switch to be Motor Emergency Stop.
You can set it up just like the Land and RTL switches, in the same MissionPlanner screen - but in your transmitter choose the switch carefully so you are not likely to switch it accidentally, but can find it when you need it without fumbling other switches.
image

The idea being if the copter doesnt detect landing for some reason, or it’s trying to tip over, you can hit the Estop switch to minimise damage. It is way more useful and safety orientated than the “Safety” switch.

With Estop, if you did switch it accidentally in the air, you can just reverse the switch and motors start again without running through the whole arming process - but I wouldnt be testing that unnecessarily.

1 Like