I tried to upload custom firmware based on AC 3.2.1
but, failed it latest day at 26th dec because of verify failed.
today, I tried again, but also failed because communication error - no connection.
Computer’s Device management (devmgmt.msc) configure is no problem. (rate 115200 / data bit 8 / parity none / stop bit 1 / flow control none)
in the Mission Planner.
I select connected port COM14
and rate set 115200
but firmware uploading isn’t work.
in addition to click on APM:Copter V3.5.4 Quad (APM is changing V3.2.1) does not work.
under progress bar’s text is show ‘reading hex’ first, and show message box “Communication Error - No connection” with ‘upload failed’ under progress bar.
data cable is fine.
and mini APM v3.1 chip is fine, too.
I need solution.
develop environment :
Windows 7 ultimate K x64
Mission Planner 1.3.50 (failed upload on latest version 1.3.52)
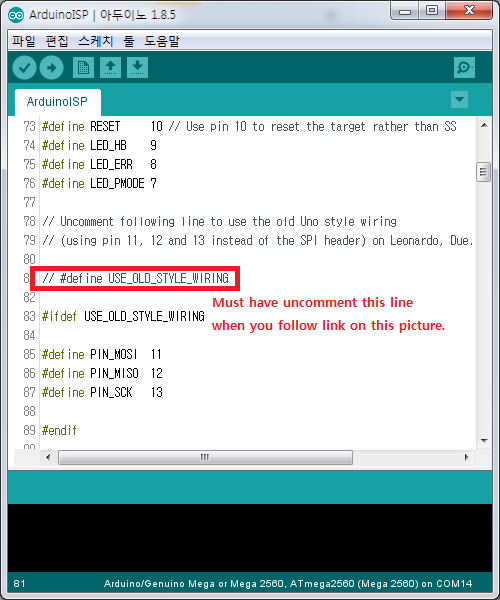
Arduino Sketch for ArduPilot Mega 1.0.3
Microsoft .Net Framework 4.6.2
Java 7u79
USB 2.0 / 3.0 interface
micro-5pin data cable
If you have “AVR ISP” module, select “Atmel AVR ISP” at the dropdown menu and “Arduino” is “Arduino”.
② Port Number connected your APM board(e.g. “COM5”)
③ Baud rate. When you using “Arduino ISP”, set default “19200”
④ Flash bootloader “.hex” file’s address.
If you installed “Arduino Sketch IDE”, default directory is “[Arduino install address]\hardware\arduino\avr\bootloaders\stk500v2\stk500boot_v2_mega2560.hex” or download here.
⑤ MCU is you board’s main chip. mini APM 3.1(or APM 2.8) board’s chip is “ATmega2560”
⑥ Fill “Option - Force” checkbox, If your process is uncompleted.
⑦ This setting is optional. “-v” is showing progress detail.