Best gear for starting ArduPilot Mower

If you don’t have a charging system on the mower for your battery system you will have to charge the batteries before you start with an external battery charger and have enough batteries to last until you are done.

You will find that you will need several different wire sizes. You can always use a bigger wire than you need except that if you are installing connectors you need the correct size to fit in the connector.


If you put a 10 amp fuse on the larger DC-DC converter you would need 18-20 gauge wire. For the other wire suppling power to the cube the size is much smaller.

1 Like

Yuri once wrote: “It is imperative that the rover and moving base communicate directly with one another, with the moving base providing RTK injects directly to the rover using the boards’ built in UART 2 ports. The flight controllers do not provide enough bandwidth/processing time for those injects to be passed through the controller successfully and at a high enough rate to support GPS yaw.”

Is this still the case?
Or does the ArduPilot auto-config take care of it?

That’s old news and no longer relevant.

1 Like

My demo of a functioning servo-driven hydro-stat has to wait, as the 3D-printed parts simply broke after hitting the physical stop on the hydro-stat. :frowning:
I have to admit that 15% infill was a bit flimsy to begin with and stupid at the same time.

Metal brackets are in production and tomorrow is another day :slight_smile:

2 Likes

Hello

Today I connected all my gear to the testbench. I got all 10 channels on my FrSky radio showing in mission planer I also connected Sik radios and servo. Servo is moving fine, my question now is what is the best way to arrange controls for skid steering on my transmitter?

My DC-DC is able to draw 9A is this really enough for two D845WP servos or do I connect every servo to one DC-DC?

Servos mounted, ready for calibration and configuration.

I am using Yuri’s post: Yuri's 4.1.0-beta Update (GPS yaw - now 4.3-beta1) - #130 by Yuri_Rage to get this sorted, and repeat here the steps in order, though for a new system. However, this might be wrong, and I will update this post based on feedback to get it right for others to follow.


  1. use Servo Output page under Setup in Mission Planner to set the end stops by visually observing the PWM value where the plate was at full travel
    Set-up all of the SERVO1* and SERVO3* PWM parameters [after a linkage change/adjustments].

  2. jack up the mower up and start the engine to roughly set the trim values to neutral (no wheel movement)

  3. fine tune the trim values using @ktrussell’s wheel tracking method 3, where you put a piece of tape on each wheel (still jacked up off the ground), push the RC stick forward in manual mode, and tune the trim values up or down to achieve the same wheel speed on each side.

  4. tune the throttle and steering parameters
    Don’t underestimate the importance of CRUISE_THROTTLE! Set it first and get it right (or undershoot slightly)

  5. Once the throttle is tuned, move on to steering. Ensure lack of free play in the linkage system. Slightly increase the FF gain

  6. move on to pivot turn tuning, mostly adjusting ATC_STR_ANG_P in small increments until the mower nails the heading on each turn.

  7. When things are looking pretty good, fine-tune the WP_RADIUS parameter to ensure that the mower pivots as close to the actual way-point position as possible.

  8. set the ATC_ACCEL* and DECEL* parameters about as aggressive as possible

  9. changing WP_RADIUS is the mechanism to ensure pinpoint turn precision. Too small a WP_RADIUS can have ill effects in way-point navigation, so be careful setting it too low (or zero). I ended up at 0.43m.

  10. With the mower turning almost exactly on top of each way-point, dial in ATC_STR_ANG_P so that it exits every turn with minimal under/overshoot.

  11. Lastly, check how the GPS_POS* and INS_POS* parameters might help or hinder things.
    Take some careful measurements, referencing the rear (drive) axle center line, which should be the pivot axis. The GPS antennas may only be about 2" aft, nevertheless enter a negative X offset to account for that. If the flight controller is almost in front of the rear axle, enter a positive X offset. Entered a negative Z offset for the GPS antennas, if they are say 2 feet above the flight controller. The result will be quite interesting!
    Re-tuning the steering parameters slightly might be necessary, to reduce overshoots.
    (Commentary: It appears that things are dialled in so closely now, that I can determine that the mower doesn’t do perfect pivot turns. It looks like the outside wheel travels a little farther than the inside wheel, making a little diagonal trace on each turn I’m curious to see if I can bias the servo trim a little toward the reverse direction and get even closer to perfect.)


What other setting need to be set, configured or tuned?
Does the above contain all steps?
Is this order correct?

I think the single power supply will work fine. Normal operation should be well below the max of your power supply.

You need to be going through all the setup documentation in the Wiki documentation labeled First Time Setup. In there is a section on motor and servo configuration.
https://ardupilot.org/rover/docs/rover-motor-and-servo-configuration.html
In that section it tells you that you have 2 options that will work for rovers like the mower. One is for separate steering and throttle vehicles where the left joystick on your RC transmitter will control throttle and the right one will be the control to turn left and right. It is also possible to modify this first approach to drive the mower off one joystick where left-right is steering and up-down is throttle forward and reverse.
The second approach for “Skid steering” vehicles and the left joystick controls the left drive wheel forward or reverse and the right joystick controls the right drive wheel forward or reverse.
All of these are personal choices and you see people doing different things. I elected to configure mine to separate the steering and throttle where the left joystick controls throttle (which also controls forward and reverse) and the right one controls to turning left and right. Now that I understand this better I will probably be changing mine to be on the same joystick someday just so I can drive with one hand.
If you don’t complete all the stuff in first time setup you will have trouble and be eventually circling back to get the stuff done so things will work.

1 Like

I would suggest that after the first 3 steps in your list above were done you need to start going through the First Drive and Tuning section of the Ardupilot Wiki set.
https://ardupilot.org/rover/docs/rover-first-drive.html
There are numerous parameters that need to be set associated with many things. There are things that need to be done before you can move to specific tuning parameters, which are also covered in that section with detailed instructions and videos. Even the guys who have done this before reference back to that detailed instruction set to tune their mowers.
The post you quoted is 2 years old and was conversation between the experts who helped perfect how to do this and write the Wiki set on tuning.

I wouldn’t call the referenced post irrelevant or overcome by events, even after a couple of years. But Steve’s advice to simply follow the wiki is well said. Get the basics first. Fine tune from there with the “advanced user” parameters if results are unsatisfactory.

On the contrary, any forum discussion regarding moving baseline woes that dates back more than 6-9 months is probably outdated. Follow the wiki and be done with GPS-for-yaw config.

Looks like it is not as easy as I thought :slight_smile:

Thanks Steve and Yuri for the guidance.

Well, difficult for a newbie to understand what and what not to read or take with a grain of salt; though I understand things are progressing fast.
On one hand I try not to ask the silly questions, on the other hand documentation often does not keep up woth the lastest; hence, my list above, whihc I thoiught could summarise as a quick-start guide what to do.

In any case, I have just done the a round in front of the garage with remote control inputs to drive the mower.


[Me sitting on the mower with laptop and remote control.]

  1. Ensured the mechanical centre of the servo is the centre.
  2. I limited the servos’ travel to avoid these running into the physical limits of movement tolerated by the hydro-stat.
  3. Adjusted the linkages so that hydro-stats and servo centres match
  4. adjusted the trim in MissionPlanner
  5. put the hweel on and had a crack at it… works! :slight_smile:

Yes, I am happy…

What I observed:

  • the servos are mounted with the horn axle facing outward. This required to set the right servo to inverted in the servo software (not MP)
  • driving forward, both linkages go backward (as they should)
  • forward steering is correct too
  • driving backward and steering behaves the opposite. (Turning the stick to the right results in the mower to go left.)
  • steering in both directions is in principal aggressively fast.
    I will now follow the documentation as pointed out.

As I can see, there is a setting for MOT_SPD_SCA_BASE which might help with this?!

On that note: throttle is smooth, while steering is darn fast; not sure why this is so by default.

Again, I appreciate any pointers and direction.

2 Likes

Servo reversing can be done within ArduPilot or via servo programming. The results are identical.

I prefer to keep the servo programming bone-stock and tune the parameters within ArduPilot (including trim and limits). That way replacement is simple and requires no documentation of servo programming. That is just preference, not procedural, and it does have its limitations if servo travel must be severely limited vs the stock configuration.

You should NEVER reverse an RC transmitter channel to achieve the same result without careful thought as to the implications. Often, that results in what appears to be proper operation in MANUAL (RC) mode but any autopilot assisted mode (AUTO, ACRO, etc) will behave improperly because the autopilot doesn’t know that you’ve reversed a transmitter channel. So, for example, it will command a left turn, the vehicle will go right, and the control algorithms will spiral out of control.

You can confirm proper operation/servo directions in several ways, but the easiest is to switch to ACRO mode and see if it goes forward/back/left/right with corresponding RC input.

This page addresses your observation regarding steering in reverse. You can change the behavior, as indicated.

ArduPilot throttle has a slew rate limit applied (tailored by MOT_SLEWRATE). Steering does not obey that slew limit, counterintuitive as it may be on a skid-steered vehicle. It’s an artifact of keeping the same basic control algorithms in play regardless of whether the vehicle is Ackerman or skid-steered. There isn’t too much you can do to avoid that, but you can apply some expo in your RC transmitter to dampen the effect when driving via RC.

MOT_SPD_SCA_BASE is intended to be a tuning parameter for assisted modes and is rarely changed from default. It is speed based and likely most useful on Ackerman steered vehicles that have very aggressive steering response (to limit steering response as speed increases, which isn’t really the desired outcome here). I suppose it’s possible you could force it to result in favorable behavior in MANUAL mode, but I suspect the 2nd/3rd order effects could be negative when the autopilot takes control.

Recommend you skip the advanced steering tuning for now and get things working by continuing to follow the wiki instructions, first.

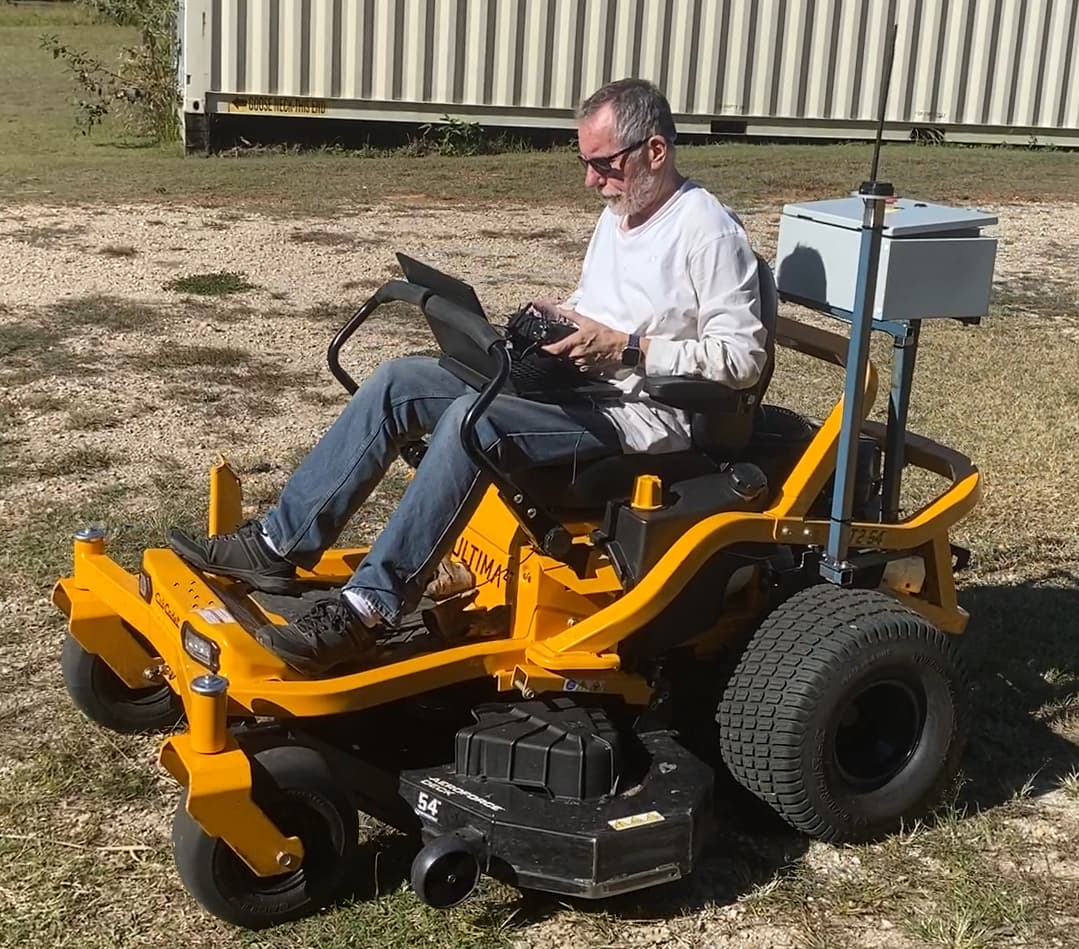
…and I wouldn’t go for too many more rides with the computer and radio in hand…as you noticed, control can get twitchy/violent in a hurry!

2 Likes

Haha… totally understand… I was in full control, as I have been aware of the fast steering response.

The reason I was sitting on it is a weird thing I didn’t dare to post…
The seat switch is as standard or primitive as it can get.
Dual throw, one NO one NC. Hence to disable it, unplug it, which will open the NC, and bridge/short-circuit the NO. To my astonishment this did not work; despite me checking the contacts with a Multi-meter. Anyway, I wanted this thing going, and the battery I used as weight would “wander” off due to vibrations, hence, I said bugger it and sat on it myself.
No need to reply, if I can’t sort this I shouldn’t build an auto-mower :smiley:


And yes, will put the servos back to standard… certainly valid points.

A brief follow-up on MOT_SPD_SCA_BASE after a review of the source code:

Speed-based steering scaling does appear to be active in all modes (selectively for MANUAL, per MANUAL_OPTIONS), however, the scaling is only ever applied as a multiplying factor that reduces steering response as a function of speed, which must be above MOT_SPD_SCA_BASE to take effect.

That’s a complicated way to say that slow speed steering response will not be (appreciably) dampened by changing MOT_SPD_SCA_BASE.

MANUAL_STR_EXPO will be introduced in the next stable release (4.4+) of Rover to help combat the rapid steering response that you’re experiencing.

2 Likes

Which flight modes should I set up for a skid-steer mower?
As in, which are useful?

(I think I have Auto, manual, and maybe another; “maybe”, because I am not connected to the mower in the detached garage ATM; 32 deg F ATM.)

I would suggest Manual, Auto, and guided if you are just using a a 3 position SW. there is a way to get six modes using another radio channel. I don’t have a spare radio channel so I just stick to 3 modes. Manual needs to be at the top so when the SW is up you are in manual position to start out with. I find the guided mode useful sometimes to lead the mower around with the computer.

In response to a few questions I’ve received… @Ger_H @Jan_Hacek @Matt_Angilley

For blade motors I use these

from Chongqing Yurui Agricultural Machinery Sales Co., Ltd. https://cqyr.en.alibaba.com/minisiteentrance.html?spm=a2700.details.cordpanyb.2.9e321d13q4s0om&from=detail&productId=1600620146469

For blade motor controllers I’m using Flipsky FSESC FLIPSKY Mini FSESC6.7 PRO 70A base on VESC6.6 With Aluminum Anodized H (Make sure you isolate these speed controllers from your flight controller otherwise you’ll fry one of them!!!)

For traction motors I’m using these 63100 140KV Sensored Version Brushless Motor for Electric Skateboard s – Dongguan Freerchobby Co.,Ltd 80Kv model

For traction gearboxes the Neugart PLE 80 PLE - Neugart USA Corp.

For traction ESCs benjamin vedder’s VESC 6 controllers VESC 6 75 (Make sure you isolate these speed controllers from your flight controller otherwise you’ll fry one of them!!!)

2 Likes

Thanks for sharing, Chris! I’ve been curious what’s under the hood. Quite the chore to find compatible hardware at decent prices, and I’m sure this will help some folks.

Hey Chris, I have always wondered if anyone has taken a Ryobi or Ego electric zero turn mower and put an Ardupilot setup on it? I figure you know what is going on in the electric mower universe. The consumer electric mowers I’ve seen look way underpowered to do big mowing areas. I was just curious about what people have done in this area.

Don’t have any insight to that, sorry

Is the centre of gravity for the zero turn mower:
a) where the diagonals from wheel to wheel cross, or
b) middle of the rear axle?

I am asking because of the weird results Yuri got here:

I think it should be b)


I have done all the tuning as far as I can tell.

I reset the servos to standard.
I inverted the right servo direction in the MP servo settings.


What should the emergency stop kill? E.g., run away mower?
a) kill the engine, thus mower stop
b) kill all power (also kill the flight controller)
c) something else


I also noticed that the mower points in the opposite direction on the map in MP. I swapped the GPS antennas for a quick fix, still the same, as in no change of direction.