Hi, I am still trying to get my rover working but already see an issue in that I want tit to start without some ground control hand held machine. Maybe on a timer or when it reaches “takeoff” point on gps. Long term I want the rover to sleep in a shed with a induction power charger and wake up on its own and run a GPS course then return to base and recharge. I guess a timer based would get me off in the right direction. Anyone any tips for this? It seems that everyone expect you to have a hand held machine to initiate start.
I believe you will need a coprocessor that can give commands to your Flight Controller over MAVLink. That could be one of several types: Raspberry Pi, Arduino, Odroid, full PC, etc. There are examples of how to use MAVLink on these. For instance: MAVLink and Arduino: step by step. But if you search, you will find more examples and documentation on how the protocol works.
I have plans to use a coprocessor on my current lawn mower rover and on future agricultural vehicles but I have not delved into it yet.
Good luck and please keep us posted on how you progress!
There’s a NAV_DELAY parameter that is implemented in Copter but not yet implemented in Rover. This allows setting a start time for a mission to start. I think it’s already somewhere in our to-do list to add it to Rover.
2 Likes
Kenny I have a pi 0w I could use but I am sure its not trivial and it seems odd that this is not a normal process for ardurover. Is the assumption then that everyone has an expensive hand controller just to start the machine?
I did see someone on one discussion say there is a setting where you can “kick” it to start it but that seems a bit risky. I’ll look it up and post if I find it. But currently I am aghast that just to test this tank I need to buy a set of devices to click “start”. Anything I learn I will post as without you guys help I would still be struggling with connections. These forums are ace.
the vehicle can also be armed and a mission can be started from the ground station. It’s not really a great idea to have a vehicle with no manual control. a transmitter is not necessarily very expensive … there are some available that are under $100.
1 Like
OK I found the page and will try to set up a switch as described. It does say you can kick the rover but that sounds a bit risky.
http://ardupilot.org/rover/docs/startstop-switch.html#startstop-switch
I 100% agree with @rmackay9, I can’t imagine not being able to drive the vehicle with a handheld remote, for troubleshooting, tuning, etc. I can recommend this for about $50.00: Radiolink T8FB 8CH RC Transmitter and Receiver R8EF 2.4GHz Radio Controller SBUS/PPM/PWM for Racing Drone/Fixed Wing and More (Mode 2) https://www.amazon.com/dp/B07DPK9Q9X/ref=cm_sw_r_cp_apa_i_zLDrCb0QKVR74
It is what I’ve used for months. Has about a 1500 feet range for my mower.
Randy, once NAV_DELAY is implemented, will Anthony be able to have have the mission start without a ground station or RC transmitter?
You are going to want some form of manual control. I think everyone with a Rover will tell you that tuning the Rover for autonomous use is not so trivial and chances are good you will run into objects as you advance. It’s not like an aircraft where a few meters, or 100’s of meters, is allowed w/o getting into too much trouble. On the ground 1m can make the difference between a successful mission or a crash.
1 Like
Well put @dkemxr. I have hit the control on the remote to switch to manual many times just in the nick of time (and sometimes NOT quite in the nick of time). No time to fumble with a keyboard or mouse.
1 Like
Yes, as have I. I came to Rover from a good bit of experience with Plane and Multirotor missions and it was eye opening to realize the hazards of being on the ground. I don’t have RTK GPS so just the basic positional precision can be problematic and it’s exacerbated by typically getting less satellites on the ground so HDOP is higher. It sure is a fun challenge though!
1 Like
Ok I bow to the inevitable. I found this same set at Unmanned tech of £48 and have ordered it. I guess the reality is that it will take time and much effort to create what I want and in the mean time it will make testing a lot easier. Thanks everyone.
1 Like
Kenny,
The user will still need to arm the vehicle with a TX or GCS and switch to Auto but if a NAV_DELAY command is the first command the vehicle will just sit there until the specified time (or delay).
1 Like
OK Kenny over to you for advice. I sourced the same transmitter receiver here from a company called unmanned tech which were local and helpful. I just unpacked it and I could do with some help here. The transmitter seems straight forward uses 4 AA battery I think. But the receiver is a tiny thing with just a bunch of pins at one end. I see no connectors and I am wondering how to connect this to pixhawk? Also they recommend a cell phone app to set up, but I am not sure if this is needed or if the pixhawk setup is different. I not you have been using one for a while.
I know I did not use a cell phone app. I do not remember doing anything via USB. Although, I see that the default alarm for battery voltage is 11.1Volts. I run on 4 AAs for about 8 hours before I start getting the low battery alarm. Maybe I did use USB to lower that alarm point, because it would alarm all the time with just a 6 volt supply at the default. I really don’t remember doing anything, though. I would not worry about this unless you get the battery alarm too soon. By the way, the batteries in the transmitter seem to last about 8 hours for me. You can use a LiPo Battery.
The only steps I took were to follow the instructions in section 1.2 of the manual (http://image.helipal.com/helipal-radiolink-t8fb-manual-v2.pdf) to bind the receiver to the transmitter and to put the receiver in SBUS/PPM mode. Then you just connect the S.B./CH1 channel on the receiver to the RC IN channel on the Pixhawk with a standard 3-wire PWM cable. That’s it.
Ask if you have more questions.
Kenny and others. Now showing the depth of my ignorance.

So how exactly does this connect to pixhawk?
Sbus/chan1 out of the Rx to to RCIN on Pixhawk.
Ok thanks. Did that. As per instructions I turned on the transmitter first and then the receiver powered via phawk. I pressed the almost invisible black button twice. There is a red led that flashes. After I pressed it did flash several times and once flashed very bright but it continues to flash regular not a continuous red as the instructions say. I turned of the TX and the light went off and then I repeated so it is talking but not sure its right. I guess when I get a motor working I will know for sure. On that front I bought two quickrun 1625 brushed controllers see image. Now another question I assume the yellow connector is for the lipo but it is not a size I have seen before my battery has a larger connector with two copper flat bars at right angles.
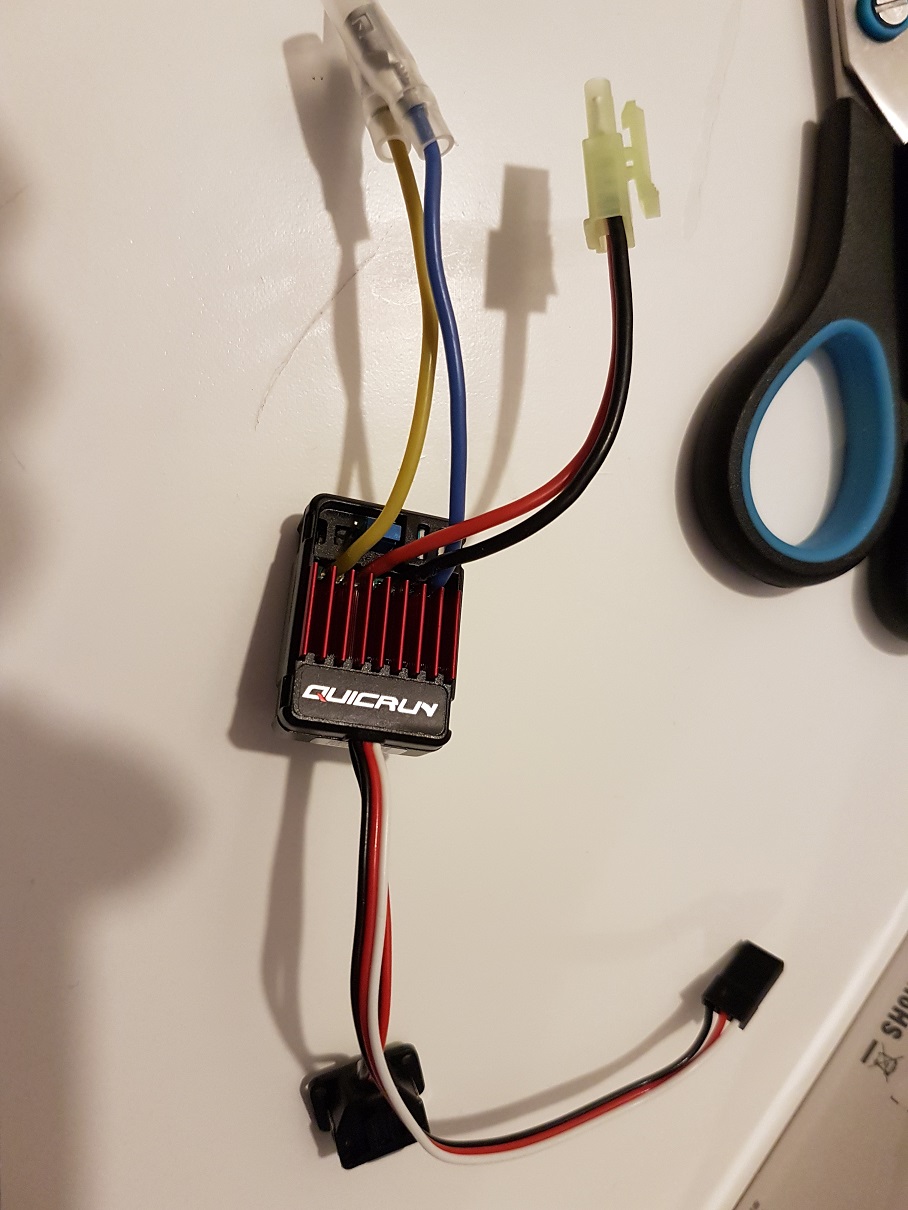
Red and black are battery, yellow and blue are motor. Check the manual.
You don’t need a motor connected to see if your Rx is working. Check in the Radio Calibration screen of Mission Planner.
1 Like
Tony,
I have not touched the setup of the receiver since I first got it about 8 months ago. But, since I have the exact same receiver, if you determine that it is not working, I will go through the setup again on mine to see how it works for comparison. So, as Dave said, check that your radio channels are being received by Ardupilot on the Radio Calibration screen under Initial Setup - Mandatory Hardware (like what you see here http://ardupilot.org/copter/docs/common-radio-control-calibration.html) and report back.