No, they are specific to the mechanical characteristics of the board and the IMU
1 Like
But yes, you can use the same calibration file for the same board on any ArduPilot firmware on any version.
1 Like
Perfect. That’s what I was wondering. Thanks.
I noticed @andyp1per used the internal calibration, and @amilcarlucas is using the python script. I see reasons and advantages to each, but the calibration settings aren’t exactly the same. From an operations/flight perspective do the calibrations each generate make any significant difference down the road?
1 Like
The only real difference is that you can verify the results and that the board didn’t move with the python script. With the internal process it is not possible to verify the quality of calibration.
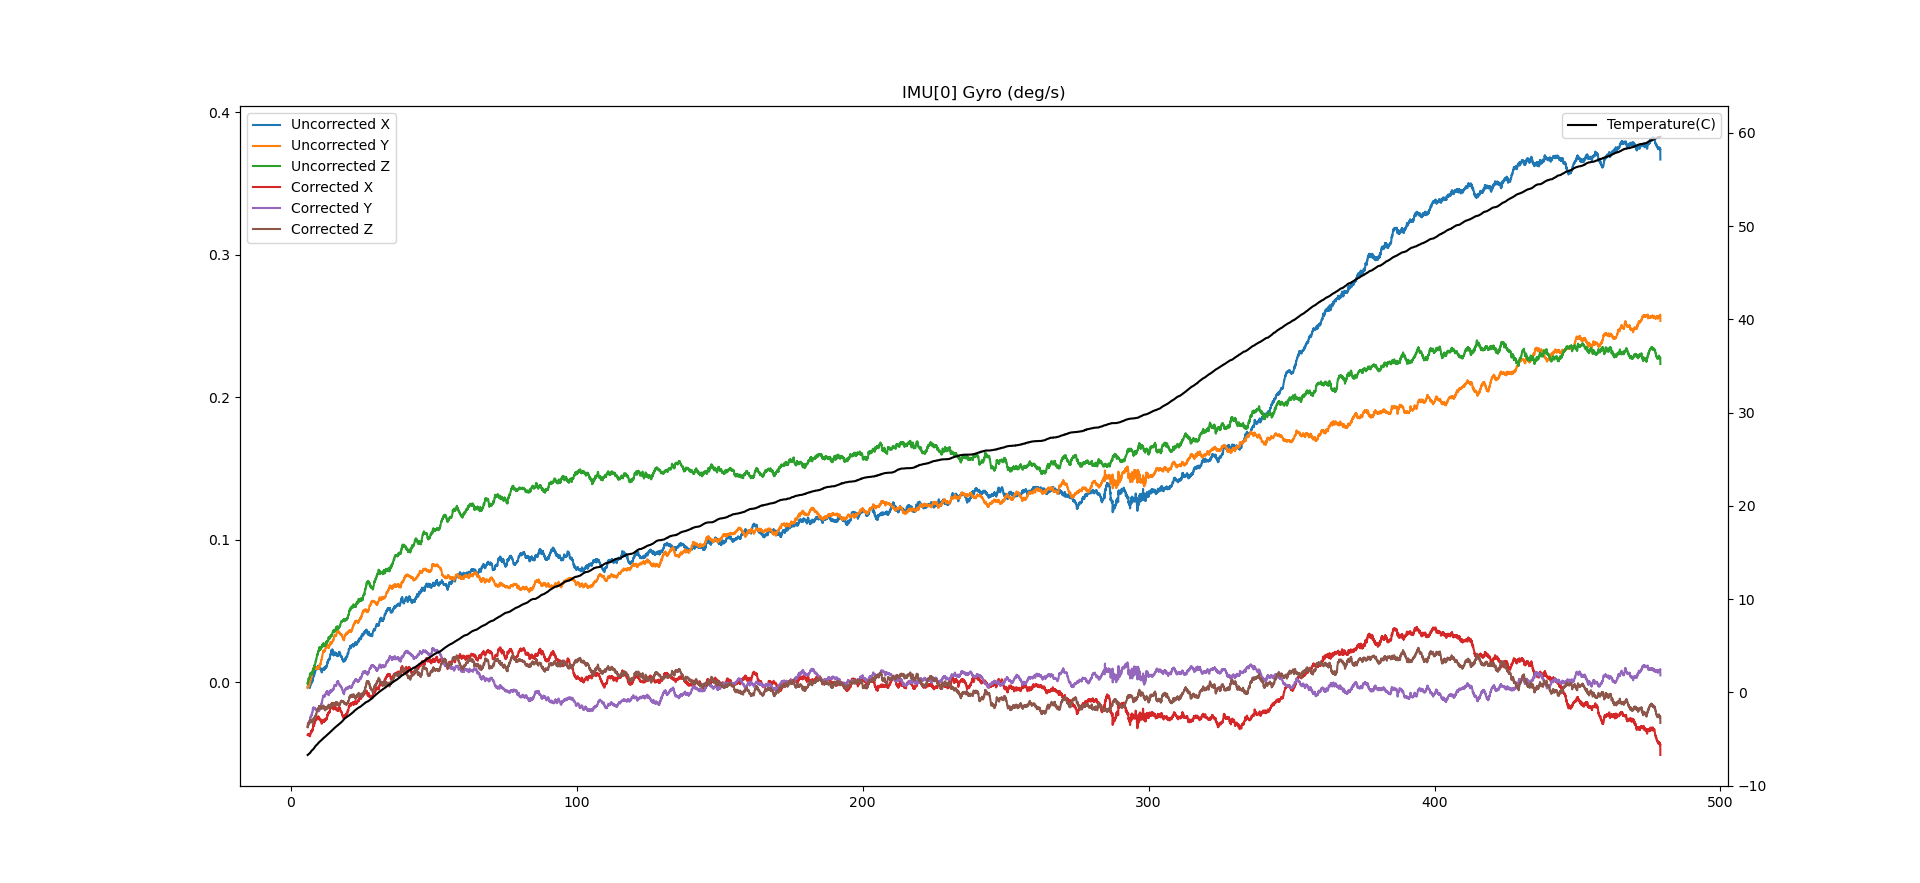
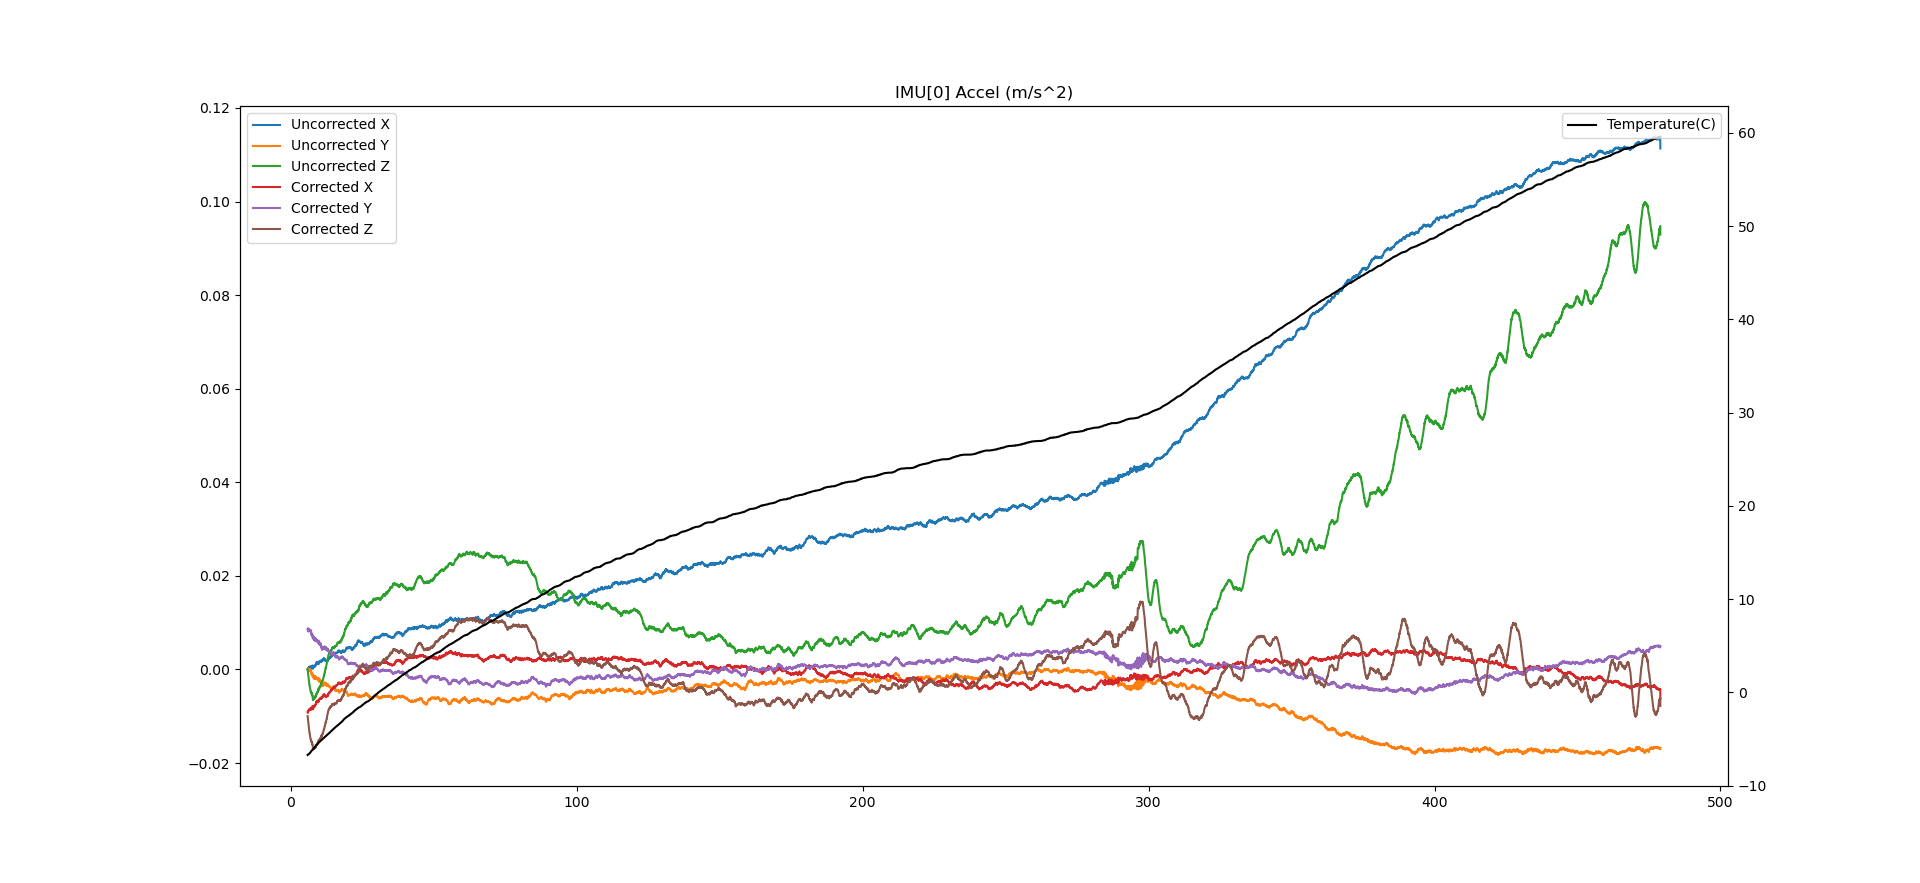
Hi @amilcarlucas Sir, I have performed the IMU temperature Calibration and here is the results:
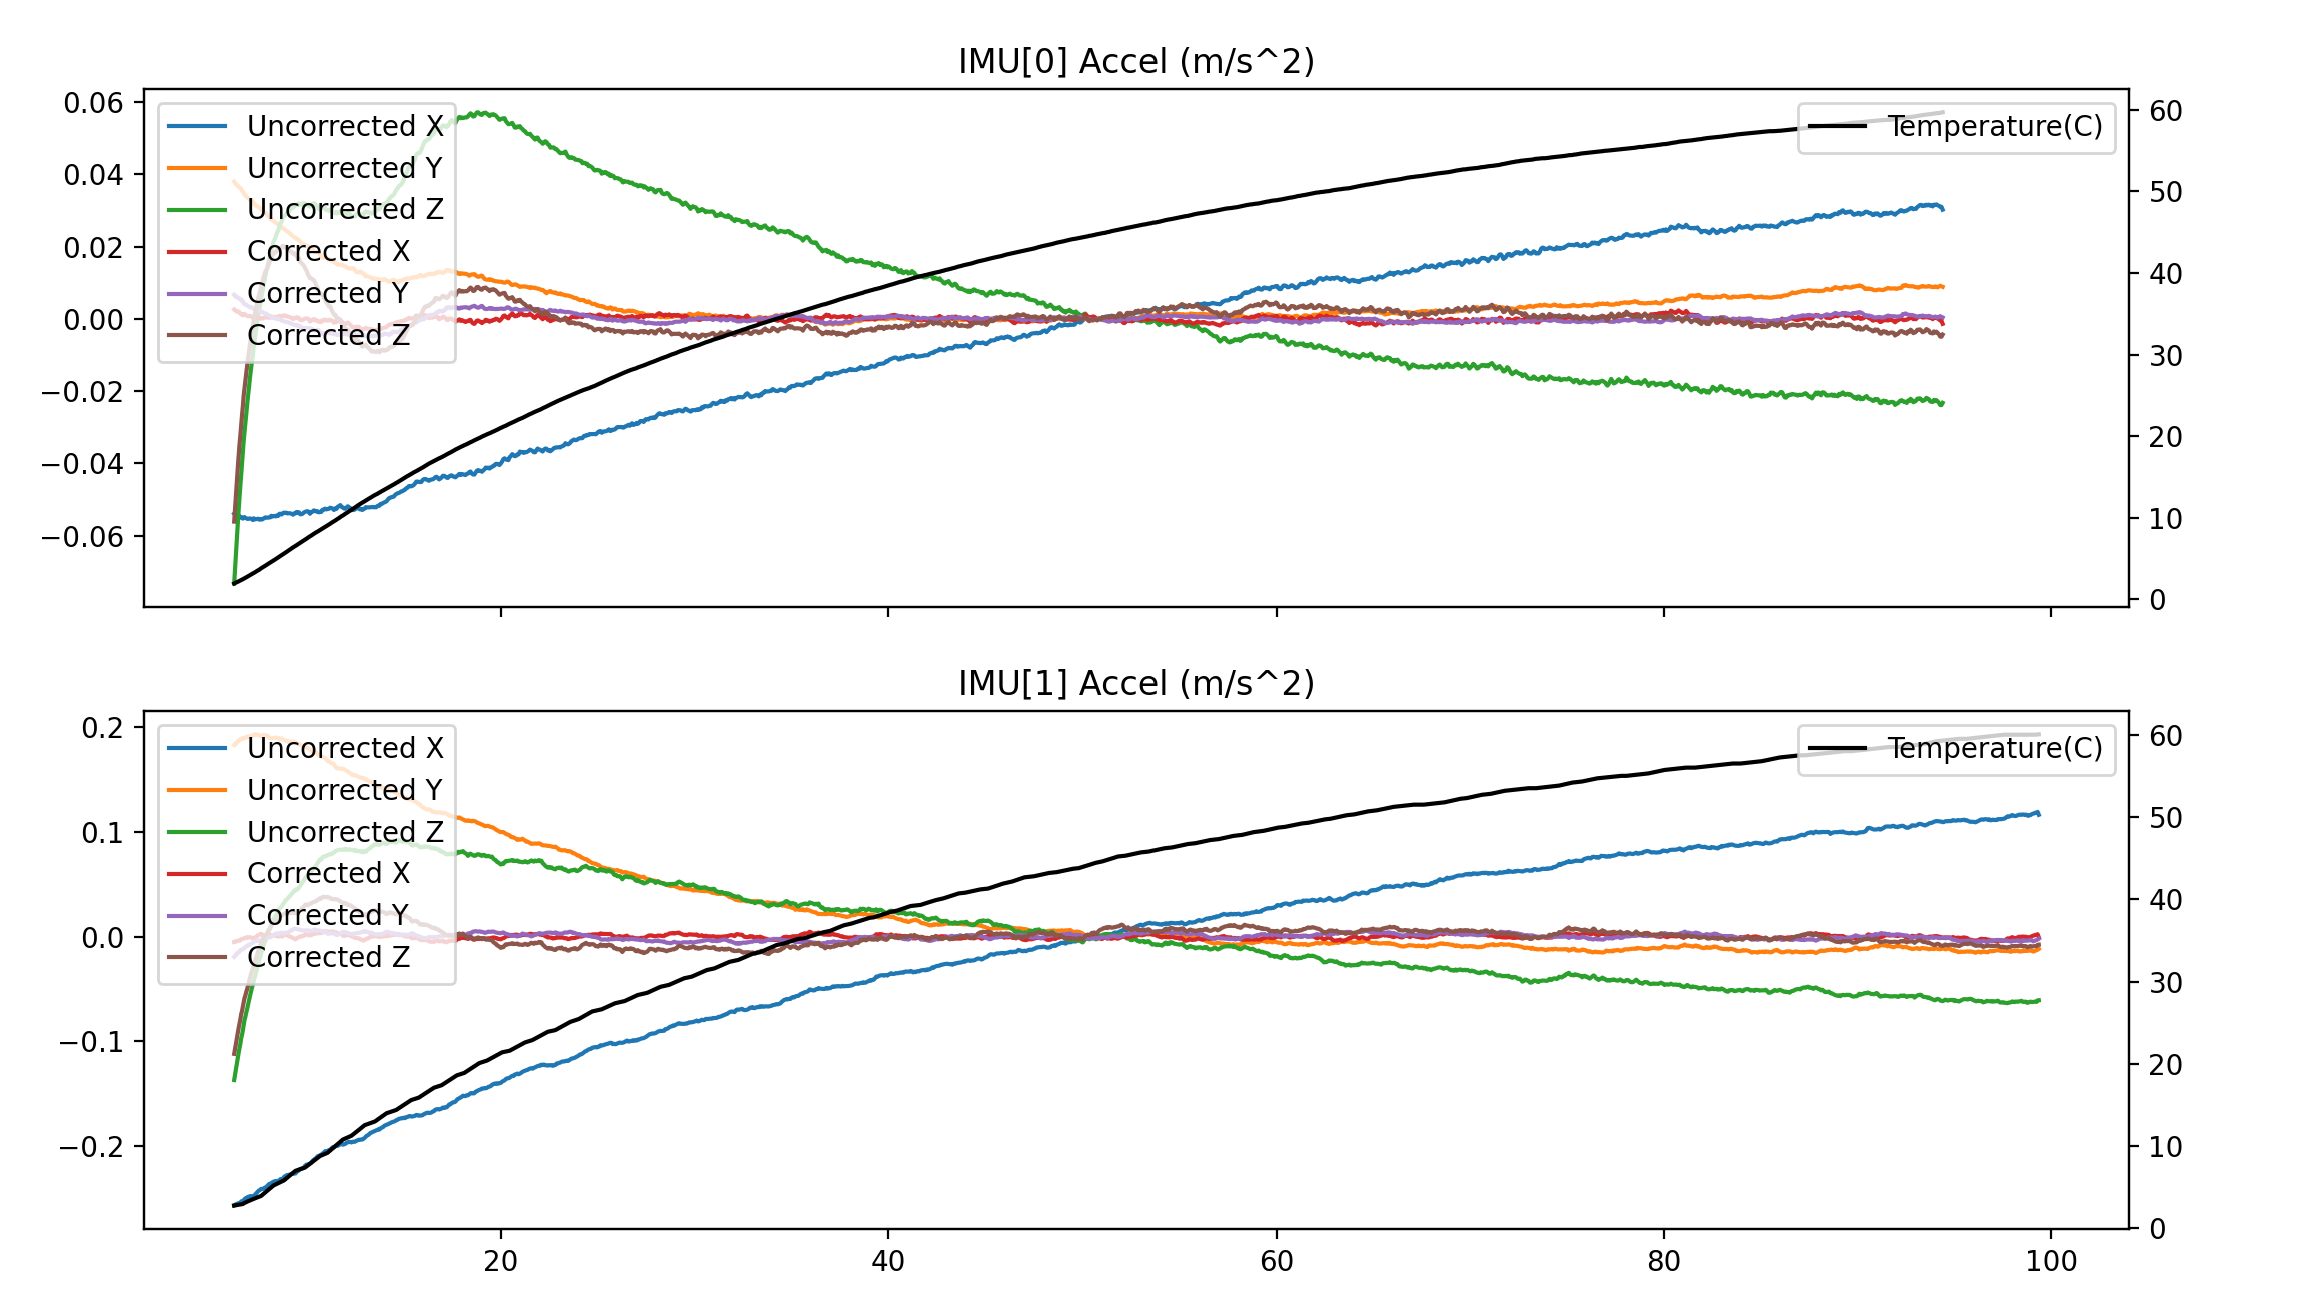
My FC is Pixhawk 6C. As per the wiki, the above graphs are good except the Gyro1. It is showing some kind of noise. Here is the logs for your reference: https://drive.google.com/file/d/1N4QxUCL0WPSB40AVOgVq-zN2Nn59f-_q/view?usp=sharing
I really want to know your views on this calibration. Do I need to calibrate it again? I have not placed the Pixhawk flat during this calibration, I know it does not matter. Thanks! Will be waiting for your response.
1 Like
It is not important to be 100% leveled, but it should be placed close to level.
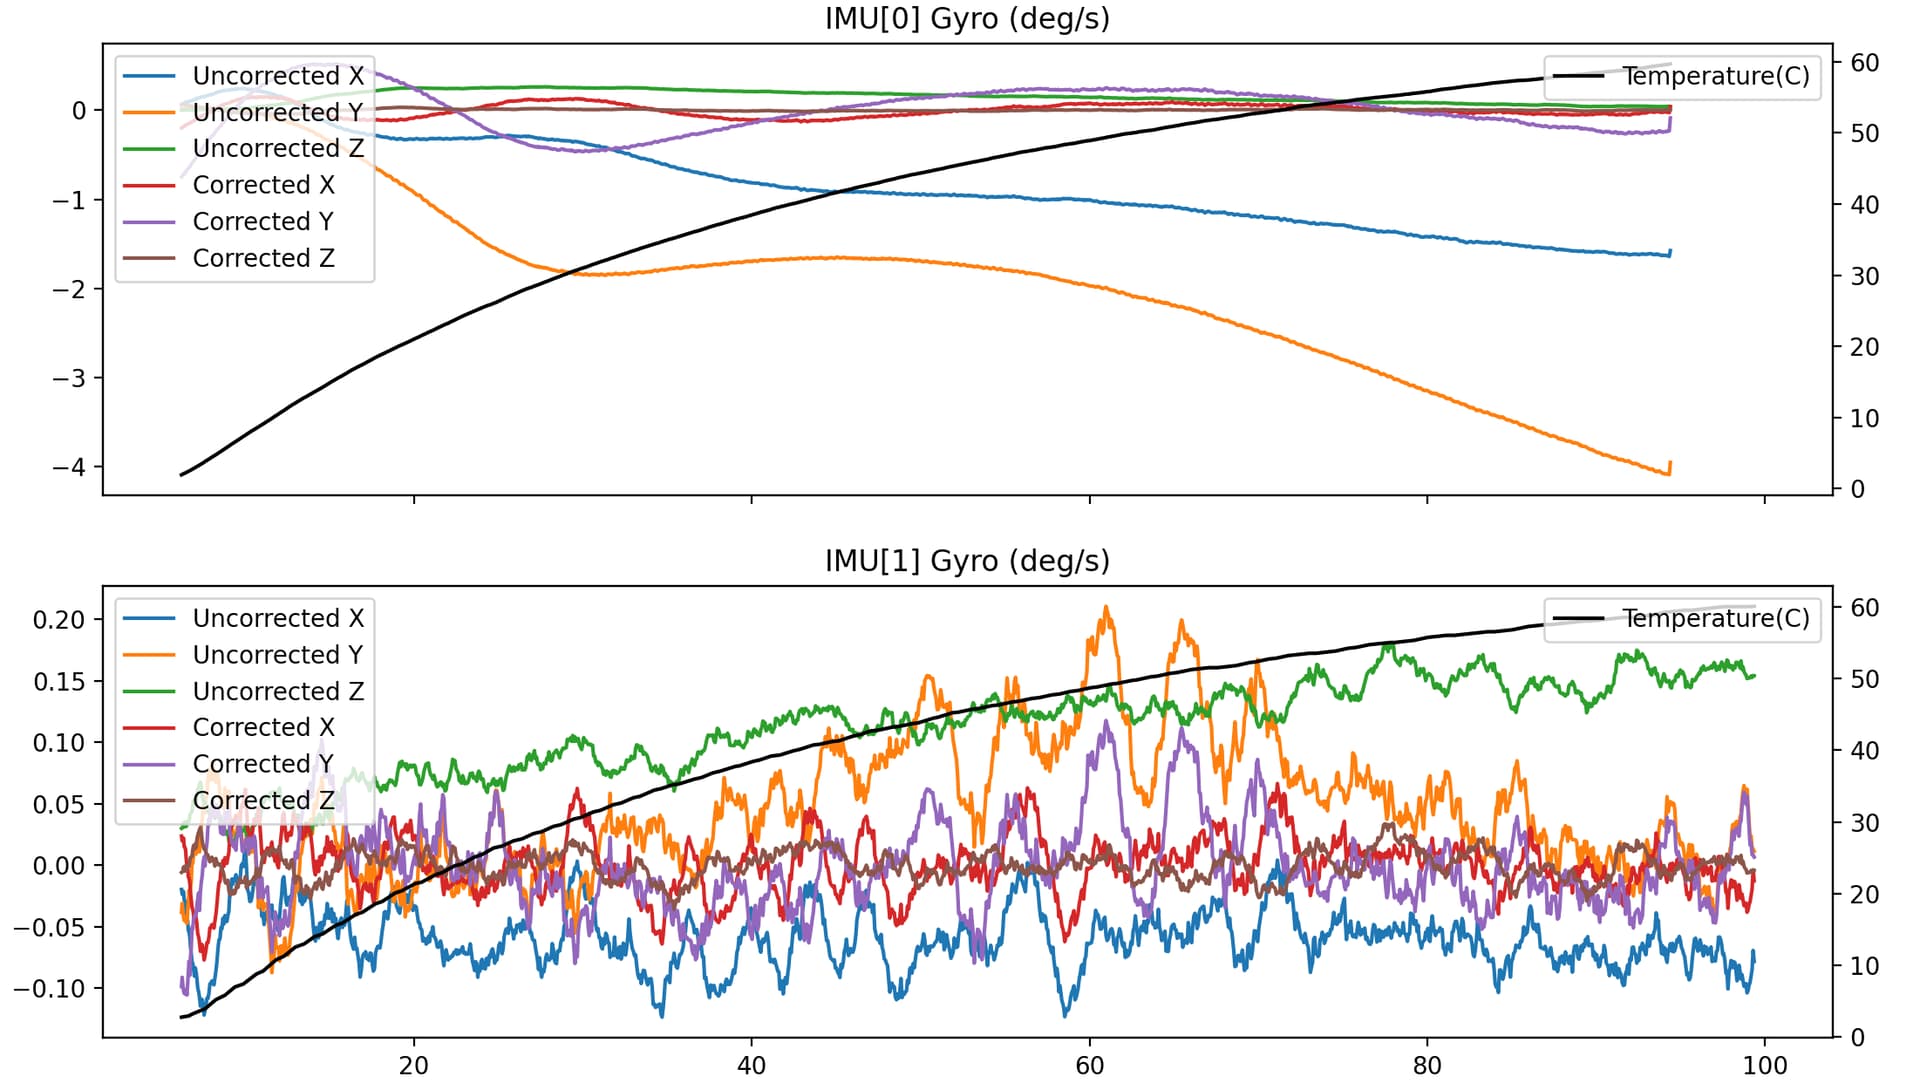
The Accels look good, and I guess your Gyro 1 is a bit noisy, but looking at the Y scale it has less drift than gyro 0.
The temperature curve is nice 0 to 60, well done.
The only curve that is a bit strange is the Uncorrected Y on gyro 0, that one is not monotonic and that produces a non-fully-corrected Corrected Y.
I would repeat it.
1 Like
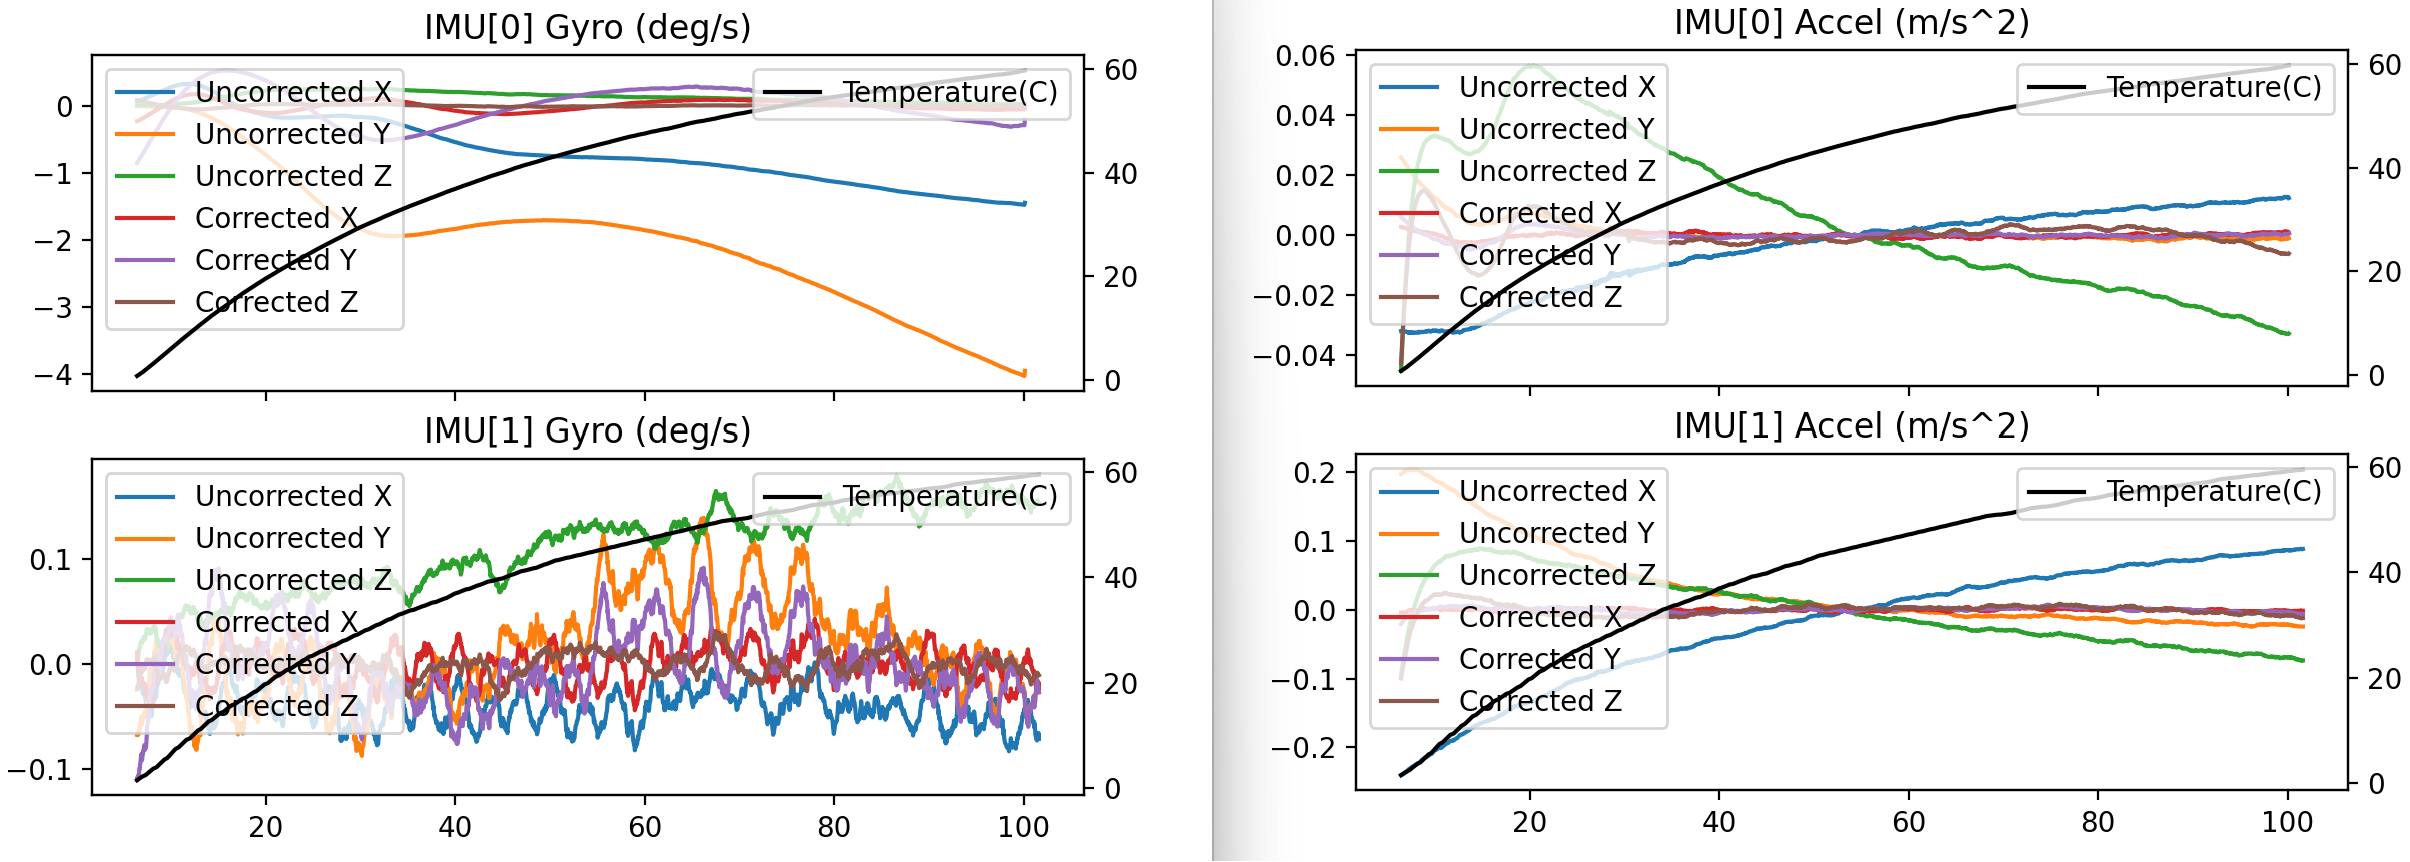
Hi @amilcarlucas, Thanks for your response. I have done few more IMU temperature calibration but in all the test, the Uncorrected Y on gyro 0 is not monotonic. It is same in each calibration. Just for the info, I have set the BRD_HEAT_TARG to 70 as per the instructions given in wiki and powering it on in a room temperature instead of powering it on in upper temperature environment(as 6C has a heater). My Temp calibration is completed within 2 minutes in each time. Can the internal heater cause this noise in Gyro1?
Test 3rd:
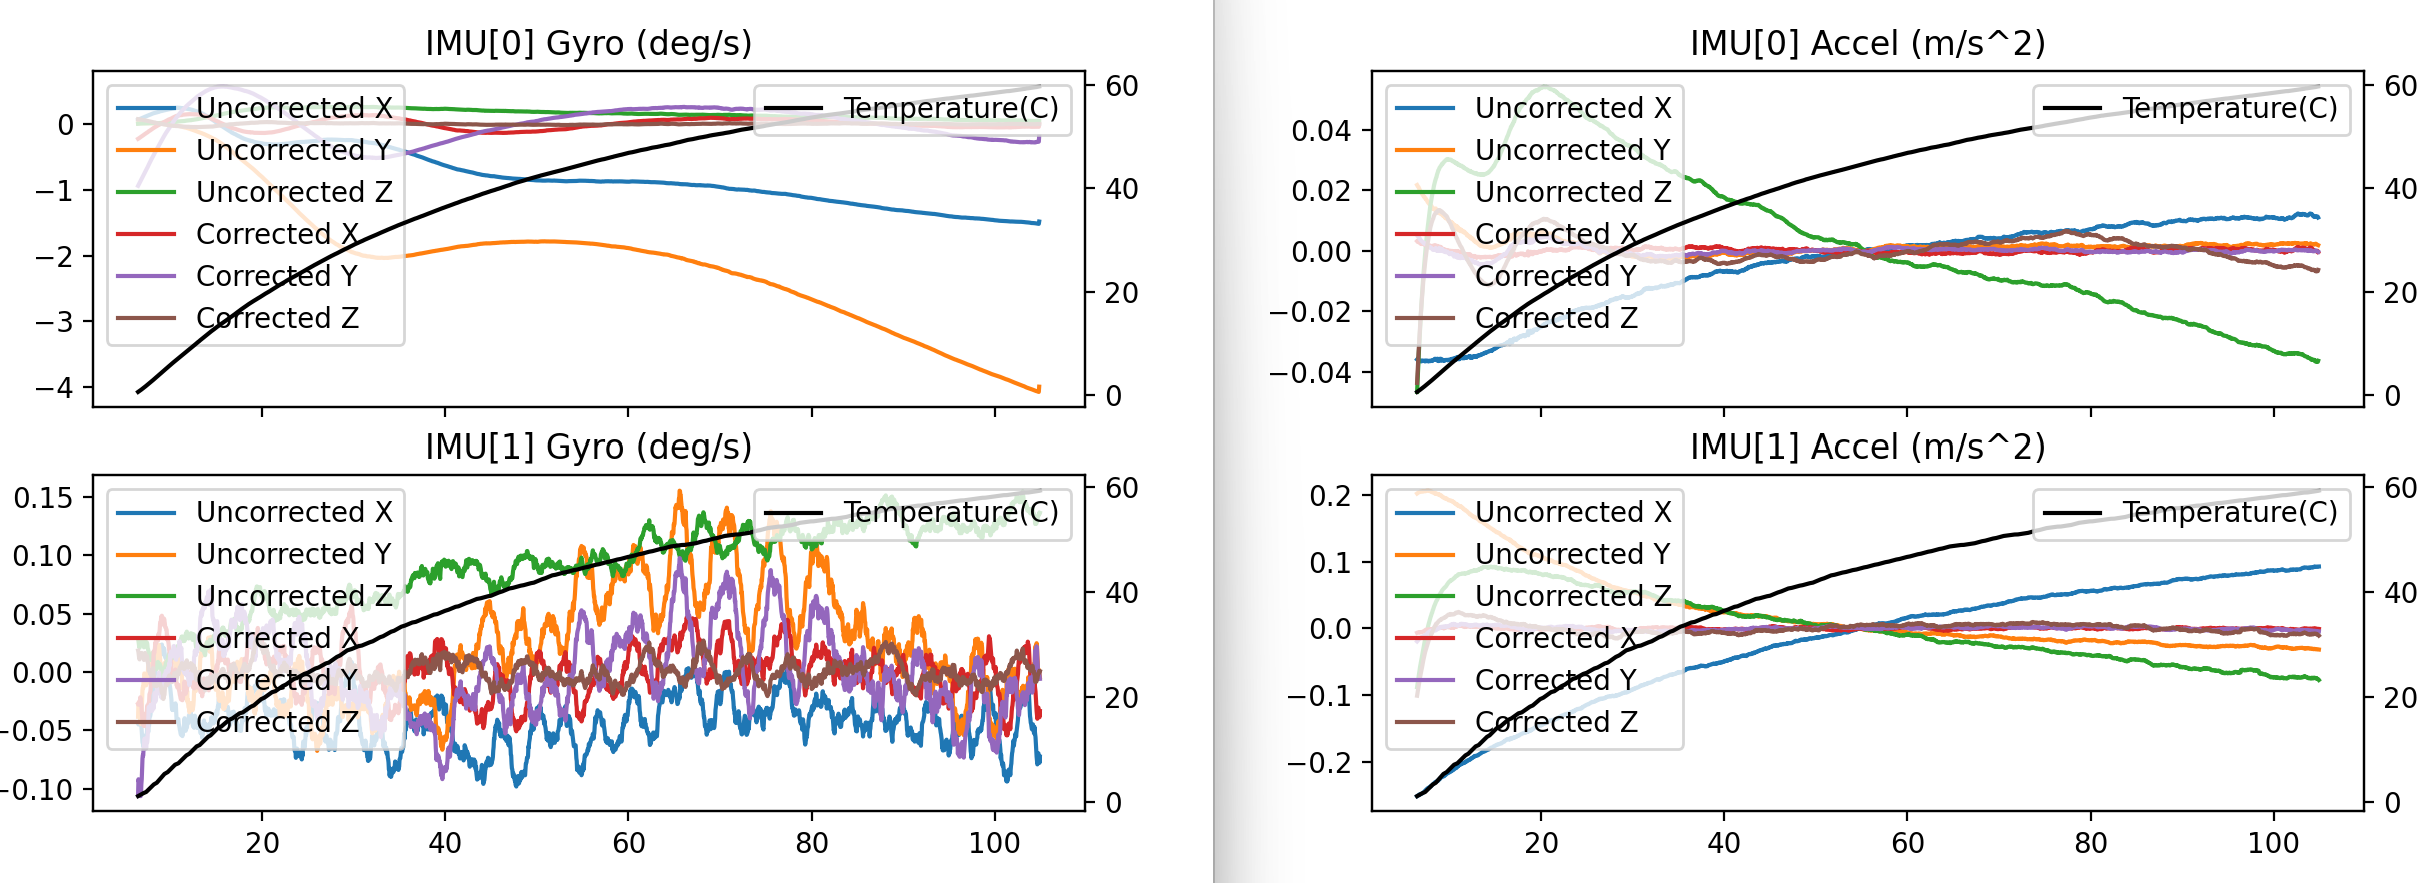
Test 4th:
a
Thanks! Will be eagerly waiting for your response.
You should always power it at the lowers temperature, right after taking it out of the freezer.
But the graphs look good and reproductive, so I think your gyro 0 is not very good. But after calibration it is a bit better
1 Like
Hi @amilcarlucas, Thanks for your quick response. Yes! I have always powered it right after taking out of the freezer in the room temperature (around 28C).
Ohh! I have not used this 6C much. Is it a defective one or all 6C gyros perform the same? do you have any experience on Pixhawk 6C?
No experience with that one. Test it in an unimportant test vehicle first.
1 Like
Hi, I’m a beginner and I wanted to ask you …scientist…bala…which program you use to get these graphs and how the trend of the various lines should be interpreted. Grazie
@Luciano_Andreani just follow Methodically tune (almost) any multicopter using ArduCopter 4.4.x the program and the graph interpretation is explained there.
1 Like
This is a good question, I have noticed this too. The online and offline calibration both have significantly slightly different results. Which one we should go with?
Why do we need to calibrate the IMU before performing the Temperature calibration? and if I again re calibrate the IMU after performing the Temperature calibration then will it create any issue?
As per I understand the Tempt calibration will calculate the IMU offsets based on the temperature change and could be helpful in the FC which do not have inbuilt heaters.
As my FC has inbuilt heater and it is going to heat the IMU at 45C no matter what is the outside temperature. So for me does the below 45C offset really make any difference?
Sorry If I understand it wrong, just trying to find the logical explanation. I hope @amilcarlucas would answer these.Thanks for your time.
I answered you on the other thread: How to methodically tune (almost) any multicopter using ArduCopter 4.4.x - #115 by amilcarlucas
1 Like
Thank You So Much @amilcarlucas, I really appreciate your help and support. Btw, I am going through each steps of your tuning process and understanding the things. I hope you don’t mind me asking few more questions about other things.
Please do. I hope I can make it clearer.
And please do post your edited .param files on the other thread
More experiments with unheated boards.
So this board (Matek F743-WLITE, not mounted yet) heats up to about 30-35c or so on it’s own. To get higher temps I tried first with my better half’s hairdryer, but that created so much vibration that the data wasn’t valid. (as seen in the uncorrected x&y accel graph) So I took a second shot but I got the bright idea to use the bed of my 3D printer as a calibrated heat source. As you can see in the graphs it worked much better, but I’m wondering about the shape of the temperature climb. You can see when I turned on the bed as the change in climb of the temperature.
@amilcarlucas Is it okay that the temperature climb isn’t linear? Is it worth doing again and turning the bed on sooner so the temperature climb is more consistent?
The temperature climb is not linear anyways. It is typically logarithmic, so that is not an issue.
And the temperature corrected curves do look a loot better than the uncorrected ones.
![]()
Yes, you’re right. I think what I was looking for consistent, not linear. But either way I think you understood. Thanks for getting back to me. I’ll go ahead and mount this one now.