I’m sorry if my English is a mess, sir because I am from Indonesia, my English is not very fluent 
New board from stupid vendor.
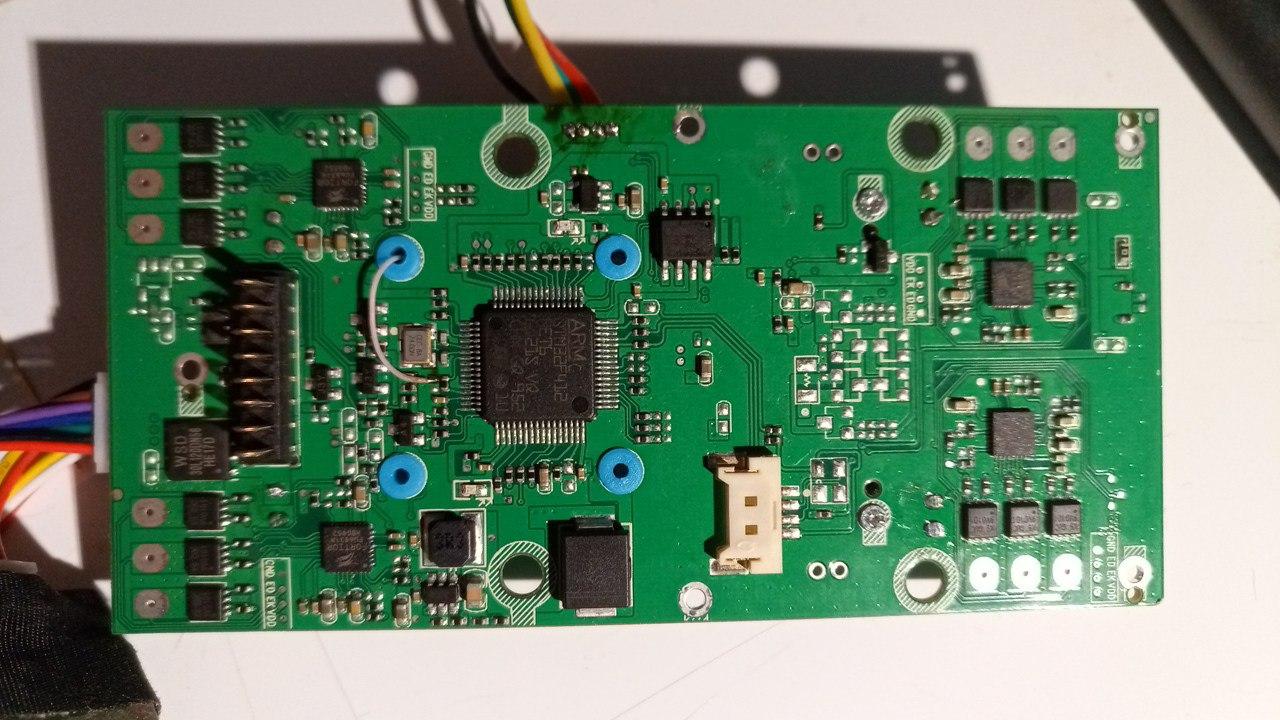
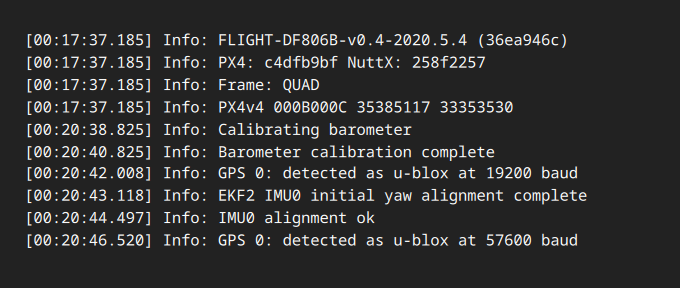
STM32F405 -> STM32F412 and fresh codebase
ROM:080797A4 0000007B C /home/yang/test_hardware/test_hardware_f806B-v0.5-2020.5.12/ardupilot/modules/PX4Firmware/
full firmware dump, useful if you have clean stm for replace
v2.5_stm32f412ret6.bin (512 KB)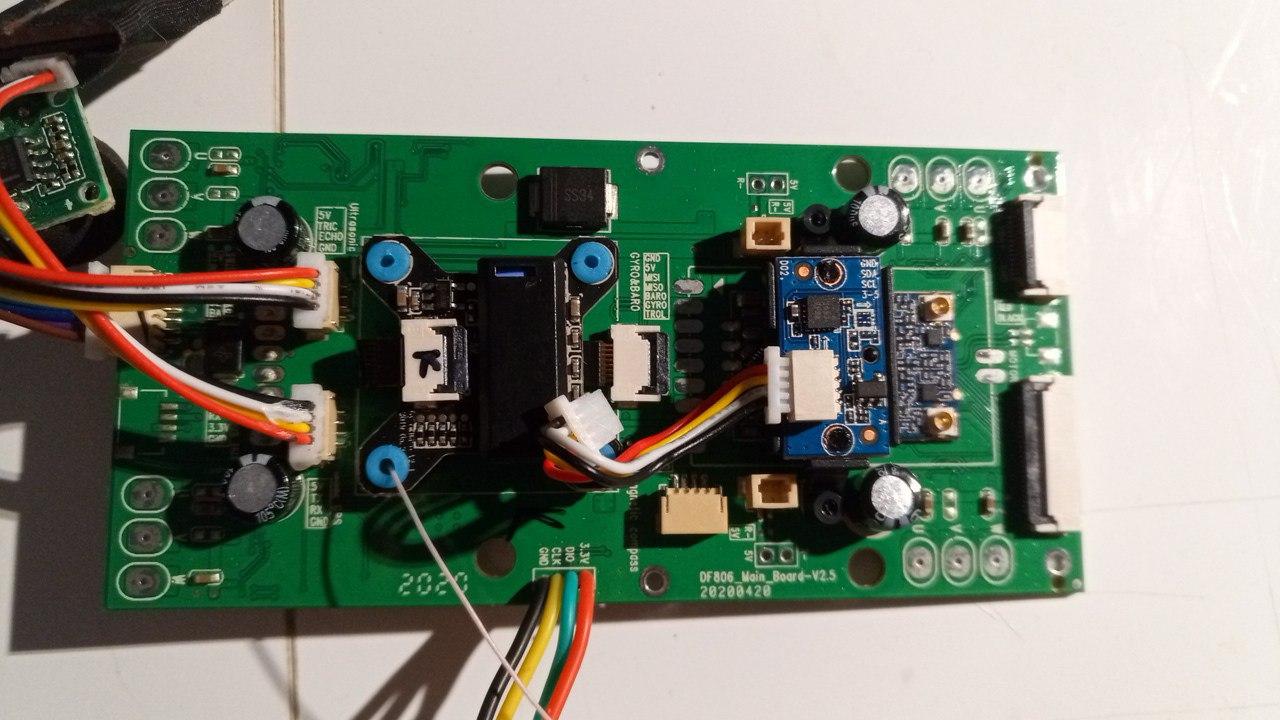
1 Like
1 Like
Very interesting, thank you.
hello, I have the same plate that you got me yesterday the surprise was to put everything back and correct welding etc … the drone does not start giving purple light and blinking … what could it be?
Hello, i found out some approach that can help to change ArduCopter params via WIFI and Android cell phone. That approach doesn’t require a SSH or USB connection to your drone.
It might be useful for those who want to change some parameters and continue use default app and doesn’t want solder a USB connector to his drone.
Ok let’s begin.
As we know, EnjoFly can change some parameters of drone (if to be more precisely it’s maximum possible altitude and flight mode). That’s mean that app communicate with Drone with some protocol. After analyzing the APP-> Drone network traffic, i found out that APP send some data through 10005 UDP port.

These messages were MavLink packets, It can be recognized by marker byte 0xFE of each message (MavLink V1).
As we know, the UDP protocol doesn’t require an establishing connection, that’s mean we can send our data to this port, namely MavLink messages.
Main problem that we can faced with is how we can build a MavLink messages? Ofcourse we can write some packet builder, but there is some easier way to do that.
There is famous app named QGRoundControl. It understand and generate MavLink messages.
That all we need, just connect QGRoundControl to drone’s IP (by default 172.50.10.1) and 10005 port.
But it’s not that simple. Drone won’t communicate with QGRoundControl, until App (EnjotFly) verificate the Drone. (App probably initiate connection with drone).
In order to initiate MavLink connection, we just need:
- Connect to our Controller or Drone
- Launch the EnjoyFly
- Wait until the button says “Start Flying”
- Press that button
At this point, we have MavLink’s opened port. Don’t close the APP, just minimize it, and allow him work in background.
Then:
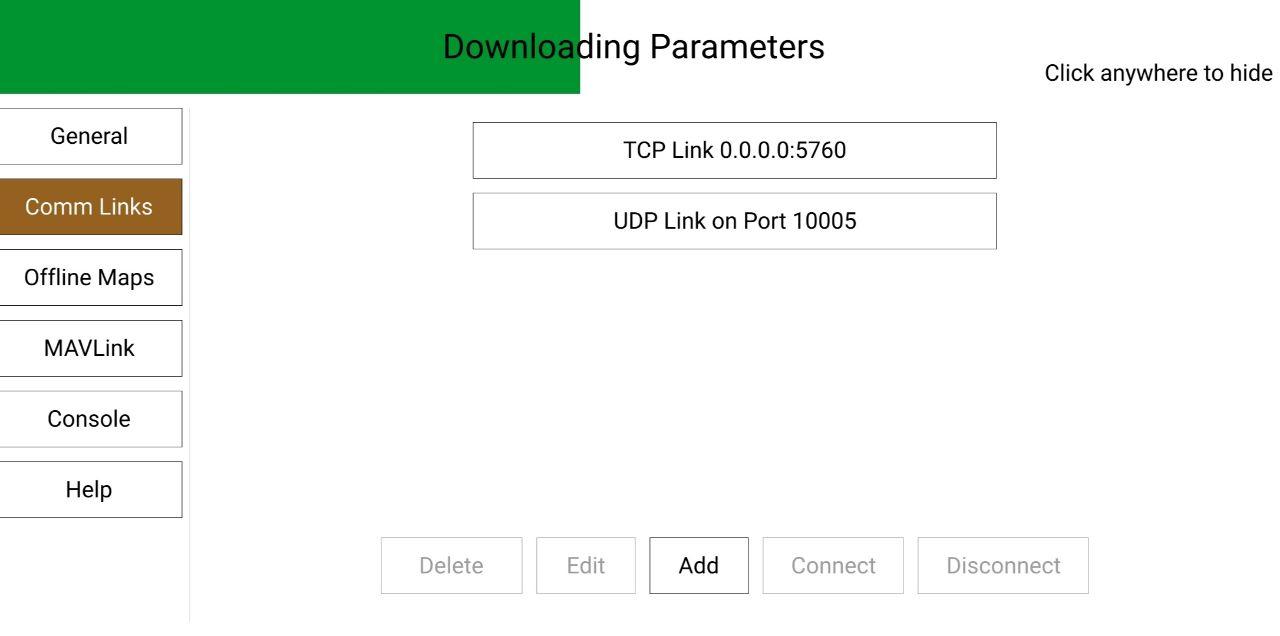
- Open QGRoundControl,
- Click to left-top purple button
- Choose from left menu “Comm Links” and click to “Add”
- In “Type” field, choose UDP.
- Now type in “Listening port” 10005 and in “Target Hosts” the drone’s (or controller’s) ip (by default 172.50.10.1)
- And click “Add”
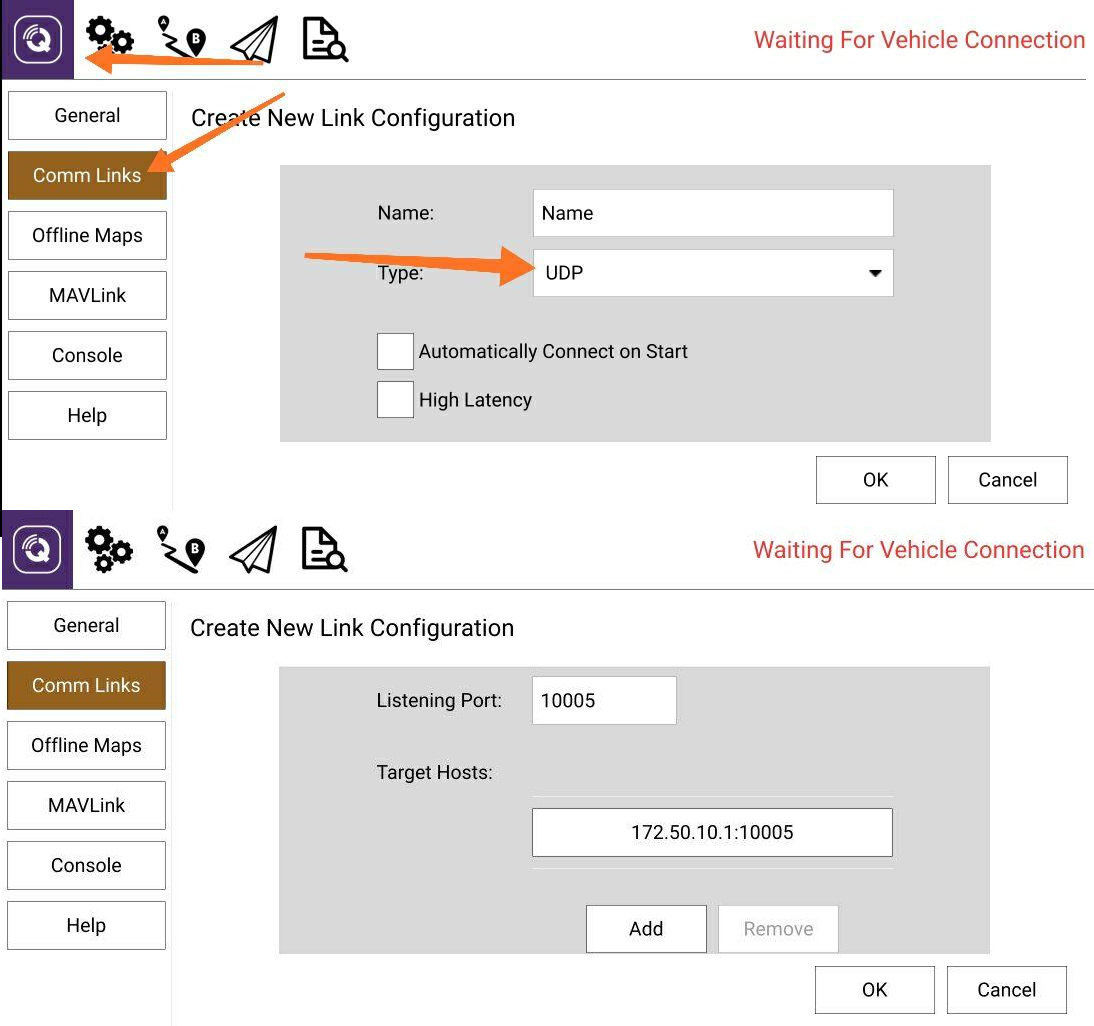
Having added the new host, just choose it and click “connect”. After several seconds the app should connect to drone, and start read drone’s parameters.
If that didn’t happend, probably the MavLink connection hasn’t initiated by the APP (EnjoyFly). You should close all apps, reboot the Drone and start again.
If everything is OK, you should see the battery voltage, and some other parameters.
In order to change ArduCopter parameters, go to “Settings” and choose “Parameters”,and here is you can change drone’s parameters.
In this app you can choose the flight modes, or maybe launch some Mission (not tested).
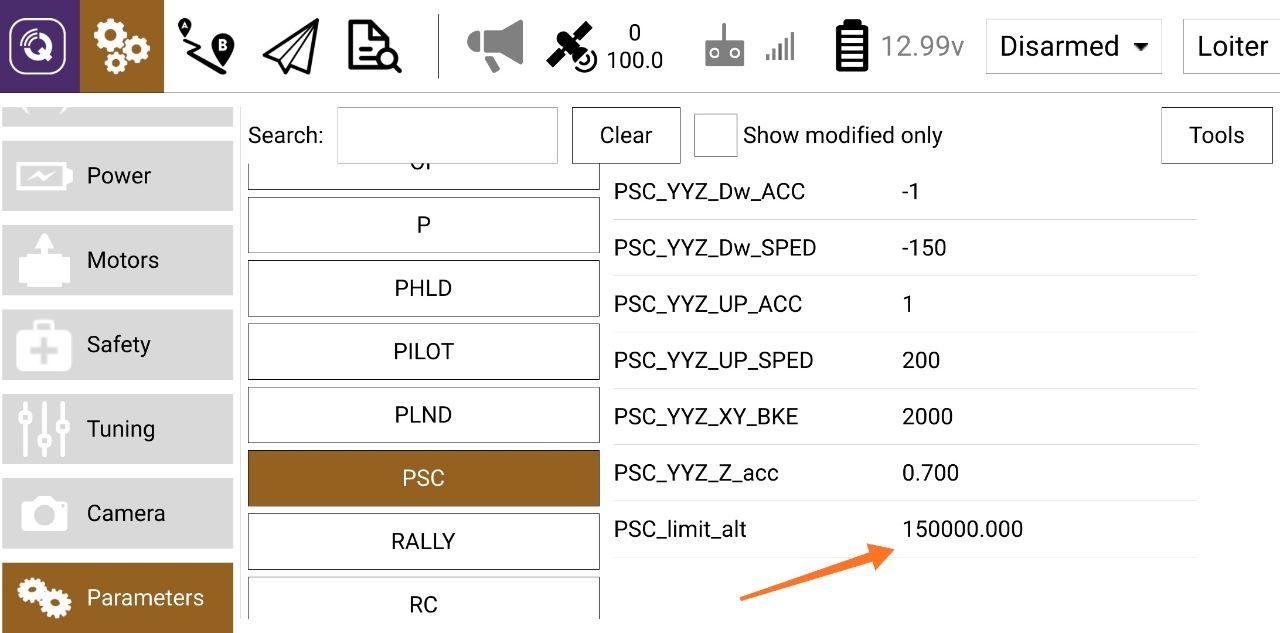
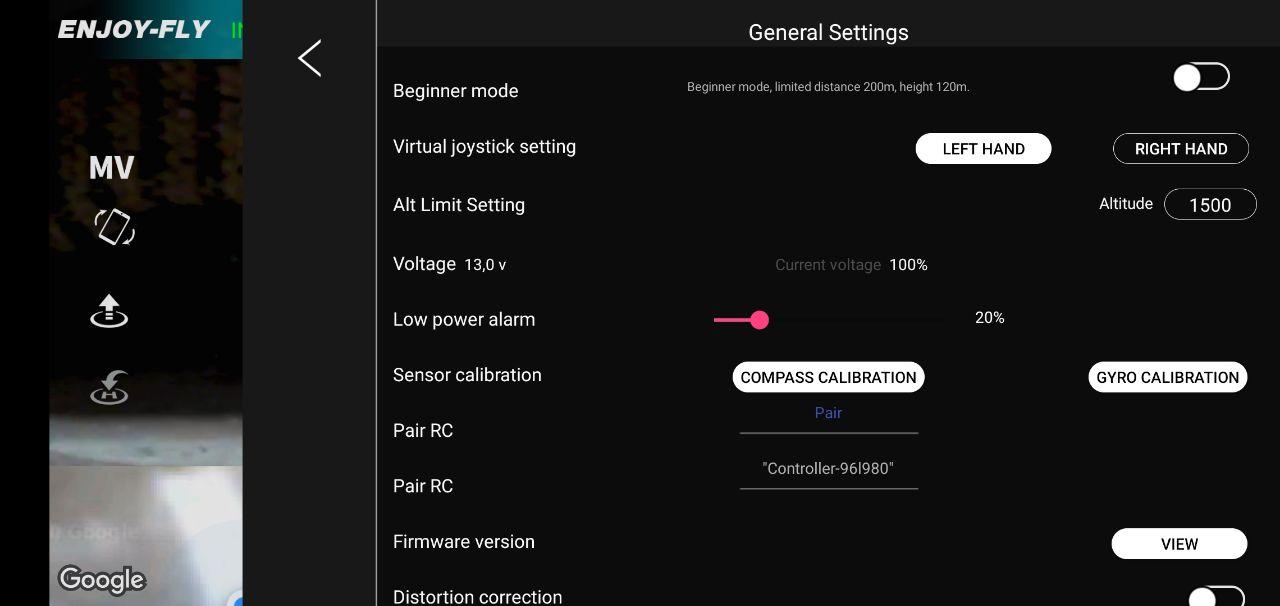
In order to be ensured that parameters are applying, i changed the maximum drone’s altitude to 1500m. It located in Parameters -> Advanced -> PSC -> PSC_limit_alt (EnjoyFly permits maximum only 500m), then restarted the drone and launched EnjoyFly, and in Settings menu i saw 1500 meters.
WARNING!
These method has critical disadvantage:
If QGRoundControl lose connection with drone, you won’t able to control the drone anymore (even via EnjoyFly) until drone restarted, which is imposibble when drone in the air.
Therefore don’t use QGRoundControl to control the drone instead of default app. It may cause drone lost.
2 Likes
This is a reasonable approach to setting some parameters, but there are indeed some issues to consider. First, the drone app appears to change some parameters on its own, and has an apparently fixed view of flight modes. For example, if you change modes via QGC, the app will not necessarily recognize them. Uploading a mission via QGC in this configuration is probably possible, but as the author above notes, losing your connection to QGC in that instance may mean loss of control (except perhaps from the drone controller itself, if you’re in a state where alterations of a mission are permitted by ArduCopter). Typically, the kind of simple parameter changes like landing speed, return to home altitude, etc. probably won’t be overridden by the app. For safe uploading of missions and full telemetry logs, use of a companion computer will likely still be required. My general view is that the less those apps are used at all, the better. Within the context of QGC there is full control over flight modes – e.g., you can configure so that the flight mode button on the controller will switch between normal loiter and loiter with simple mode (headless).
This approach works even when connected directly to the drone’s wifi, no actual need to use the controller’s repeater wifi.
The UDP connection does need to be triggered by the C-FLY app otherwise QGroundControl doesn’t seem to be capable of connecting to the drone.
Overall it’s a very useful non-intrusive method to modify most of the parameters, just make sure you know what you’re doing, and definitely don’t do this while the quad is in the air.
I’ve successfully used this method to change the RTL_ALT to 0, so the quad will no longer climb to 30 meters before heading to its take off location, very useful if you are low on battery. Has some drawback, if there are obstacles between the quad and the home location then obviously you have to cancel the RTL.
Other that that I’ve changed the CIRCLE_RATE which was set to 20 deg/sec and this was horrible, the resulting video was awful, now I’ve changed it to 6 deg/sec so a full panoramic turn will take 60 seconds, more if you increase the radius with the right stick.
So overall a very useful method. I haven’t yet managed to connect to Mission Planner on my PC but will give it some more careful tries soon.
The only problem with QGC is that there’s no way to account for the customizations done to the PX4 that’s running on these quads. When I connected to it, there were some warning messages that some channels were set or not set, some other params not set and such. I did not touch those since I have no idea how the app sets those. But the “usual suspect” RTL_ALT being chief among them, can be set easily and are persisted between reboots of the quad. The app doesn’t seem to have any way to set those so the ballpark guideline is “if you can’t change it from the app then it probably won’t be changed at all”, But of course this depends on the parameter. Switching modes using the M button might be interesting if you can afford a runaway but most folks don’t experiment with their quads which they expect to fly like a DJI Mavic Pro and cost as much as a pack of smokes…  sarcasm showing up here
The biggest customizations that their PX4 build seems to have (other than assorted parameters set to other than the more typical defaults) seem to relate to anything needing an sdcard – since the unit has no sdcard. So logging, retaining missions between boots, etc. appear to be compiled out and most of the related parameters do not exist. QGC complains mostly about the unit not having multiple compasses and such.
hm…then I wonder how are the gimbal and camera controlled? I know the live video stream is an rtsp feed but other than that…
The still shot/video/gimbal up/down movements are controlled by auxiliary RC channels. However, in a cursory examination some time back, I didn’t find the expected configurations in the ArduCopter settings for those channels. So either I missed them (which is possible, I didn’t look in depth) or they’re being routed directly in the build. When you monitor the RC channels directly (e.g. in QGC or Mission Planner), you can see how the PWM changes for those functions.
I know there are MAVLink messages to control gimbal movement as well as still/video recording so theoretically this should be possible to figure out from how the controller outputs are recorded by the drone, what reactions they cause, the one thing I believe would interest more people is if there is a way to change the camera settings such as ISO, shutter speed, exposure, that sort of thing, even if it is just on a regular UVC device capable level, that I think should give some flexibility although I believe it would be rather difficult to integrate into the controlling app without its source code.
The other thing I was rummaging about was the ANGLE_MAX and the PHLD_BREAK_ANGLE which would mean we can increase the max speed and reaction time of this quads, leading to better resistance to stronger winds and the obvious extra speed which some people complained about. y default these seem to be set to 20 deg so I was thinking to make it 25 deg but I’m not sure I could gauge if this small increase was useful without risking the drone flying away. I know the biggest value I could/should set is 45 deg, but this as far as I can tell affects the camera and gimbal: the camera will reach its maximum range of motion if greater than 25 deg. On the other hand, I’m not sure the gain would justify the risk of changing from default, after all whoever made this quad did (hopefully) some testing and tuning to set those params.
Remember that there are differences between Loiter mode and Position Hold mode relating to handling. The drone defaults to Loiter and can’t change to Position Hold unless the flight mode parameters are altered.
Good point. I did notice there are several “angle max” params in the documentation so looking at ANGLE_MAX: Angle Max
Note: This parameter is for advanced users
Maximum lean angle in all flight modes
Now it says ALL FLIGHT MODES but then there’s this:
LOIT_ANG_MAX: Loiter Angle Max
Note: This parameter is for advanced users
Loiter maximum lean angle. Set to zero for 2/3 of PSC_ANGLE_MAX or ANGLE_MAX
and this:
PHLD_BRAKE_ANGLE: PosHold braking angle max
Note: This parameter is for advanced users
PosHold flight mode’s max lean angle during braking in centi-degrees
So I figure it would be up to an actual test to see how and which ones to set. Obviously setting all to the same value would be the simplest choice to ensure all modes use the same max lean angle value but this could become quite cumbersome to keep track and not miss something.
But then again, it’s for experimentation so might as well leave it as it is for now and only go for a change if the “itching” gets worse
hello,
I’ve been watching this topic since i got my hands on the X12 not so long ago. so i tried to connect to it using this method you share. i connected directly to the aircraft wifi and got this warning
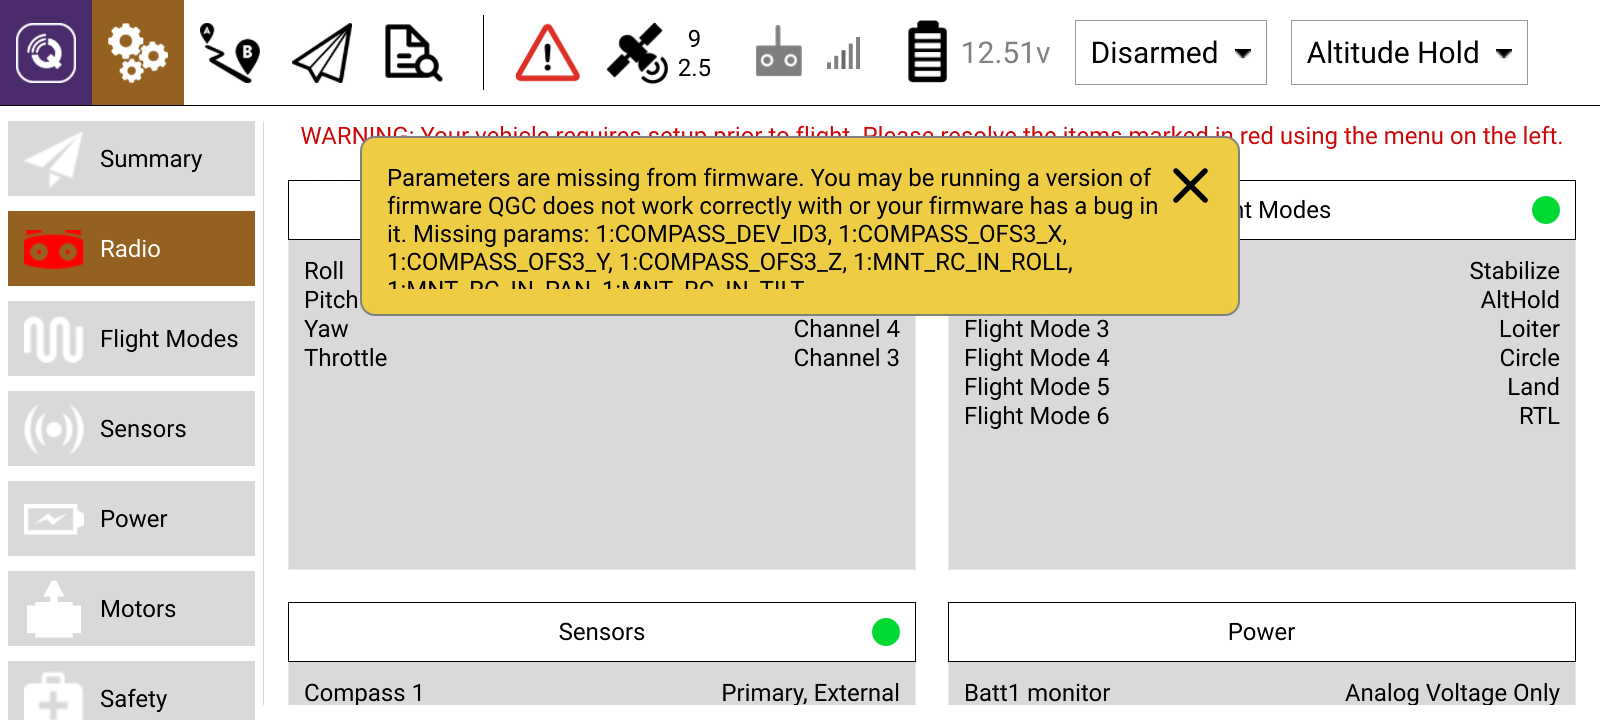
so my question is, what did i do wrong?
Just ignore that message. It’s just a warning about parameters not supported in the device. Close the warning and move on.
thank you for the reply.
one more thing tho’ any tips to keep the aircraft connected because it keep turning off after a while and its quite annoying.
Yeah, that’s a big downside to this approach vis-a-vis my favored USB approach. When I tested the unit early on, the only way (without being connected to USB) that I found to keep the unit from powering off after some small number of minutes was to arm it at intervals. When connected by USB the unit never self powers off. More detail: If you connect USB without a battery in the unit, you can access and change all parameters. No timeouts or other problems. If you connect USB with a battery in the unit, you have that same access plus the unit will immediately power on fully and stay on unless you manually turn it off.
I am using SiK telemetry radios to connect QGC on Android to my Pixhawk and F405-Wing.
Behaviour is the same as using USB.
Can you connect to a serial port?
https://www.rcgroups.com/forums/showthread.php?3374105-Connecting-SiK-telemetry-radio-to-F405-Wing