Here is the link to the parts list further up the thread: Rugged ArduBoat for Mapping Applications (Continued). Without a chartplotter/sonar, I’d probably estimate around $1000 for all the parts. Let me know if you need pictures of anything.
I’m working on getting a Raspberry Pi3 integrated as a companion computer for better communications and additional sensors, but I haven’t figured out how to get it working as a Wifi access point yet. What would you need the Uno for? If this is your first trip into unmanned marine systems, I would highly suggest using a Pixhawk with ArduRover. That will get you up and running fairly quick.
The Uno would be used to grab all your sensor data before going into the Raspberry PI3, and the uno can take almost any sensor very easily.
are you using the PI3 to control the boat?
I am only asking as I have a PI3 and Ardunio uno and they both would work great for this setup as well. Also my plan is to use the communications part of the PI3 as well with this.
Ah ok, got it, I thought you were going to try to use the Uno and RPi3 for control, doable, and there are a few examples out there, but a lot of rework. Using the Uno and RPi3 together for sensor work should work out very well for you.
At this time, no, I am not using the RPi3 for control. It’s connected via USB and has power, but that’s about it. I’ll post updates as the communications goes along, but the RFD900+ already has pretty good range for lakes and lagoons. The limitation has been my RC transmitter, which is probably around 1000ft.
Like you mentioned about the guards you are using @Kevin_K , they worked very well while moving forward. But you can see in the video how the weeds get caught at the top of the thruster and then become entangled in the props when we put the thrusters into reverse. Our next modification is to add a skeg to deflect the weeds from catching on the top of the thrusters. We are thinking of also adding a rear-guard as well.
Use a Joystick with Mission Planner and the RFD 900. Throw in an antenna tracker and directional antennas and your only problem becomes the curvature of the earth.
@David_Boulanger I am interested in starting to work remotely and over the horizon, so i have quite a bit of work to get there. Hopefully we can get something that is easy to set-up.
@Kevin_K We are using a custom built fiberglass hull, roughly 4’ long. We have installed some deflector skegs and will post video of how well they work.
@Kevin_K Great setup you have here mate. Im looking at doing at setup very similar to this. I’m new to all this stuff with Pixhawk and Drones etc. Have you got a link to any starting points to get this off the ground? Im more interested in working out my wiring first on a simple diagram and doing costings for the project. The boat itself isn’t an issue for me, more so the acutal setup of the Pixhawk Unit and intergration with thrusters/propulsion, gps and setting up the autonomous functions. I have found some documentation but not alot.
Thanks in advance.
Scott
Your best bet is to start going through the ArduRover documentation and go from there. There are various setups and control methods available so pick something you think will work for you and go from there.
At a minimum, get a Pixhawk kit, a GPS module, a telemetry radio, and whatever thruster/ESC combo you would like. I bought pretty much everything off Amazon, so there isn’t anything too exotic.
I’m on here quite freqently, so I’m happy to help get you started. Boats are a great way to get started into autonomous systems…fewer things to run into and you won’t lose thousands of dollars in a crash.
Kevin
@Kevin_K Thanks for the heads up. Been reading through while waiting for gear to arrive before building it up.
In regards to the Basic ESC’s you used (I also got the basics but using T100s) did you wire both up using the BEC’s provided to the servo rail? Im in the process of getting a Zener Diode for this purpose. If I were to hook both ESC’s up to the RC1 and RC3 ports, will this in anyway damage the pixhawk/servo rail? Or shold I remve the (+) and (-) from one BEC and just use the signal wire to allow only one BEC for the back up power supply to the servo rail? (Hope that makes sense!)
Also with your Receiver unit, you used the PWM? I have access to a Futaba 14SG with a R7008SB Receiver. I was only looking to use the S.BUS out port for the RC IN on the servo. This would still work I assume?
@Penjack7 I can see you’ve been doing your homework, good!
Regarding the ESCs: I removed the +5V from both the signal/BEC wires. See image below. The servo rail on the Pixhawk does not need to be powered to work. however, if you wish to power it, you may leave one of the +5V wires on one ESC, but not both. Otherwise, they will overheat each other. I’ve seen at least one fire where more than one BEC +5V was connected. Another option is to clip both +5V BEC wires and plug in a dedicated 5V UBEC. This is what I’ll probably end up doing if I find myself ever needing to power the servo rail for whatever reason.
I’m unsure I about the Futaba equipment. I used a Spektrum DX8 G1 plugged into the SPKT port. As a note, I’ll be ditching this on the next upgrade and moving to a pure joystick setup.
Thanks for the tips. I got every all plugged in, installed and running with no visible problems as of yet.
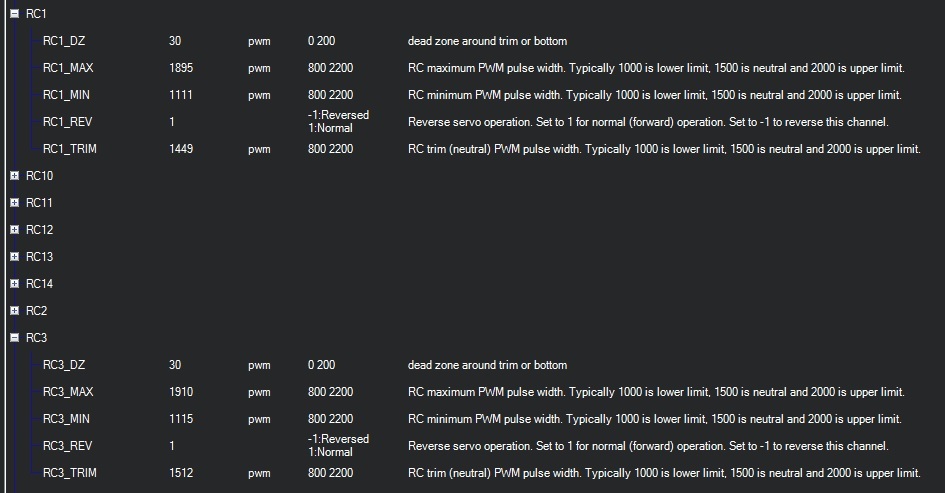
Only question I have is it seems the ‘dead zone’ for the forward/reverse throttle (CH 1 i think?) seems to be really small.
If the throttle is not directly on zero, one thruster will still power slightly.
I note that is says the deadzone is +/- 50 of the PWM output scale (cant remember where I found it, maybe on the BlueRobotics page?). Is there a way of increasing this slightly or is there a setting I havent yet found.
Ok great, you’re really close! Getting the trims set-up is usually my last part.
To get the throttles evened out, you will have to adjust RC1_TRIM or RC3_TRIM. 1500 is midpoint, so you’ll have to play from there until they are evened out.
The DeadZone (DZ) is just if you want to have more room on your throttle stick before the propellers engage.
Thanks for the tips @Kevin_K . Will get it going and go from there.
The sounding unit I am using is a Survey grade Omex SonarMite directly connected to my Trimble Survey Controller and Trimble R8 GPS unit for RTK depth soundings. This will work independently of the Pixhawk System.